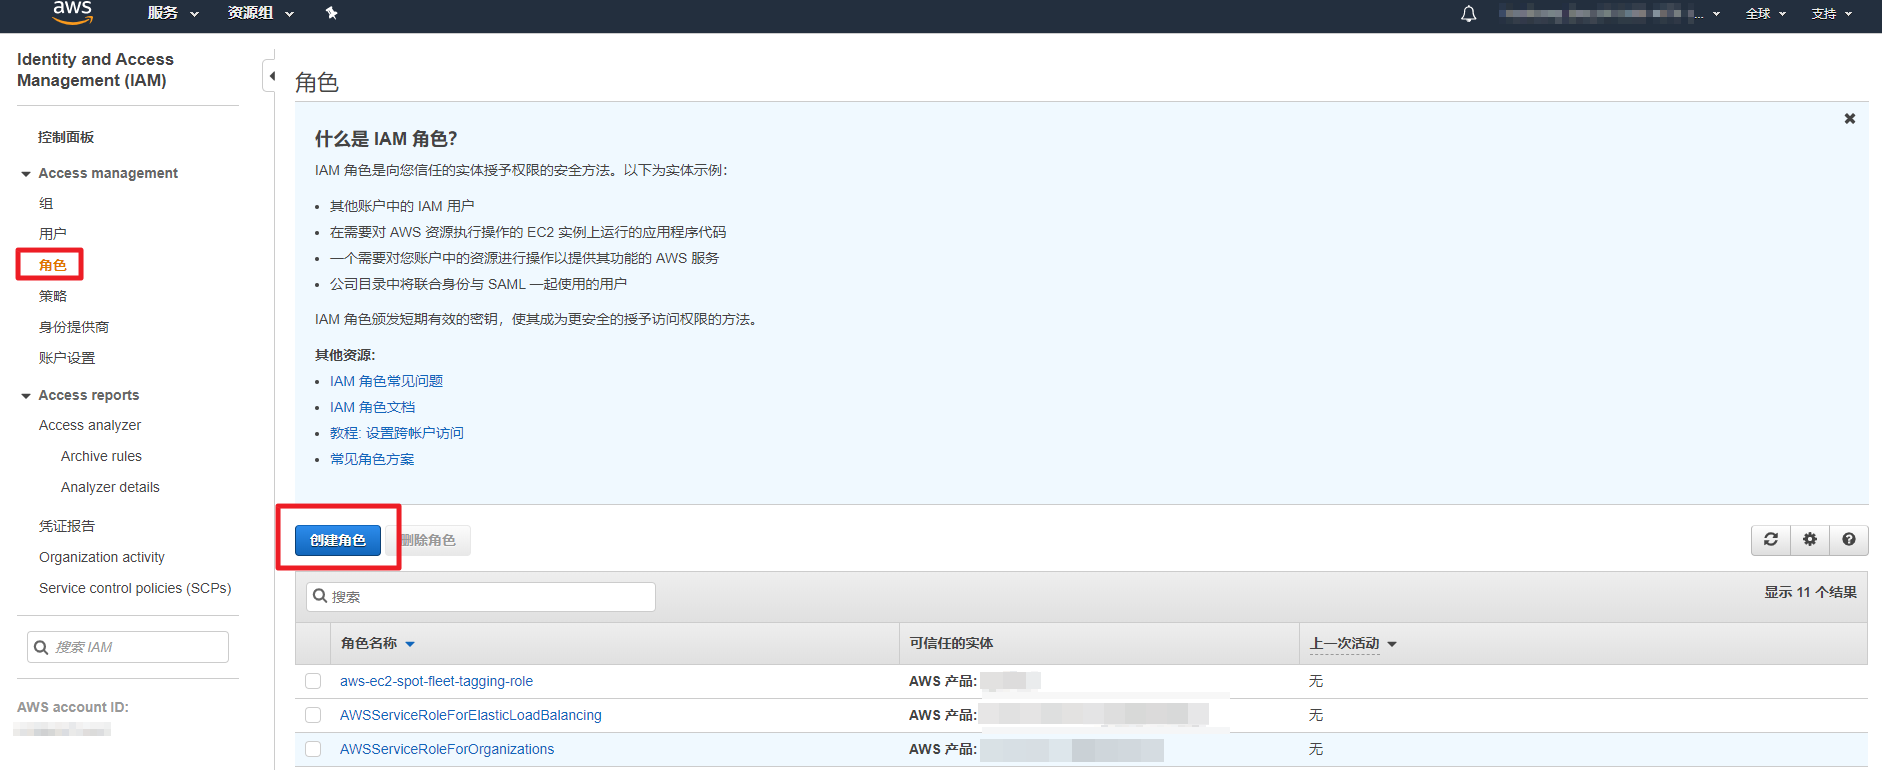
费用管理
可以查看当前运行中的多云服务产生的费用。费用管理服务提供九个菜单,以供用户分析和确认费用。
快速入门指南
本指南描述使用费用管理服务时所需的基本内容。
在服务门户中注册使用中的云账户并配置所需的设置后,便可开始使用费用管理服务。
使用可视化图表和图形查看产生的费用及使用量数据,以准确了解组织的支出模式。各云服务类别的当前产生费用、月度及日费用的详细内容,请参阅仪表盘。
分析总成本,以推测对比预算的月度、季度和年度费用趋势。用户可选择账户、产品、区域、服务组等项作为条件,确认所需的结果值。如要按所选择的条件确认费用,请参阅费用分析。
您不仅可以查看使用中的云服务的全部费用信息,还可以按账号、账单、附加服务查看费用信息。各云服务类别的云使用金额、支持费用、优惠金额等账单明细,请参阅账单。
仪表盘
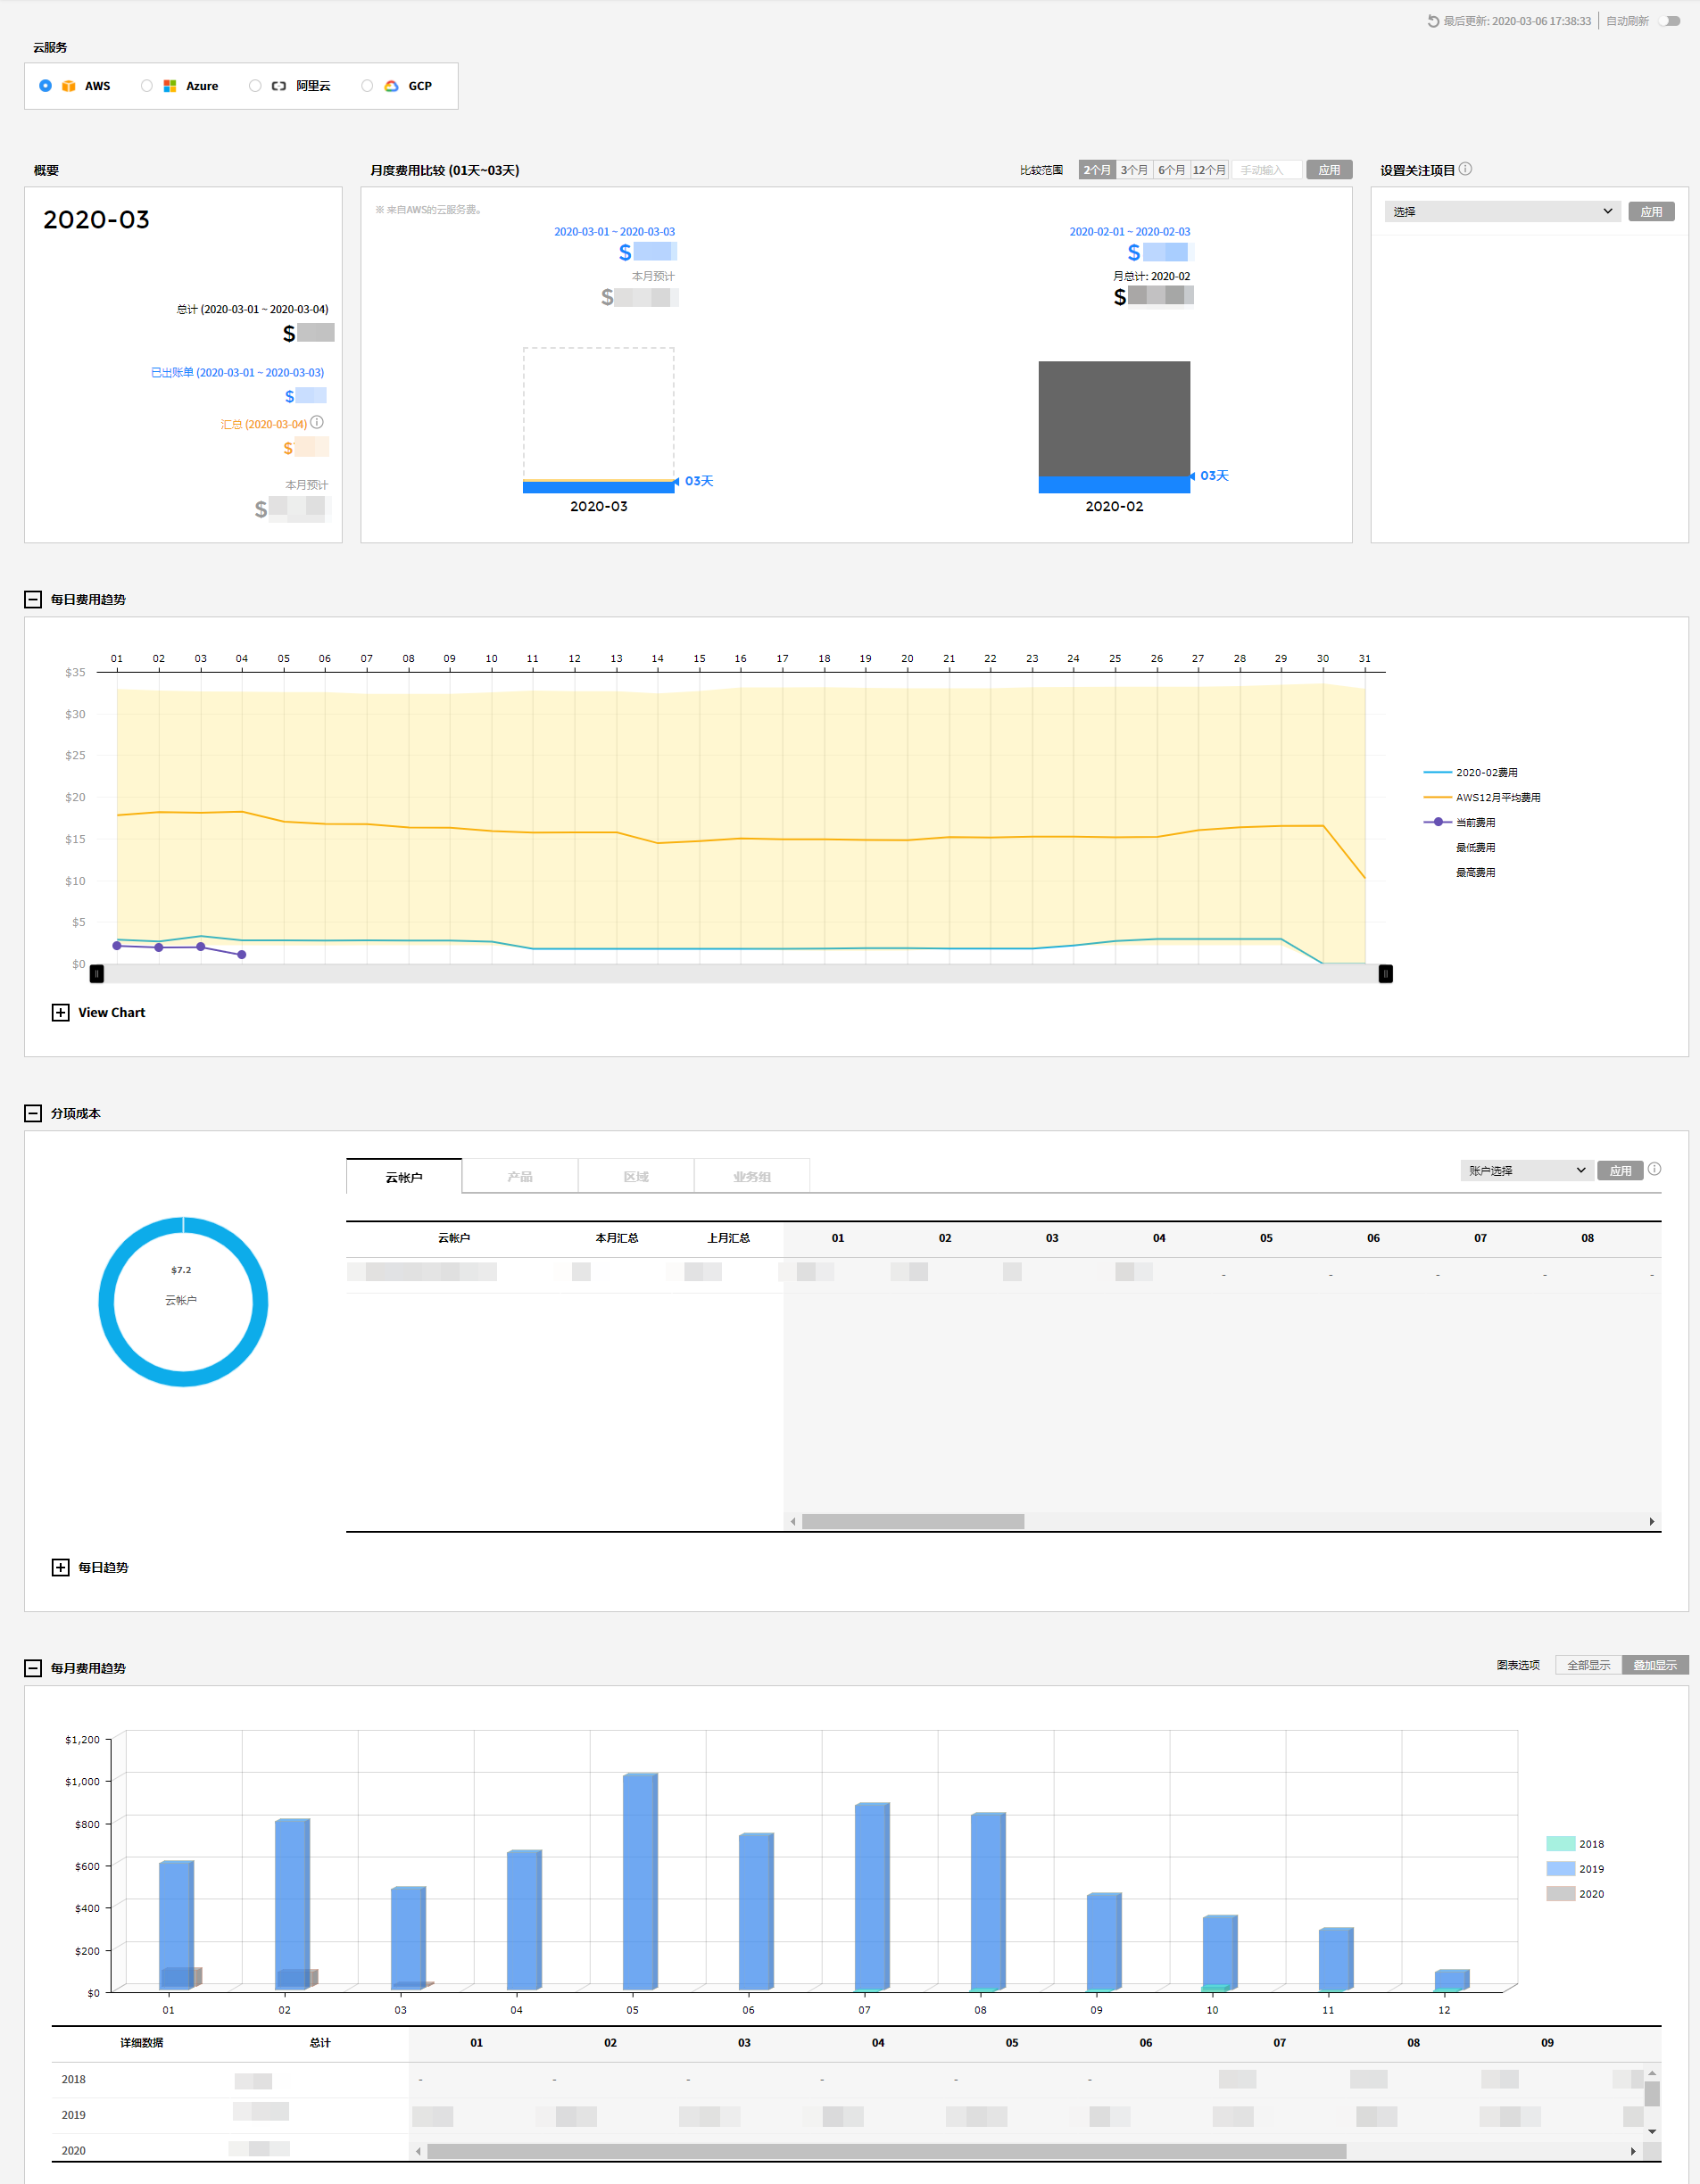
费用管理的首页仪表板中,可以一目了然地看到每个云服务产生的当前产生费用,每月、每日产生的费用情况。
费用管理 > 仪表盘
云服务
显示当前使用中的云服务和账户信息。可以以各种形式查看所选云服务和账户的使用费用和费用趋势等。

本月汇总
可以确认本月产生的费用的汇总情况。
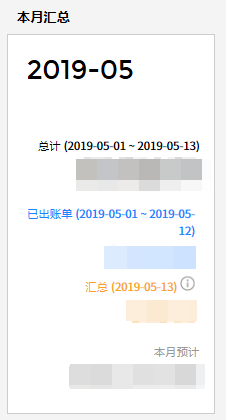
- 汇总:显示当天产生但目前尚未汇总完成的费用。
- 汇总完成:显示从1号到当前的汇总费用。
- 本月预计:通过使用模式分析显示本月将产生的估算费用。
月度费用比较
根据设置比较范围最多可以比较和分析12个月的产生费用,比较范围可以选择2个月/ 4个月/ 6个月/ 12个月,也可以手动输入月数范围进行比较。
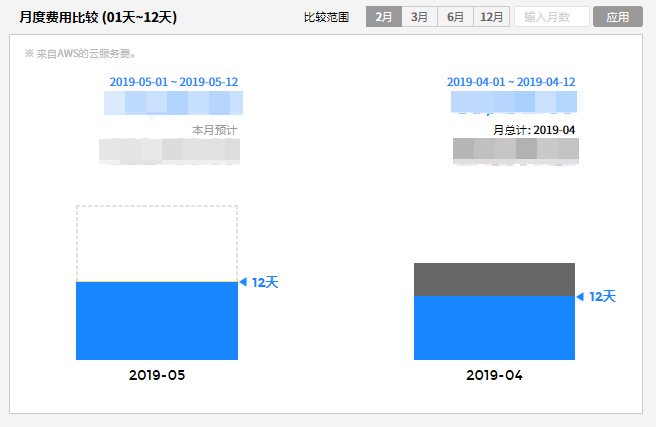
上面图片中的条形图按费用进行颜色区分,由以下四种颜色组成:
1. 蓝色:显示从当月1号到当天的累计费用。
2. 橙色:显示汇总中的金额(当天产生但目前尚未汇总完成的费用)。
3. 灰色:显示上个月产生的累计总费用.
4. 虚线:显示本月的估算费用。
设置关注项目
只需选择要确认的项目,就可以直接在仪表盘上看到所产生的费用。点击【选择】按钮时,可以设置的项目将在下拉菜单中显示。在更改项目之前,所选项目的费用会一直显示在仪表盘中。

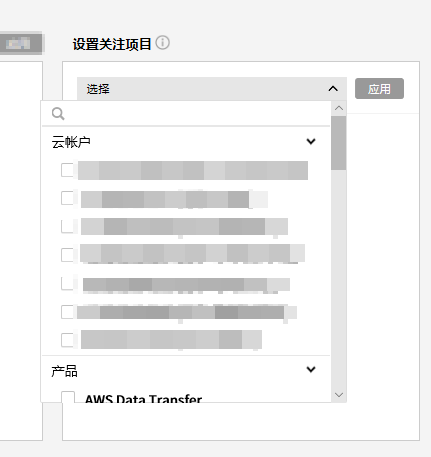
点击【选择】按钮以重新选择下面列出的类别的详细信息,并可以确认所选详细信息的费用。
- 云账户
- 产品
- 区域
- 数据传输
- 业务组
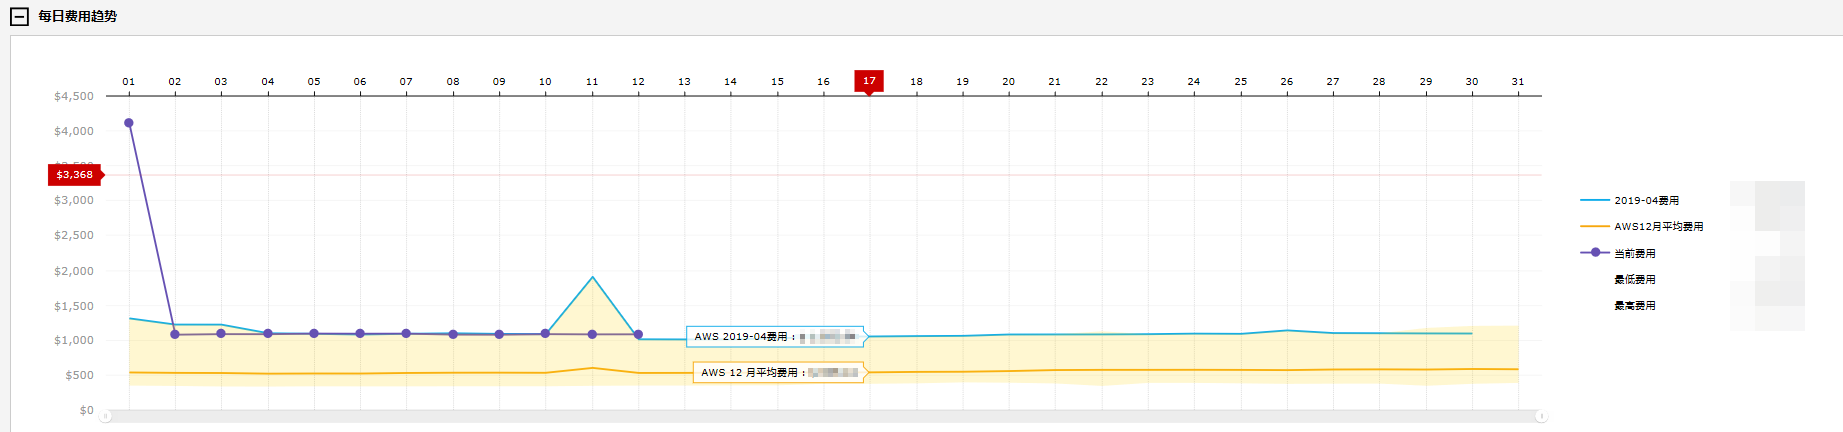
每日费用趋势
每日费用趋势提供所选期间的每日费用趋势图和详细数据。通过每日费用趋势可以确认每日使用模式和产生异常费用的时间点。通过每日费用趋势图和网格可让确认每日最低费用和最高费用。
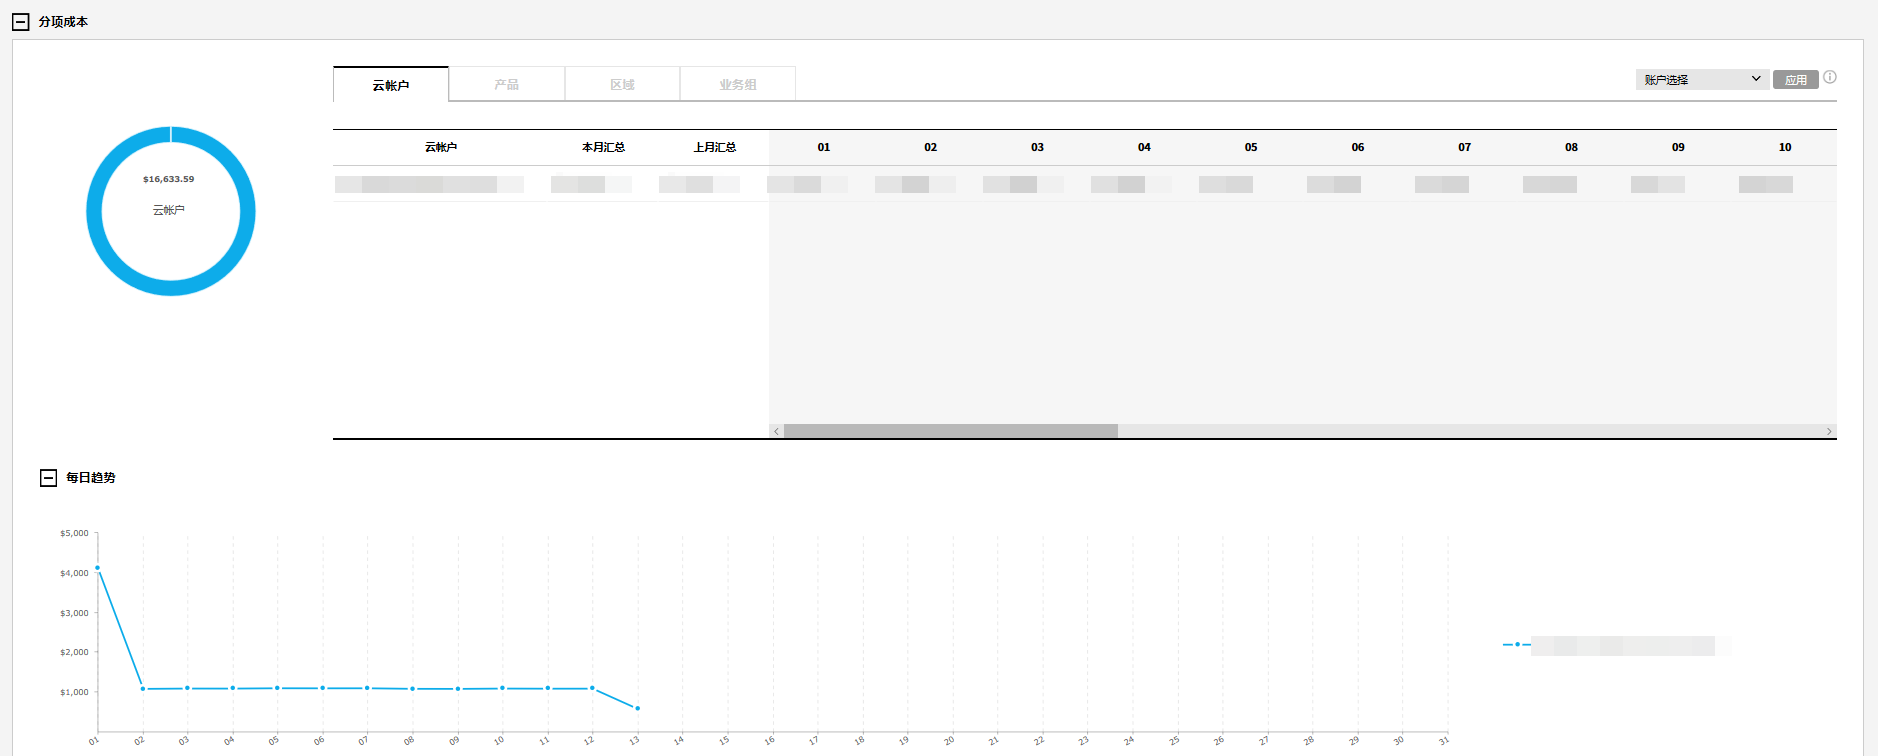
分项成本
可以按账户、产品、区域和业务组确认产生的费用,并且提供分项费用的每日趋势图。
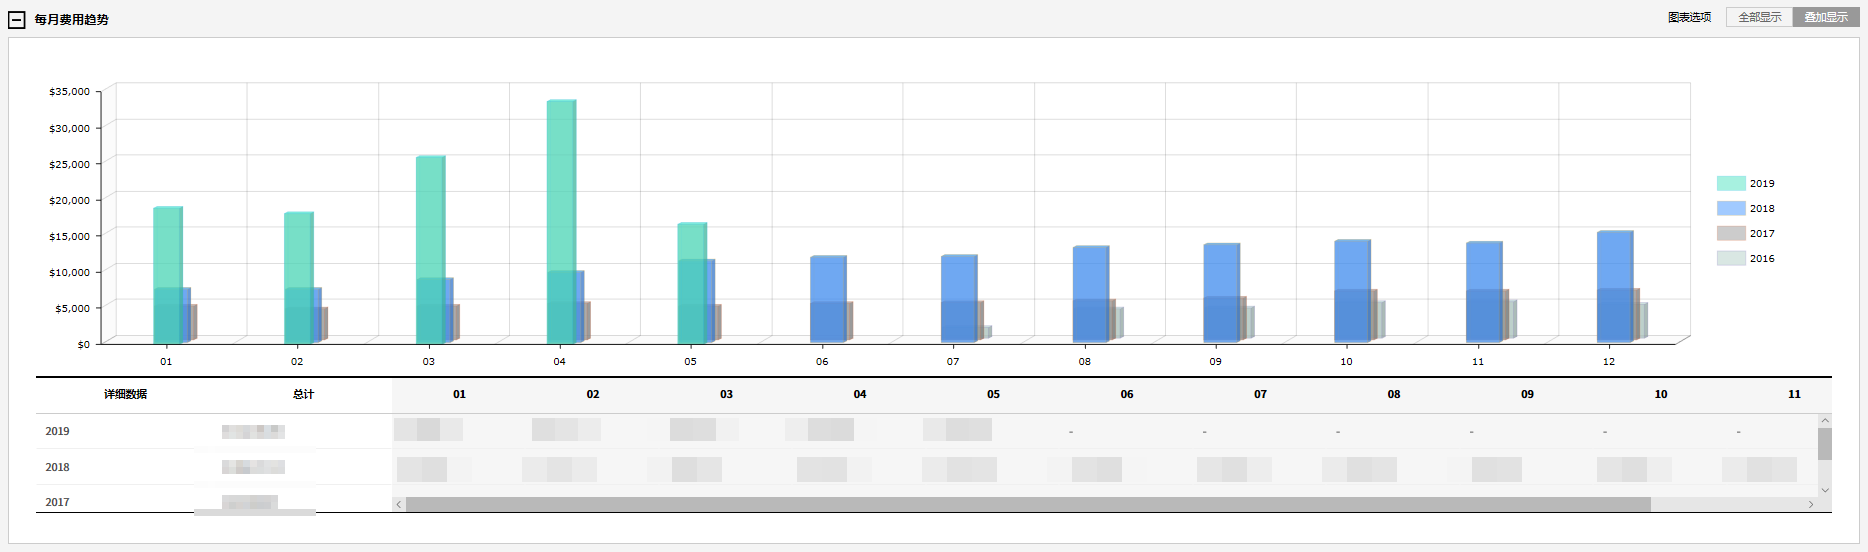
每月费用趋势
可以确认最多3年间的每月产生费用趋势。还可以使用【展开查看】和【叠加查看】选项直观地查看每月费用趋势。
用户仪表盘
费用管理 > 用户仪表盘
用户仪表盘拥有根据用户需要添加、用户自定义仪表盘的功能。用户可对默认仪表盘模板进行添加、编辑,根据需要最多可创建10个仪表盘。此外,我们还提供多种可编辑的部件,让用户能够打造自己的仪表盘。只需点击几下鼠标,就能轻松编辑部件、移动位置,做到随心构建页面、只查看需要的信息。

多云仪表盘
为方便使用,用户可按照不同的用途创建、编辑、自定义多个仪表盘。
用户在复制默认仪表盘模板之后,可添加、编辑所需的部件,从而打造用户专属的仪表盘。
新建仪表盘
您可基于提供的模板创建、编辑新的仪表盘。
① 点击复制图标,则会出现可以新建仪表盘的页面。
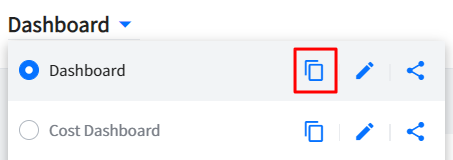
② 将新建仪表盘修改为想要的名称之后,点击保存到新的仪表盘按钮,就能创建新的仪表盘。

③ 新仪表盘创建完成时,用户可以根据需要编辑部件。
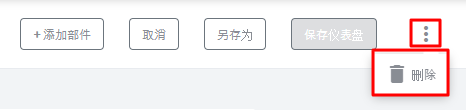
删除仪表盘
点击想要删除的仪表盘名称旁边的编辑图标,此时页面右上角会出现详细(三个点)按钮。
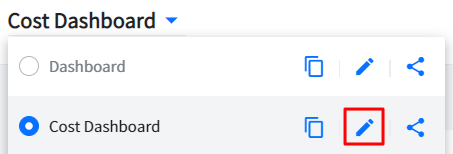
点击此按钮之后再点击删除按钮即可删除仪表盘。
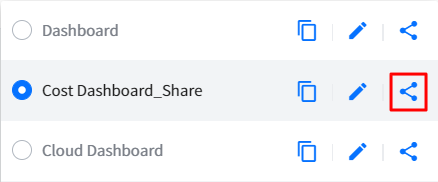
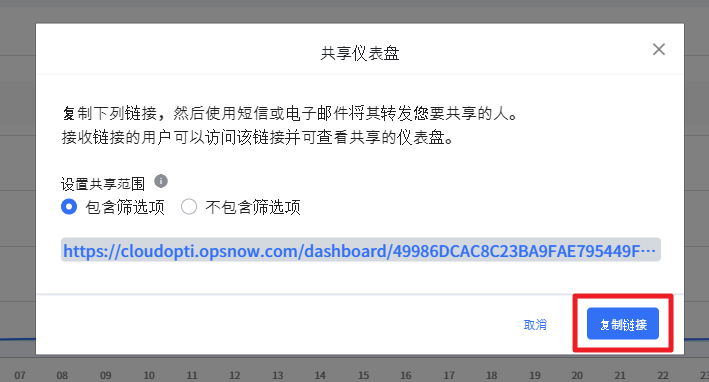
共享仪表盘
该功能能让用户将仪表盘共享给其他用户。用户只需复制相关仪表盘的URL链接,再通过短信或者电子邮件等渠道将链接发送给其他用户,即可实现仪表盘的共享。
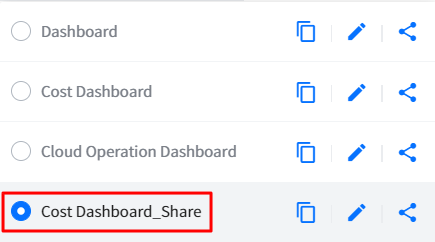
点击想要共享的仪表盘名称旁边的共享图标。
![]()
点击共享仪表盘弹窗中的复制链接按钮。
![]()
再通过短信或者电子邮件等渠道将已复制的链接发送给想要共享仪表盘的用户。
相关用户可以点击收到的链接以查看共享的仪表盘。并且该仪表盘将会被添加到相应用户的仪表盘列表中去。
![]()
- 当共享的仪表盘被删除或者被共享的用户没有相关权限时,无法使用共享仪表盘。
部件类型
用户仪表盘中会提供费用趋势、费用分析、前5项费用等部件。
下面将会向您说明各部件的类型和功能。
本月累计费用
显示根据本月到目前为止发生的费用而估算出来的费用,并且会将本月费用与上月费用进行比较。您可以按照云服务查看本月累计费用。
本月预估费用
显示到本月末预计会发生的费用,并且会将本月预估费用与上月实际发生的费用进行比较。您可以按照云服务查看本月预估费用。
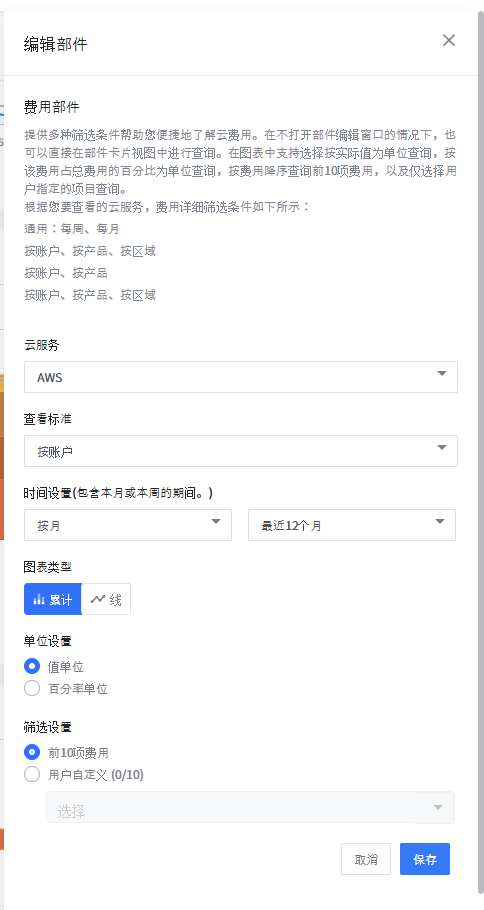
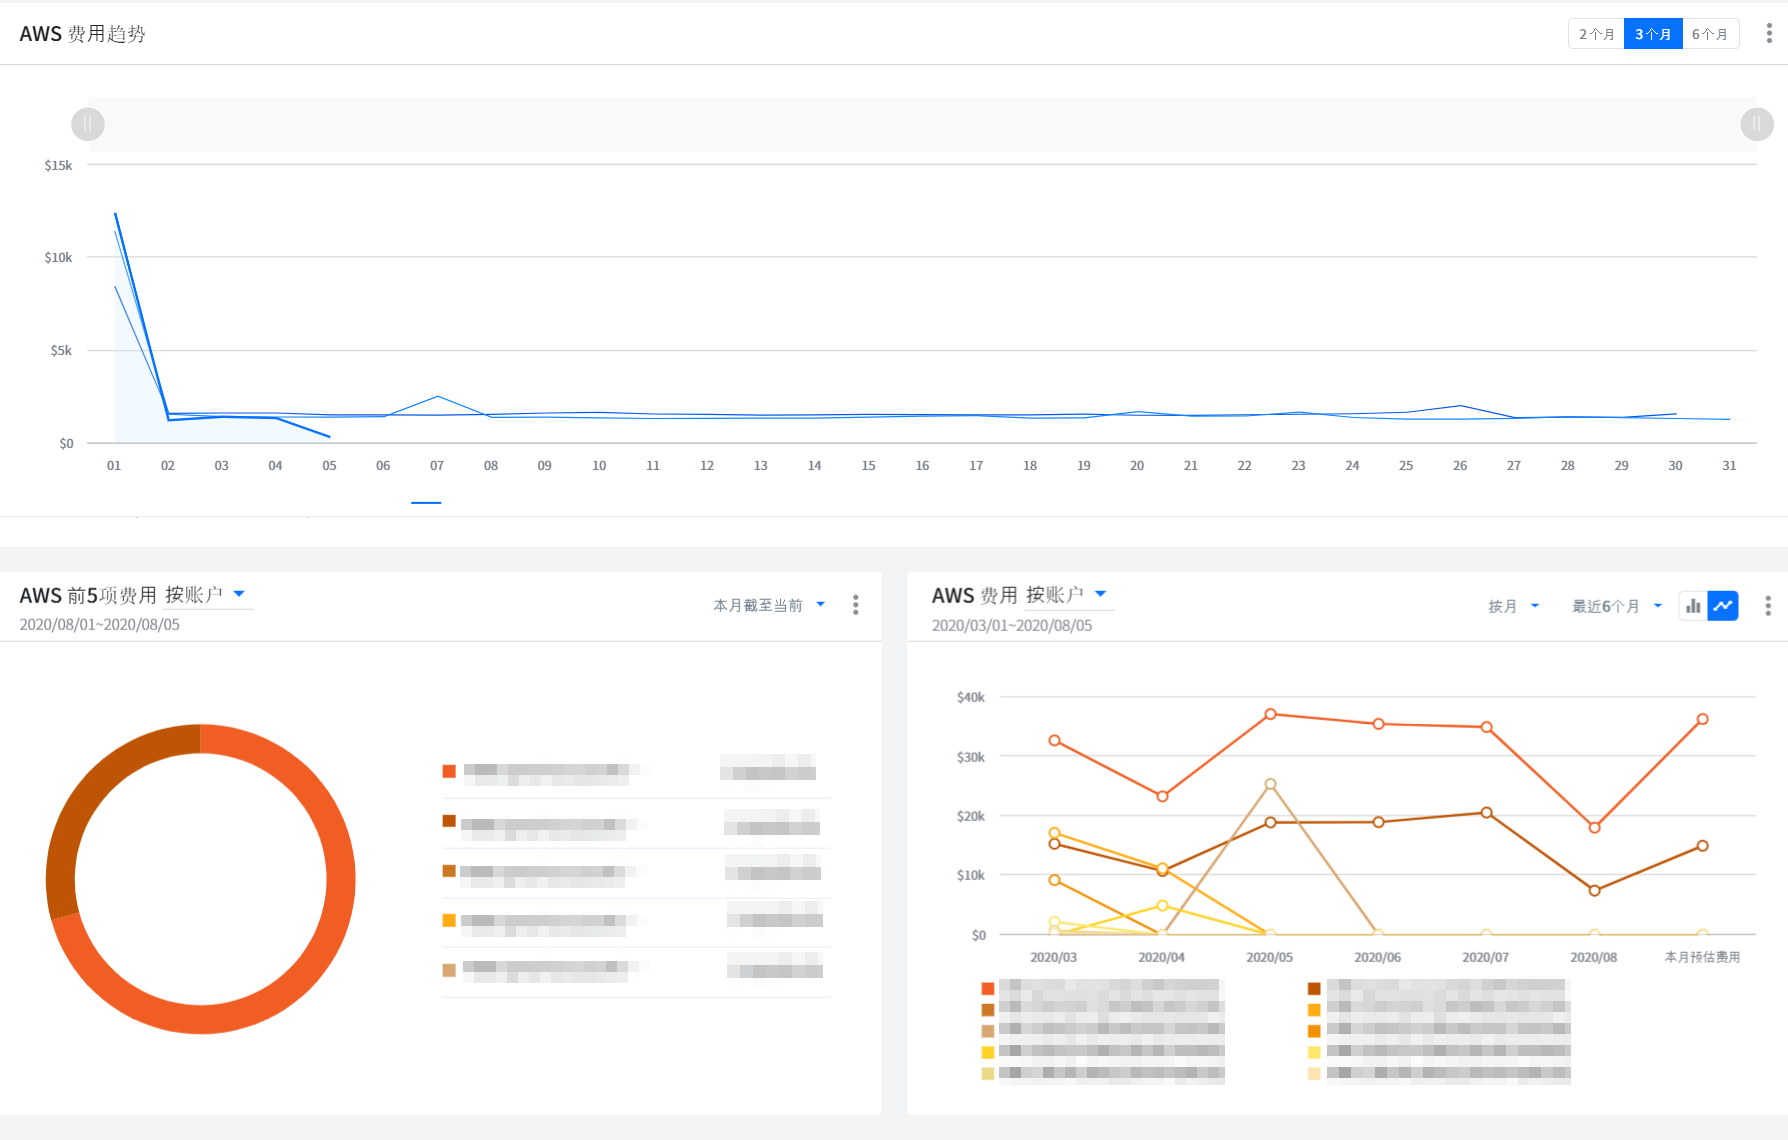
费用趋势
我们会以视觉化的图表展示云服务费用的变化趋势。您可以将时间设置为2个月、3个月或者6个月。将鼠标悬放在图表上时,会出现相应的提示,显示根据所选时间变化的每月费用。
费用
我们会以视觉化的图表展示相关的云服务费用。您可以按照账号、产品、地区查看相应的费用信息,也可以选择时间和图表类型。将鼠标悬放在图表上时,会出现相应的提示,显示一定时间内各账号、产品、地区的费用以及总计费用。
产品费用分析
显示对所选账号的产品费用进行分析的信息。您可以按照产品种类查看费用。将鼠标悬放在图表上时,会出现相应的提示,显示相关产品种类中包含的产品费用和总计费用。我们还提供可选择时间的选项卡。
费用分析
您可以按照账号、标签、产品、地区查看有关费用分析的信息,我们会提供可选择时间的选项卡。
前5项费用
显示费用最高的前5项费用信息。您可以按照账号、产品、地区查看前5项费用信息,我们也会提供可选择时间的选项卡。
各分类的综合费用分析部件是
当使用一个以上的云服务时,可以在一个部件中一目了然地分析各产品类别的综合费用,并用条形图显示。
各服务组的综合费用分析部件是
当使用一个以上的云服务时,可以在一个部件中一目了然地分析各服务组的综合费用,并用条形图显示。
综合费用部件是
当使用一个以上的云服务时,可以根据以下筛选条件在一个部件中一目了然地分析综合费用。
- 通用:每月、每周
- 要查看的云服务包含GCP时:按账户、按产品
- 不包含GCP时:按账户、按产品、按区域
1年后预估费用部件
使用AWS时间序列预测算法AWS SageMaker DeepAR学习历史云使用费用,并以此为依据在部件中显示1年后预估云费用。
若您使用的是多云,可以按各云服务添加1年后预估费用部件,从而可以在用户仪表盘中便捷地查看预估费用。
目前此部件仅支持AWS云服务。
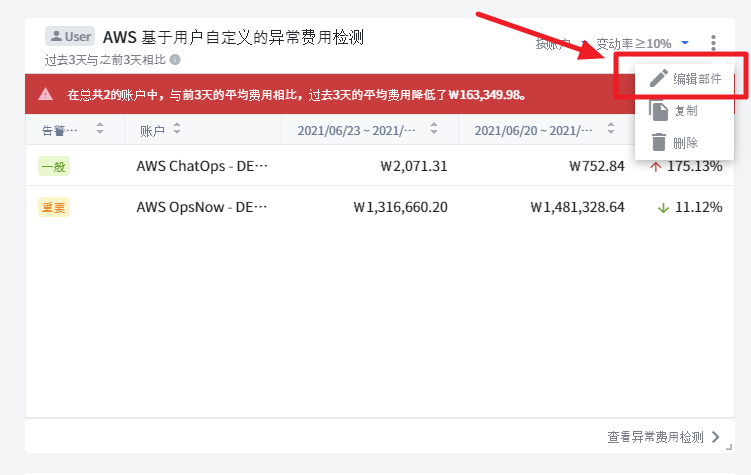
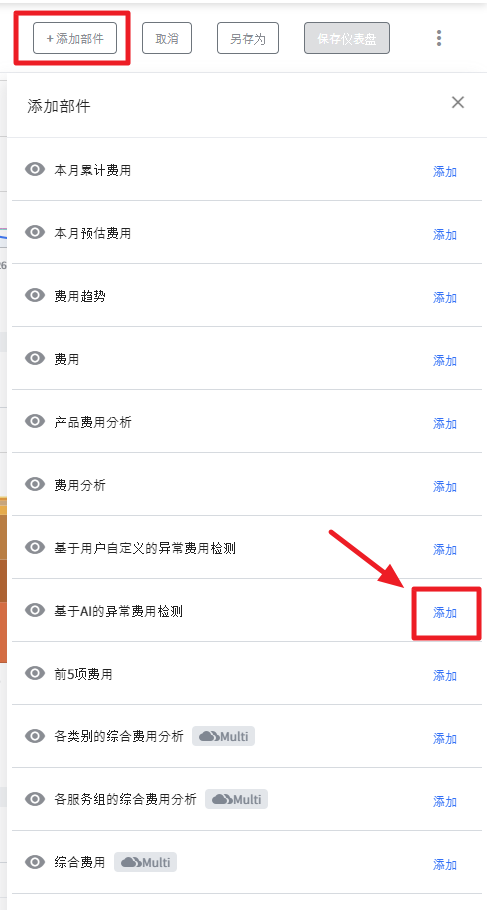
用户自定义异常费用检测
该服务是指使用用户设置的规则分析云使用量和费用,每日检测不符合规则的情况,然后发送相应的告警。当检测到异常费用时,系统会立即发送告警,因此用户不仅不会错过任何的异常费用信息,还能十分详细地监控到所有的费用信息。
① 点击仪表盘名称旁边的编辑图标,此时页面的右上角就会出现添加部件按钮。
② 点击添加部件按钮,再在部件列表中点击用户规则检测异常费用部件的添加按钮,即可完成部件添加。

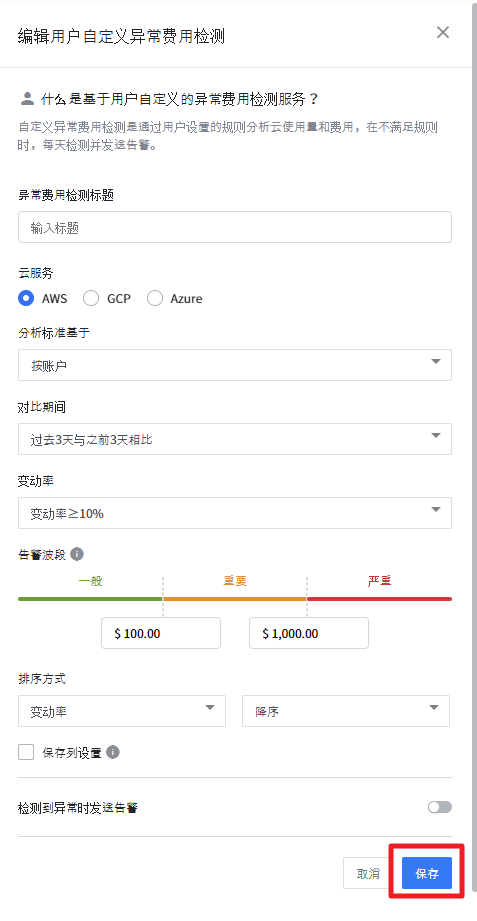
③ 点击部件右上角的【详细】按钮,再点击编辑部件按钮,此时会出现编辑部件的页面。
接下来将会向您说明编辑页面中的各项内容。
| 项目 | 说明 |
|---|---|
| 异常费用检测标题 | 表示检测异常费用部件的标题。您可以输入想要的标题、修改默认的标题。 |
| 云服务 | 在AWS、GCP、Azure中选择一项云服务以分析云使用量和费用。 |
| 分析标准 | 您可以将云使用量和费用的分析标准设置为账号、产品或者地区。 |
| 变动率 | 您可以选择异常费用的变动率。 |
| 异常费用告警区间 | 您在设置两个对比区间之间的费用差异时,可以分区间输入金额,让系统按照区间发送告警。 告警级别分为一般、重要、严重。 |
| 检测到异常时发送告警 | 如果您想接收告警,请将转换按钮调整为“on”。您可以选择告警发送的类型、收件人、渠道。 |
④ 设置完成后点击保存按钮。
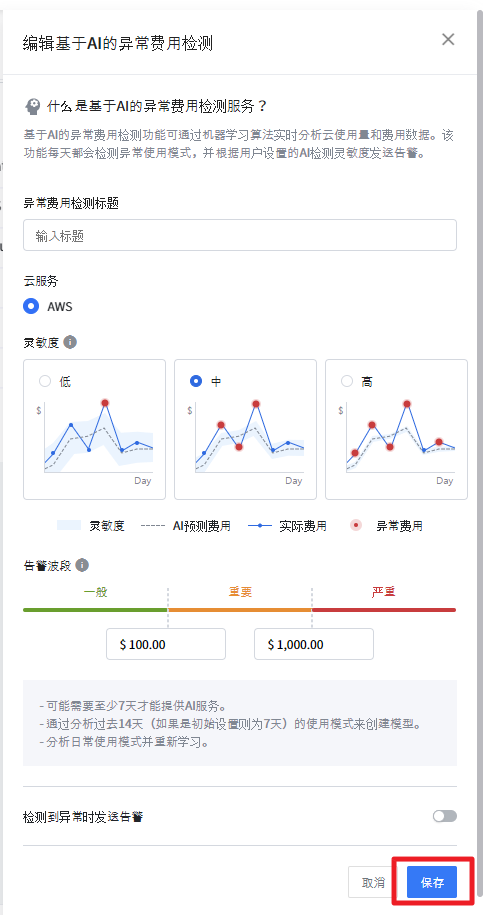
基于 AI 的异常费用检测
该服务是指基于 AI 学习相关的云使用量和费用数据之后,利用机器学习算法实时分析云使用量和费用、每日检测异常的费用模式,然后根据用户设置的 AI 检测灵敏度发送告警。当检测到异常费用时,系统就会立即发送告警,因此用户不仅不会错过任何的异常费用信息,还能十分详细地监控到所有的费用信息。
① 点击仪表盘名称旁边的编辑图标,此时页面的右上角会出现添加部件按钮。
② 点击添加部件按钮,再在部件列表中点击AI检测异常费用部件的添加按钮,则可完成部件的添加。
③ 点击部件右上角的详细按钮,再点击编辑部件按钮,此时会出现编辑部件的页面。
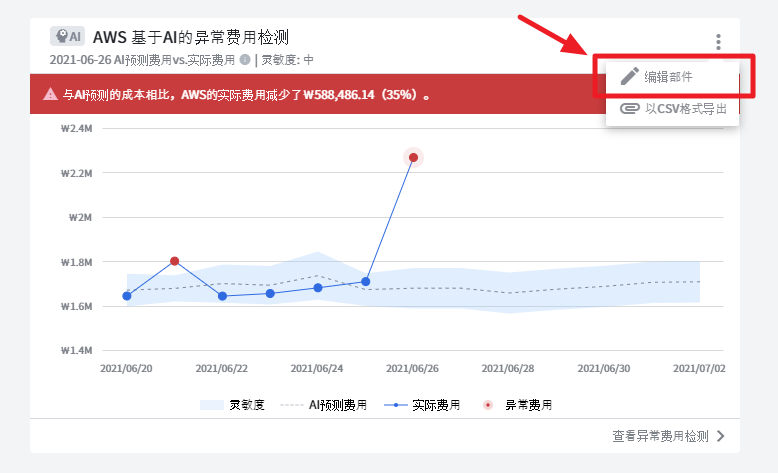
接下来将会向您说明编辑页面中的各项内容。
| 项目 | 说明 |
|---|---|
| 异常费用检测标题 | 表示检测异常费用部件的标题。您可以输入想要的标题、修改默认的标题。 |
| 云服务 | 选择相应的云服务以分析云使用量和费用。 *目前只有AWS支持使用AI检测异常费用的功能。其他云服务预计在不久之后会支持使用该功能。 |
| 灵敏度 | 灵敏度可选择低、中、高。 *灵敏度越高,AI 预测费用的范围就会越小。当费用超过AI预测费用的灵敏度范围时,系统就会检测到相关的异常费用,并发送告警,因此用户会接收到更多的告警,从而不会漏掉任何有关异常费用的信息。 |
| 异常费用告警区间 | 您在设置发生费用和 AI 预测费用之间的费用差异时,可以分区间输入金额,让系统按照区间发送告警。 告警级别分为一般、重要、严重。 |
| 检测到异常时发送告警 | 如果您想接收告警,请将转换按钮调整为“on”。您可以选择告警发送的类型、收件人、渠道。 |
④ 设置完成后点击保存按钮。
部件管理
编辑部件
该编辑功能能让用户根据需要修改部件。
点击部件右上角的详细(三个点) 按钮之后,再点击编辑部件按钮,此时就会出现编辑部件的页面。
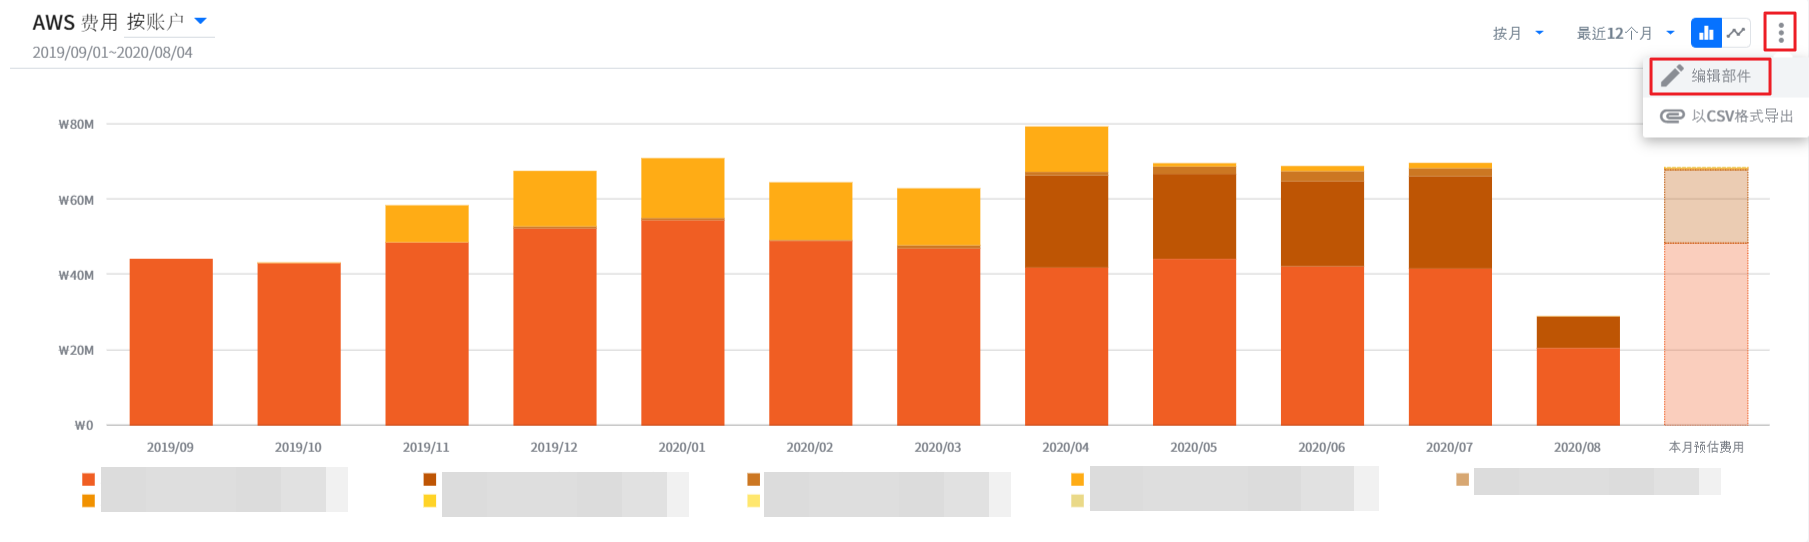
修改相关的项目之后,点击保存按钮以完成部件的编辑。
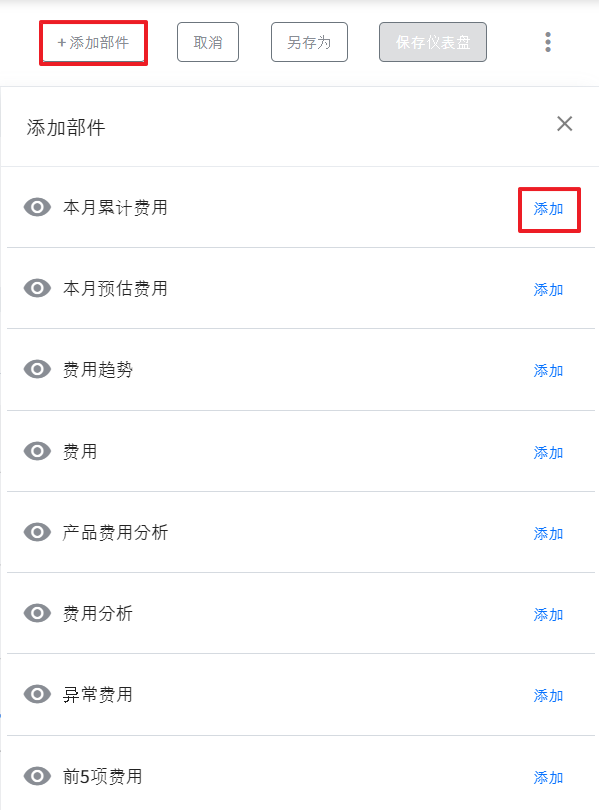
添加部件
用户可根据需要添加想要的部件。
点击仪表盘名称旁边的编辑图标,此时页面的右上角就会出现添加部件按钮。
点击添加部件按钮,然后点击部件列表中的添加按钮,即可添加想要的部件。
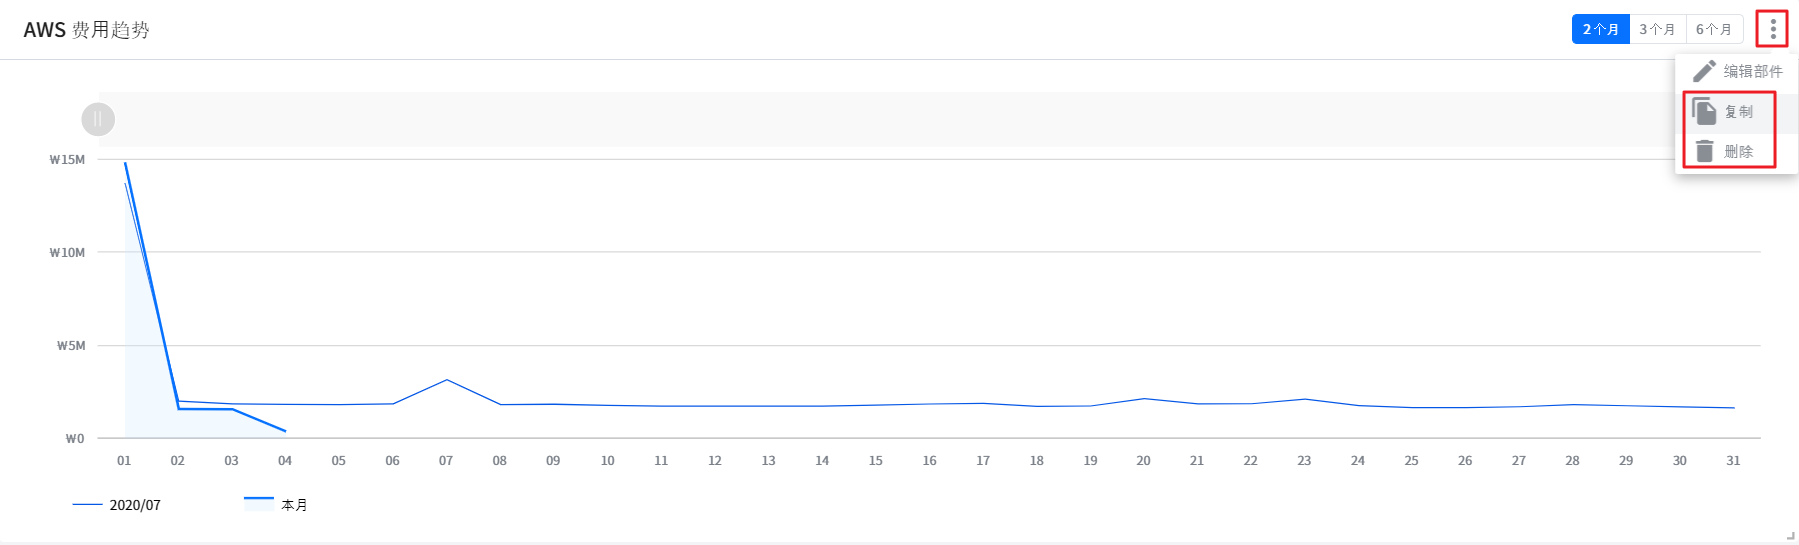
复制及删除部件
点击仪表盘名称旁边的编辑图标,此时就会跳转到可以复制和删除部件的编辑页面。
点击部件右上角的详细(三个点)按钮,再点击复制按钮之后就可以复制部件,如果点击的是删除按钮则可以删除部件。
移动部件及调整部件大小
点击仪表盘名称旁边的编辑图标,此时就会跳转到可以移动部件和调整部件大小的编辑页面。
如果您想扩大或者缩小部件的大小,请拖拽部件右下角的边角。当部件已经调整到想要的大小时,只需停止拖拽即可。

如果您想移动部件的位置,只需选中部件,然后将其拖拽到新的位置即可。
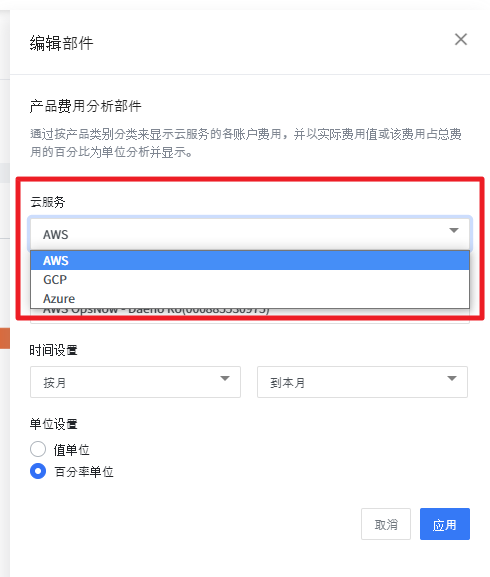
选择云服务
您可以按照部件选择云服务。点击部件右上角的详细(三个点)按钮,再点击编辑部件按钮,此时会出现编辑部件的页面。在AWS、GCP、Azure这些云服务项目中选择想要的云服务,然后点击保存按钮完成选择。
异常费用检测
费用管理 > 异常费用检测
异常费用检测通过用户规则和AI算法实时分析用户的云费用,可以帮助用户确认过去特定时间点产生了哪些异常费用。据此可以预测产生异常费用的原因,从而可以轻松地制定解决方案。
- 可以在费用管理 > 用户仪表盘中设置用户规则和AI检测灵敏度。您可以无需另外设置部件直接使用下面的默认设置,也可以在用户仪表盘中编辑部件,按照需要更改规则。
| 内容 | 默认设置 | 规则类型 |
|---|---|---|
| 云服务 | AWS | User |
| 分析标准 | 按账户 | User |
| 比较期间 | 本月截至当前 vs. 上月同期 | User |
| 变动率 | 10% | User |
| 告警区间 | $100.00~$1,000.00 | User, AI |

异常费用检测告警总数量
异常费用检测告警总数量根据告警等级显示基于用户自定义规则和AI分析得出的异常费用告警的总数量。还可以查看各等级中通过用户自定义规则和AI算法检测到的告警各有多少。告警等级分为严重、重要和一般3种,点击各等级时,可以在下方的异常费用检测列表中查看各等级异常费用的详情。

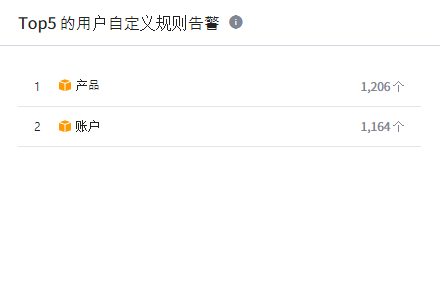
Top5的用户自定义规则告警
可以按用户自定义规则查看累计告警数量最多的前5项,可以将分析标准设置为账户、产品和区域。
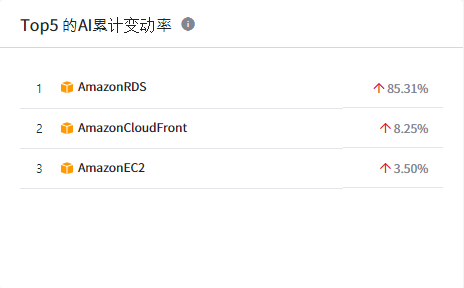
Top5的AI累计变动率
Top5的AI累计变动率显示AI通过学习云使用量和费用数据检测到的异常费用的累计变动率。展示累计变动率最高的5个服务,并以百分比的形式展示相应服务费用的增减。
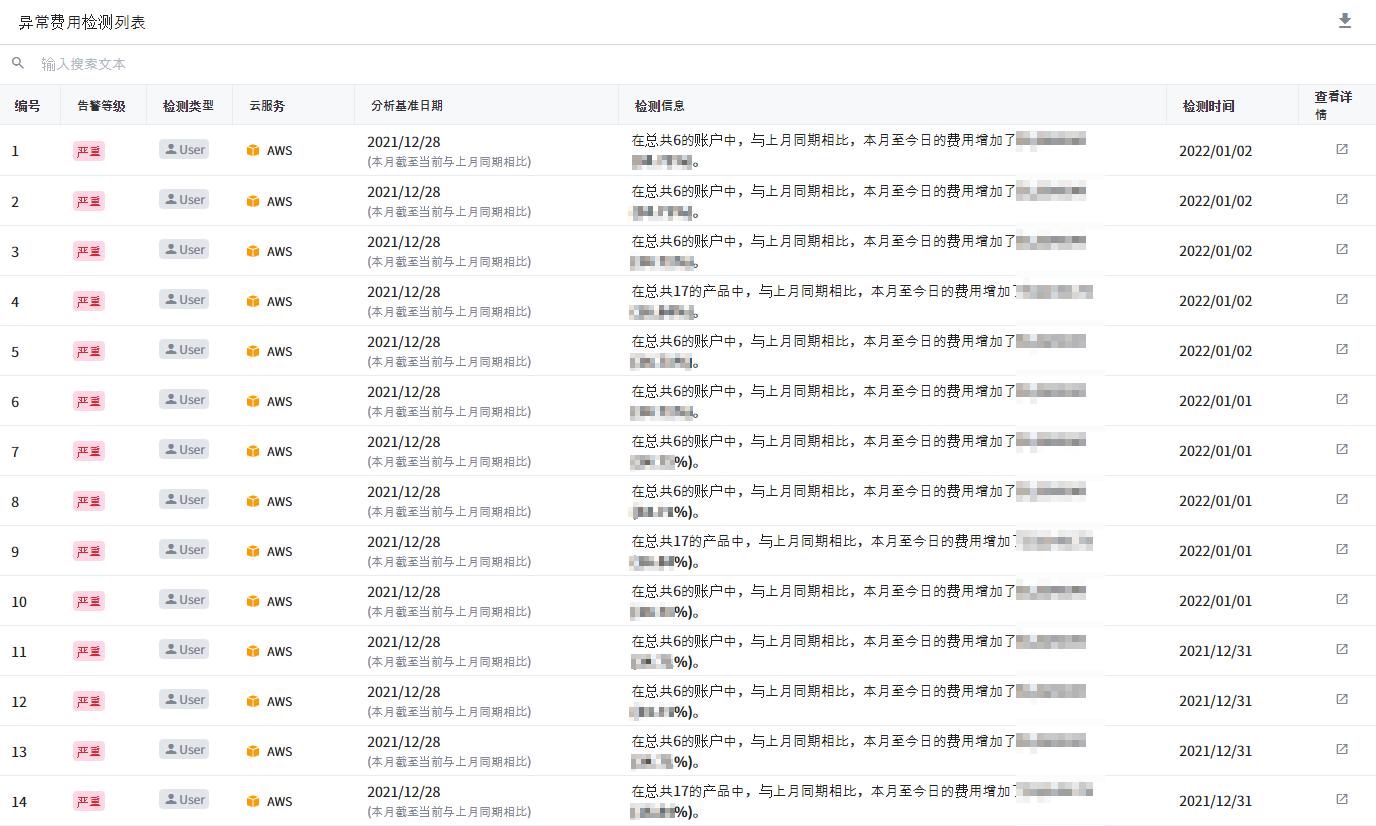
异常费用检测列表
以列表形式展示检测到的异常费用。
1. 告警等级: 将检测到的异常费用的告警等级显示为严重、重要和一般。
2. 检测类型:
- User: 根据用户规则进行的异常费用检测
- AI : 根据AI分析进行的异常费用检测
3. 云服务: 显示产生异常费用的云服务。
4. 分析基准日期:
- 本月截至当前 vs. 上月同期: 从上次收集日期开始到本月当前日期这段期间与上月相同期间比较
- 上次收集日期 vs. 过去7天平均值: 上次收集日期和过去7天平均值相比
5. 检测信息: 根据账户、产品和区域显示指定期间的费用较上月同期增加或减少的金额及百分比。
6. 检测时间: 检测到异常费用的时间。
7. 查看详情: 点击![]() 图标可移动到费用分析页面,可查看更多关于异常费用的详细信息。
图标可移动到费用分析页面,可查看更多关于异常费用的详细信息。
- 点击列表右上方的
![]() 图标可以以Excel文件的形式下载列表。
图标可以以Excel文件的形式下载列表。
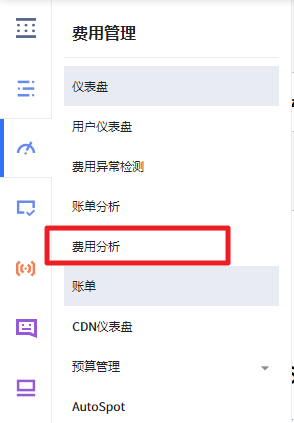
账单分析
费用分析提供智能搜索功能,通过选择实际使用的资源作为搜索条件,可以快速轻松地查找产生的费用。
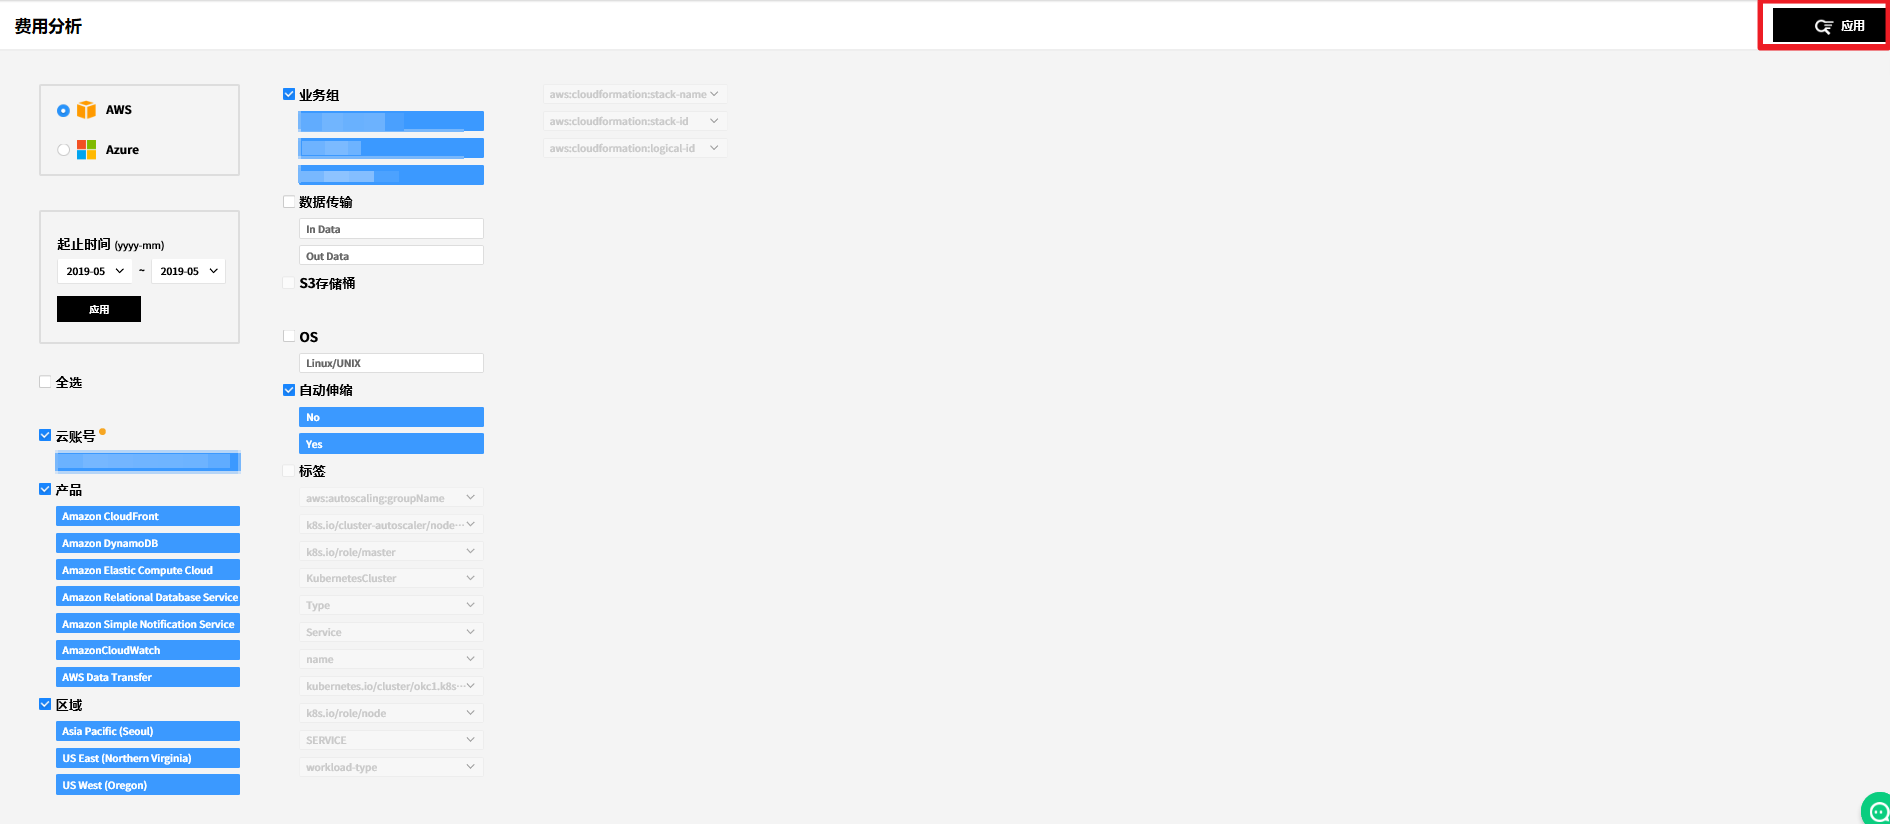
费用管理 > 账单分析
费用分析及可视化
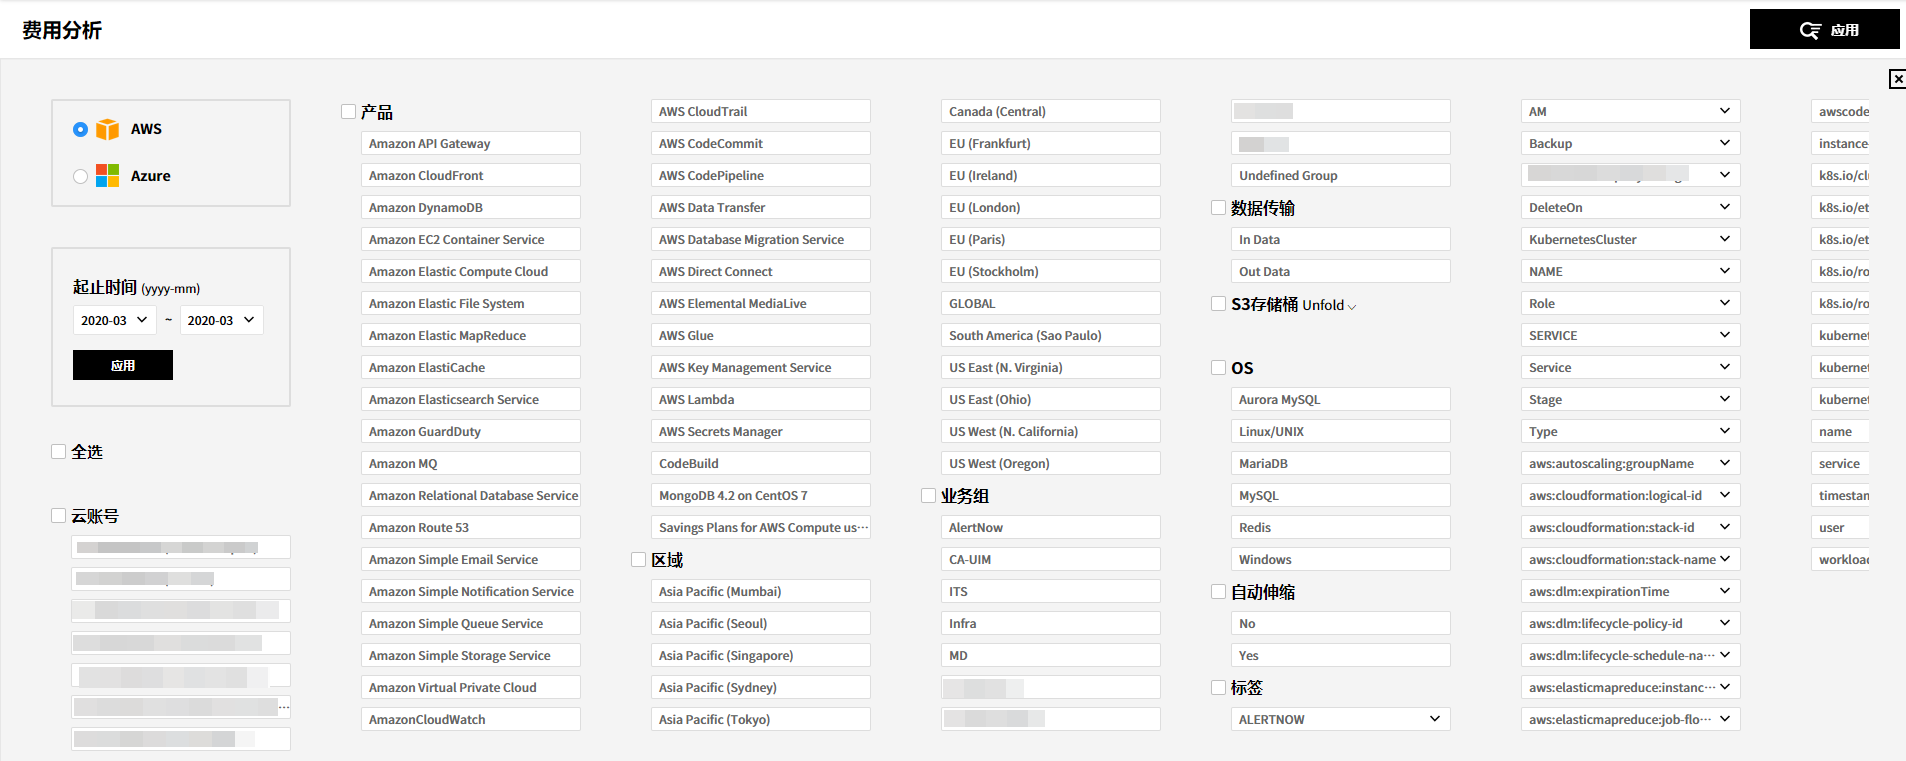
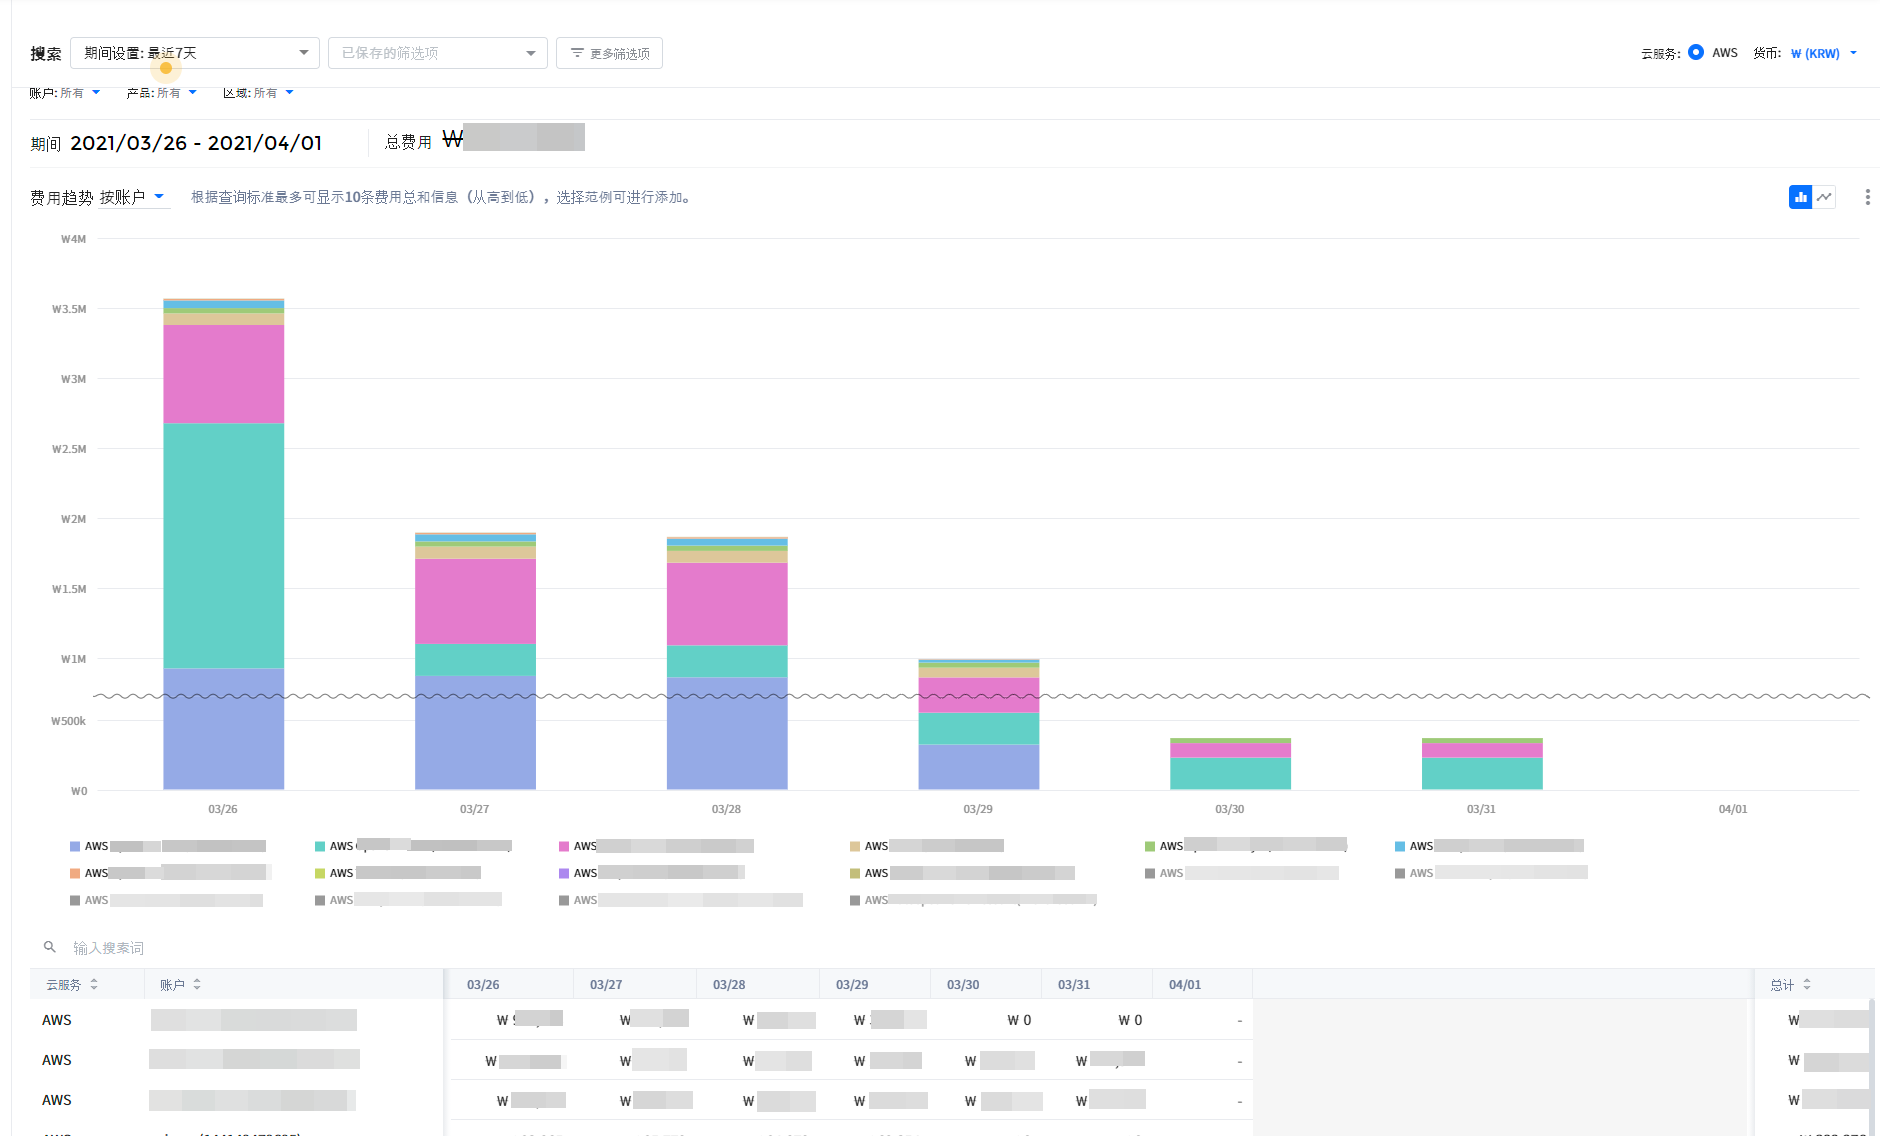
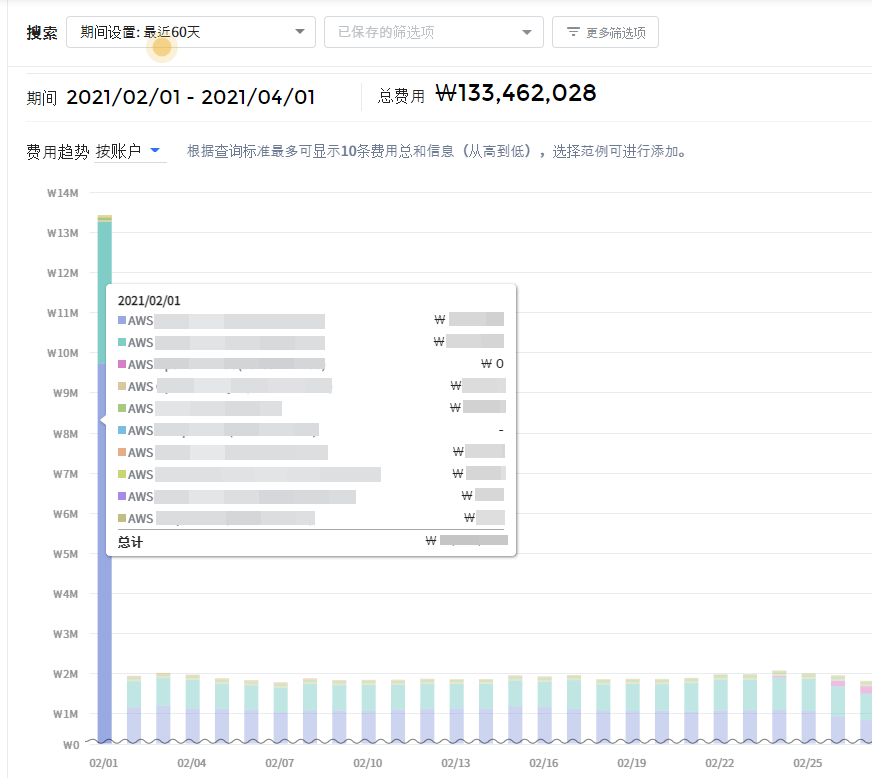
可以按云服务和期间进行搜索,提供图表和图形等可视化工具以确认对所需项目深入分析和多维度的分析结果。
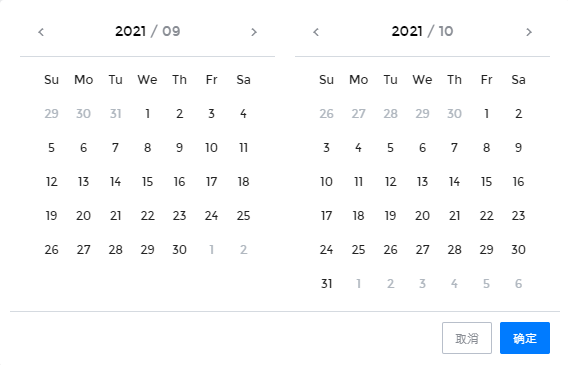
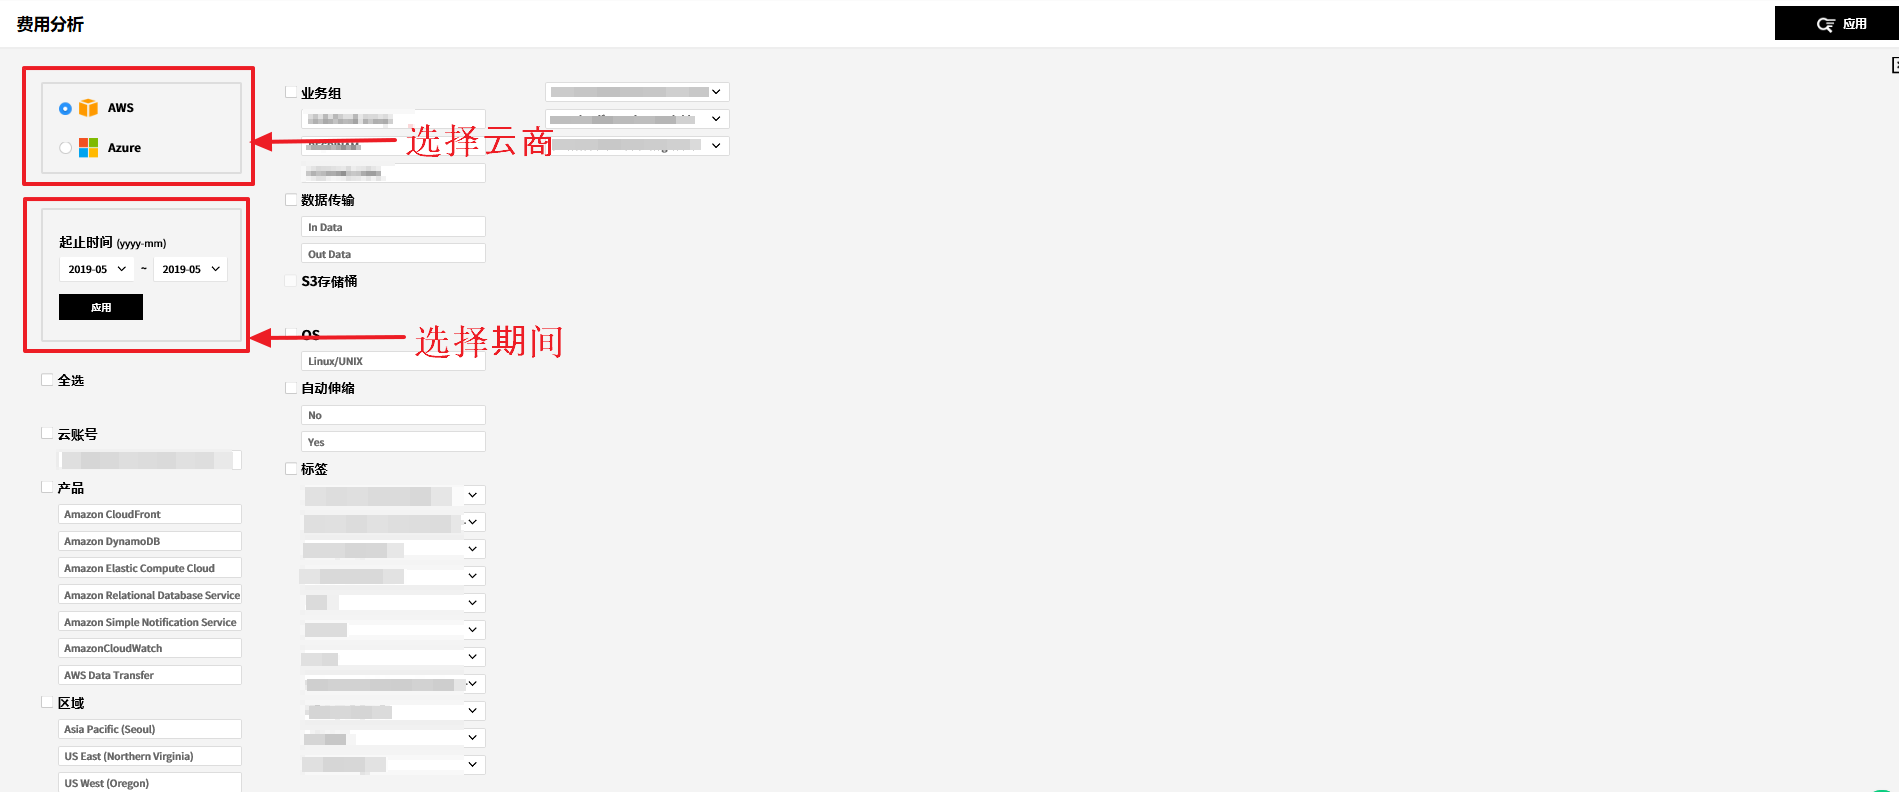
在费用分析首页,选择要搜索的服务和期间。
如果选择要搜索的服务和期间,搜索条件将显示在此期间使用的账户、产品、区域、业务组等。选择查询期间后,点击查询期间框中的【应用】按钮以应用所选期间。
![]()
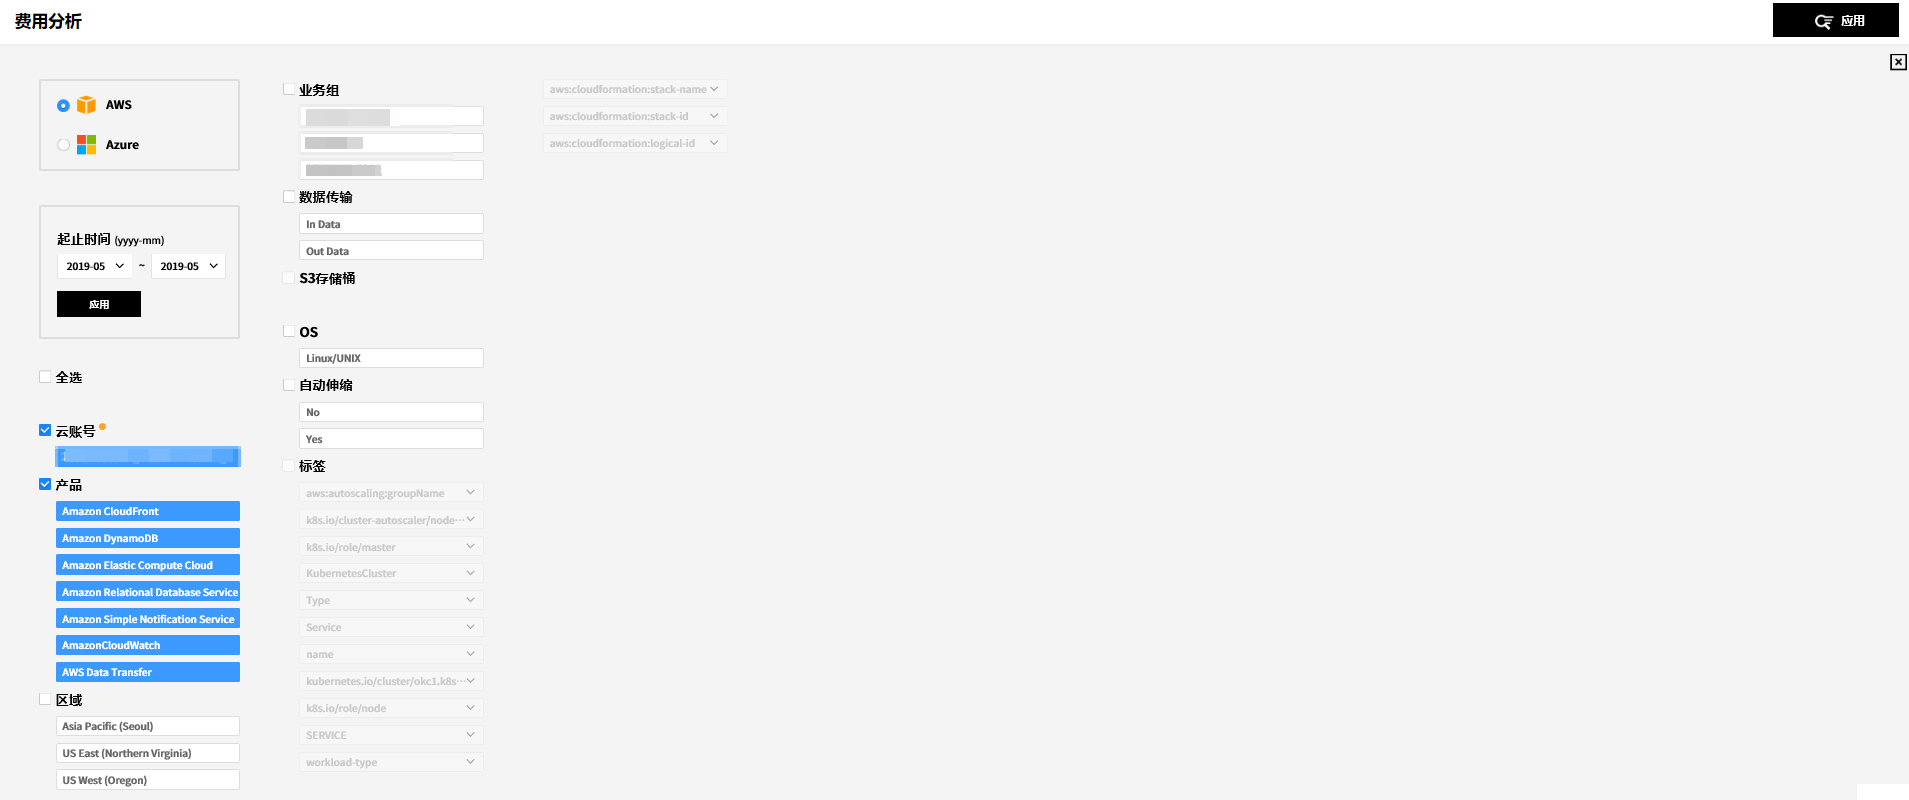
选择要搜索的产品和区域。
选择条件时,只有以向下钻取形式选择的条件项才会显示为可选项,其余项目将被禁用。
![]()
选择所有条件后,点击右上角的【应用】按钮。
![]()
点击【应用】按钮后,可以通过图表,数据表,条形图等多种方法查看搜索结果,可以且可以查看各项目费用、每日费用、各详细数据。
![]()
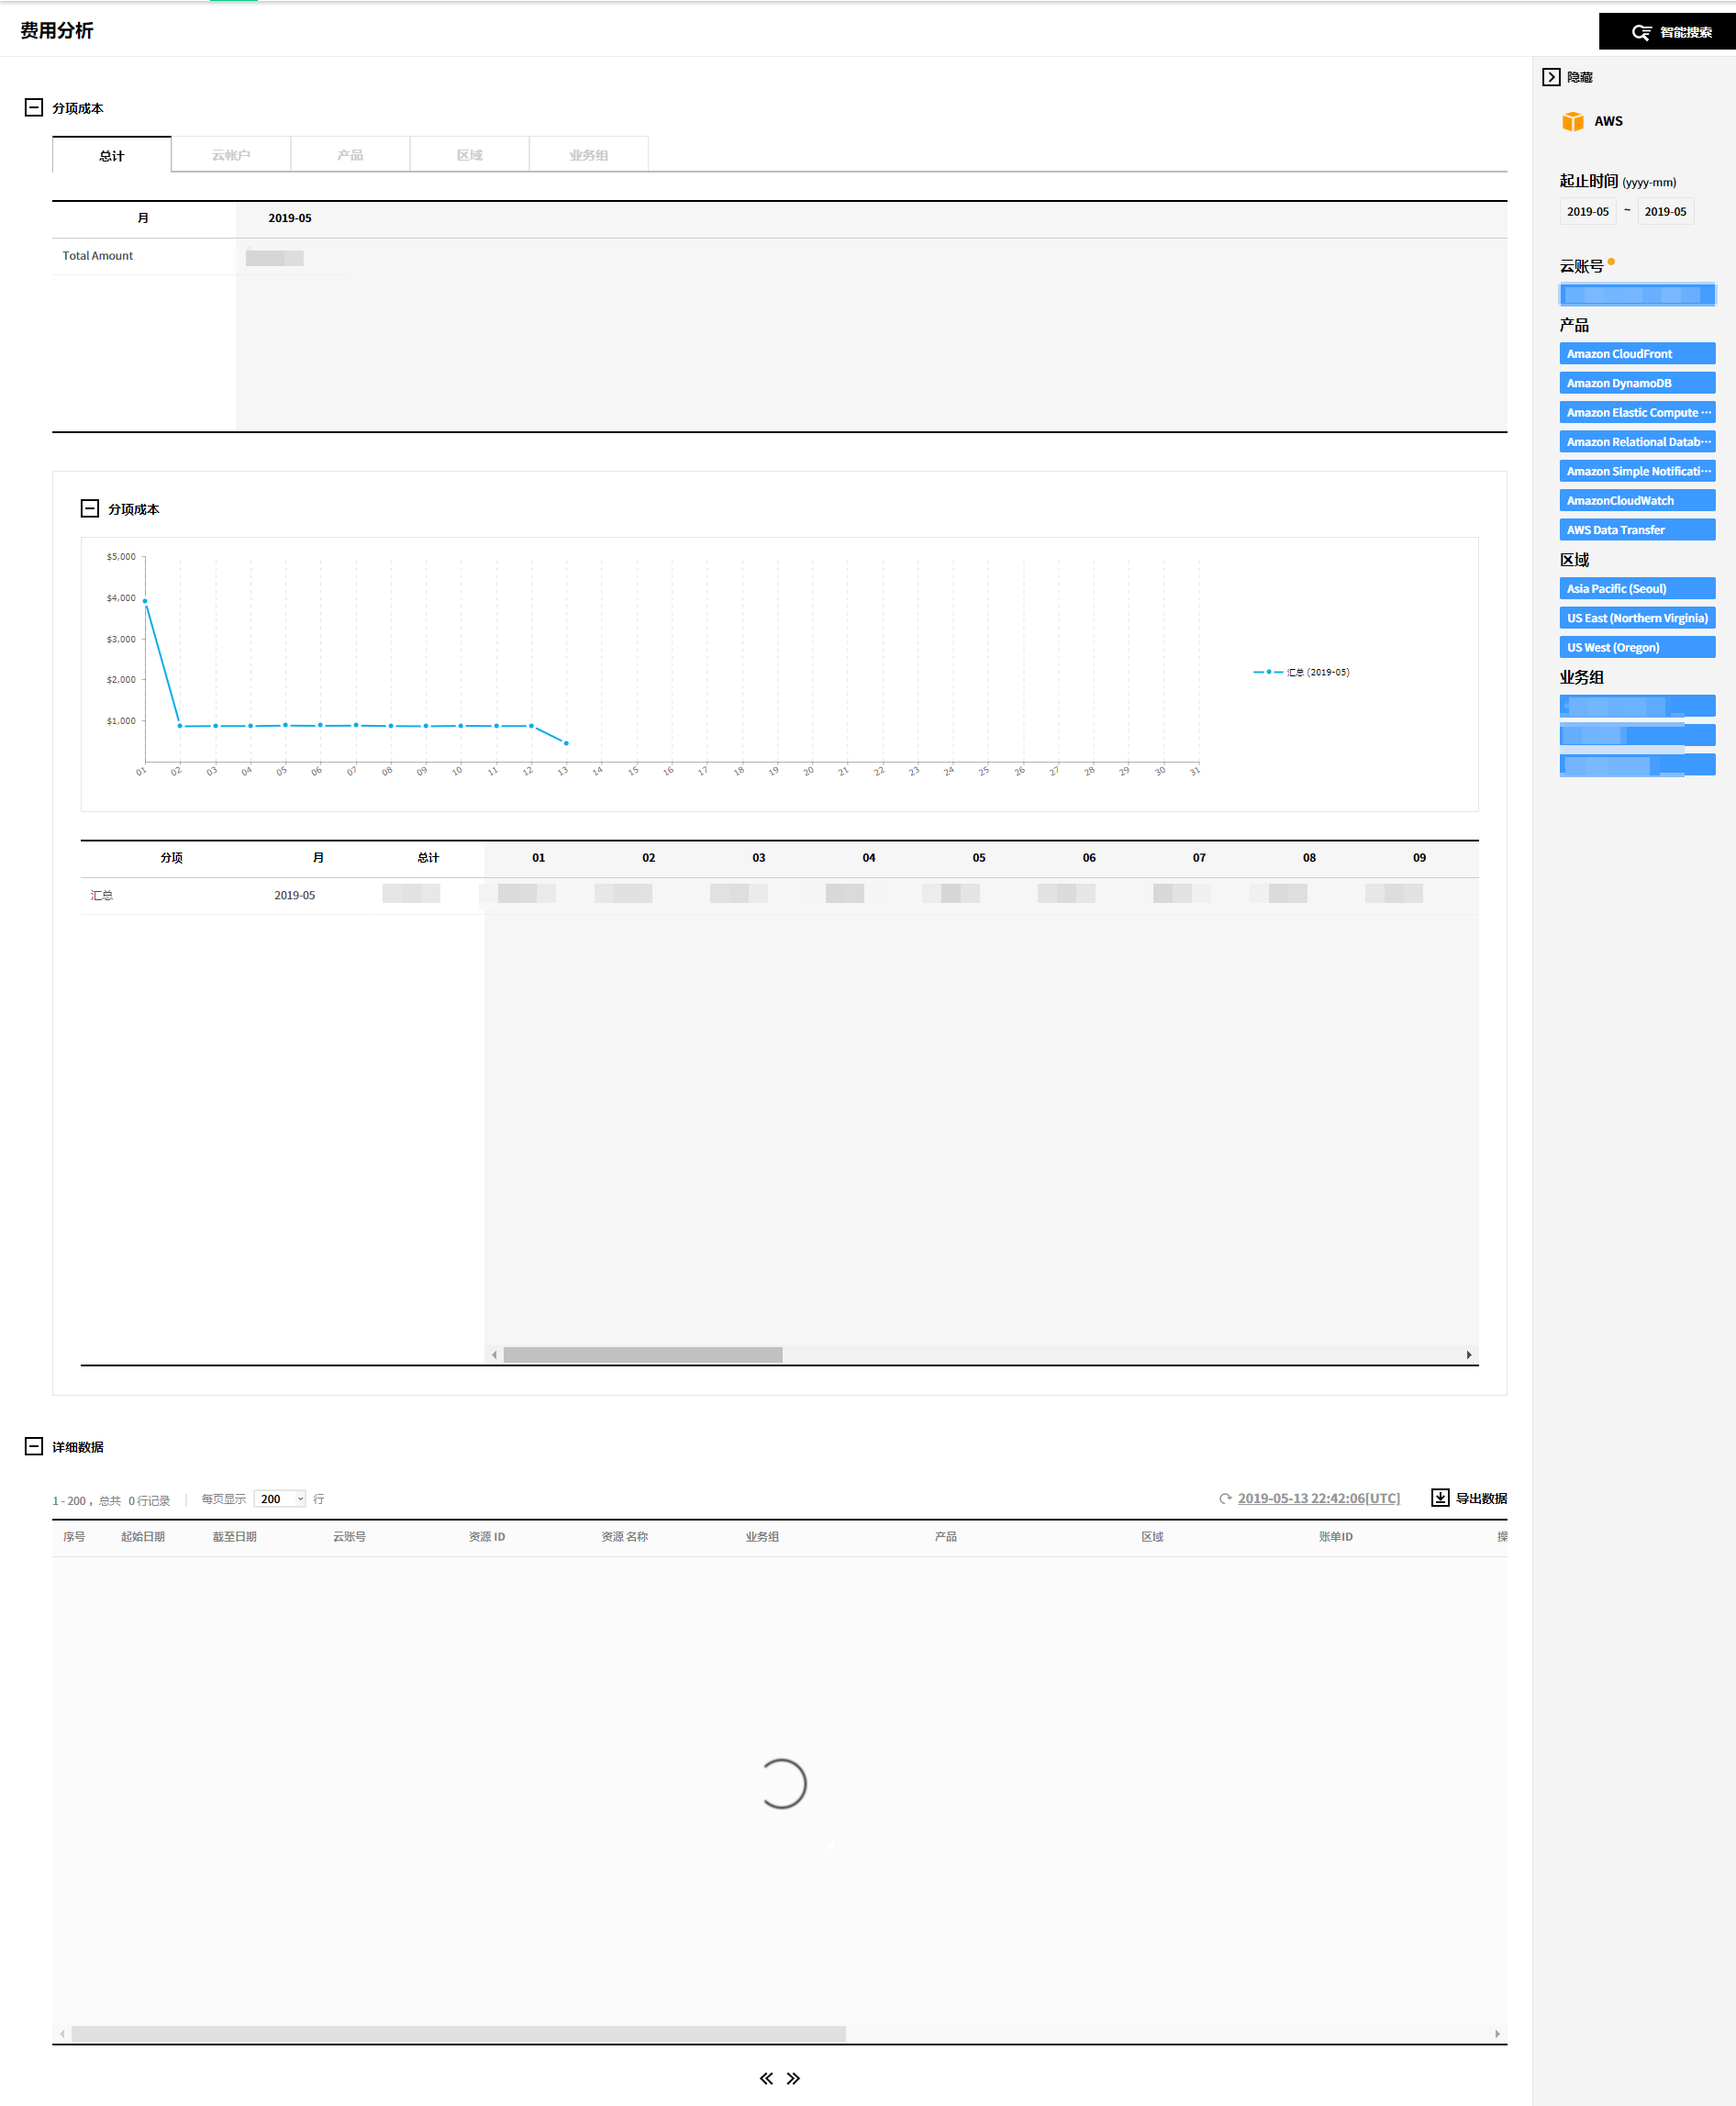
查看搜索结果
基于所选条件,搜索结果可以以多种格式查看,包括各项目费用、每日详细费用、详细数据等。
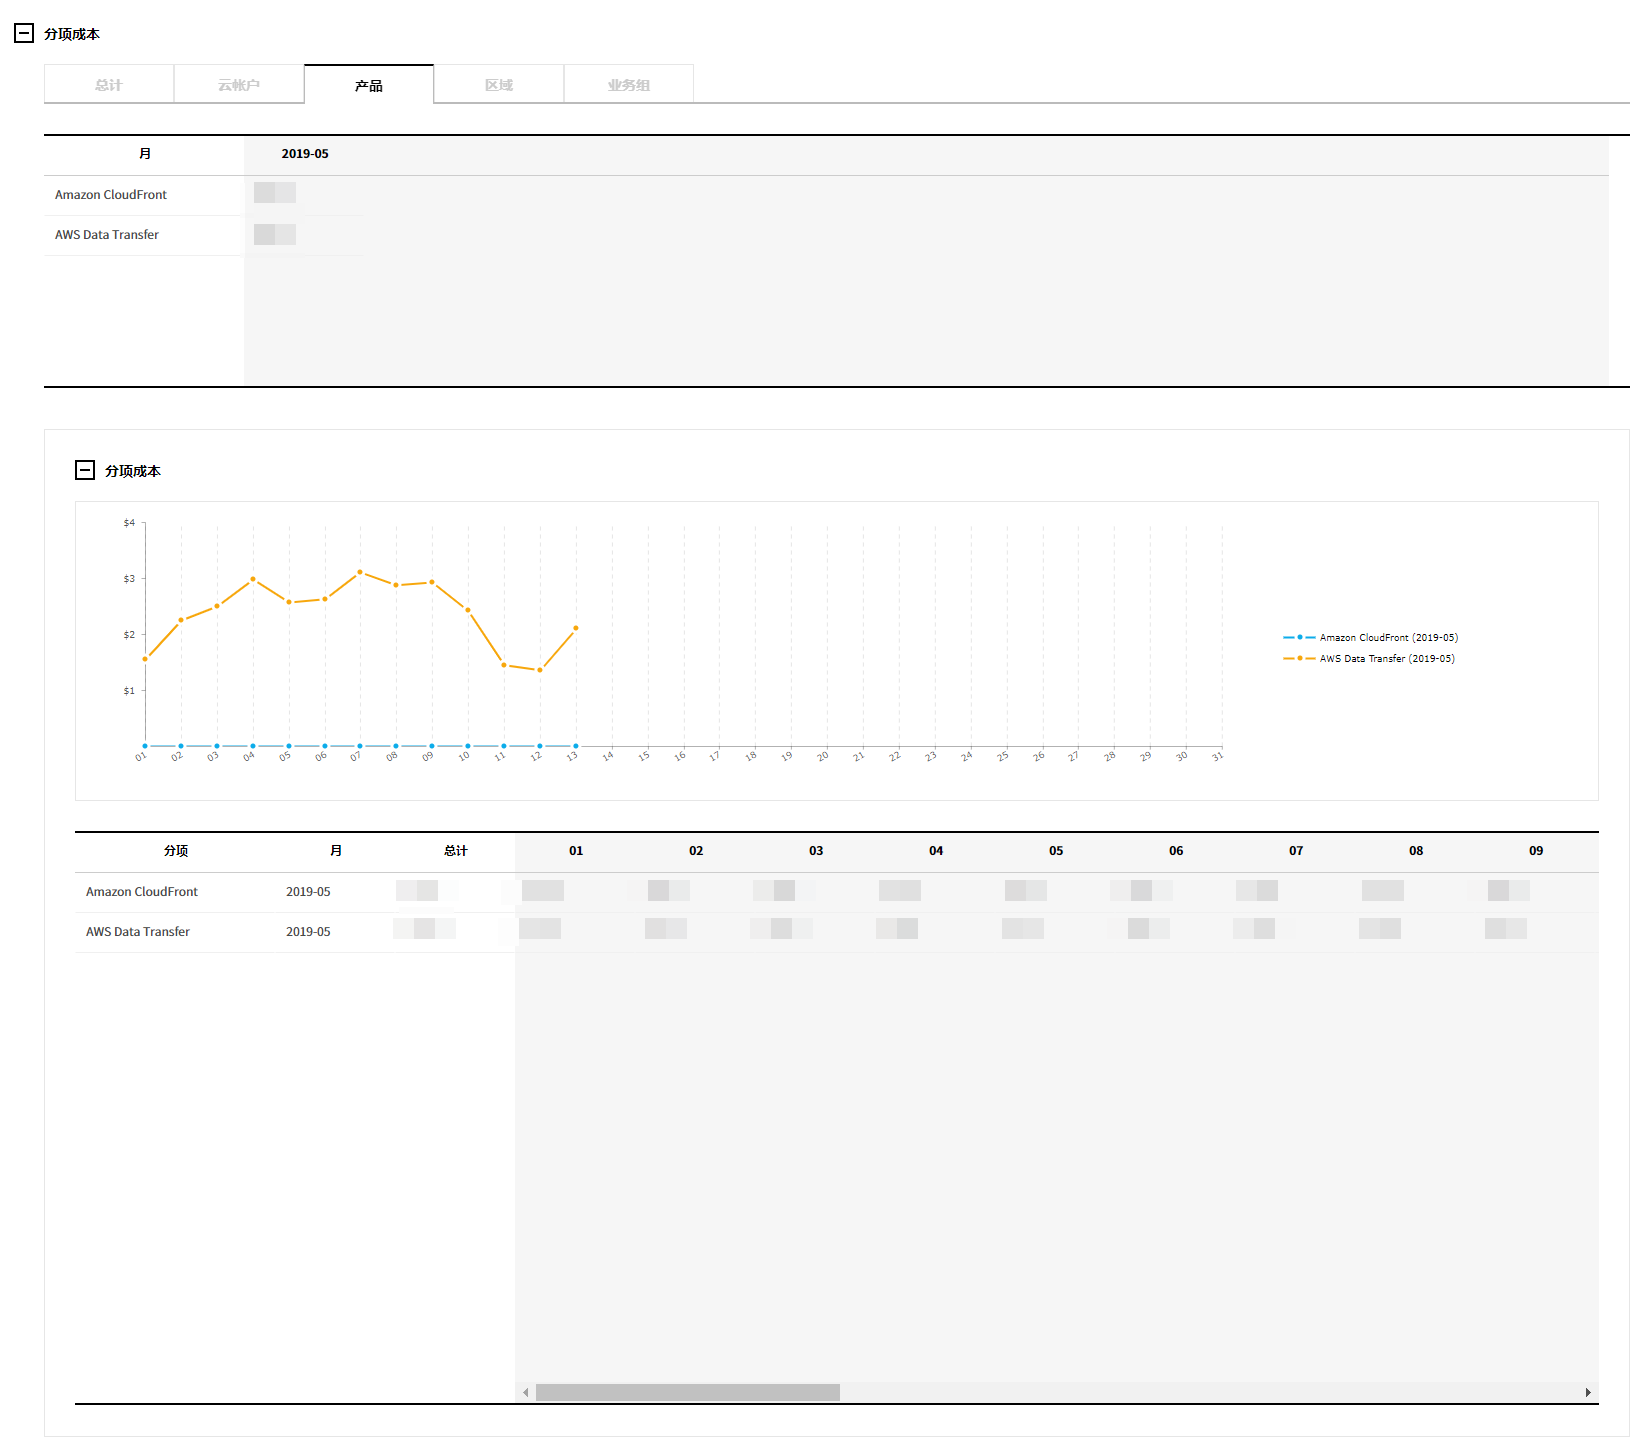
分项成本
可以按所选条件查看总费用。
可以按账户、产品、区域、业务组区分费用并确认。可以按天查看每个类别的详细费用和趋势图。点击每个项目的费用数据表中的总计、账户、产品、区域、业务组选项卡时,可以查看按各项目区分的费用。
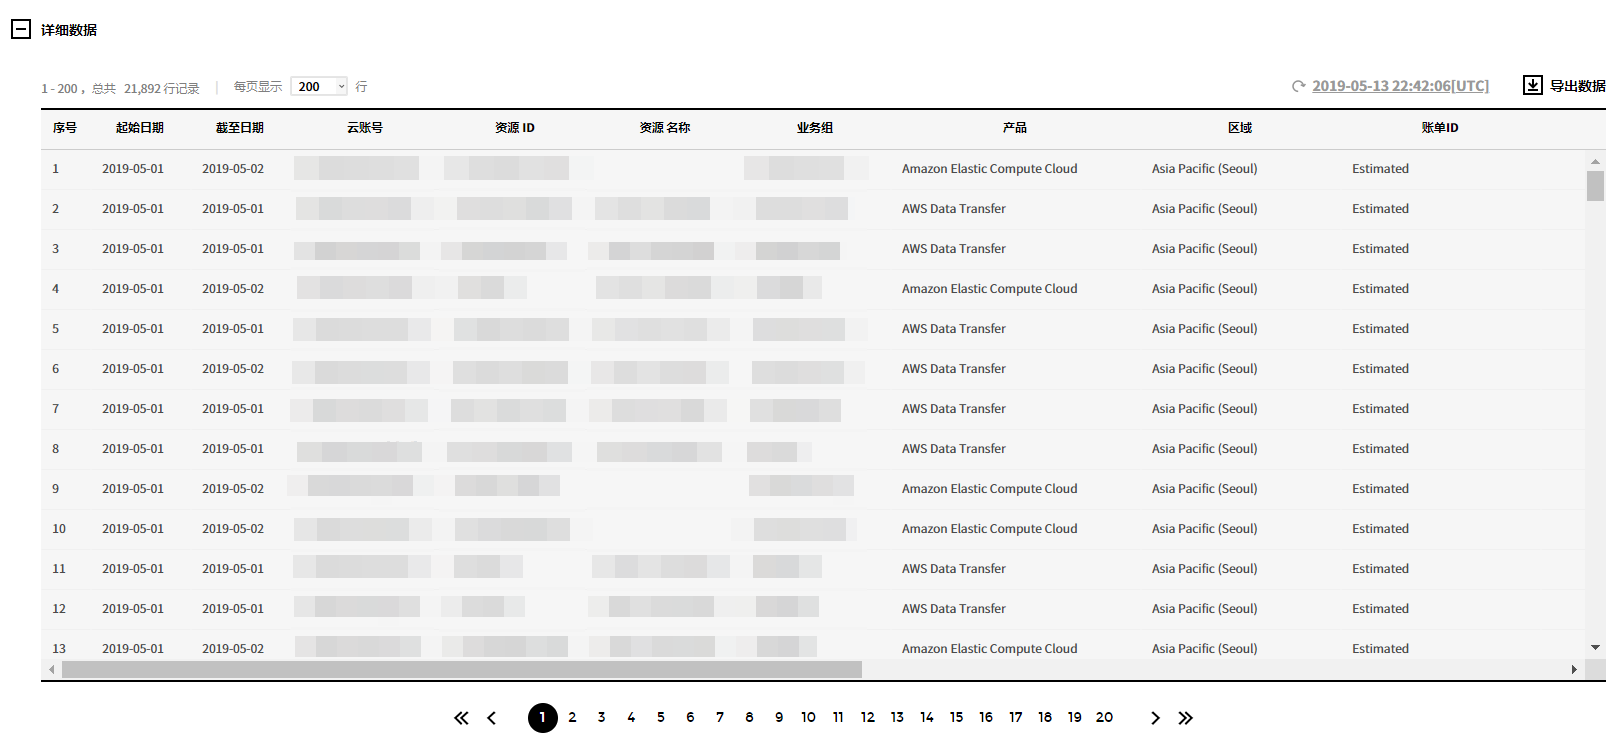
详细数据
可以查看所选条件产生的所有费用的详细信息。
费用分析
Cost Management > 费用分析
费用分析支持查看总费用及费用趋势。您可以详细地分析费用数据并了解费用变化原因,从而使您能够快速了解费用因素及趋势。
费用趋势
通过设置时间段可以查看截至今日的总费用和费用趋势。
以图形和表格的形式提供费用信息,并根据用户设置的账户、产品和区域可视化展示费用趋势。
将鼠标悬停在图表上将弹出一个提示窗口,显示您设置的各账户、产品和区域的费用信息和总费用。
您可以在表中选择特定日期的费用,以查看该费用的详细数据。点击相应日期的费用,将显示“截至当前的费用”页面。您可以按账户、产品、区域及使用类型等关键项查看费用信息。

1.1 期间设置
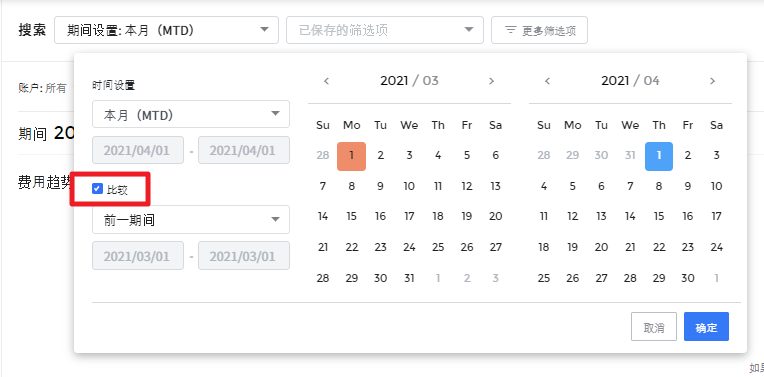
页面左上方的期间设置支持用户选择搜索时间段。
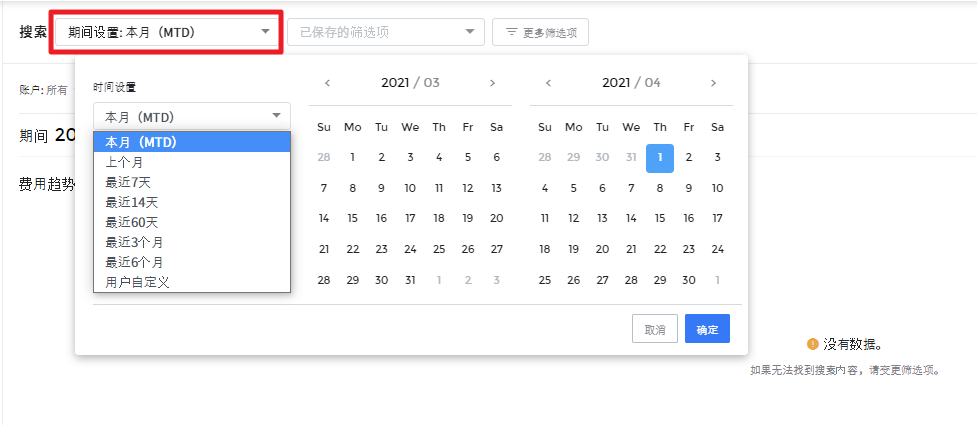
选择对比支持对比并显示上一时间段的费用数据。
1.2. 筛选
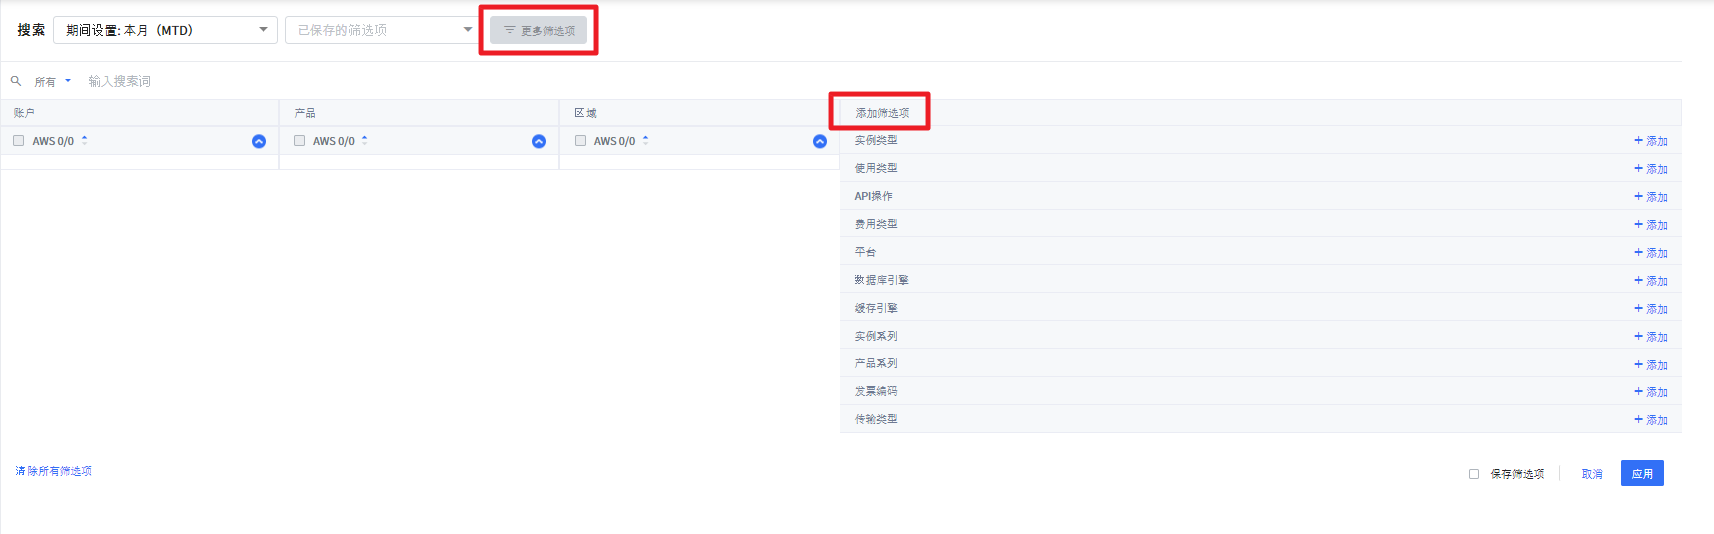
使用筛选功能,可以让您更详细地了解费用数据并了解费用变化的原因。
点击查看更多筛选后选择账户、产品或区域等筛选项来搜索费用信息。同时还提供设置服务组、标签、实例类型及使用类型等其他筛选项的功能。
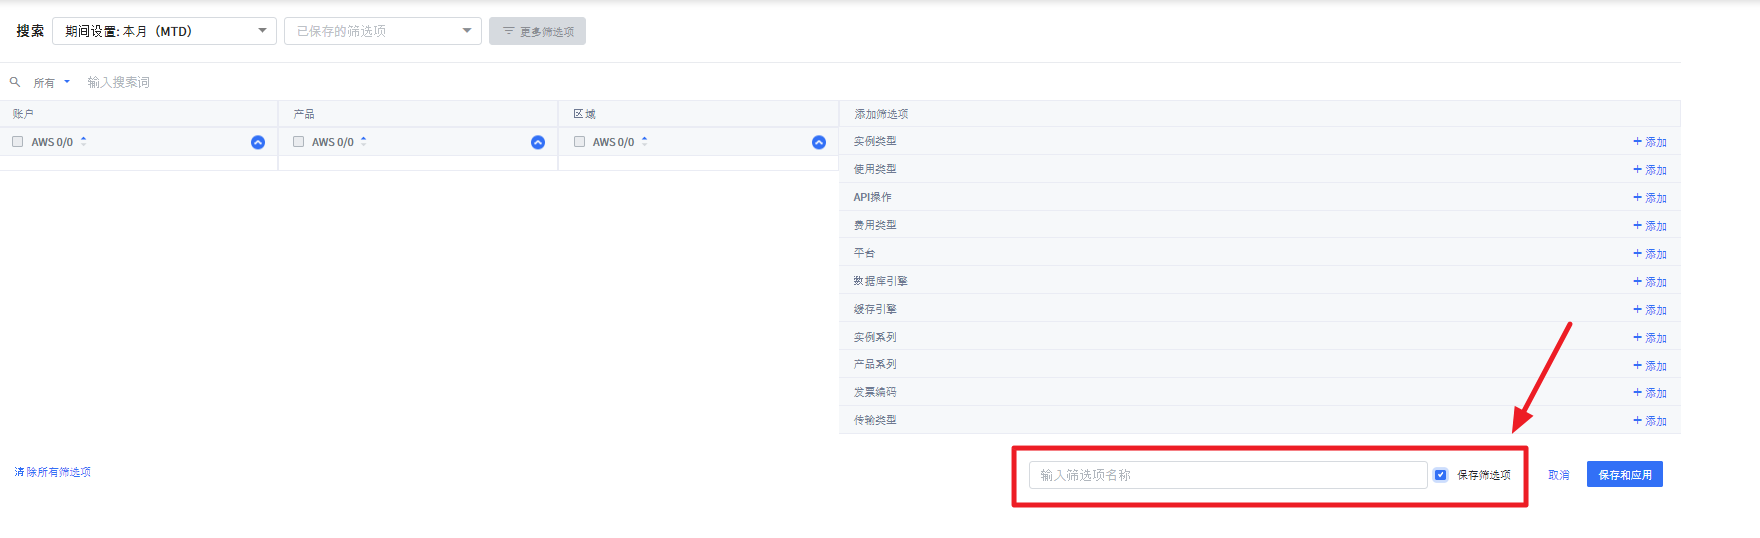
1.3. 保存筛选
提供保存筛选内容的功能,可以将经常使用的筛选内容进行保存方便后续的便捷使用。点击更多筛选,设置所需的筛选项,然后点击保存筛选按钮并输入筛选名称。从页面上端的下拉菜单中选择已保存的筛选内容,则无需重新选择筛选内容便可便捷使用。
账单
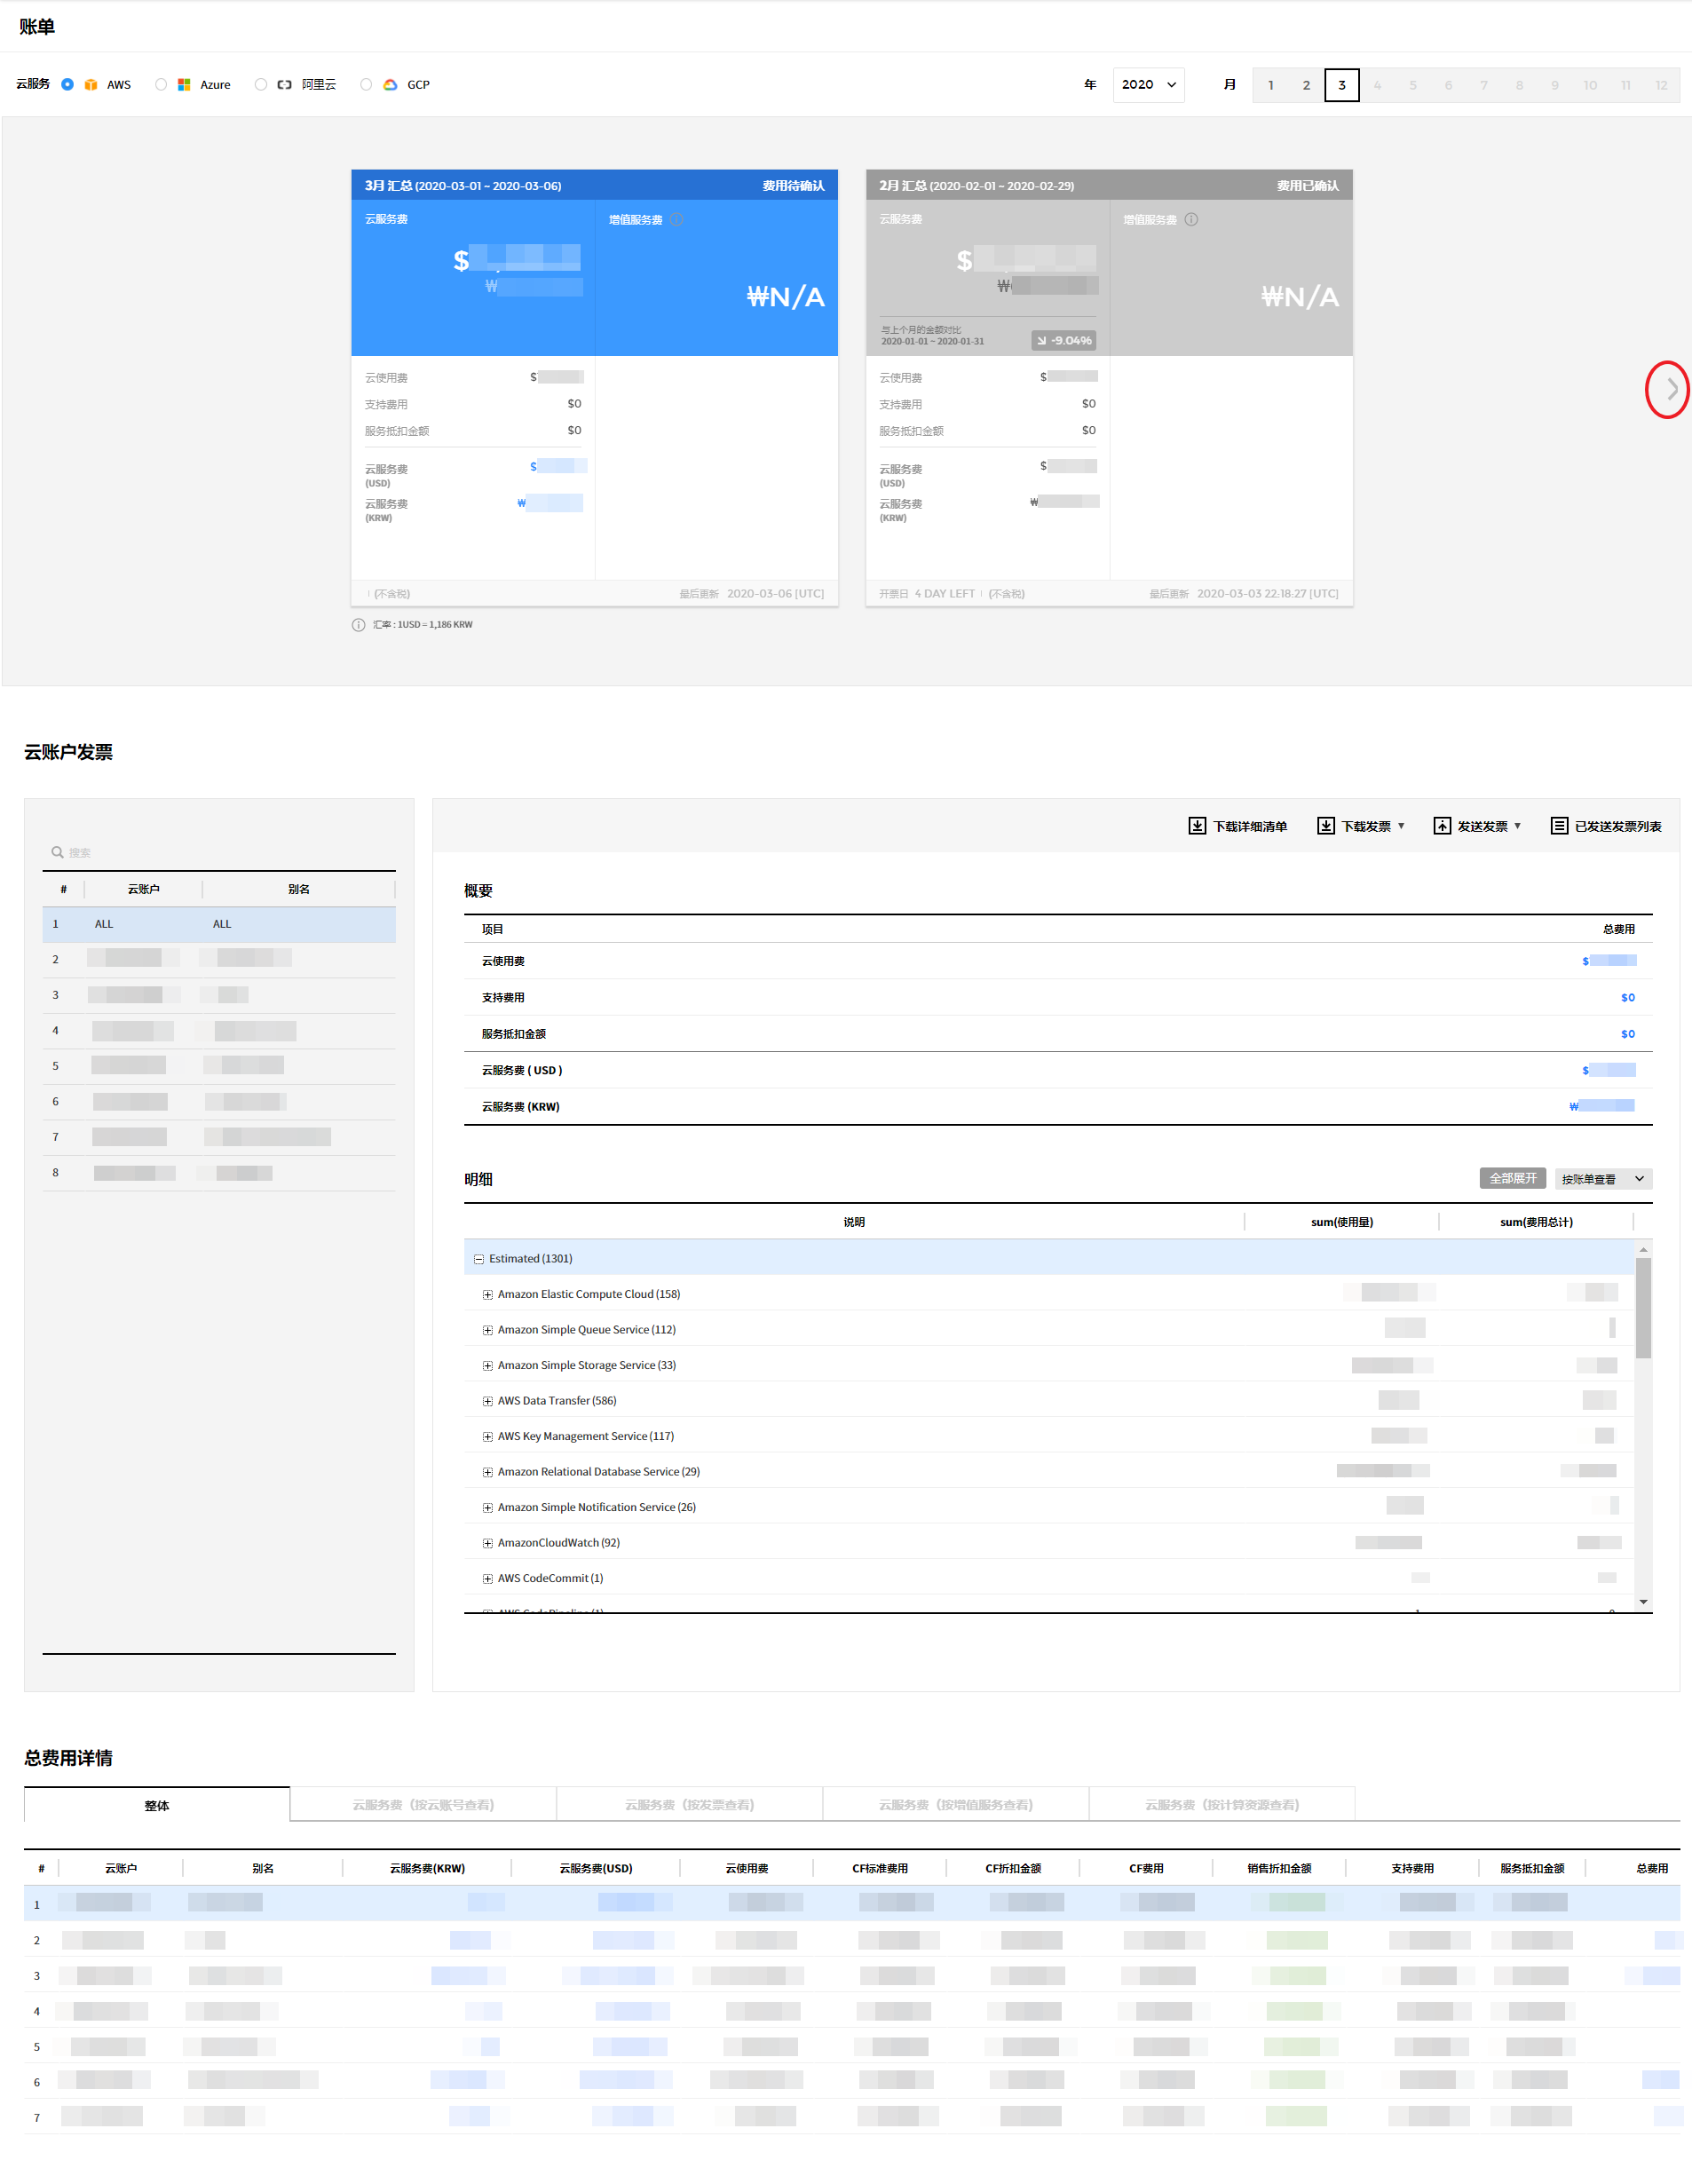
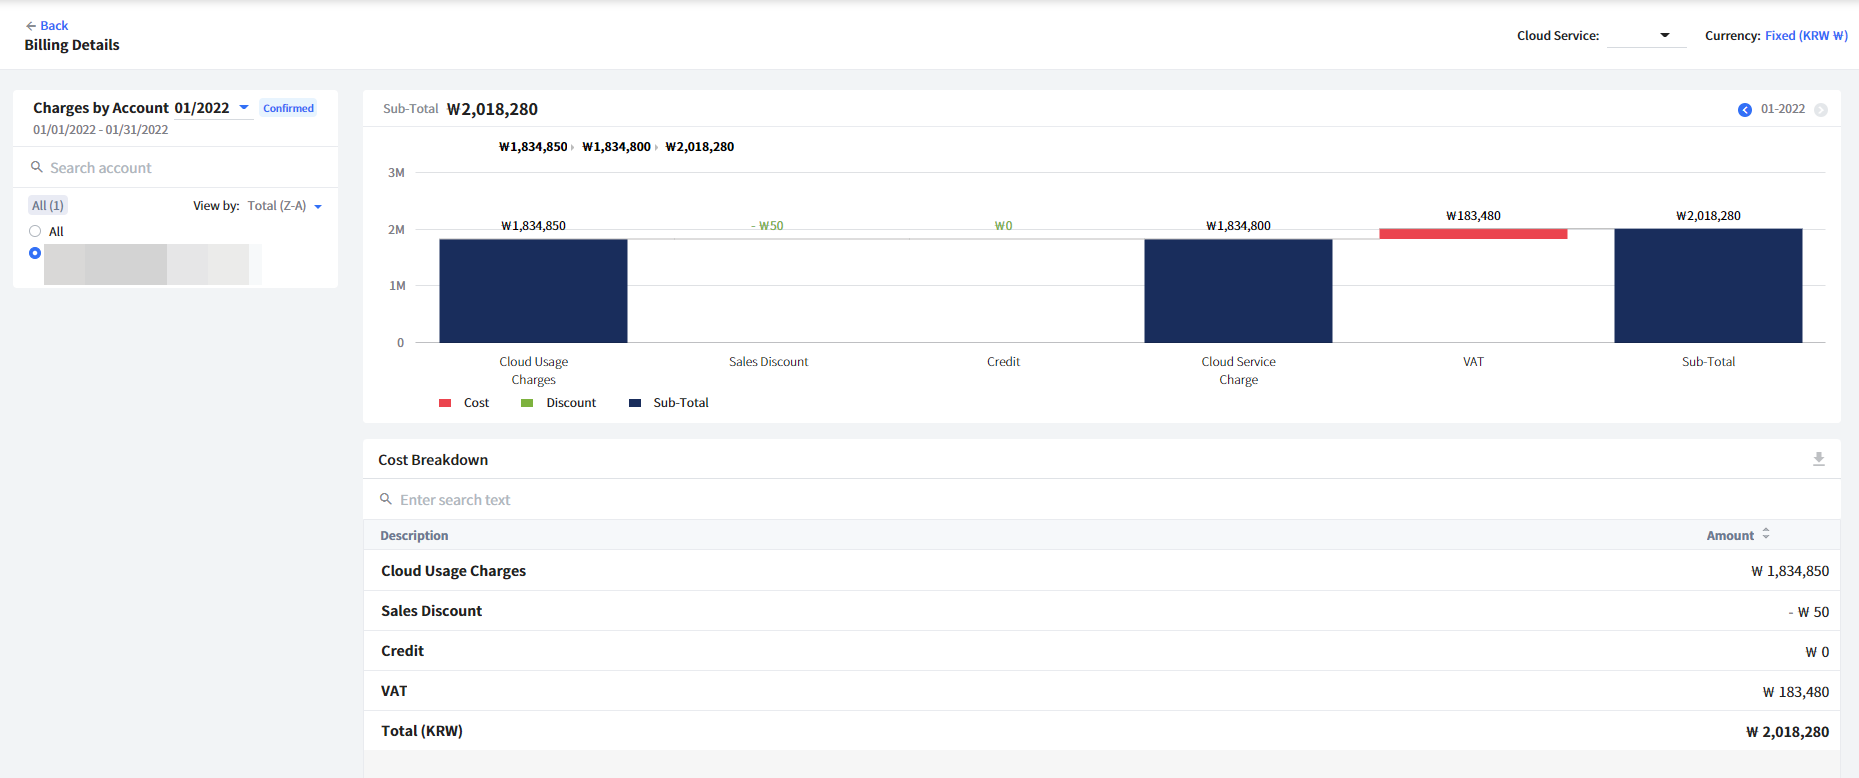
可以查看云服务、云账户结算金额及增值服务金额,并可以比较每月结算费用。
费用管理 > 账单
账单单据
可以按每个云服务查看月度账单单据摘要内容,其中包括云服务费、支持金额、折扣金额等。此外,由于摘要以简单的卡片显示,因此用户可以一目了然地与上个月的费用进行比较分析。
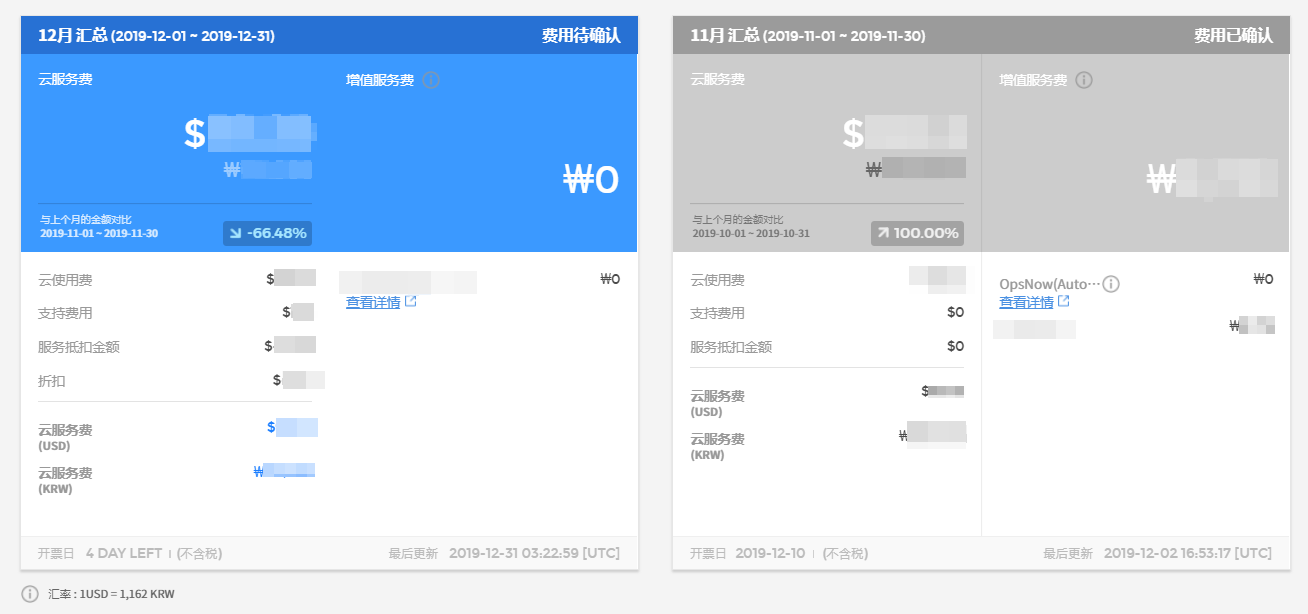
- 云服务:当选择左上角的云服务时,将显示该服务的账单单据。
- 选择期间:在右上角的菜单中,可以选择要查看账单单据的年份和月份。例如,如果选择2019年1月,1月账单单据和和2018年12月的账单单据将合并显示,并与上个月的费用进行比较分析。
- 本月摘要:显示所选月份的费用详情,仅区分账单金额和附加服务费。
- 上个月摘要:显示所选上个月的费用详情,仅区分账单金额和附加服务费。
点击服务屏幕右侧的【右箭头】按钮,可以一目了然地查看一年中发生的每月费用的趋势图表。
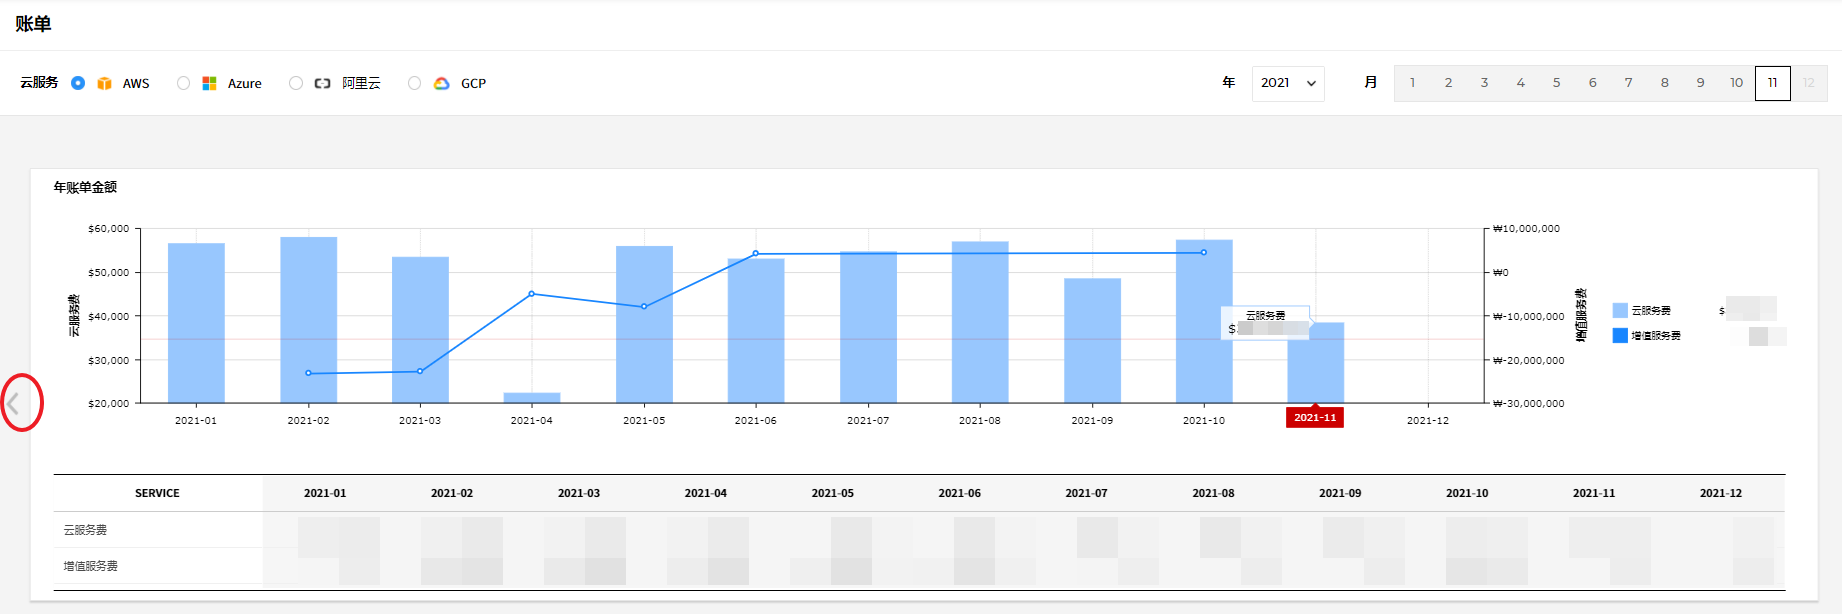
- 每月趋势图:可以在趋势图中查看每月产生的费用。
- 每月数据:可以在网格中查看每月产生的费用。
云服务费详情
也可以通过汇总和明细查看注册的各账户的费用信息。可以在每个云账户的账单菜单右上角下载所选账户的账单。可以通过【下载详细清单】和【下载账单】下载费用信息。【下载账单】支持各种格式,如PDF和Excel等。如果点击【发送账单】按钮,则可以选择仅发送一次和重复发送的条件。如果选择重复发送,将定期收到月度账单单据。还可以通过【已发送账单列表】查看到目前为已发送的账单单据列表。
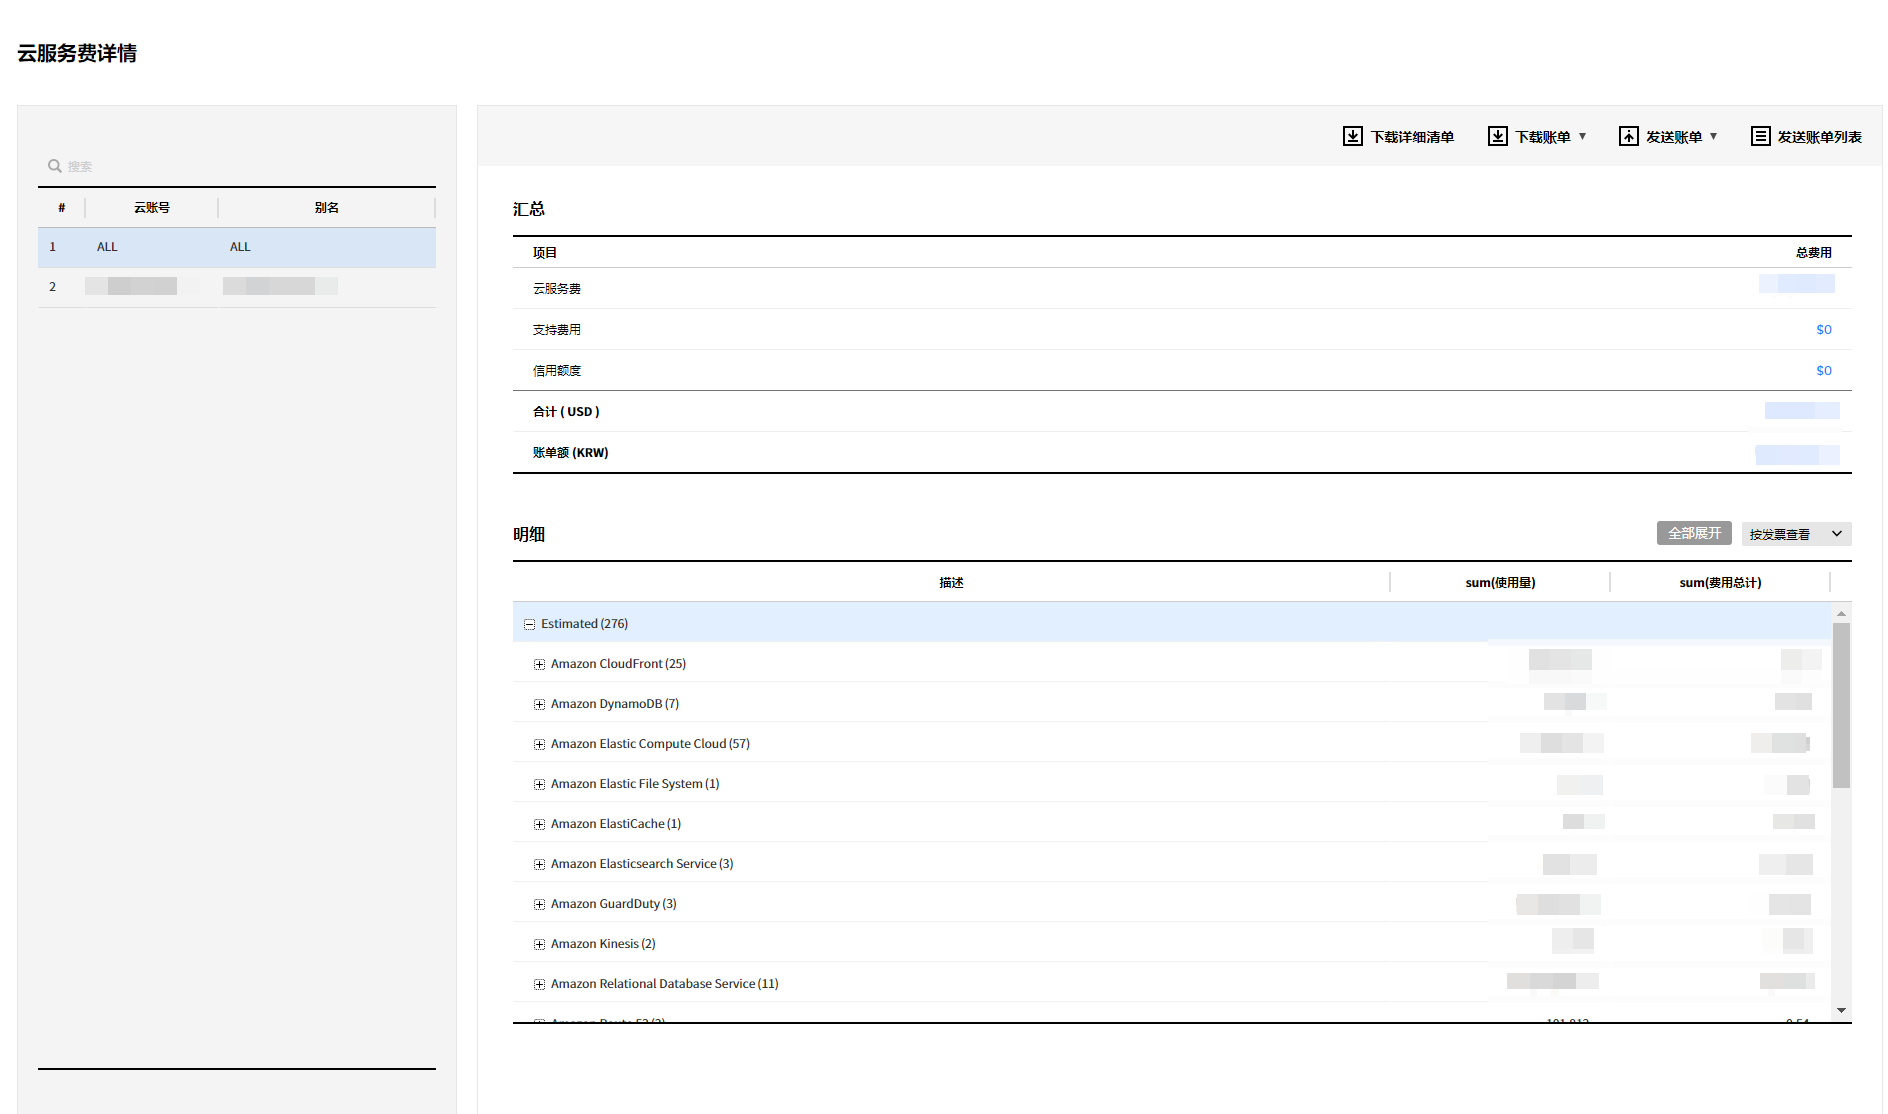
- 选择账户:可以在左侧的表中选择要查看的账户。所选账户的汇总和明细将显示在右侧的表格中。
- 汇总:显示使用费和账单费用等的概要信息。
- 明细:可以查看已产生的费用和折扣等详细信息,还可以通过点击明细表右上角的【全部展开】或【全部收起】按钮来区分显示的项目。点击【全部展开】按钮右侧的第一个下拉按钮,将项目分成发票,云账号,业务组,区域和标签以显示项目。还可以点击第二个下拉按钮以选择按名称区分项目。
- 变更显示方法:通过以下条件确认明细中显示的费用详细。
AWS: Invoice, Account, Service Group, Region, Tag
Azure: Subscription, Service Group, Region, Meter Category
总费用详情
除了整体费用信息,还可以按云账号、按发票和增值服务查看费用信息。

- 按云账号:可以查看每个注册账户的使用费用和折扣。
- 按发票:可以按发票查看服务费和支持费用。
- 增值服务:可以看到由于增值服务详情和增值服务而产生的费用。
Billing Invoice
Cost Management > Billing Invoice
The Billing Invoice helps you to quickly and easily understand your charges for the selected month and previous month with Cloud Billing Details and Monthly Cost Trend. You can view your charges by account, cloud billing, and cloud invoice, and the Invoice Insight feature allows you to identify products with biggest changes in cost patterns and its predicted causes.
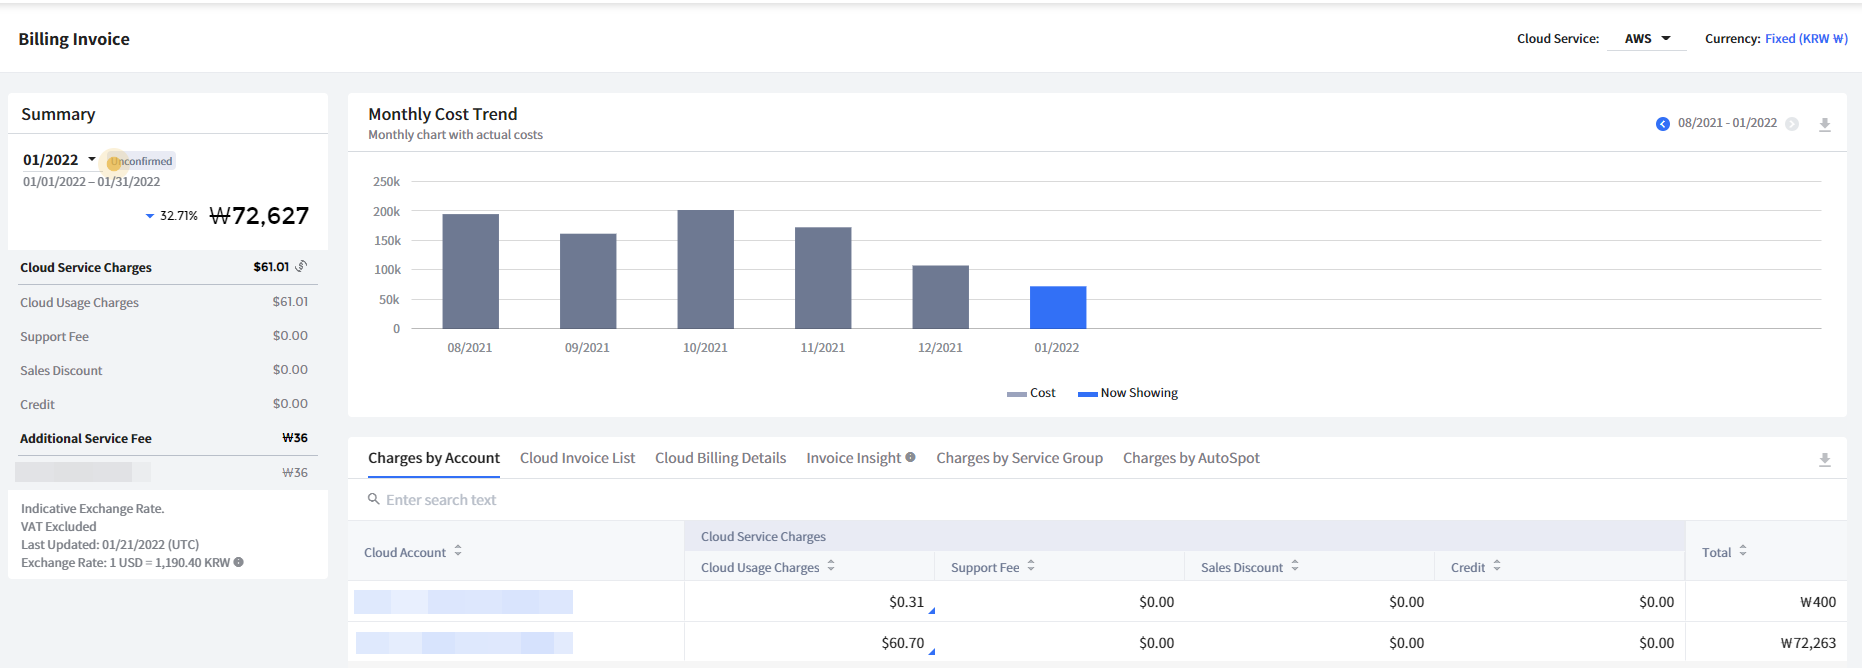
Summary
The Summary provides cloud services charges and additional service fees, and subordinate items such as cloud usage charges, support fees, sales discount, and credit.
① Select a cloud service on the top-right corner of the page
② Click a month to view the information you want.

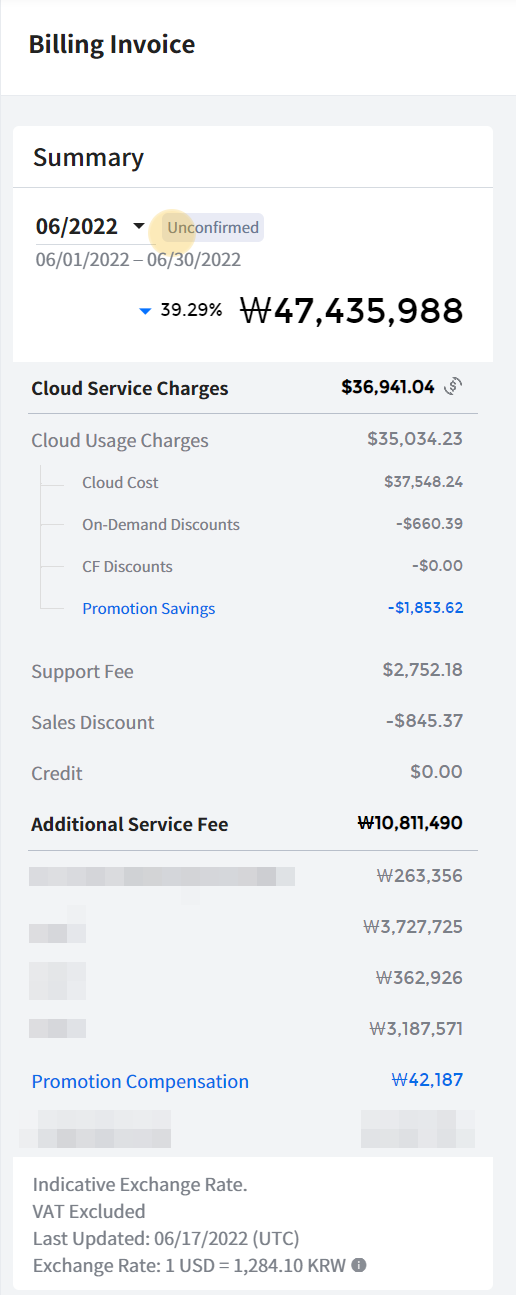
- Cloud Usage Charges: Charges of cloud computing usage
- Support Fee: Fees determined by the service contract under the AWS Support Plan
- Sales Discount: Discounted amount on cloud usage charges under the service contract
- Credit: Credits applicable to your invoice
- Additional Service Fee: Additional fee or discounts such as Savings Plans Promotion Compensation
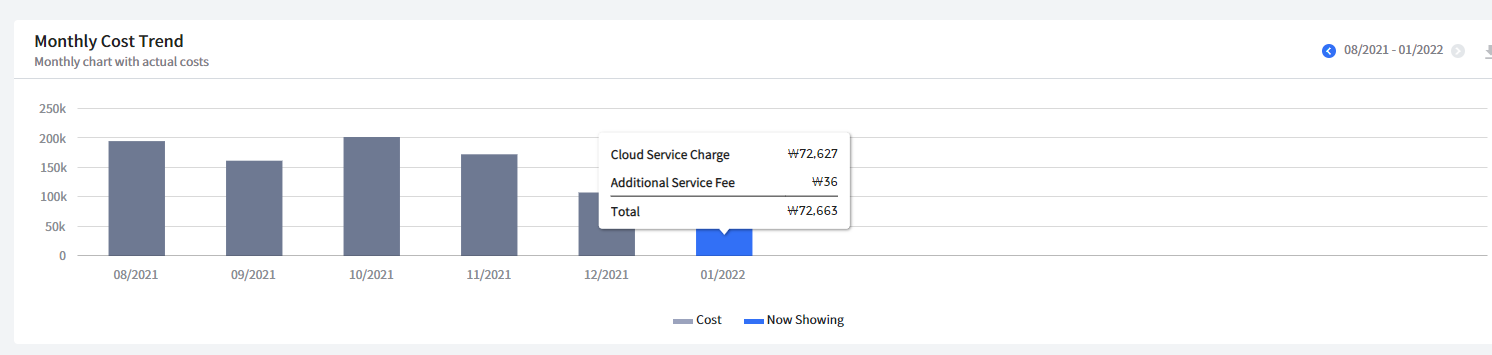
Monthly Cost Trend
The chart displays the trend of cloud service charges. You can select a month from the trend chart, and if you hover your mouse over the chart, you can see the popup window displaying cloud usage charges, additional service fees, and total amount of the selected month.
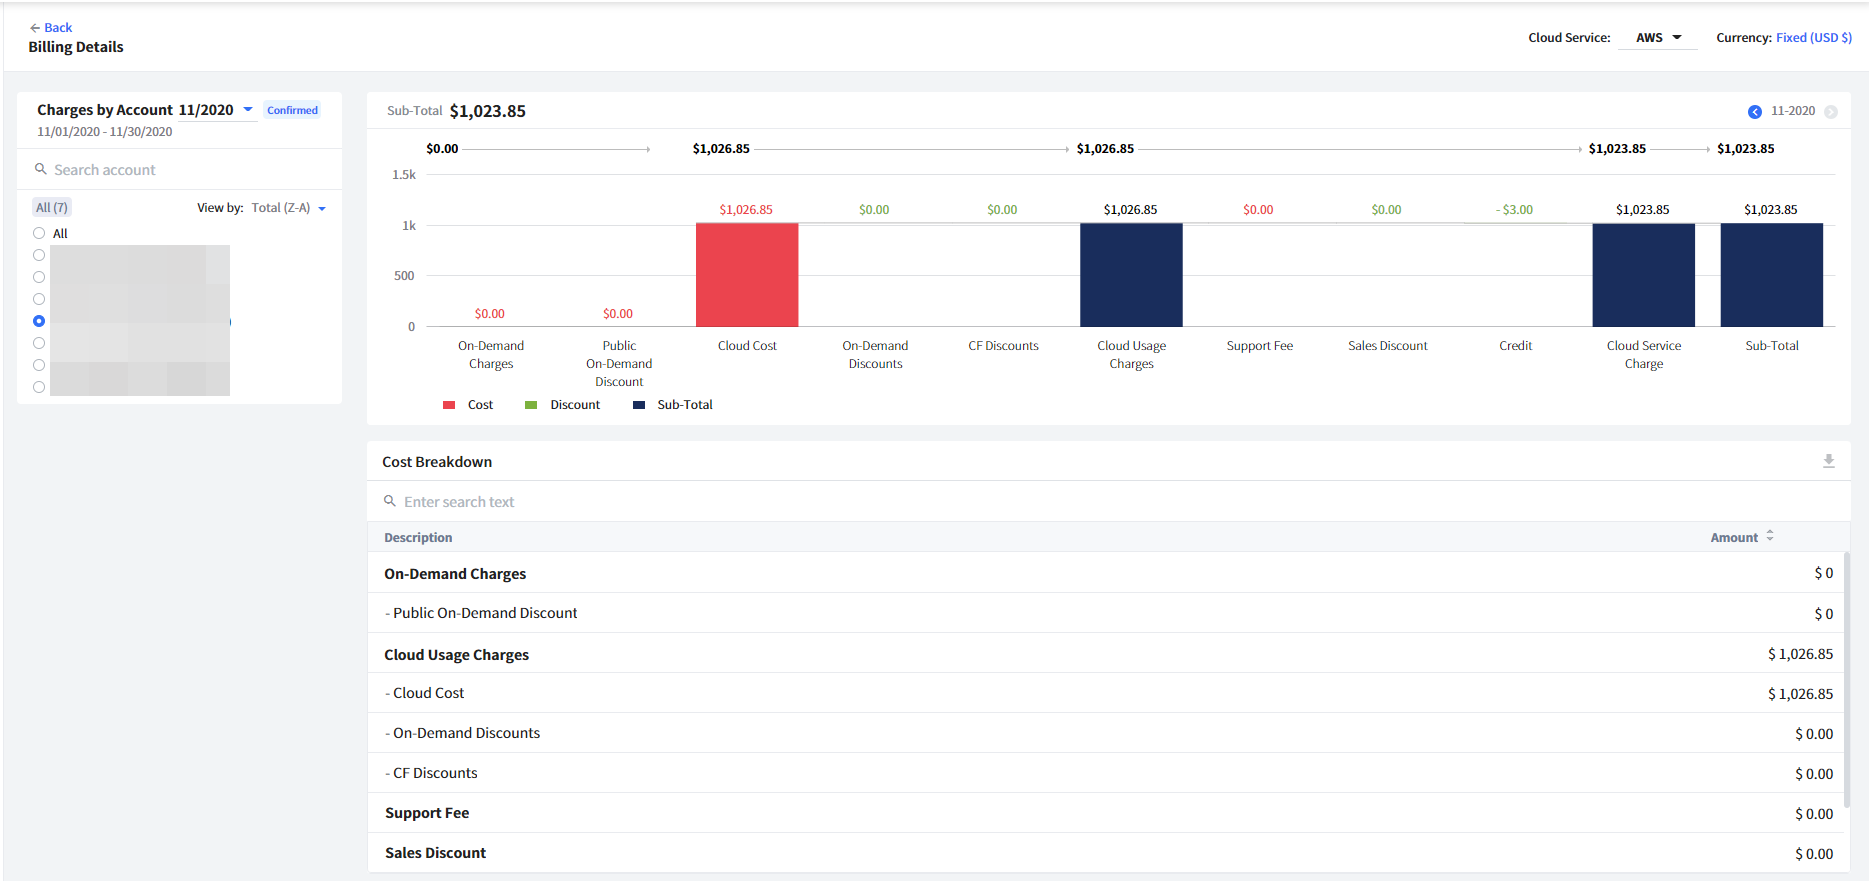
Detail Table - AWS
The Detail Table contains Charges by Account, Cloud Invoice List, Cloud Billing Details, and Invoice Insight tabs.
Charges by Account
You can see cloud usage charges, support charges, discount rates, and credits by account, and the total amount calculated for these items. Select a cloud account to go to the detail page to view its cost information.

Cloud Invoice List
By matching Billing IDs and Cloud Accounts, you can check billing dates and charges by billing ID or cloud account. When the billing is confirmed, Billing ID will be displayed and if not, Estimated will be shown.

- Cloud Invoice List displays cloud service charges only, and you can find additional service fees in Charges by Account tab.
Cloud Billing Details
You can view usage and costs by account, bill, region, tag, or service group.

- Cloud Billing Details displays cloud service charges only, and you can find additional service fees in Charges by Account tab.
Invoice Insight
Invoice Insight compares and analyzes past and newly issued invoices to identify products with large changes in cost patterns and possible causes. When cost changes detected in the invoice, it shows the difference between this month versus the last month and average costs, and provides the link to go to [Cost Analytics] to identify what caused the change.
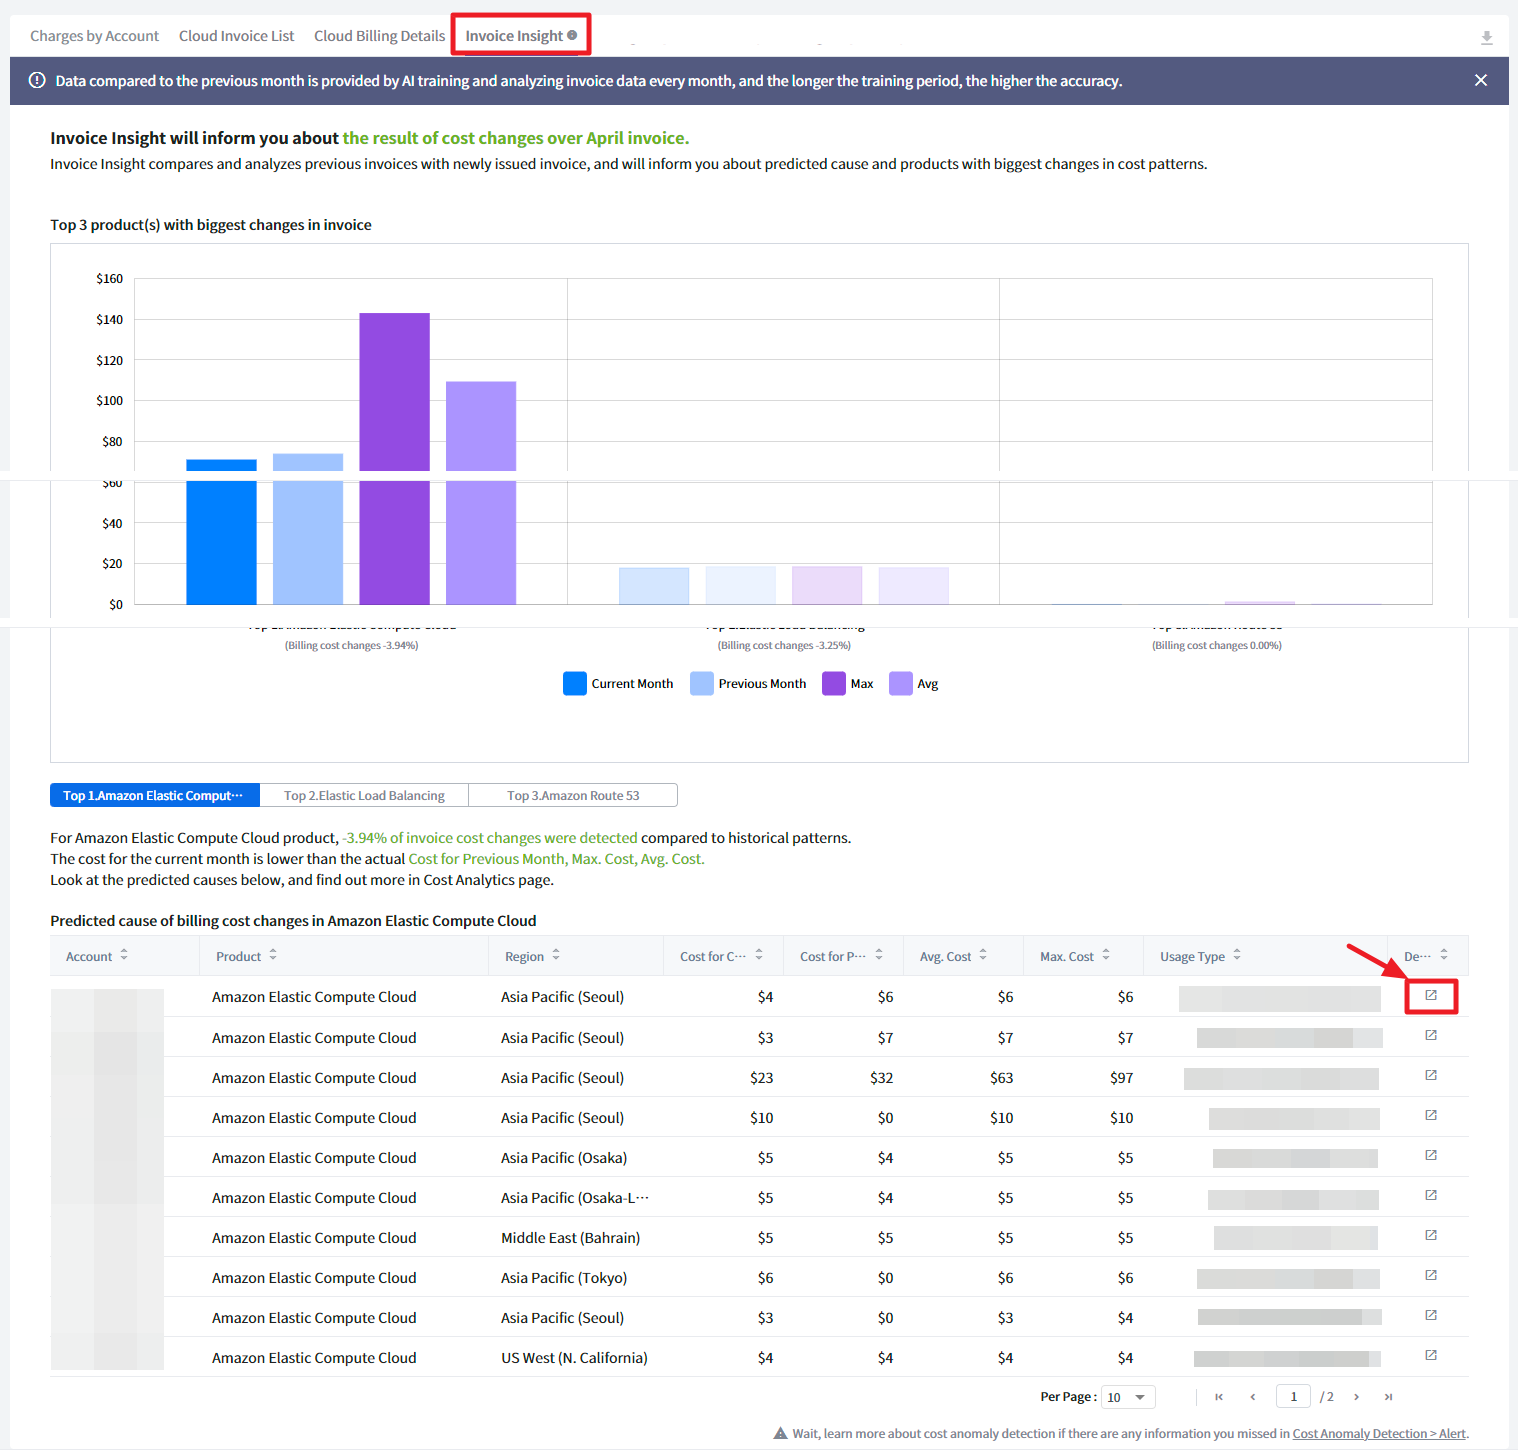
- Invoice Insight is only available in the global version.
- Cost changes in the invoice or cost anomaly occurs, you can set alarms in the [Cost Anomaly Detection] to track them immediately.
Detail Table - Ncloud
The Detail Table contains Charges by Account, Cloud Invoice List, and Cloud Billing Details tabs.
Charges by Account
You can see cloud usage charges, sales discounts, credits, and VAT by account, and the total amount calculated for these items. Select a cloud account to go to the detail page to view its cost information.

Cloud Invoice List
By matching Billing IDs and Cloud Accounts, you can check billing dates and charges by billing ID or cloud account. When the billing is confirmed, Billing ID will be displayed, and if not confirmed, Estimated will be shown.

- Cloud Invoice List displays cloud service charges only, and you can find additional service fees in Charges by Account tab.
Cloud Billing Details
You can view usage and costs by account, bill, region, tag, or service group.
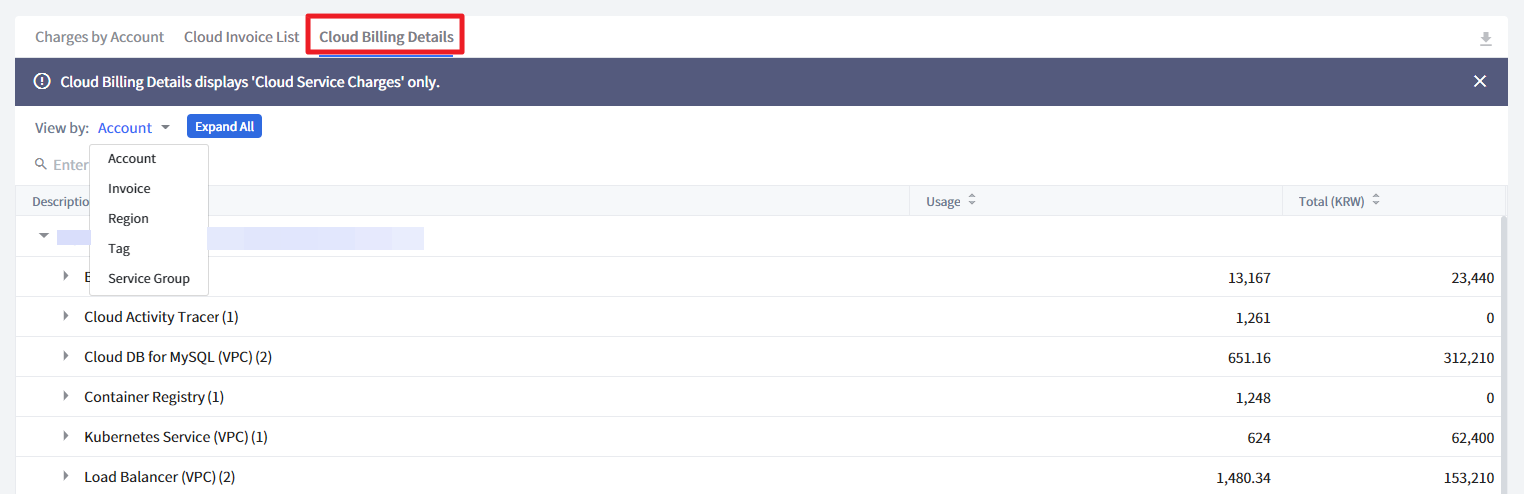
- Cloud Billing Details displays cloud service charges only, and you can find additional service fees in Charges by Account tab.
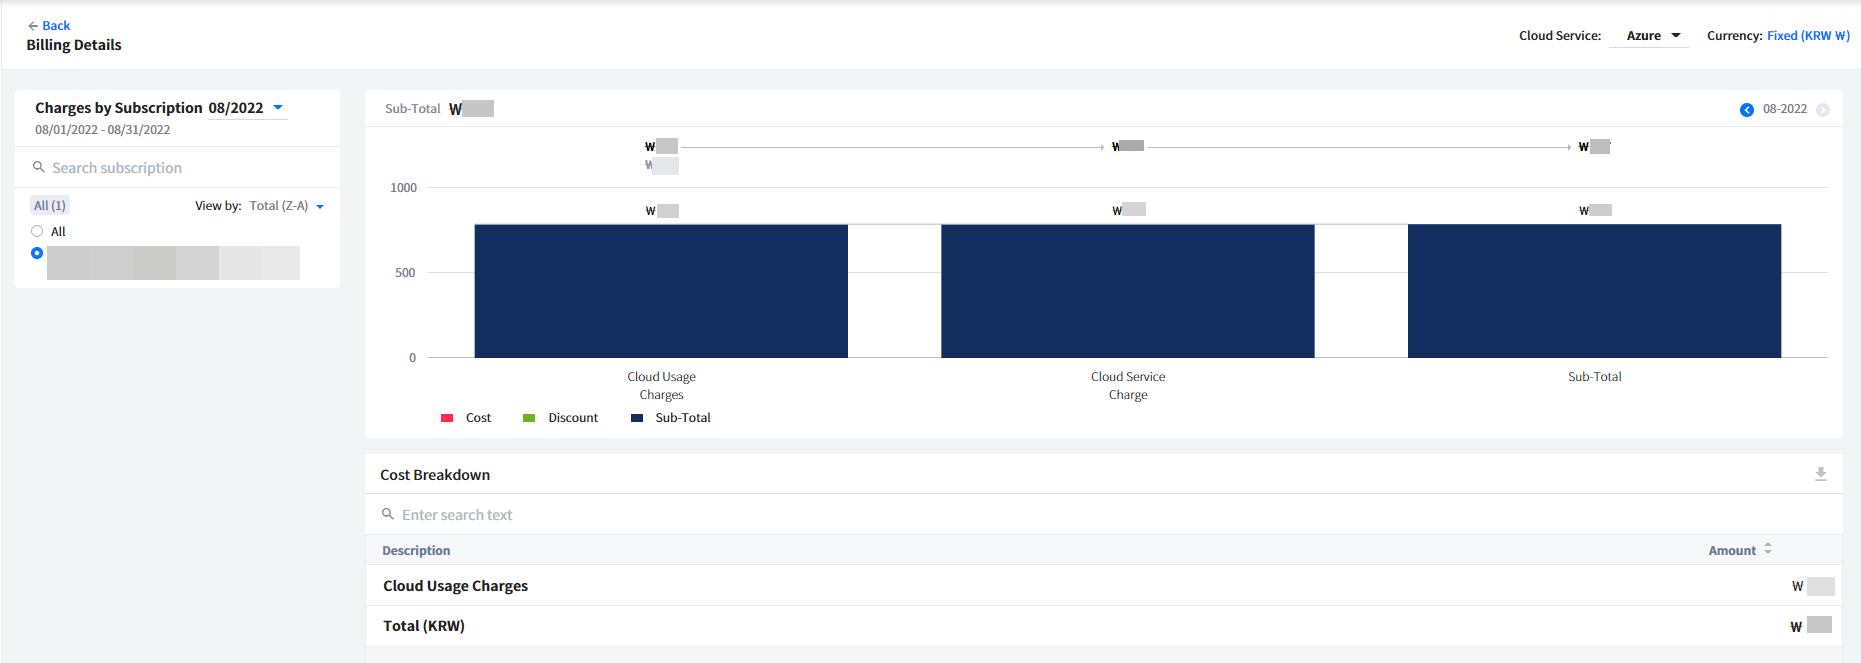
Detail Table - Azure
The Detail Table contains Charges by Subscription, Cloud Invoice List, and Cloud Billing Details tabs.
Charges by Subscription
You can see cloud usage charges by subscription. Select a cloud subscription to go to the detail page to view its cost information.

Cloud Invoice List
By matching Billing IDs and Cloud Subscriptions, you can check billing dates and charges by billing ID or cloud subscription.

- Cloud Invoice List displays cloud service charges only, and you can find additional service fees in Charges by Subscription tab.
Cloud Billing Details
You can view usage and costs by subscription, invoice, or region.
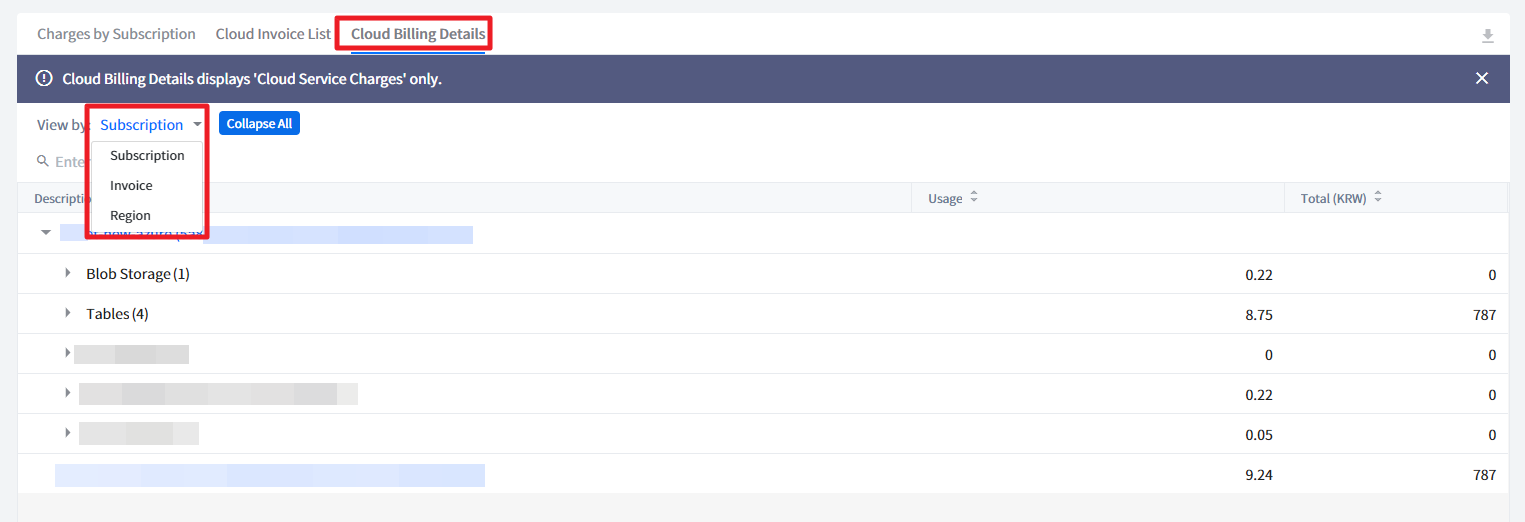
- Cloud Invoice List displays cloud service charges only, and you can find additional service fees in Charges by Subscription tab.
CDN 计量
可以查看Amazon CloudFront的费用、数据和请求次数等的概要信息。
概要信息将本月和上个月一起展示,以便于进行比较分析。
费用管理 > CDN 计量
Amazon CloudFront 概要
可以一目了然地查看费用, 数据传输, 请求等的信息,并与上个月的信息进行比较。
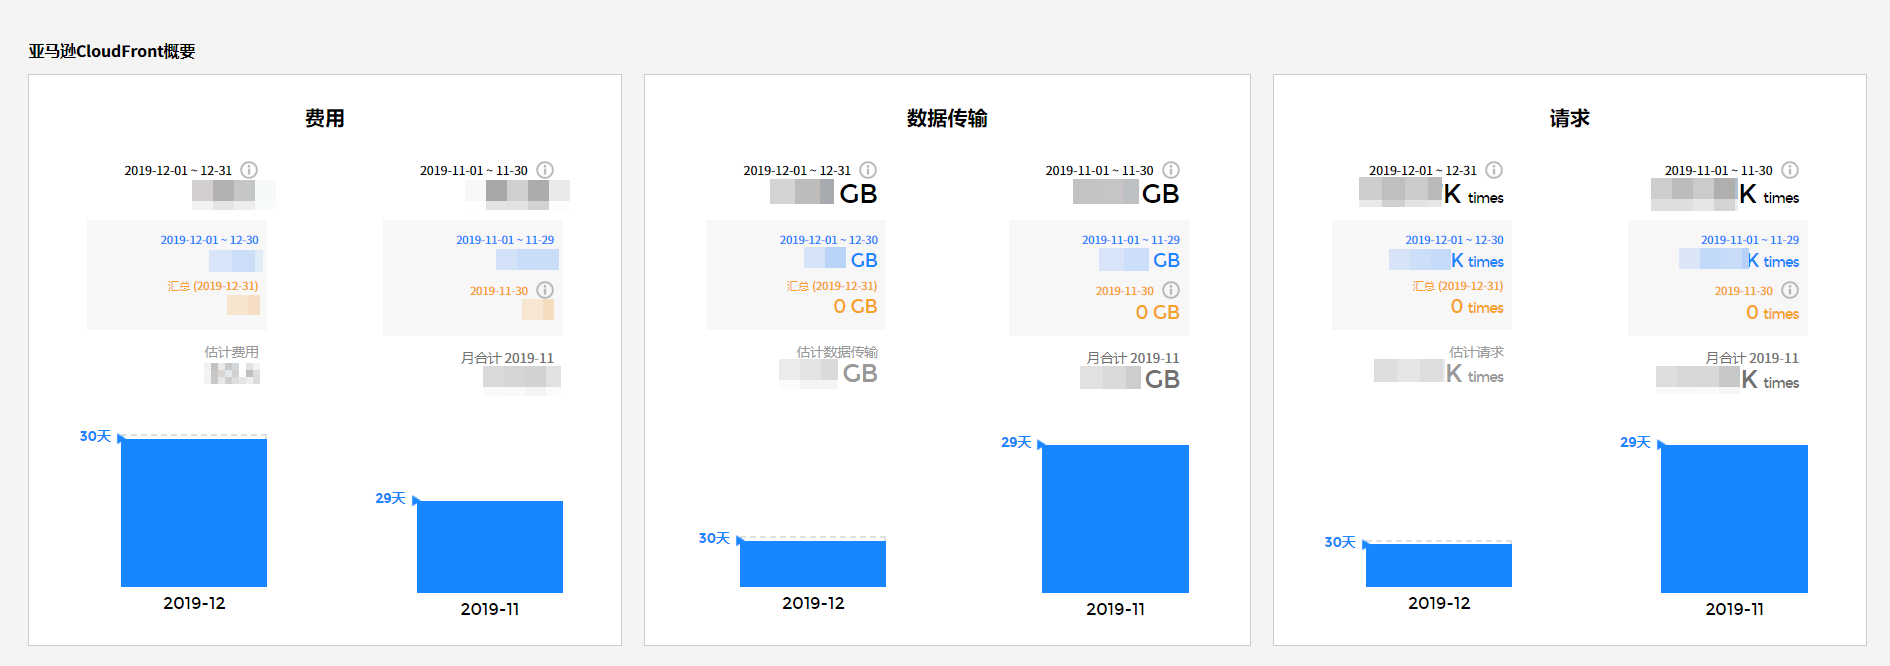
- 费用:费用按本月与上个月区分,显示汇总、月合计、估计费用。
- 汇总:是指当天产生但尚未汇总完成的费用。
- 汇总完成:是从本月1号到最终收集数据日的结算费用。
- 估计费用:分析使用模式以显示本月的估计费用。
- 数据传输:数据传输按本月与上个月区分,显示汇总、月合计、估计数据传输等。
- 汇总:是指当天产生但尚未汇总完成的数据传输。
- 汇总完成:是指从本月1号到最终收集数据日的数据传输量。
- 估计数据传输:分析使用模式以显示本月的数据传输。
- 请求:请求次数按本月与上个月区分,显示汇总、月合计、估计请求等。
- 汇总:显示当天产生但尚未汇总完成的请求次数。
- 汇总完成:是从本月1号到最终收集数据日的数据请求次数。
- 估计费用:分析使用模式以显示本月的估计请求次数。
- K: 1,000, M: 1,000,000, B: 1,000,000,000
Amazon CloudFront 使用情况
可以通过饼图和表查看每个账户、区域、网络分布(Web Distribution)的费用、数据传输和请求次数。
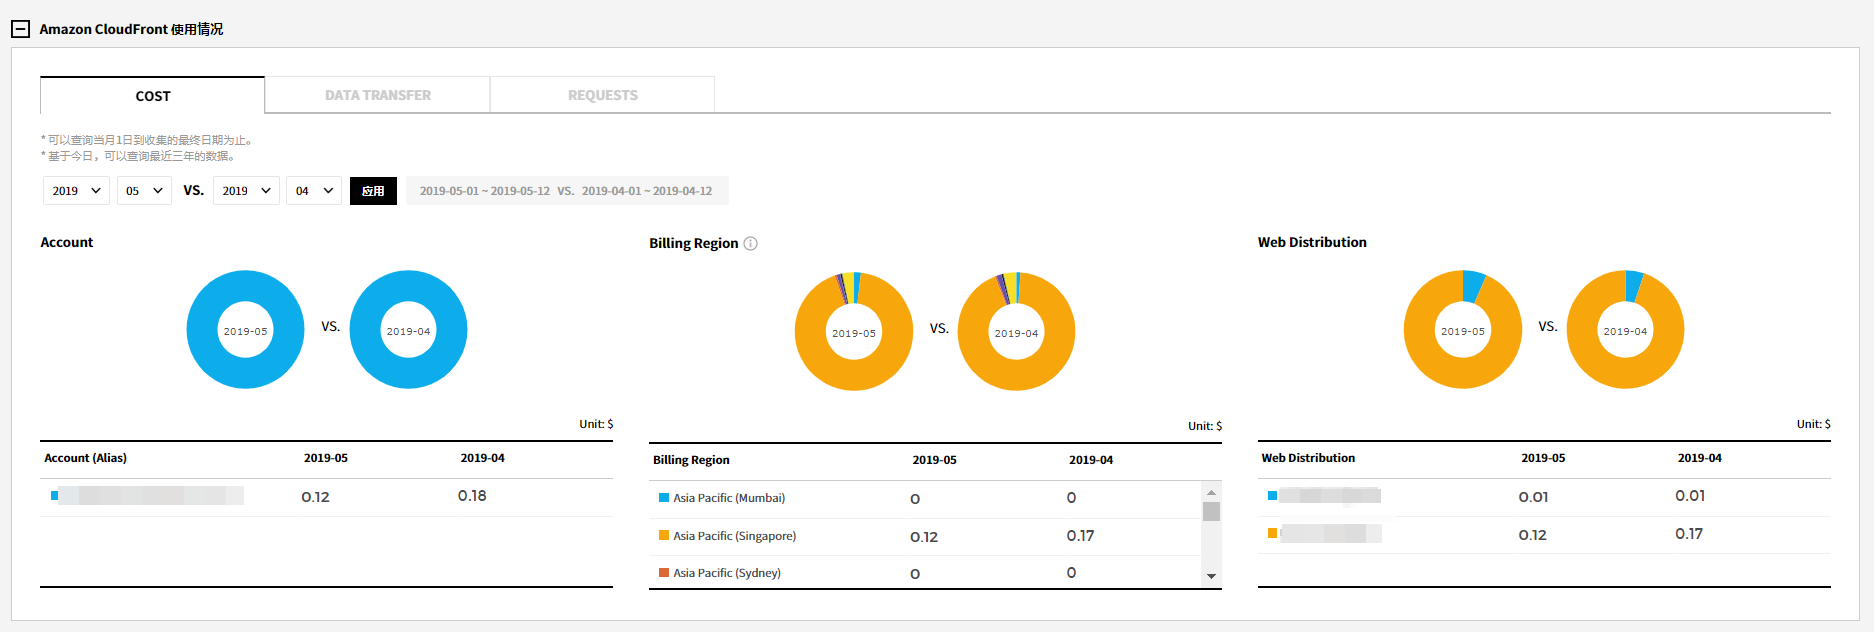
- 费用:可以按所选月份的账户、区域和网络分布比较费用。
- 数据传输:可以按所选月份的账户、区域和网络分布比较数据传输。
- 请求: 可以按所选月份的账户、区域和网络分布比较请求次数。
Amazon CloudFront 使用趋势
可以以天或小时为单位查看费用、数据传输、请求次数。
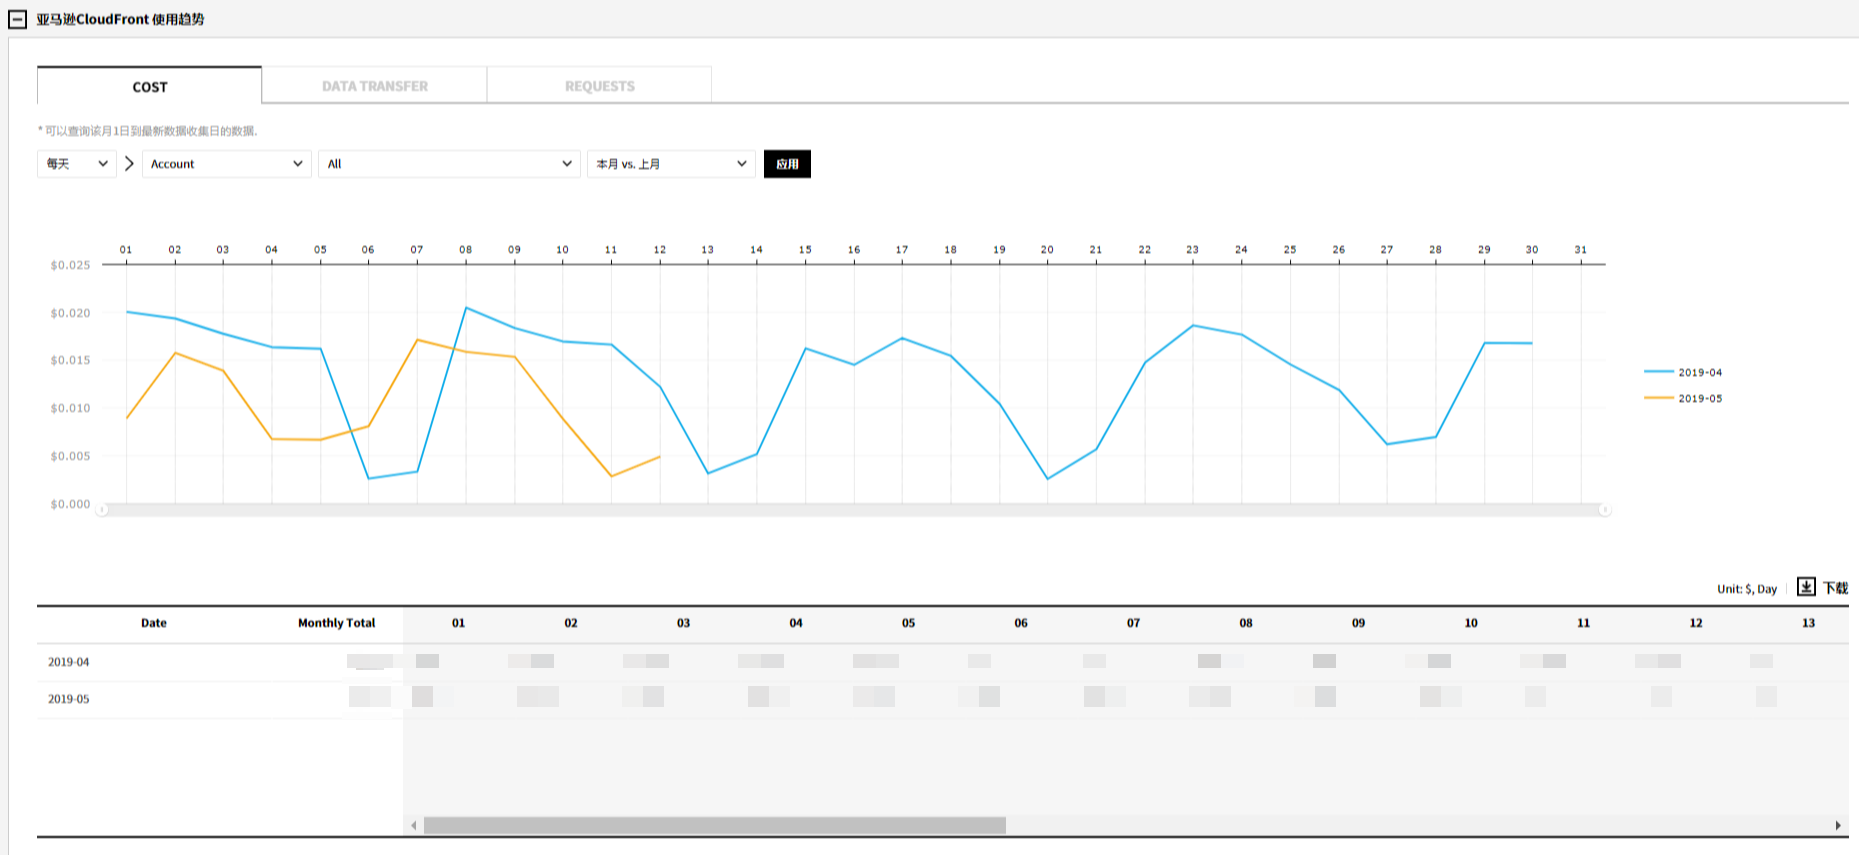
- Cost: 可以根据所选方式用图表查看费用的趋势。
-每天:可以以天为单位将费用信息分为本月和上个月进行查看。可以查看本月1号到最后一天的每日费用。
-每小时:可以查看从指定日期到最近8天的每小时费用信息。 - Data Transfer: 可以根据所选方式用图表查看数据传输的趋势。
-每天:可以以天为单位将数据传输分为本月和上个月进行查看。
-每小时:可以查看从指定日期到最近8天的每小时数据传输。 - Requests: 可以根据所选方式用图表查看请求次数的趋势。
-每天:可以以天为单位将请求次数分为本月和上个月进行查看。
-每小时:可以查看从指定日期到最近8天的每小时请求次数。 - 条件下拉列表:可以在以下条件查看图表上显示的信息,可以通过点击图表正上方的下拉菜单设置条件。
每天:账号, 区域, 网络分布, 时间间隔
每小时:账号, 区域, 网络分布, 选择日期
预算
按服务输入每月预算,用图形查看实际使用费用与预算。通过通知设置,设置的预算对比率或超出标准金额时可以通过短信或电子邮件收到通知。
费用管理 > 预算
预算概览
费用管理 > 预算 > 预算概览
每月预算与实际产生费用按总预算和云服务区分并用图表显示。
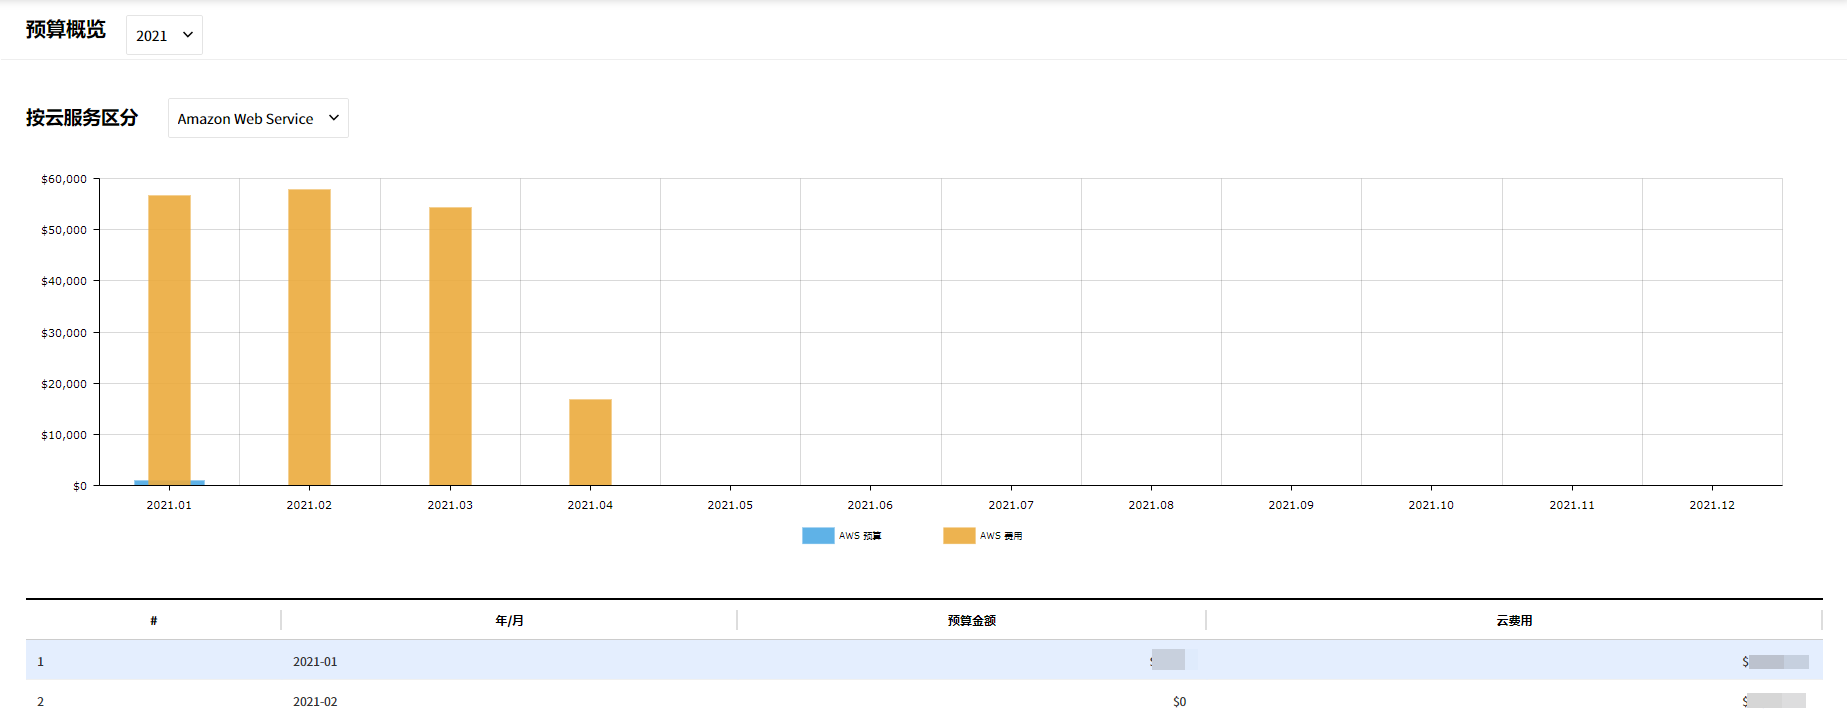
- 年份选择:可以查看在页面左上角的下拉菜单中所选年份的总预算和各云服务的费用。
- 按云服务区分:可以用图表比较每项服务的预算和实际费用
预算设置
费用管理 > 预算 > 预算设置
可以查看每月的预算,也可以按云厂商或总预算区分管理。
- 年份选择:可以选择设置预算的年份。支持未来三年的预算设置,可以输入每个年份的预算并保存。如果需要修改,可以选择年份并进行修改。
- 预算表:可以按云厂商输入每月预算。双击每个单元格将其更改为可以输入的状态,可以在此处输入预算。输入预算后,可以通过点击表格右上角的【保存】按钮来保存更改。
预算告警
费用管理 > 预算 > 预算告警
与预算相关的告警可以按照用户条件进行设置。
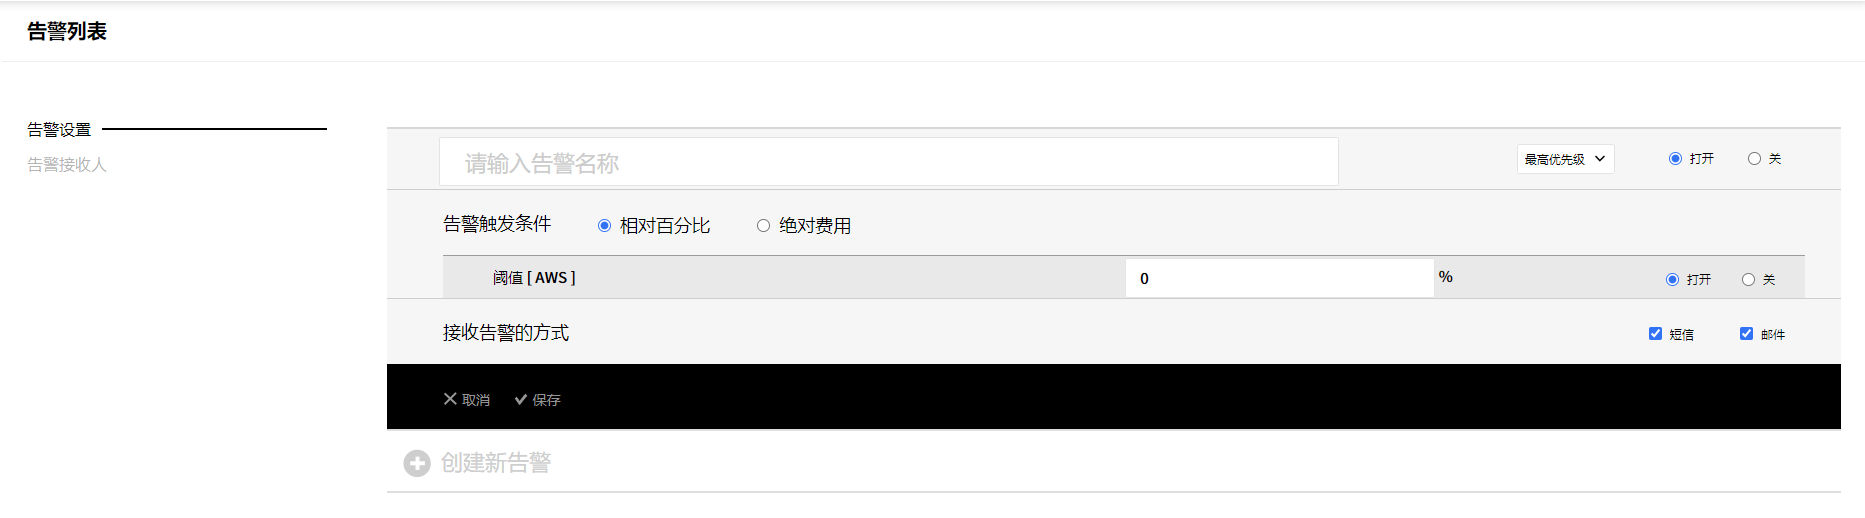
- 创建新告警:点击相应按钮输入新告警的信息。
- 告警名称:在文本字段中输入要新建的告警名称。
- 警告:是否接收告警可以设置为开/关,可以接收到告警级别分类为注意或警告的告警。
- 接收告警的方式:可以通过短信或电子邮件接收告警。
- 【删除】按钮:将鼠标悬停在告警名称上时,名称左侧将显示删除按钮。点击按钮删除设置的告警。
- 【编辑】按钮:将鼠标悬停在告警名称上时,名称右侧将显示编辑按钮。点击按钮编辑设置的告警。
预算告警接收人
费用管理 > 预算 > 预算告警接收人
可以设置接收告警的接收人。
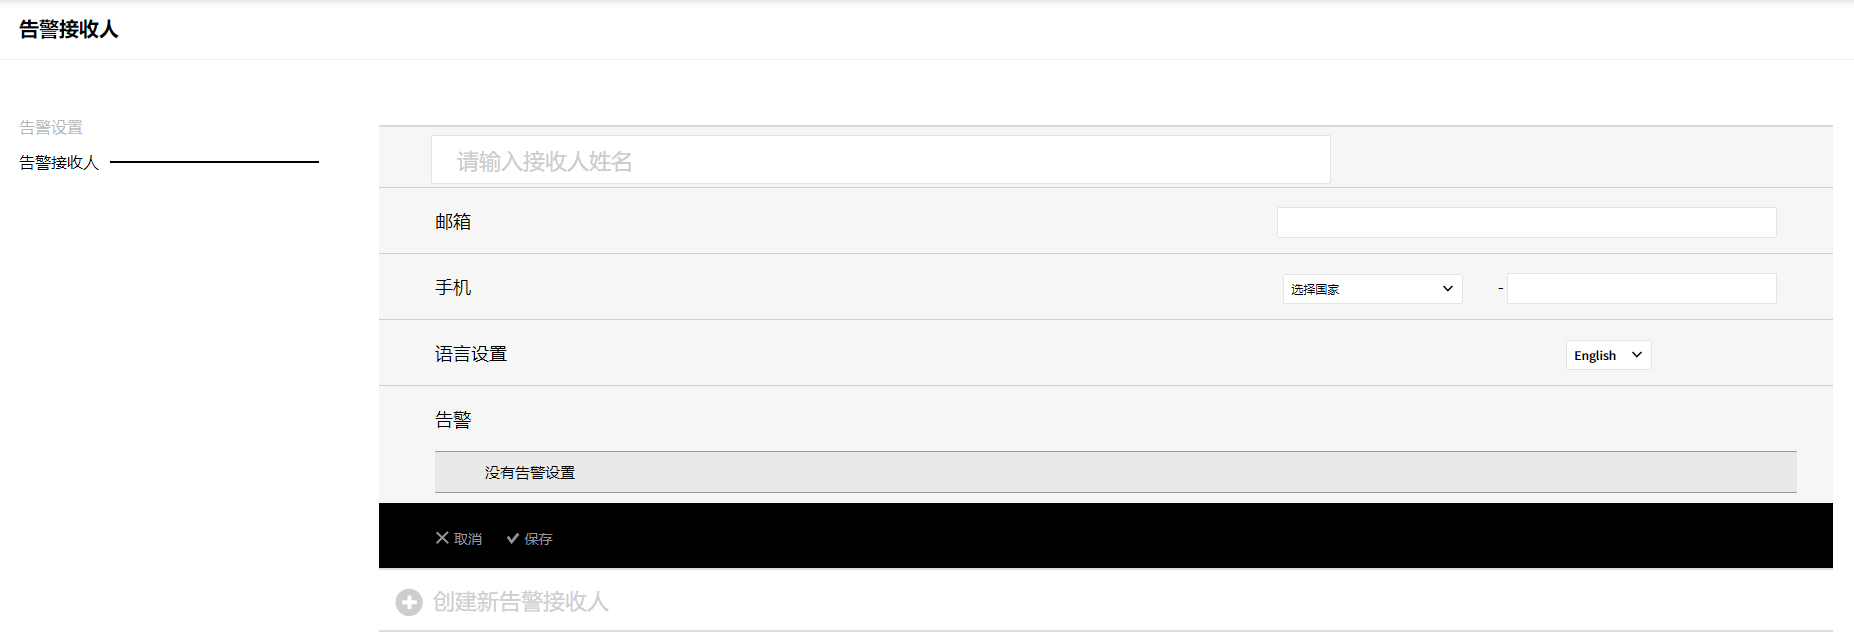
- 【创建新告警接收人】按钮:点击按钮以输入新的收件人信息。
- 接收人姓名:在文本字段中输入告警接收人的姓名。
- 电子邮箱:显示告警收件人的电子邮箱。
- 手机:显示告警收件人的手机号码。
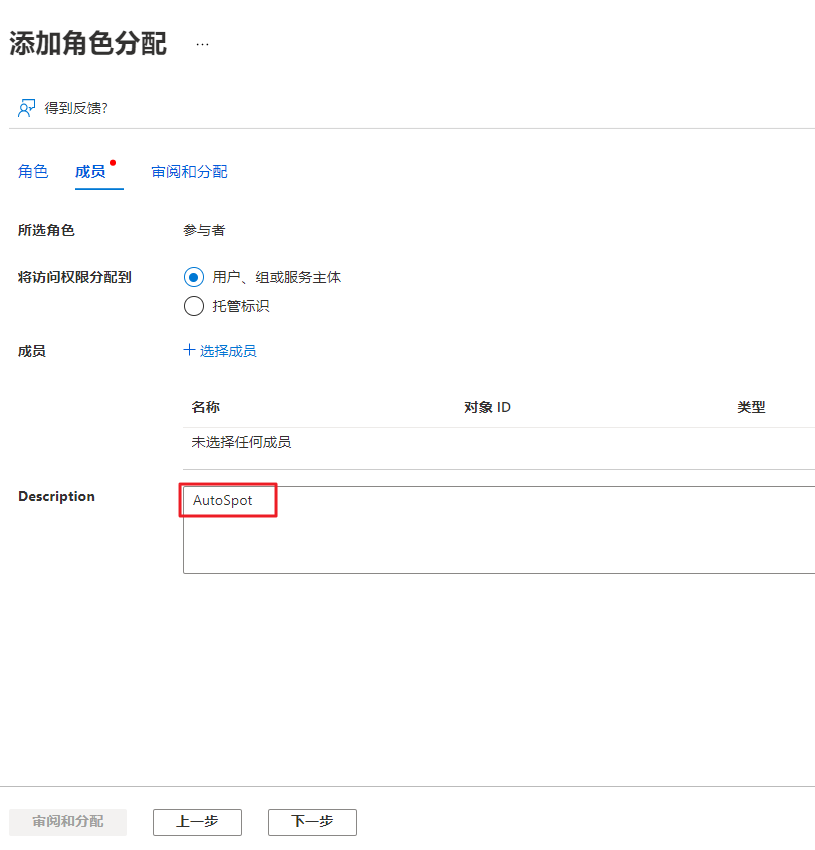
AutoSpot
根据国家或地区,该功能可能无法使用。
开始AutoSpot
AutoSpot与RI推荐功能类似,是帮助优化云资源费用的服务。安全使用云服务供应商剩余云资源(AWS Spot Instances, Azure Spot VMs, GCP Spot VMs),与按需实例费用相比最多可节省80%的费用。使用AutoSpot可以提前15分钟预测资源回收,然后自动转移到其它竞价实例、RI和按需实例上,确保高可用性和不间断的服务。AutoSpot依据服务等级协议(SLA)确保99.99%的可用性。
费用管理 > AutoSpot
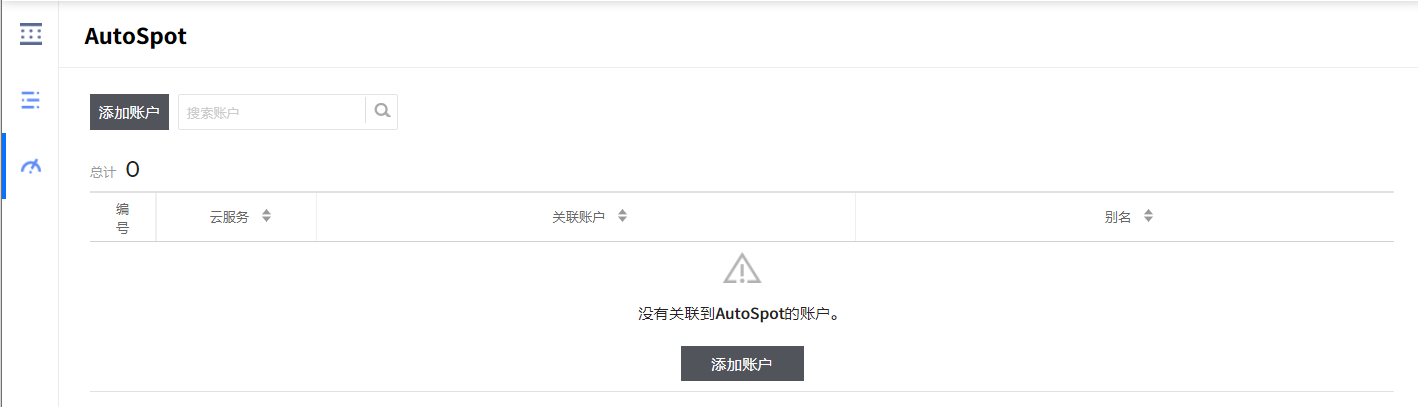
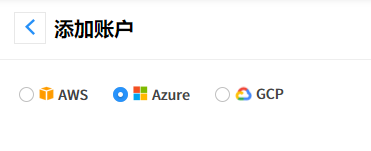
添加AWS云账户
在AutoSpot中添加AWS账户之前,请先确认要添加的AWS账户是否已在服务门户 > 云账户菜单中登录。
如果已经在服务门户中添加了AWS账户,那么就可以在AutoSpot 菜单中添加账户了。
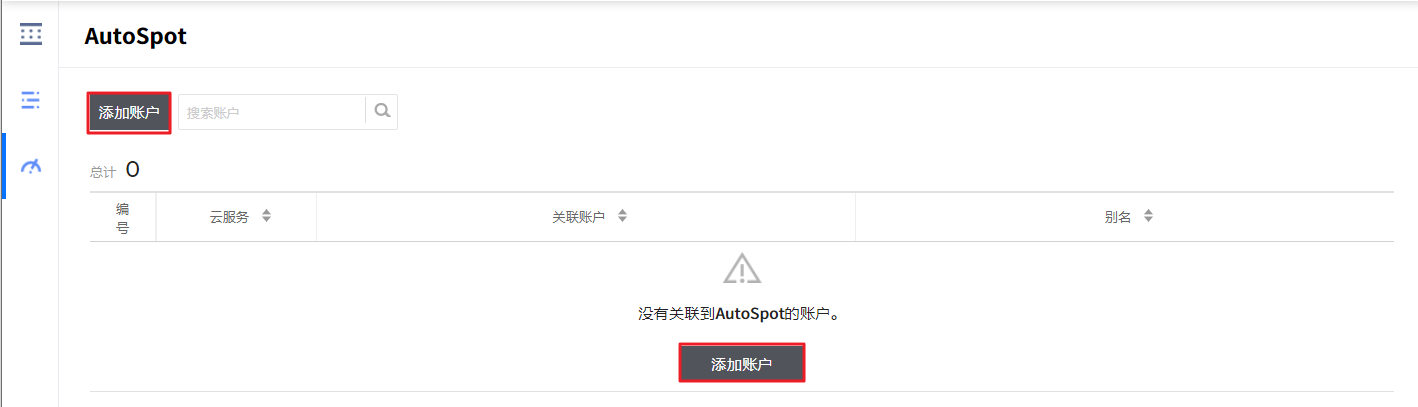
- 点击AutoSpot页面中间或页面左上方的添加账户按钮。
- 选择AWS。
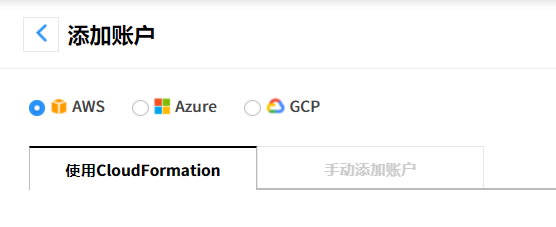
- 根据以下指南自动添加或手动添加AWS账户。
使用CloudFormation自动添加账户
- 可以使用CloudFormation自动添加AWS账户。
点击打开模板按钮会跳转到AWS控制台页面。在AWS控制台中使用要添加的账户登录。
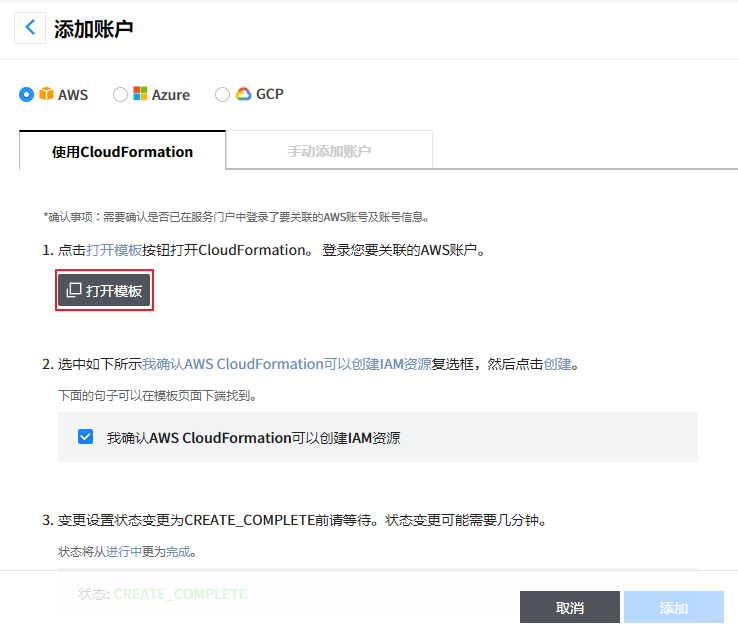
在AWS控制台页面中,如下图所示勾选我确认AWS CloudFormation可以创建IAM资源复选框后点击创建。
![]()
如果状态更改为
Create_Complete,请将AutoSpotRoleArn的值输入到下面的字段中。
![]()


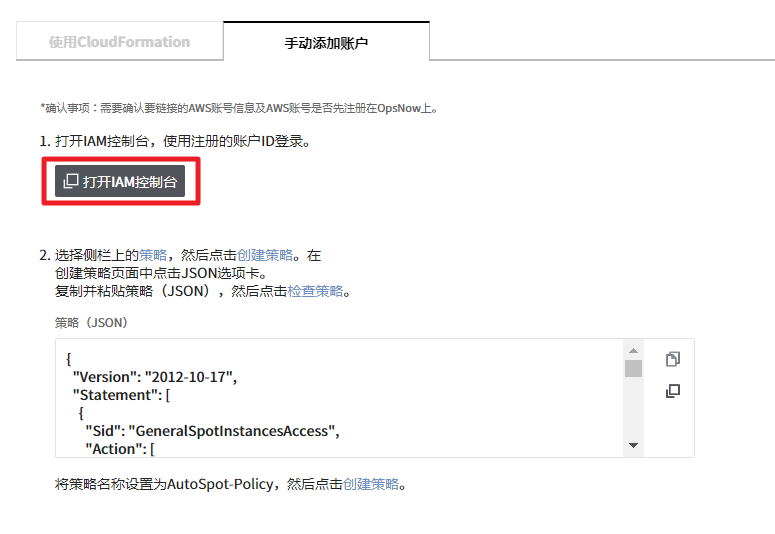
手动添加账户
- 添加用户所需的配置时,可以通过点击手动添加账户直接添加。
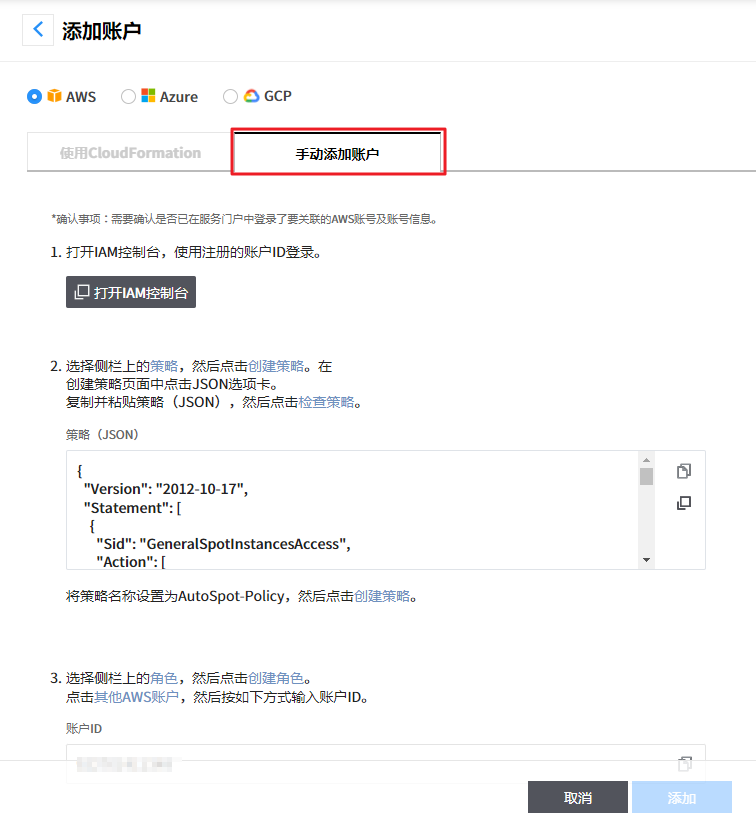
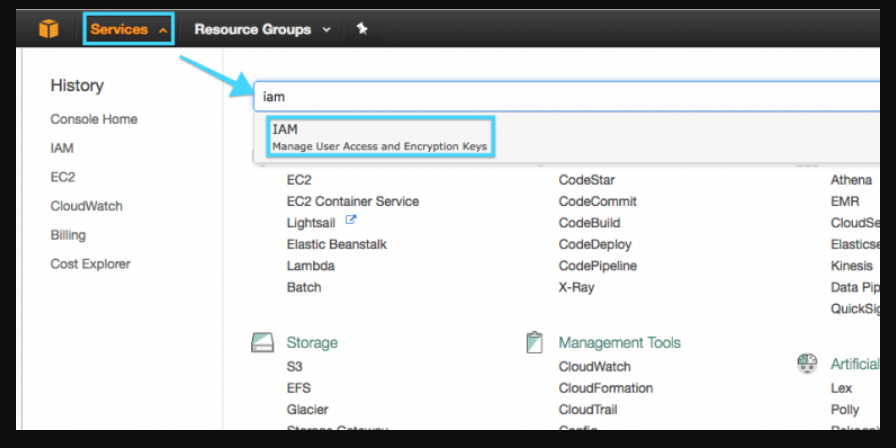
点击打开IAM控制台按钮跳转到AWS控制台页面。
![]()
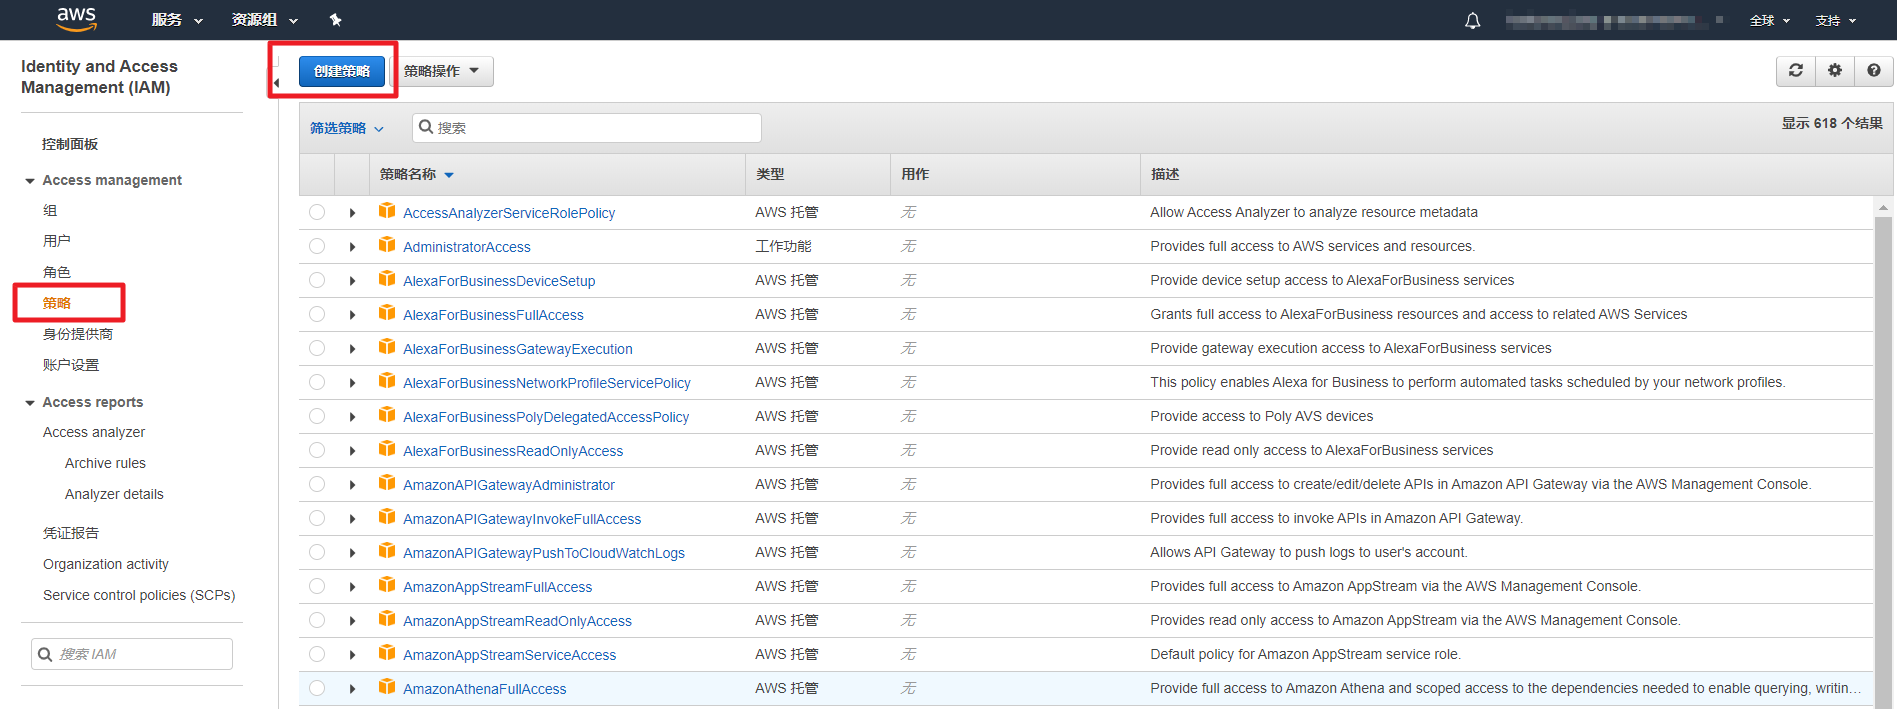
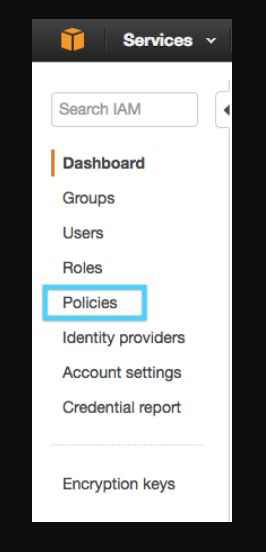
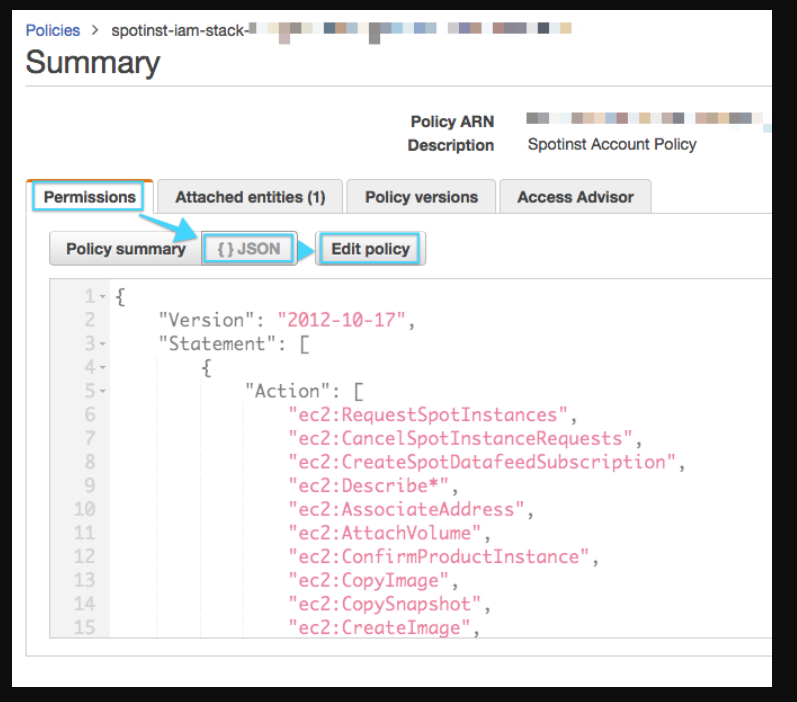
在AWS控制台页面中选择左侧的策略后点击创建策略。
![]()
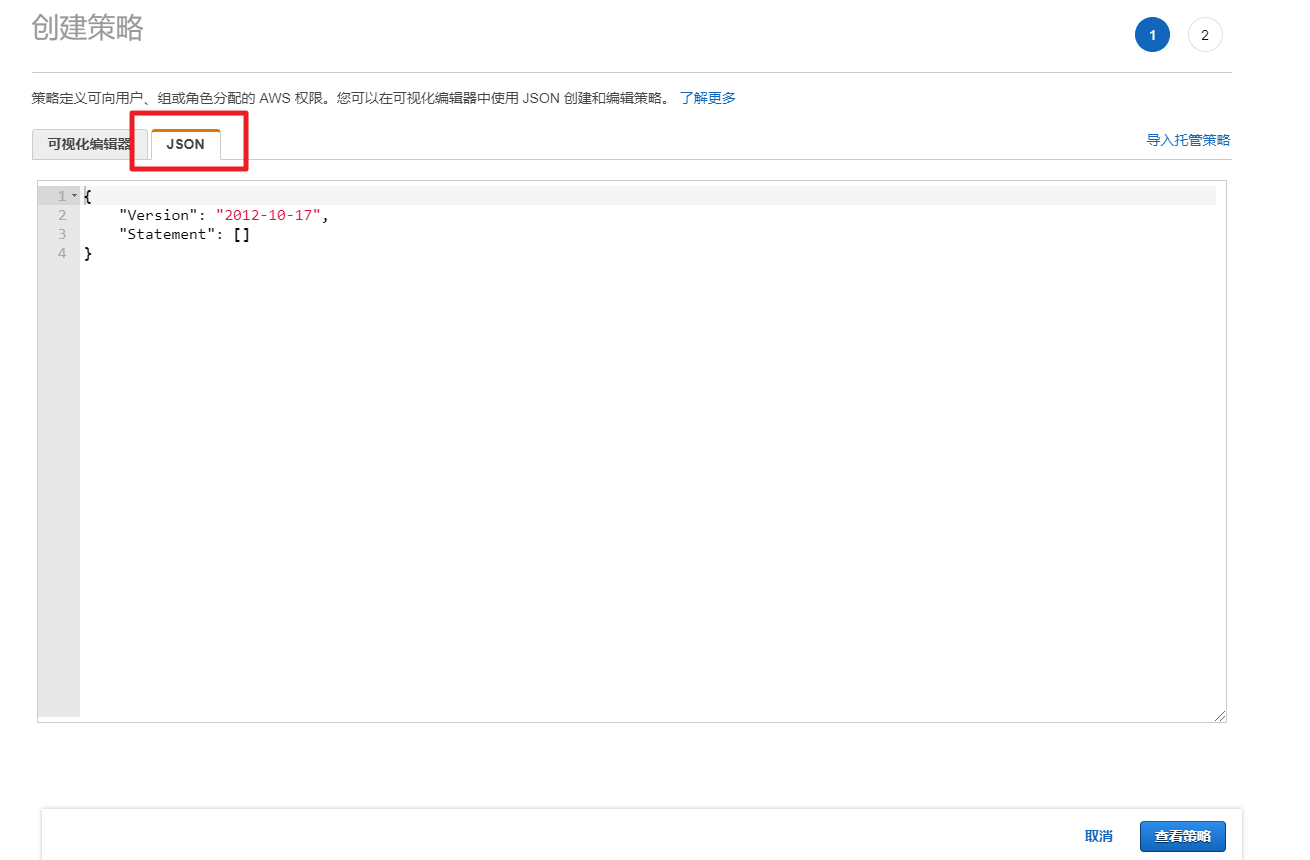
在创建策略页面中点击JSON选项卡,粘贴策略后点击右下方的查看策略。
![]()
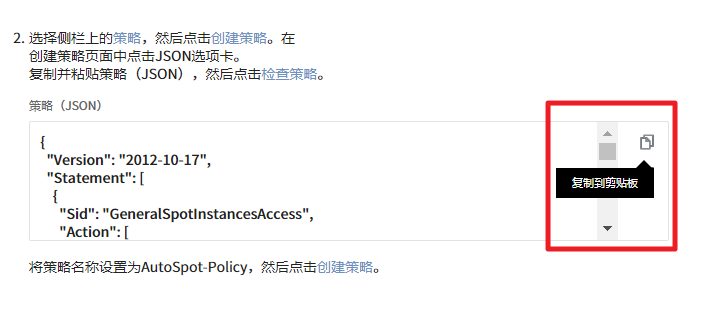
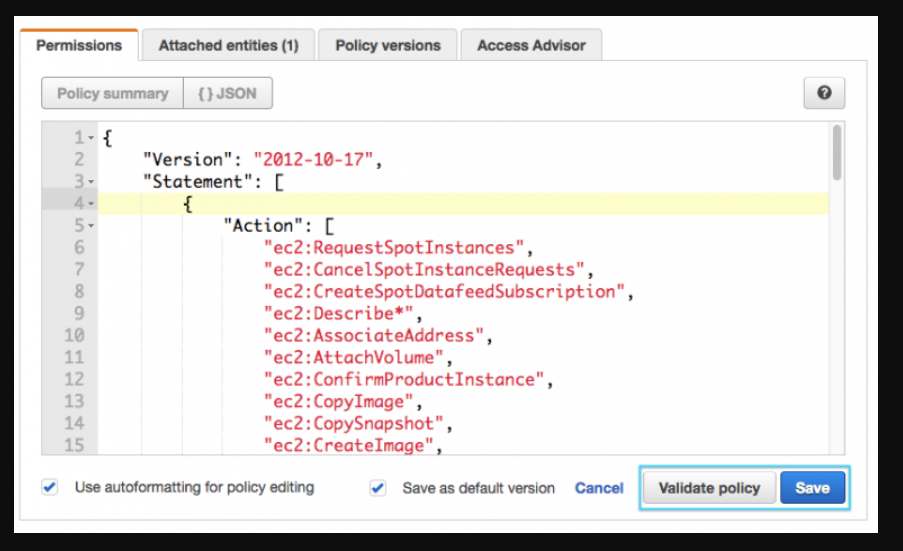
在下图所示的AutoSpot页面中点击右侧的按钮,可以将策略复制到剪贴板或在弹窗中查看。 点击该按钮复制策略后粘贴到AWS控制台的JSON选项卡中。
![]()
接下来,选择侧栏中的角色后点击创建角色按钮。
![]()
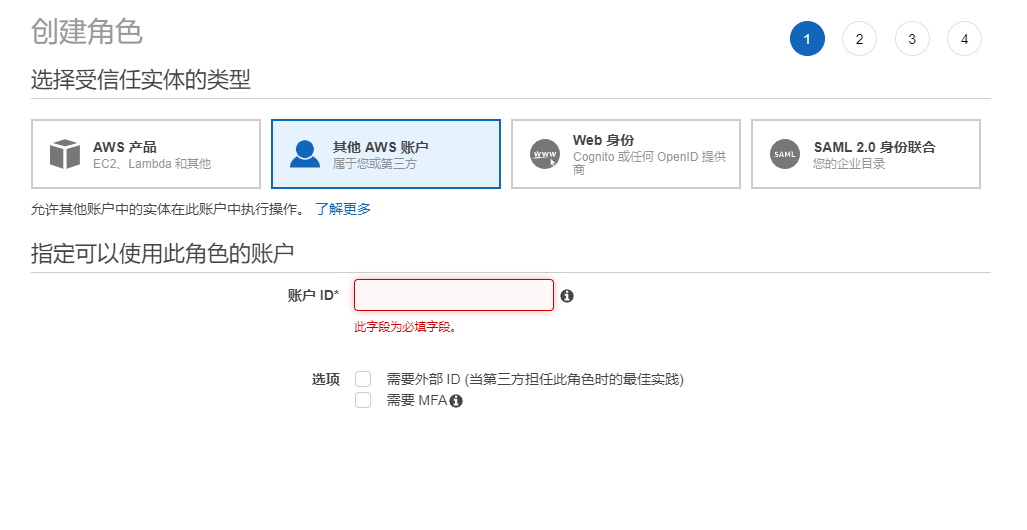
点击其他AWS账户后输入账户ID。请输入有效的账户ID。
![]()
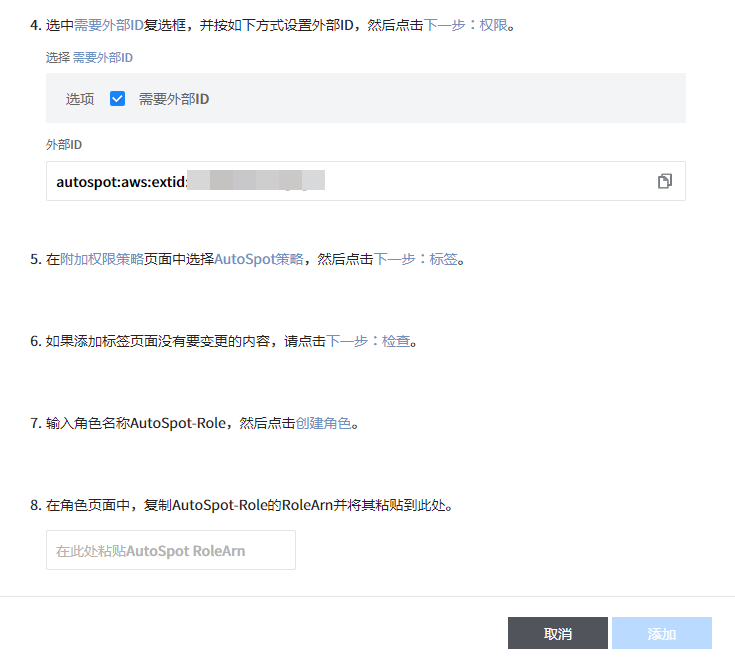
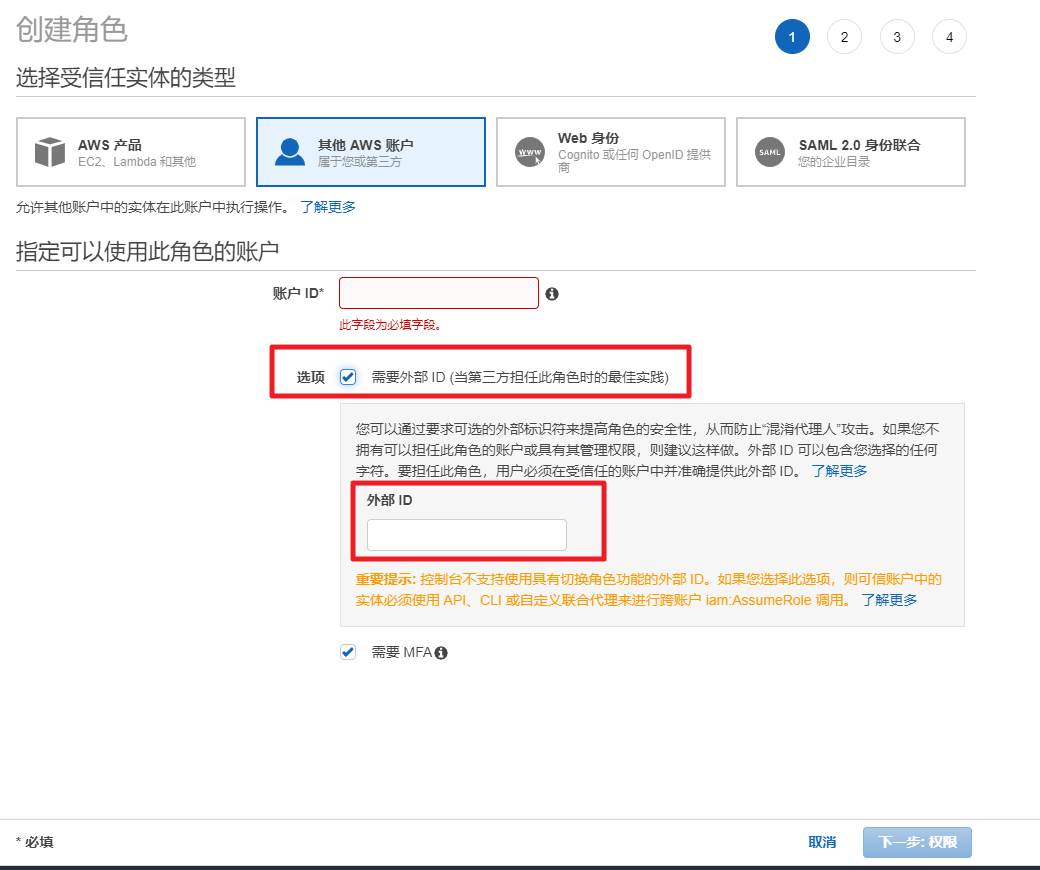
在选项中勾选需要外部ID复选框,输入外部ID后点击下一步:权限按钮。
![]()
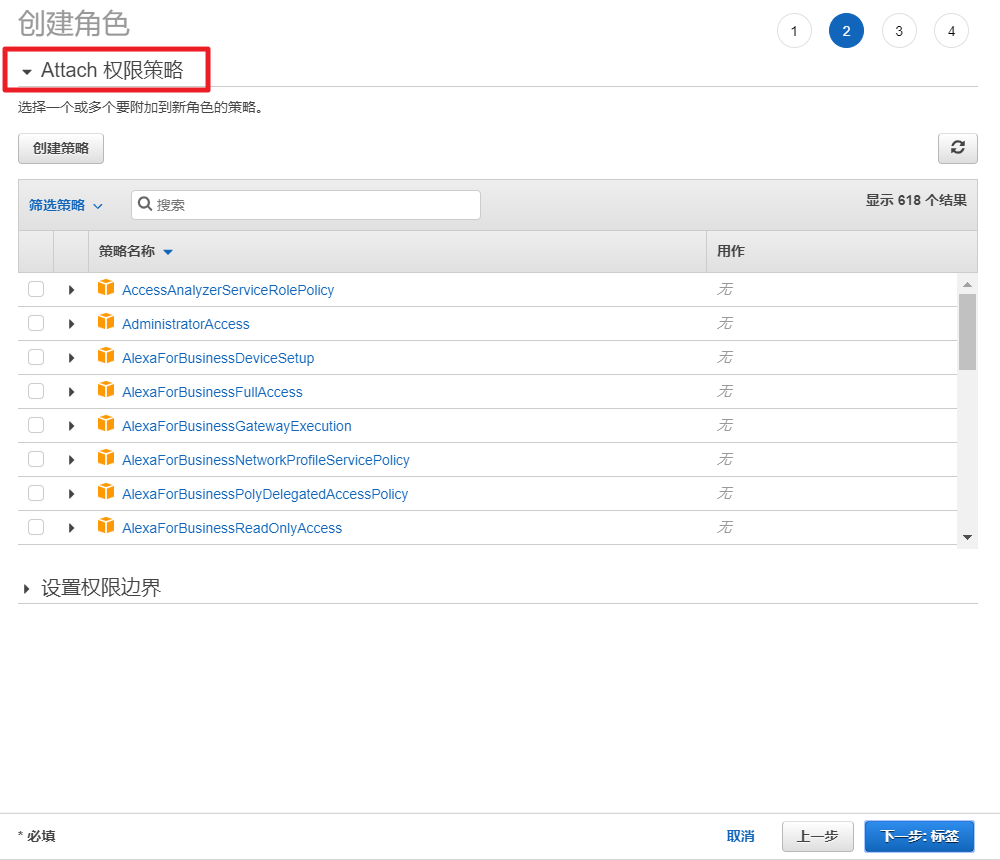
在Attach权限策略页面中选择AutoSpot策略后点击下一步:标签按钮。
![]()
在角色名称中输入AutoSpot-Role后点击创建角色按钮。
![]()
将AutoSpot-Role的RoleArn粘贴到输入字段中。
在关联账户列表中会显示已创建的账户。点击各个账户,如下可以使用AutoSpot的Spot Analyzer、Elastigroup、Ocean。
![]()
AWS用Elastigroup教程
创建Stateful Elastigroup
介绍
本教程介绍如何使用Stateful Creation Wizard创建Stateful Elastigroup,并介绍竞价实例中断时维持Volumes、Elastic Ips、Private Ips等的方法。Stateful Elastigroup通过使用托管竞价实例和SLA竞价实例,可以运行多种Stateful工作负载。首先,让我们在Use Cases中选择’Stateful Cluster’,然后创建新的Elastigroup。
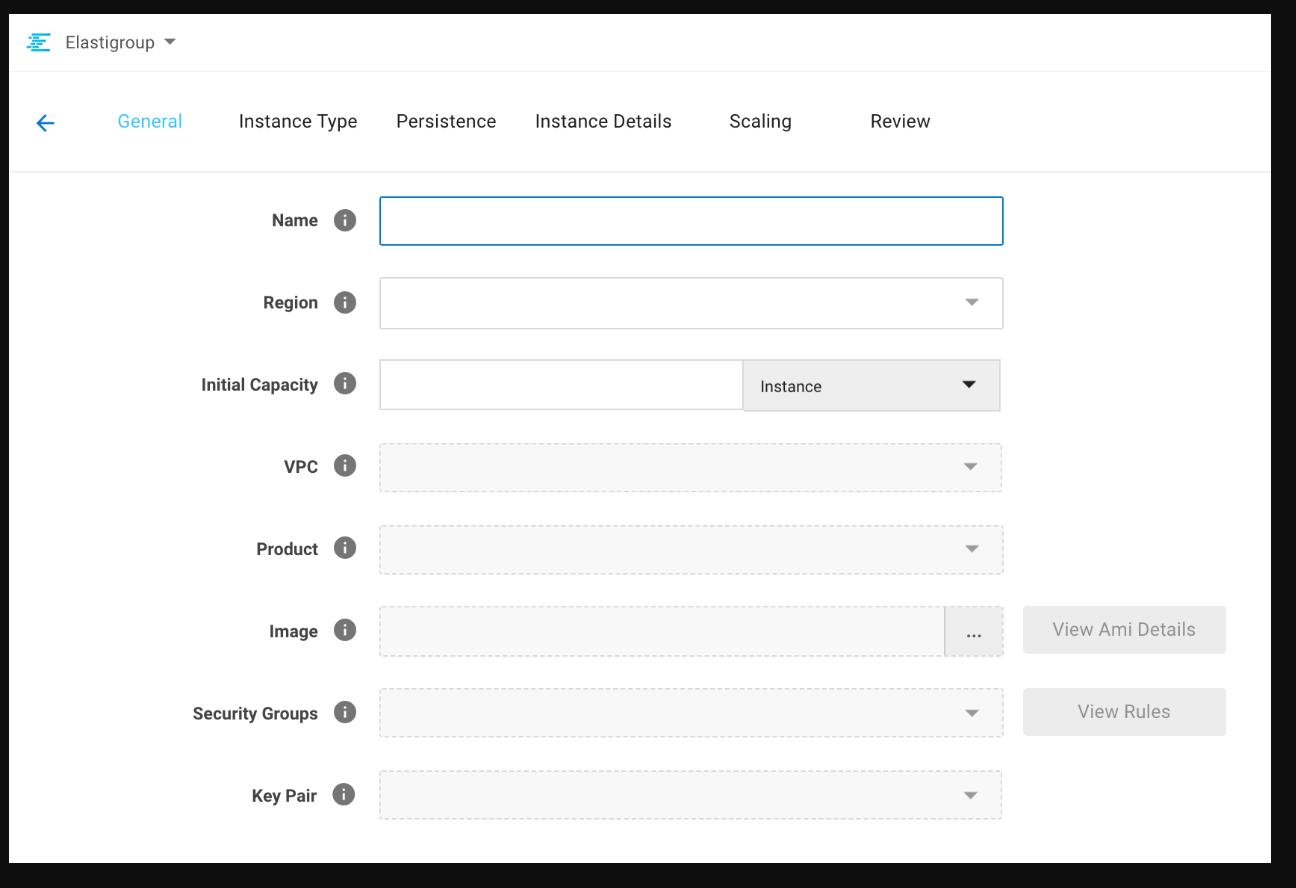
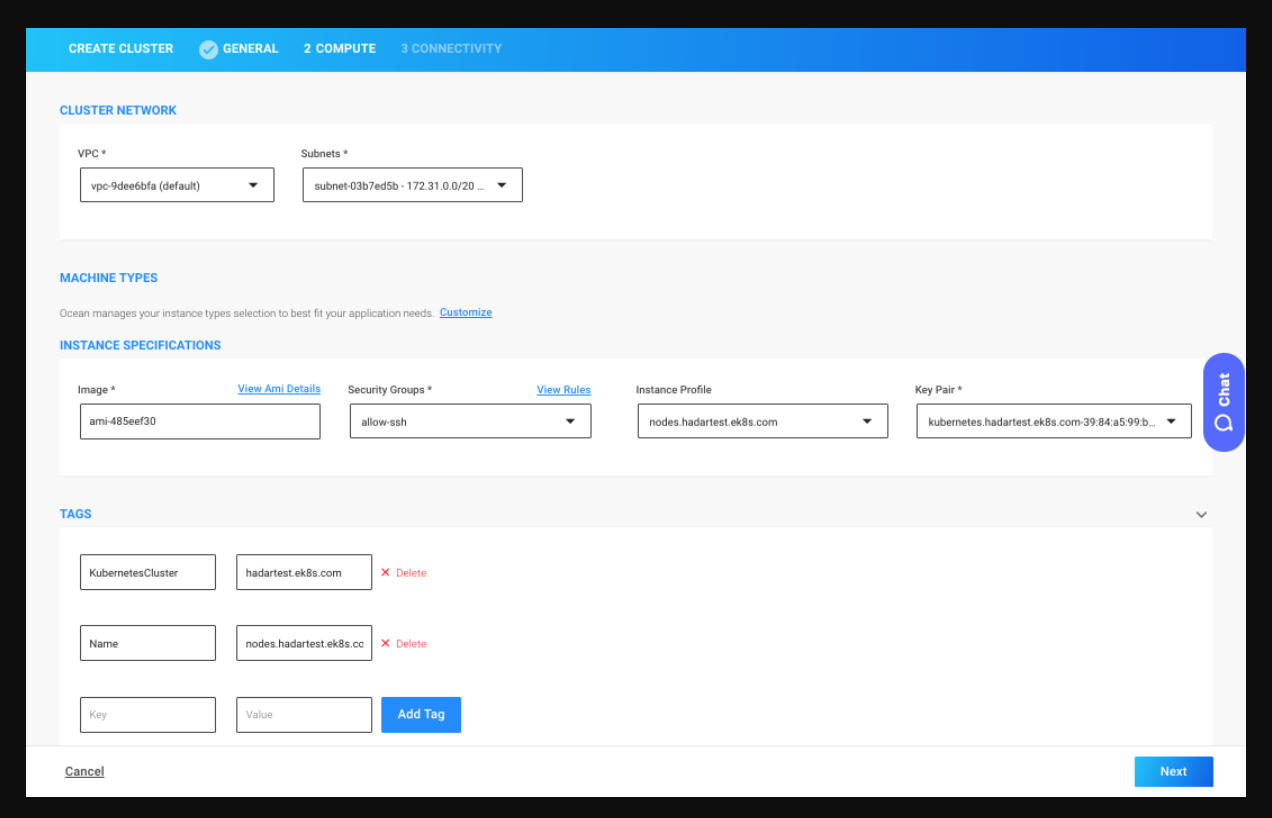
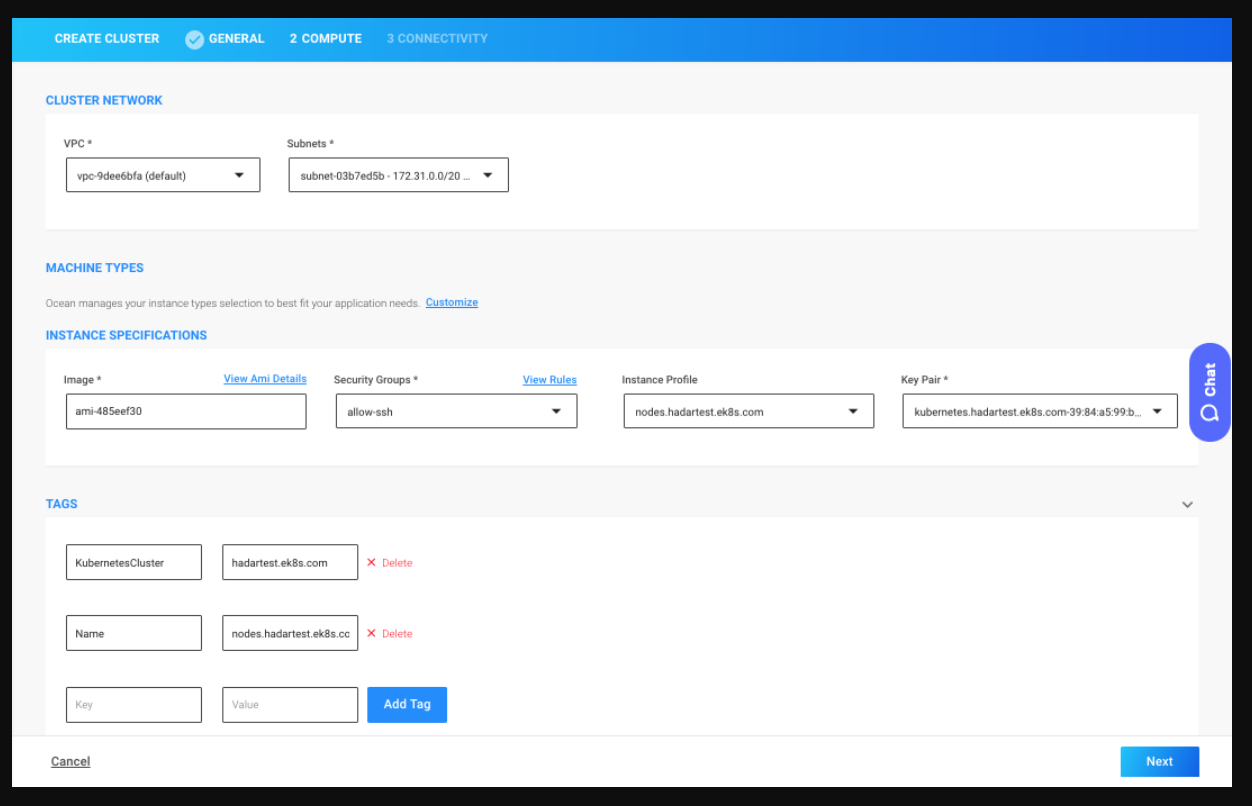
步骤1:基础设置(General)
- 输入Elastigroup的名称并设置区域。
- 设置Elastigroup组的初始容量。
可以选择通过实例数量或vCPU总数来测量容量。 - 选择要运行Elastigroup的VPC和要实例化的所有实例的产品类型和镜像。
- 选择要附加到实例的安全组和与此安全组关联的密钥对(Key-Pair)。
- 最后,可以选择在Stateful组的实例上添加标签。
步骤2:实例类型(Instance Type)
- 若没有符合实例类型的竞价实例,则选择要使用的按需实例类型。
- 选择启动实例时Elastigroup要覆盖的可用区。为了最大限度地节省成本,Elastigroup会计算在所选可用区中启动竞价实例的费用。为增加Elastigroup可覆盖的竞价实例市场数量,建议选择多个可用区。
- 启动竞价实例时,选择 Elastigroup要覆盖的实例类型。为了在竞价实例市场中给Elastigroup提供尽可能多的选项,建议选择多种实例类型。
📜 提示: 为了给Elastigroup提供更多的竞价市场,同时降低价格提升可用性,建议选择多个可用区和多种实例类型。
步骤3:持久性(Persistence)
- 在此步骤中选择Elastigroup需要维护的持久性类型。
存储持久性
- 当实例中断时,选择是否希望Elastigroup保持实例根卷或数据卷不变。还可以选择保持、连接和备份数据卷的方式。
网络持久性
- 选择是否要将网络设置保持为Instance private IP等。
![]()
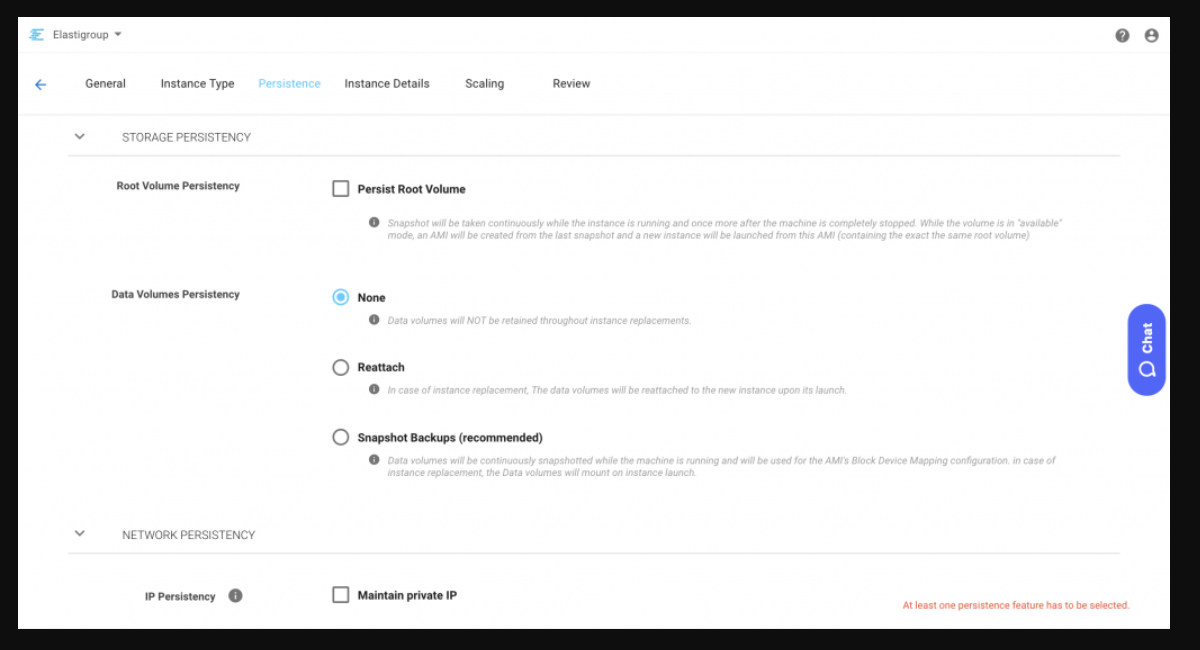
📜 提示: 在此步骤中必须选择一个以上的持久性功能。
步骤4: 实例详情(Instance Details)
- 选择已启动实例的IAM角色、租户等详细信息后,选择是否要应用EBS优化监控或EC2自动恢复功能。
- 填写启动或终止实例时要执行的userdata or shutdown scripts。
步骤5: Scaling策略(选填)
- 选择创建Target Scaling Policy或Simple Scaling Policy。请参阅此处的说明文档了解更多使用Elastigroup Scaling的内容。
步骤6:Review(选填)
- 在此步骤中检查Elastigroup配置,然后完成创建流程。
Elastigroup Actions菜单
1. Elastigroup部署及滚动
1.1 Elastigroup部署及滚动
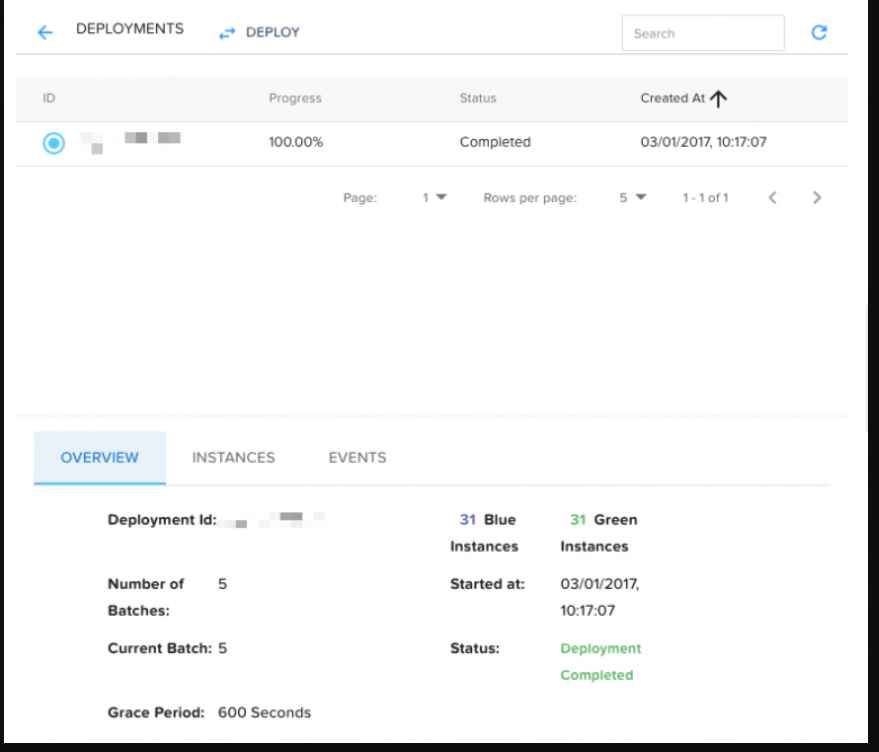
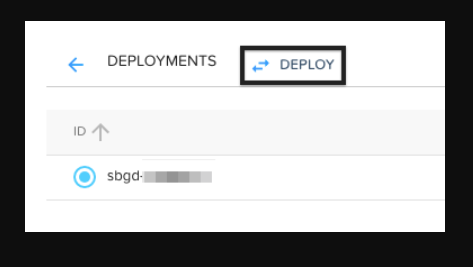
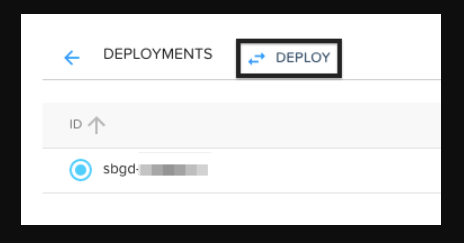
本教程介绍如何用蓝/绿部署方式运行Elastigroup。在Elastigroup管理页面中,选择右上方Actions菜单下的Deploy,即可在AutoSpot Console中进行部署。
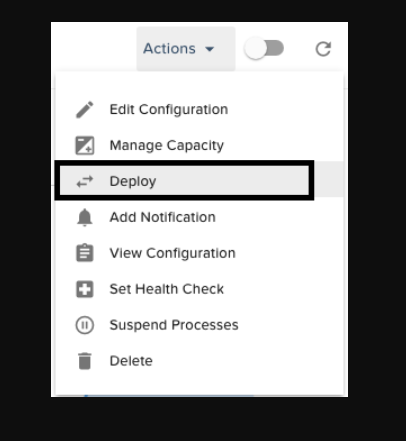
可以使用Deploy选项检查之前的部署或开始部署。
若想开始新的部署,请点击Deploy按钮。
当进行批量流程时,不会在组中应用容量更新等更新。
接下来设置部署参数。
批处理规模: 部署的每个批处理规模会以占组内实例总数的百分比显示。也就是说,百分比是20%的组拥有5个单独的批处理。
宽限期: 指在部署开始下一批处理之前,根据状态检查设置确认实例为正常时所等待的时间。
📜 提示: 如果Elastigroup中没有“状态检查”设置,那么各批处理需要等待全部宽限期结束。
现在开始蓝/绿部署。Elastigroup将新的实例(绿色)添加到集群中,使用配置的“状态检查”(EC2, ELB, MLB等)监控状态。如果实例正常运行,旧的实例(蓝色)将会缩减。这个流程被分为代表各批处理的可配置的部分。
什么时候应该滚动组?
当更新有可能影响实例配置时,尤其是修改下列参数时需要滚动。
General Tab
Advanced:
- Cluster orientation
- Strategy (Spot Instances Percentage, OnDemandCount, utilizeReservedInstances)
Compute Tab:
Availability Zones
On-Demand Type
Spot Types
Launch Specification (Image, Security group, key pair, tags)
Additional Configurations:
- IAM role
- EbsOptimized
- Detailed monitoring
- Public IP
- Tenancy
- User Data
- Signal and Signal timeout
Stateful:
- Assign specific Private IPs only
⚠️ 注意事项
* 一个失败的批处理足以让部署失败。请务必利用充足的宽限期,以确保创建后实例可以维持正常的状态。
* 在失败的滚动未完全停止或解决之前Elastigroup不会执行新的滚动或任何缩减操作。
* Scaling的特点: 缩容策略将会暂停,直到部署完成。AutoSpot开发并应用了既可以根据需要扩容,又可以避免丢失服务器的机制。
1.2 滚动失败
导致滚动失败的原因有很多,其中最常见的问题如下:
1. 应用程序存在问题(新的AMI或代码库)
2. 滚动宽限期过短
3. 宽限期后,特定批处理的异常实例比例达到50%以上时,蓝/绿部署将失败。
如何解决滚动错误问题
即使部署失败,实例还会继续运行以解决问题。因此,Elastigroup可能会有一部分实例仍是旧的配置,而其余实例拥有新的配置。为修复失败的滚动,需要停止并分离新旧实例。更新 Elastigroup配置后,通过重新部署应用更新的配置。
📜 提示: 在失败的滚动未完全停止或解决之前 Elastigroup不会执行新的滚动或任何缩减操作。
2. 管理组容量
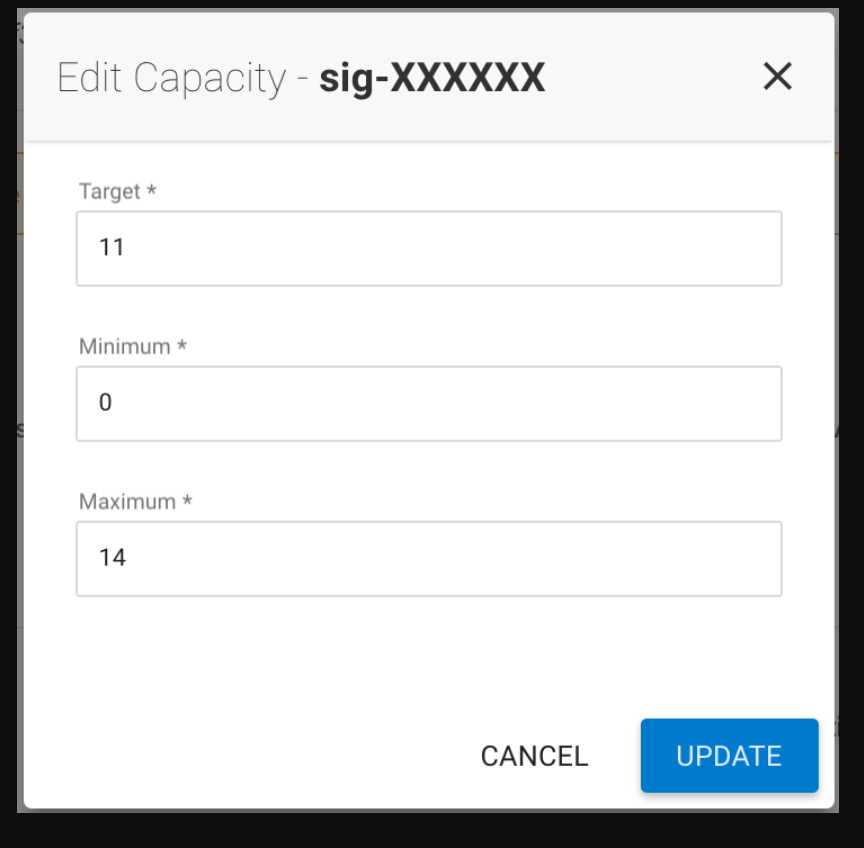
2.1 更新Elastigroup容量配置
Elastigroup的Actions菜单中的Manage Capacity选项简化了更新Elastigroup Target、Minimum、Maximum配置的流程。
更新Elastigroup容量前
* 如果组内有计划外的容量配置,请检查是否存在可触发容量更新的定时任务。
* 容量更新会影响Elastigroup可扩展的范围。
Elastigroup容量更新
若想更新Elastigroup容量,请在查看Elastigroups页面中选择需要的Elastigroup。在Actions菜单中选择Manage Capacity。
需要时,修改Target、Minimum、Maximum后点击UPDATE按钮。
⚠️ 警告: 容量更新会立即被应用。开始更新后Elastigroup会根据需要进行扩/缩容。
3. 状态检查设置
3.1. 配置Elastigroup的用户自定义状态检查
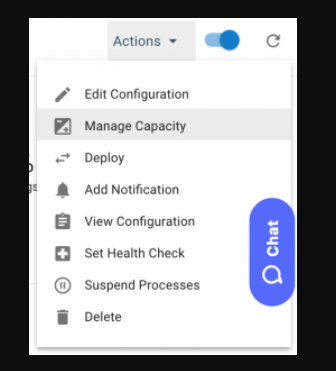
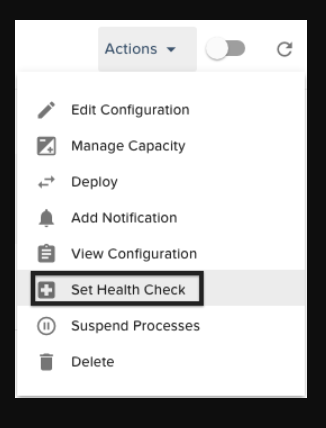
AutoSpot在Elastigroup提供自定义“状态检查服务(HCS)”选项。请点击此处查看更多关于状态检查服务的内容。在VPC中设置了“状态检查服务”后,可在所需的Elastigroup中引用。若想运行,请在所需的Elastigroup管理页面中选择Actions菜单下的Set Health Check项。
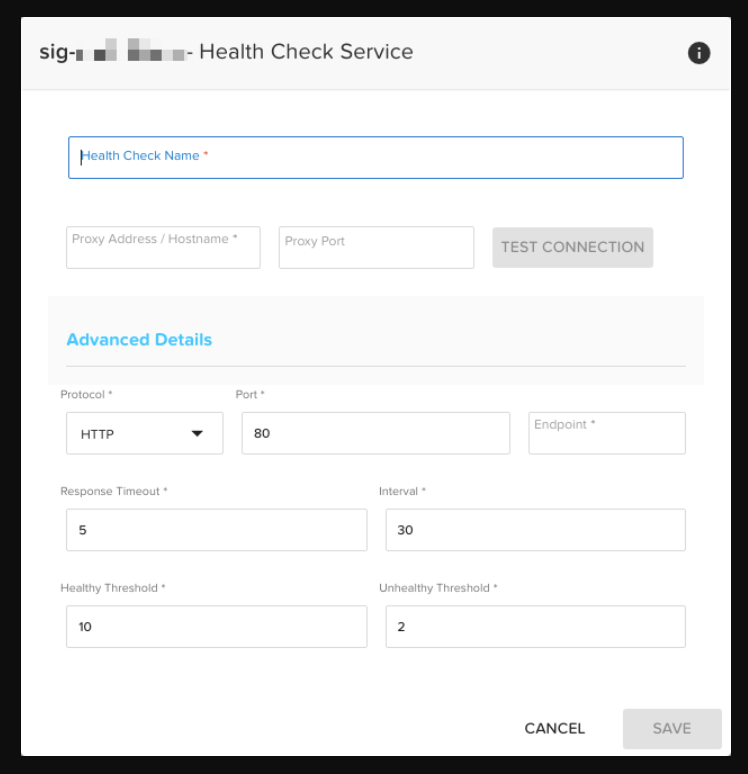
选择后会弹出“状态检查服务”弹窗,在弹窗中设置如下参数:
- Name:为更加方便,设置“状态检查服务”的名称。
- ProxyAddress:已选安装服务的实例的公共主机/IP将设置成http://publicip的形式。
- Protocol:AutoSpot用来检查实例状态的协议。目前支持http和https。
- Endpoint:各实例的“状态检查”路径。
- Interval:检查状态的时间间隔,最小间隔为10秒。
- Timeout:到各实例响应状态检查所等待的时间。未响应时, AutoSpot显示为异常状态(
unhealthy)。 - UnhealthyThreshold:声明实例为异常状态(
unhealthy)之前,设置的连续未响应状态检查的次数。 - HealthyThreshold:声明实例为正常状态(
healthy)之前,设置的须连续响应的状态检查次数
![]()
保存设置后,确认是否也在组的Auto-Healing设置中使用。
4. 暂停流程
暂停流程提供可以简单暂停伸缩 (Scaling)或自动修复(Auto-Healing)操作的选项。选择Actions的 Suspend Processes项可执行此功能。
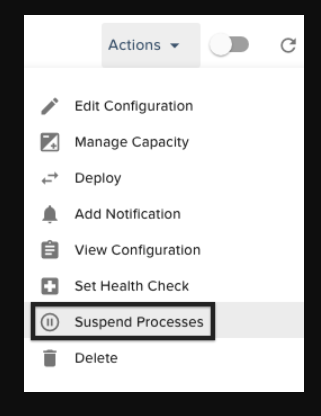
在弹窗中点击“暂停”或“开始”按钮即可执行伸缩或自动修复操作。
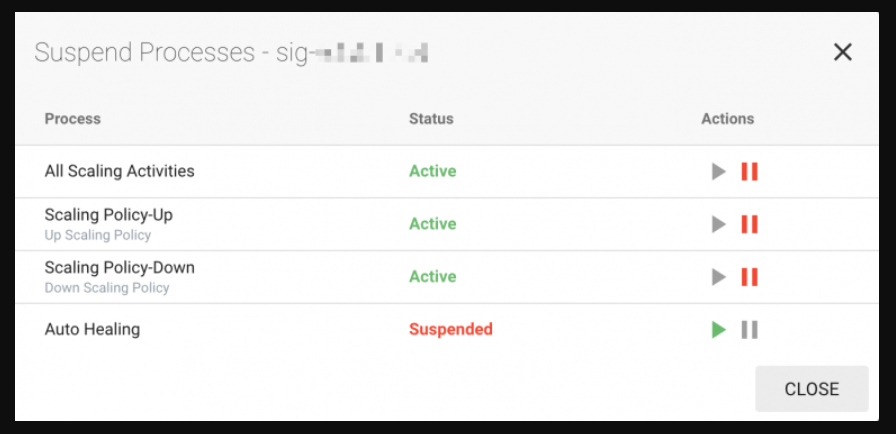
📜 提示: 在暂停伸缩操作期间,无法在Monitoring或Instance选项卡的Scaling图表中监控此指标。
5. 通知
5.1. 创建通知
5.1.1. 设置Elastigroup通知
使用“Elastigroup通知“可以通过SNS、邮件或HTTP端口等接收Elastigroup各事件的通知。本节介绍如何使用“Elastigroup通知”,以及根据用户需要自定义设置通知内容的方法。
前提条件:
- 运行中的Elastigroup
步骤1:打开Notifications Modal
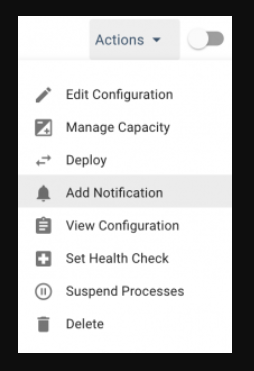
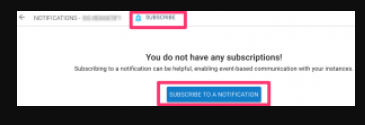
点击Elastigroup管理页面右上方的Actions按钮,然后选择Add Notification。
点击Subscribe或Subscribe to a Notification按钮。
📜 提示: 无法修改现有通知。若要进行更改,请创建新通知后删除旧通知。
步骤2:配置通知
SNS的情况,将Protocol Type选为aws-sns,然后选择发布通知的 SNS Topic ARN。若想在HTTP/HTTPS端口中发布通知,则将Protocol Type选为web,然后输入端口。

📜 提示: 目前只能通过API 来设置“email”及“email-json”等其它平台的通知。
步骤3:事件类型
- Group Deployment Completed: 若部署流程成功结束则会触发通知。详细内容请参阅Deploy。
- Group Deployment Failed: 若部署流程失败则会触发通知。
- Group Update Completed: Elastigroup成功更新时会触发通知。可以用作服务编排工具或在其它用户监控Elastigroup时使用。
- Instance Launch: 在Elastigroup中启动新的实例时会触发通知。
- Instance Launch Failed: 在Elastigroup中启动实例失败时会触发通知。
- Instance Terminate: 实例被标记为终止时会触发通知。此通知会在实例终止前发出。
- Instance Terminated: 当实例中一个实例终止时会触发通知。
- Scale Failed – Group Max Capacity: 当组达到了Elastigroup定义的最大容量时,会触发通知以防止进行额外的扩展操作。
- Signal Timeout – Instance Not Ready: 当信号超时时会触发通知。请点击此处了解更多关于Elastigroups信号配置的内容。
- Unhealthy Instance: 根据“状态检查”的配置内容,当组内实例中的某一个被识别为异常时,则会触发通知。异常实例(Unhealthy Instance)事件类型也适用于“状态检查服务”用户。请参阅使用手册了解更多关于“状态检查”的内容。
步骤4:格式(选填)
在“Format”字段中可以更改通知的默认输出。通知内容格式支持 instance-id、event、resource-id、resource-name、resource-id、subnet-id、availability-zone等变量。
默认通知内容:
                    {
                         "event": "<event>",
                         "instanceId": "<instance-id>",
                         "resourceId": "<resource-id>",
                         "resourceName": "<resource-name>"
                    }
用户自定义格式示例:
                    {
                        "event": "%event%",
                        "resourceId": "%resource-id%",
                        "resourceName": "%resource-name%",
                        "myCustomeKey": "My content is set here",
                       "AWS_Account_ID": "1234567890"
                    }
启动实例:
                    {
                    "default": "spotinst:notification:instance",
                    "event": "AWS_EC2_INSTANCE_LAUNCH",
                    "instanceId": "i-0d1c09565f353e90e",
                    "resourceId": "sig-675240da",
                    "resourceName": "ElasticSearch_Test"
                    }
终止实例:
                    {
                     "default": "spotinst:notification:instance",
                     "event": "AWS_EC2_INSTANCE_TERMINATE",
                     "instanceId": "i-0d1c09565f353e90e",
                     "resourceId": "sig-675240da",
                     "resourceName": "ElasticSearch_Test"
                    }
5.2. Slack用Elastigroup通知
5.2.1. 通过Slack接收Elastigroup通知
Elastigroup通知可以自动发送到提前设置好的 Slack 渠道。若想定义渠道,请在此处创建Webhook URL。
https://slack.com/apps/A0F7XDUAZ-incoming-webhooks
复制URL后,前往Elastigroup设置 > 账户页面,然后选择通知。勾选Slack复选框后粘贴Webhook URL。
可以选择要发布的通知。
5.3 用户自定义邮件通知
5.3.1. 配置用户自定义邮件通知
默认情况下,AutoSpot会向账户的所有用户通知所有错误和告警事件。但是,取消订阅服务的用户除外。可以定义Elastigroup通知来发送重要事件的通知。
使用用户自定义邮件通知
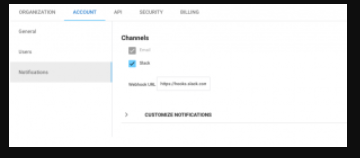
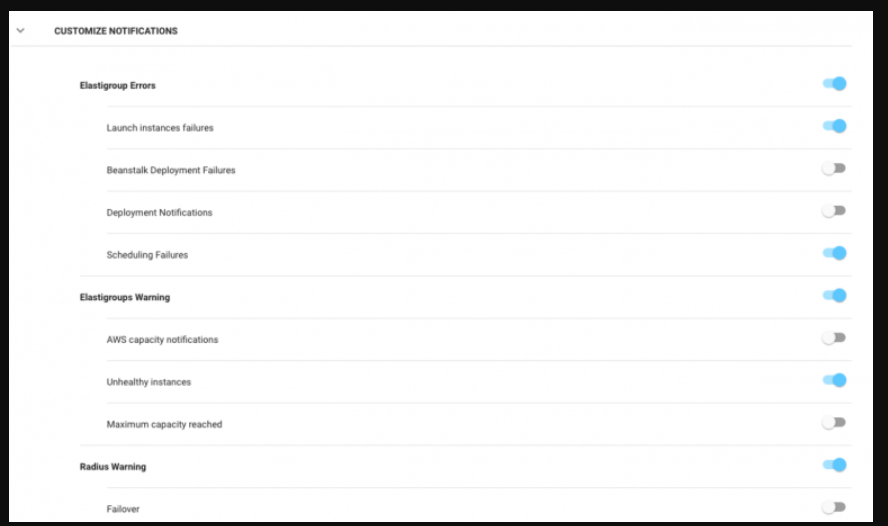
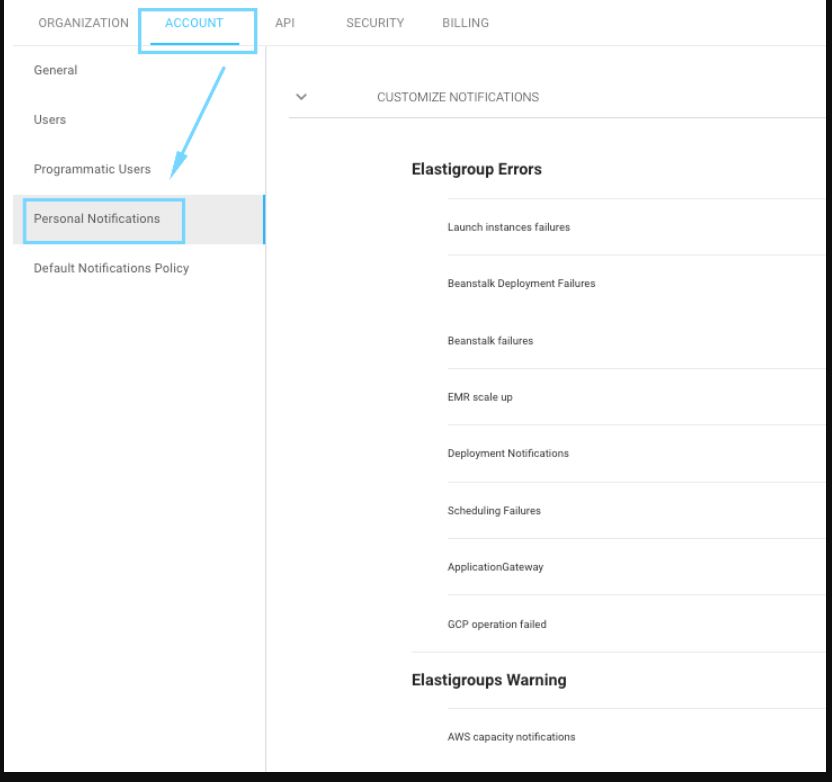
- 打开设置菜单,选择Account选项卡,然后点击Personal Notification。
- 显示Customize Notifications页面后,可以按照需要选择要禁用或激活的项。
![]()
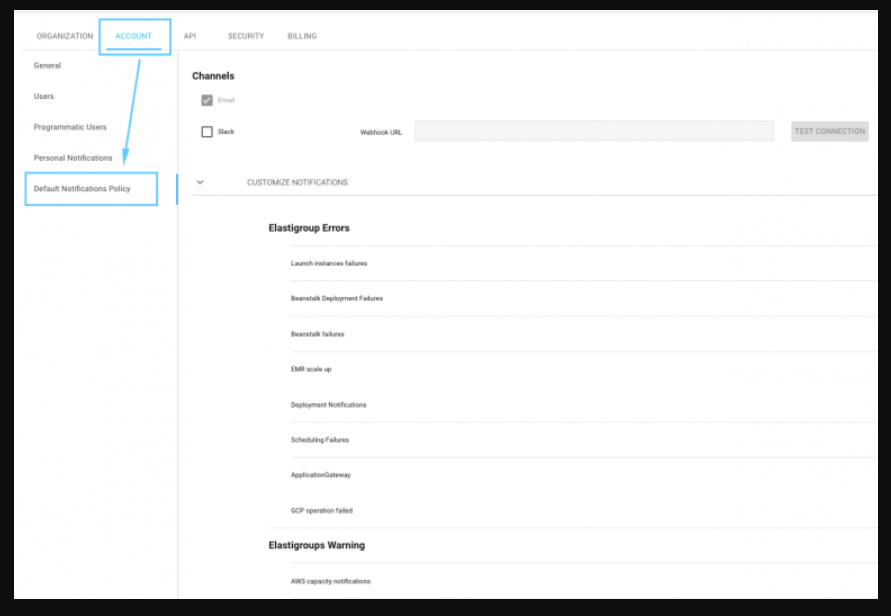
按账户使用用户自定义邮件通知
- 打开设置菜单,选择Account选项卡,然后点击Default Notifications Policy。
- 选择要对关联到此账户的所有用户禁用的通知。此操作只能由Account Editors/Organization Admin执行。
📜 提示: 默认账户通知策略仅适用于未定义自己仅有通知策略的用户。用户可以在“Personal Notifications”页面中定义自己仅有的通知策略。
KMS加密与AutoSpot
介绍
AWS Key Management Service(KMS)是能让您轻松创建并管理数据加密使用密钥的服务。使用此服务可以简便使用通过AutoSpo配置竞价实例加密的卷。若想让AutoSpot能够使用加密卷,您需要授予其加密卷时使用的用户自定义KMS的访问权限。
在AutoSpot中使用用户自定义密钥的方法
为使用用户自定义密钥,须调整用户自定义密钥使用权限,使其包含AutoSpot 必须内容。
步骤1:登录AWS IAM管理控制台
登录AWS控制台后前往IAM管理控制台。
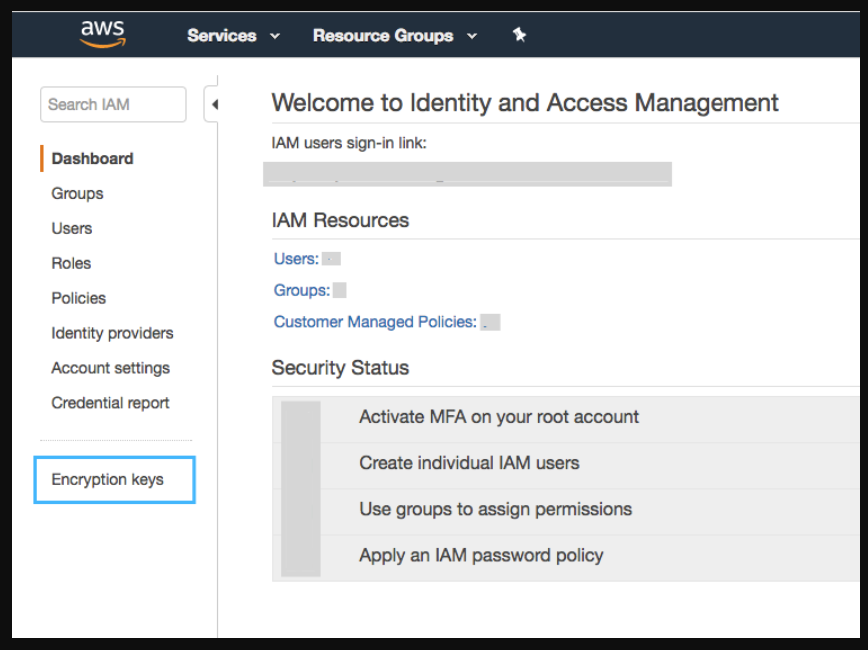
步骤2:点击Encryption Keys。
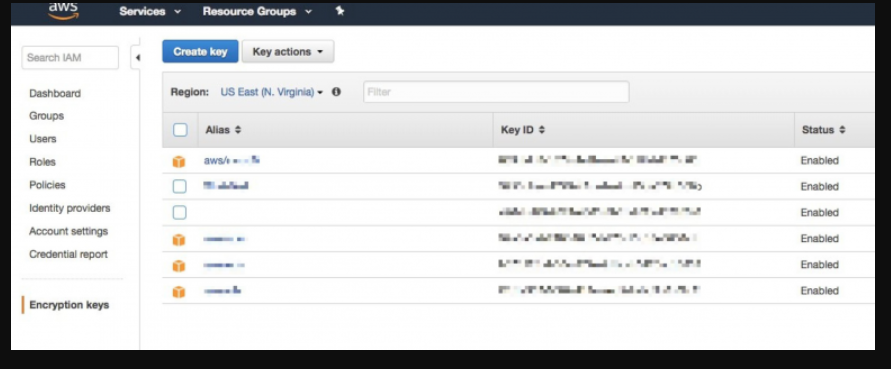
步骤3:点击要加密卷的Custom Key按钮。
步骤4: 下拉至Key Users部分。
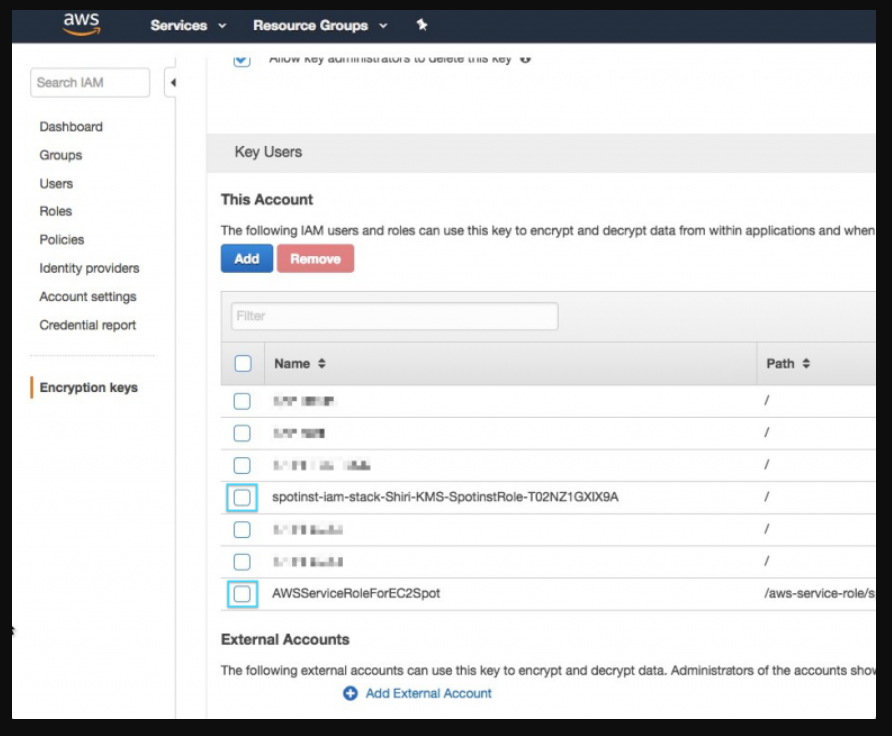
须在此用户自定义密钥中添加两个角色。
- AWSServiceRoleForEC2Spot(AWS在各个账户中自动创建的关联服务角色)
- AutoSpot跨账户IAM角色(在AutoSpot中输入凭证时创建的角色)
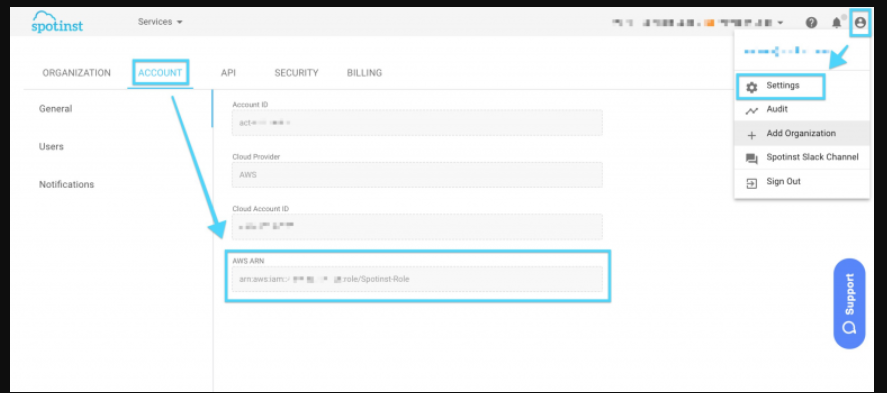
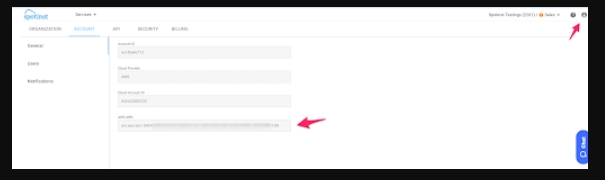
通过下面的链接,可以在可使用的Account菜单中找到 AutoSpot跨账户IAM角色。如下图所示,点击右上方的图标然后点击 Settings后, 即可在Account菜单中查看AWS ARNhttps://console.spotinst.com/#/settings/account/general
步骤5:在Elastigroup Block Device Mapping中配置密钥
您可以添加Mapping Elastigroup Block设备映射配置所需的密钥。请点击此处查看详情。
然后添加以下内容。
kmsKeyId – String –加密EBS卷的用户管理型CMK ID
Example 1:
                    "blockDeviceMappings": [
                       {
                         "deviceName": "/dev/sdf",
                         "ebs": {
                           "encrypted": true,
                           "kmsKeyId": "bajkadk-12345-1234-1234-1234567",
                           "volumeSize": 20
                         }
                       }
                     ]
Example 2:
存在使用用户自定义密钥加密的快照时:
                    "blockDeviceMappings": [
                        {
                          "deviceName": "/dev/xvdb",
                          "ebs": {
                            "deleteOnTermination": false,
                            "encrypted": true,
                            "snapshotId": "snap-90gh20c09281b1234",
                            "volumeType": "gp2"
                          }
                        }
                      ]
使用跨账户KMS密钥通过AutoSpot加密EBS卷
介绍
在上一个章节中介绍了KMS密钥、用途,以及如何与Elastigroup一起使用。因为以上内容都在同一个 AWS账户内执行,所以可以正常运行。接下来简单介绍一下跨账户的内容。
我们先假设下面几点内容。
- 已按照前面阶段说明创建了密钥。
- 账户actKey代表拥有KMS密钥的账户。
- 账户actInst代表要运行实例的账户。
- 密钥和实例必须位于相同区域。
操作步骤如下:
用actKey账户创建KMS密钥。
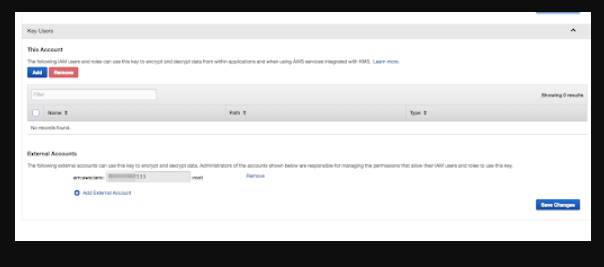
在主要属性的External Accounts中添加账户actInst的账户,然后保存更改内容。
![]()
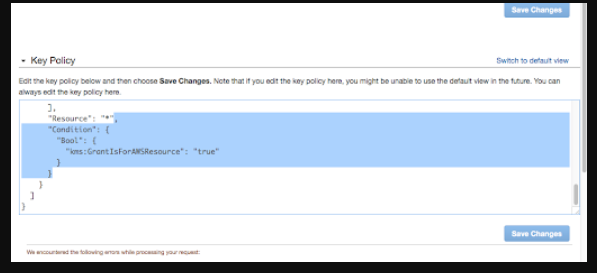
在主要属性中切换到查看策略后,删除以下条件后保存更改内容。
![]()
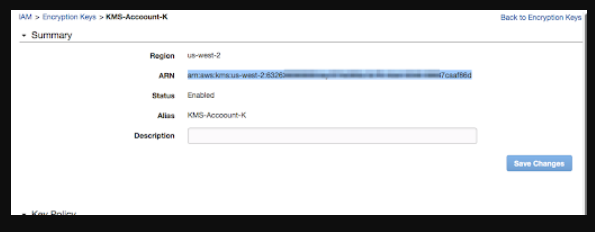
保存Key ARN。
![]()
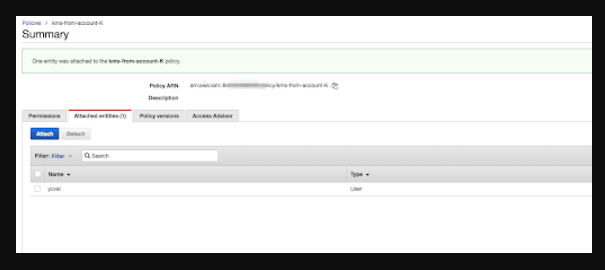
在actInst账户中创建策略,然后输入如下JSON。此处须更改Key ARN。
                    {
                        "Version": "2012-10-17",
                        "Statement": [
                            {
                                "Sid": "AllowUseOfTheKey",
                                "Effect": "Allow",
                                "Action": [
                                    "kms:Encrypt",
                                    "kms:Decrypt",
                                    "kms:ReEncrypt*",
                                    "kms:GenerateDataKey*",
                                    "kms:DescribeKey"
                                ],
                                "Resource": [
                                    ""
                                ]
                            },
                            {
                                "Sid": "AllowAttachmentOfPersistentResources",
                                "Effect": "Allow",
                                "Action": [
                                    "kms:CreateGrant",
                                    "kms:ListGrants",
                                    "kms:RevokeGrant"
                                ],
                                "Resource": [
                                    ""
                                ]
                            }
                        ]
                    }
接下来使用AWS CLI在actInst账户中运行。需要确认AWS CLI中配置的用户是谁。
将创建的策略附加到上一阶段的用户。
![]()
复制角色ARN(点击右上方人物图标后,可在AutoSpot控制台中找到)。
![]()
在终端执行以下命令。(给AutoSpot角色赋权的操作)
aws kms create-grant --key-id <b><i><KMS key-ARN></i></b> --grantee-principal <b><i><Spotinst role ARN></i></b> --operations "Encrypt" "Decrypt" "RetireGrant" "DescribeKey" "GenerateDataKey" "GenerateDataKeyWithoutPlaintext" "ReEncryptFrom" "ReEncryptTo" "CreateGrant" --name spotinst-grant
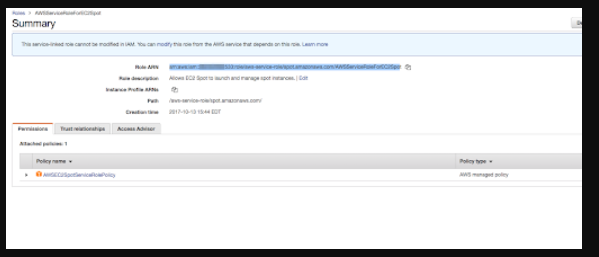
找到AWSServiceRoleForEC2Spot角色后,复制相应的ARN。
![]()
在终端执行以下命令(给竞价实例角色赋权的操作)
> aws kms create-grant --key-id <b><i><KMS key-ARN></i></b> --grantee-principal <b><i><AWSServiceRoleForEC2Spot ARN></i></b> --operations "Encrypt" "Decrypt" "RetireGrant" "DescribeKey" "GenerateDataKey" "GenerateDataKeyWithoutPlaintext" "ReEncryptFrom" "ReEncryptTo" "CreateGrant" --name spot-grant现在准备工作已基本完成,可以在Elastigroup配置中将KMS密钥ID添加到BDM部分中了。
https://api.spotinst.com/elastigroup-for-aws/concepts/compute-concepts/block-device-mapping/
                     "blockDeviceMappings": [
                        {
                          "deviceName": "/dev/sdf",
                          "ebs": {
                            "encrypted": true,
                            "kmsKeyId": "",
                            "volumeSize": 20
                          }
                        }
                      ]
创建Elastigroup
介绍
本教程将介绍使用空模板创建Elastigroup的方法。可以在Creation Wizard的Uses Cases中找到空模板。若想基于AWS的Elastic Beanstalk或AutoScaling Group等现有的工作负载创建Elastigroup,请在Use Cases中选择工作负载类型后获取工作负载。若想在Onboarding Wizard中创建Elastigroup,请选择Create an Elastigroup from Scratch。
步骤1:基础设置(General Settings)
- 输入Elastigroup名称后设置区域。
- 在Elastigroup中输入Target、Minimum、Maximum的容量。
步骤2:设置Compute
- 选择要运行Elastigroup的VPC,如果在您选择的市场中没有可使用的竞价实例,也可以选择要使用的产品类型和按需类型。
- 在启动实例时,选择Elastigroup要覆盖的可用区。为最大限度节省成本,Elastigroup会计算在所选可用区中启动实例所需的费用。为增加Elastigroup可覆盖的竞价实例市场数量,建议您选择多个可用区。
- 在启动竞价实例时, 选择Elastigroup要覆盖的实例类型。为尽可能多地给Elastigroup提供竞价实例市场选项,建议您选择多种实例类型。
📜 提示: 建议您选择多个可用区和多种实例类型,以给Elastigroup提供更多的竞价市场,同时降低价格提高可用性。
- 选择要在实例中使用的Image、Security Groups、Key Pair(选填)。
步骤3:配置伸缩策略(选填)
选择创建Target Scaling Policy 或Simple Scaling Policy。请点击此处参阅用Elastigroup进行伸缩的方法。
步骤4:检查及创建
在此步骤中检查设置,然后运行Elastigroup。
将EC2-Classic实例连接到VPC
介绍
若想将EC2-Classic中运行的实例连接到VPC安全组,须使用Elastigroup配置中用户自定义的用户数据脚本将实例登录到VPC。
步骤1:创建IAM角色
在首个步骤中,应在其策略中创建具有如下权限的实例的IAM角色。
                    {
                        "Version": "2012-10-17",
                        "Statement": [
                            {
                                "Sid": "Stmt1500534977000",
                                "Effect": "Allow",
                                "Action": [
                                    "ec2:AttachClassicLinkVpc"
                                ],
                                "Resource": [
                                    "*"
                                ]
                            }
                        ]
                    }
在Additional settings – Compute Tab的Elastigroup配置中选择此IAM角色。
步骤2:输入用户自定义脚本
在Additional settings – Compute Tab的User-Data字段中输入用户自定义脚本。
                    #!/bin/bash -x
                    echo "Running sportInst user data script" >> /var/log/cloud-init-output.log
                    instance_id=$(curl -s http://169.254.169.254/latest/meta-data/instance-id)
                    echo " Installing pip"
                    yum install -y python-pip
                    echo "Make sure aws-cli installed and up-to-date" >> /var/log/cloud-init-output.log
                    pip install awscli --upgrade --user
                    export PATH=~/.local/bin:$PATH
                    echo "Attach the EC2-Classic instance to VPC"
                    aws ec2 attach-classic-link-vpc --instance-id $instance_id --vpc-id VPC_ID --groups SECURITY_GROUPS --region REGION
将VPC_ID、SECURITY_GROUPS、REGION修改为需要的值。可以继续创建组或更新组的配置。
更新AutoSpot策略
介绍
在设置AutoSpot账户时,使用 CloudFormation堆栈在AWS账户中登录AutoSpot的IAM角色策略。 此策略包含了AutoSpot账户在处理AWS资源时所需权限的相关内容。
请参阅以下链接了解IAM角色AWS ARN详情。
https://console.spotinst.com/#/settings/account/general
📜 提示: 此策略的重点在于要更新到最新版本。请点击此处参阅最新版本。
步骤1:登录到AWS IAM管理控制台
登录到AWS控制台然后前往IAM管理控制台。
步骤2:搜索用户的AutoSpot策略
在侧边菜单中点击Policies。
搜索AutoSpot策略后选择。
步骤3:修改策略
在Policy页面中选择Permissions 选项卡,查看JSON后点击Edit Policy。
现在您可以删除JSON,用API文档中可使用的最新策略替换。
步骤4:确认并保存
AutoSpot IAM策略限制
介绍
AutoSpot使用安全的跨账户角色访问您的AWS账户。因为此角色包含了受限策略列表,所以您可以基于 AWS资源来限制此策略列表,并可以将特定区域、VPC 或标签用作限制条件。
请参阅AWS 文档查看更多示例,要了解使用IAM策略轻松控制AWS区域访问的方法,请点击此处查看。
各示例说明如下:
Example 1:
如果您想将策略限制为特定的VPC,可以添加如下条件。
                    {
                      "Statement": [
                        {
                          "Sid": "ExampleForRestrictVPC",
                          "Action": [
                            "ec2:RequestSpotInstances"
                          ],
                          "Resource": [
                            "*"
                          ],
                          "Condition": {
                            "StringEquals": {
                              "ec2:vpc": "arn:aws:ec2:REGION:ACCOUNTNUMBER:vpc/VPC-ID"
                            }
                          },
                          "Effect": "Allow"
                        }
                      ],
                      "Version": "2012-10-17"
                    }
Example 2:
基于标签限制策略。
                    {
                      "Statement": [
                        {
                          "Sid": "ExampleForRestrictTags",
                          "Action": [
                            "ec2:RequestSpotInstances"
                          ],
                          "Resource": [
                            "*"
                          ],
                          "Condition": {
                            "ForAllValues:StringLike": {
                              "aws:TagKeys": [
                                "foo",
                                "bar"
                              ]
                            }
                          },
                          "Effect": "Allow"
                        }
                      ],
                      "Version": "2012-10-17"
                    }
Example 3:
将策略限制为特定区域。
                    {
                      "Statement": [
                        {
                          "Sid": "ExampleForRestrictRegion",
                          "Action": [
                            "ec2:RequestSpotInstances"
                          ],
                          "Resource": [
                            "*"
                          ],
                         "Condition": {
                            "StringEquals": {
                              "ec2:Region": "us-west-1"
                            }
                          },
                          "Effect": "Allow"
                        }
                      ],
                      "Version": "2012-10-17"
                    }
您还可以使用以上条件语句如下限制特定的AWS资源。
1.7.1. 限制N. Virginia区域EC2实例的访问。
                    {
                      "Statement": [
                        {
                          "Sid": "GeneralSpotInstancesAccess",
                          "Action": [
                            "ec2:RequestSpotInstances",
                            "ec2:CancelSpotInstanceRequests",
                            "ec2:CreateSpotDatafeedSubscription",
                            "ec2:Describe*"
                             ......
                             ......
                             ......
                             ......
                          ],
                          "Effect": "Allow",
                          "Resource": [
                            "*"
                          ],
                          "Condition": {
                            "StringEquals": {
                              "ec2:Region": "us-east-1"
                            }
                          }
                        }
                      ],
                      "Version": "2012-10-17"
                    }
1.7.2. 在特定VPC中限制ElasticBeanstalk环境的访问。
                    {
                      "Statement": [
                        {
                        "Sid": "GeneralAccessElaticBeanstalk",
                        "Action": [
                          "elasticbeanstalk:Describe*",
                          "elasticbeanstalk:RequestEnvironmentInfo",
                          "elasticbeanstalk:RetrieveEnvironmentInfo",
                          "elasticbeanstalk:ValidateConfigurationSettings",
                          "elasticbeanstalk:UpdateEnvironment",
                          "cloudformation:GetTemplate",
                          "cloudformation:DescribeStackResources",
                          "cloudformation:DescribeStackResource",
                          "cloudformation:DescribeStacks",
                          "cloudformation:ListStackResources",
                          "cloudformation:UpdateStack",
                          "cloudformation:DescribeStackEvent",
                          "cloudformation:DescribeStackEvents",
                          "logs:PutRetentionPolicy",
                          "logs:createLogGroup"
                          ],
                          "Effect": "Allow",
                          "Resource": [
                            "*"
                          ],
                          "Condition": {
                            "StringEquals": {
                              "ec2:vpc": "arn:aws:ec2:REGION:ACCOUNTNUMBER:vpc/VPC-ID"
                            }
                          }
                        }
                      ],
                      "Version": "2012-10-17"
                    }
Example 4:
若想查看使用AutoSpot节省的费用,只能使用Spot Analyzer,并需要以下策略。
                    {
                      "Statement": [
                        {
                          "Sid": "SpotAnalyzer",
                          "Action": [
                                    "ec2:Describe*",
                                    "ec2:MonitorInstances",
                                    "elasticloadbalancing:Describe*",
                                    "cloudwatch:GetMetricStatistics",
                                    "cloudwatch:ListMetrics",
                                    "iam:ListRoles",
                                    "iam:ListAccountAliases",
                                    "iam:GetPolicyVersion",
                                    "iam:ListPolicies",
                                    "elasticbeanstalk:Describe*",
                                    "autoscaling:Describe*",
                                    "ecs:List*",
                                    "ecs:Describe*"
                                    ],
                          "Effect": "Allow",
                          "Resource": [
                            "*"
                          ]
                          }
                        ],
                        "Version": "2012-10-17"
                    }
更多信息请参阅AWS 文档。
在域名中注册实例
若想在域名中注册实例,需要在Compute的Elastigroup设置中应用用户数据脚本。
脚本执行任务:
1. 如果脚本不执行任何操作,请确认计算机是否已经是域名成员。
2. 在网络接口设置DNS服务器(用于搜索域名) 。
3. 在域名中添加实例。
4. 重新启动系统(应用更改内容)。
添加如下的User Data(以下示例适用于Windows系统)。
                    <powershell>
                    $isMember = (Get-WmiObject -Class Win32_ComputerSystem).PartOfDomain
                    if (!$isMember)
                    {
                    $dnsserver = "10.0.0.1"
                    $domain = "myDomain"
                    $password = "myPassword!" | ConvertTo-SecureString -asPlainText -Force
                    $username = $domain\myUserAccount
                    $ou = "OU=testOU,DC=domain,DC=Domain,DC=com"
                    $nic = Get-NetAdapter
                    Set-DNSClientServerAddress –interfaceIndex $nic.ifIndex –ServerAddresses ($dnsserver)
                    $credential = New-Object System.Management.Automation.PSCredential($username,$password)
                    Add-Computer -DomainName $domain -Credential $credential -OUPath $ou
                    shutdown -r -t 00
                    }
                    </powershell>
以下值需要根据用户配置进行修改。
📜 提示: $ou是选填项。如不需要,可以删除此行并在Add-Computer命令中删除 -ou标志和值。
📜 提示: 该脚本假设实例只有1个网络接口。
将 Elastigroup指标发布到CloudWatch
Elastigroup可以选择将用户自定义指标发布到CloudWatch。这些指标用于向DataDog或者Grafana等第三方工具报告数据。
Elastigroup按照AWS账户报告如下指标:
- #instances (OD and Spot) per instance type
- CPU
- Memory
- Disk
- NetworkIn
- NetworkOut
这些指标的用户自定义命名空间是具有 Elastigroup ID和实例类型两种维度的AutoSpot。若想将这些指标发布到CloudWatch中,需要在IAM策略中添加以下权限。
cloudWatch : PutMetricData
完成此操作后,请联系账户管理员咨询如何使用AutoSpot进行Elastigroup指标发布。AutoSpot会优先考虑用户的数据隐私,所以在向CloudWatch等第三方工具公布数据前,会先取得用户的同意。
WordPress On Spot:详细指南
介绍
本指南将帮助您在竞价实例中使用WordPress运行网站。WordPress网站将安装在可自动扩容的Elastigroup中。然后配置和启动EC2竞价实例、 获取WordPress用户名称和密码以及登录WordPress管理门户。
前提条件:在开始本教程之前,请确保AutoSpot Console中存在具有有效凭据的账户。
步骤1:创建Elastigroup

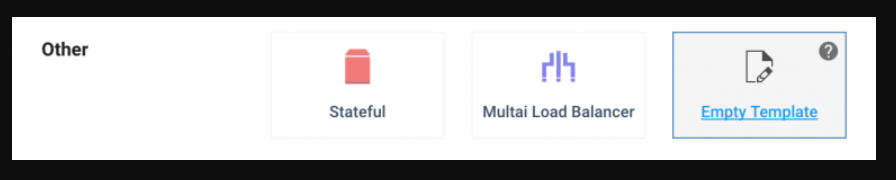
选择适合Elastigroup的用例后点击 Launch。本操作将会为用户进行初始配置。然后选择Empty Template选项。
Elastigroup的基础信息
Name – 指定Elastigroup的名称(建议基于客户要管理的特定工作负载来命名Elastigroup)。
Region –选择要运行Elastigroup的区域。
Description –定义对Elastigroup的额外说明。
Capacity
设置Elastigroup所需容量
Target –Elastigroup中正在运行的实例数量/ vCPU权重 。
Minimum –‘scale down’ 策略操作的情况,代表组中正在运行的实例的最小数量/vCPU权重。
Maximum –’scale up’策略操作的情况,代表组中正在运行的实例的最大数量/vCPU权重。
[Compute Tab]
可以在这里设置网络、启动配置和Compute相关配置等。
VPC –选择VPC网络。
Product – 选择OS,不确定时请选择Linux / UNIX。当账户中同时激活了EC2-Classic和VPC网络时,则必须将此字段明确选为Amazon VPC。
On-Demand Type – 选择按需实例类型。此类型让 Elastigroup可以根据价格和性能评估出最佳的Spot类型。如果已在Strategy中激活了 Fallback to On-Demand选项,则使用该实例类型。
设置好VPC后,可以选择要使用的可用区。
Availability Zones - 选择要启动实例的可用区。可以为Elastigroup选择一个或多个可用区。
📜 提示: 建议选择尽量多的可用区。这样可以为算法提供更多种多样的市场。
Selecting subnets - 在各可用区中选择需要的子网。
Spot Types
在Elastigroup中选择竞价实例类型。选择所需的竞价类型后,可以查看 SpotMarket Scoring,了解市场动向,分数越高越好。
📜 提示:建议选择尽量多的实例类型。这样可以为用户的算法提供更多种多样的市场。
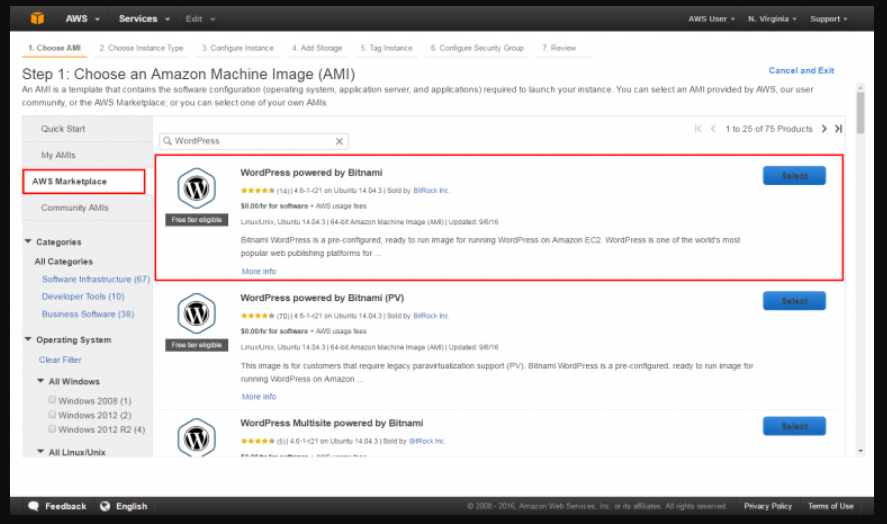
Image – 登录AWS账户后前往AMI市场。选择以下AMI后,粘贴您所在区域的特定ID。
Security Group – 指定一个或多个与Elastigroup启动实例关联的安全组。
Key Pair – 指定要与实例关联的密钥对的名称。
Tags – 指定由区分大小写的键值对(key-value pair)构成的标签。
Scaling
可以在组中添加伸缩策略,在负载增加或使用量不多时调整计算容量。可以按需设置策略,以确保可以根据需要更改组容量,并可以根据需要添加伸缩规则。 伸缩规则中使用CloudWatch指标。
步骤2:环境测试
实例运行之后即可测试WordPress网站。在Elastigroup的Instance中搜索实例的公共IP。
![]()
将公共IP复制到网络浏览器的新页面中,则会出现Hello World博客页面。
步骤3:修改Website
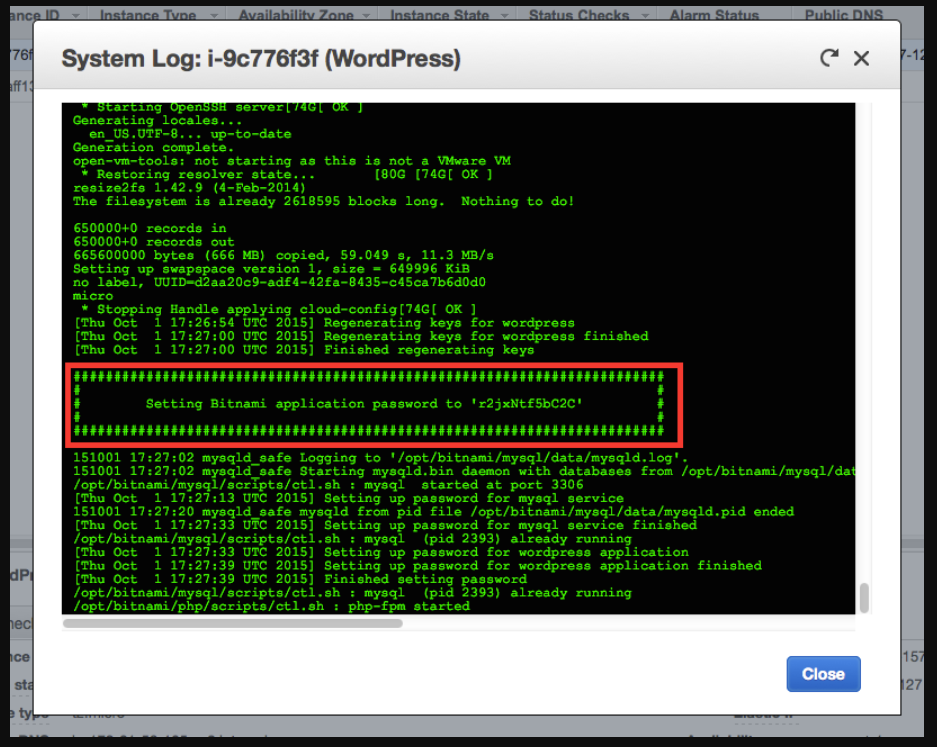
在创建并运行了WordPress网站之后,即可登录到管理页面按照需要修改网站。若想找回密码,请执行以下步骤。
从网络浏览器重新回到EC2管理控制台。选择WordPress实例,然后点击Actions按钮。在下拉菜单中选择Instance Setting后,点击Get System Log。
![]()
在系统日志窗口中下拉滚动条,找到由井号标签标示的密码。
![]()
现在已获取密码,请重新回到访问WordPress Hello World使用的页面。在URL末尾添加/admin, 使其成为类似54.192.32.144/admin的形态,点Enter键,然后输入在日志文件中获取的Username用户和密码。
![]()

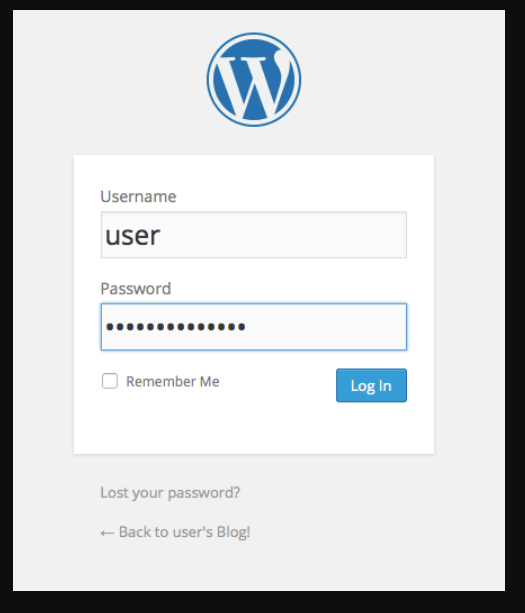
恭喜您,已成功创建并运行了WordPress网站。您现在可以按需对其进行管理、配置和自定义了。
基于组参数筛选API响应
介绍
在使用AutoSpot API时,您可以过滤要接收过长输出的响应,比如基于Tag值的Elastigroup列表。 若想筛选API响应,建议您使用 jq框架。您可以在https://stedolan.github.io/jq/中获取附加功能。
步骤1:
在系统中安装jq。点击下载安装。
步骤2:
通过添加的jq查询语句和curl进行API调用。
Example 1:
                    curl -s -X GET -H Authorization: Bearer ${token}
                    https://api.spotinst.io/aws/ec2/group |
                    jq '.response|.items[]|select(.compute|.launchSpecification|.tags[]|.tagValue| test(staging))'
调用API后,标签值会显示为和staging相同的Elastigroups配置。
Example 2:
                    curl -s -X GET -H Authorization: Bearer ${token}
                    https://api.spotinst.io/aws/ec2/group |
                    jq '.response|.items[]|select(.compute|.launchSpecification|.tags[]|.tagValue| test(TagValue) ) | {name: .name, id: .id}'
将显示标签值与TagValue相同的Elastigroups的名称和ID。请参阅以下链接了解更多运算符和额外选项。
https://stedolan.github.io/jq/tutorial/
AWS用Ocean教程
Kubernetes
创建Ocean Cloud Cluster
AutoSpot Ocean是Kubernetes的基础设施管理服务,可以根据所有Pod、容器和应用程序的需求,自动调整基础设施容量和大小。
本教程介绍如何使用AutoSpot Console创建Ocean集群。若想启动Ocean Creation Wizard,请登录AutoSpot账户后,在 Ocean Menu的Cloud Clusters中选择Create Cluster。
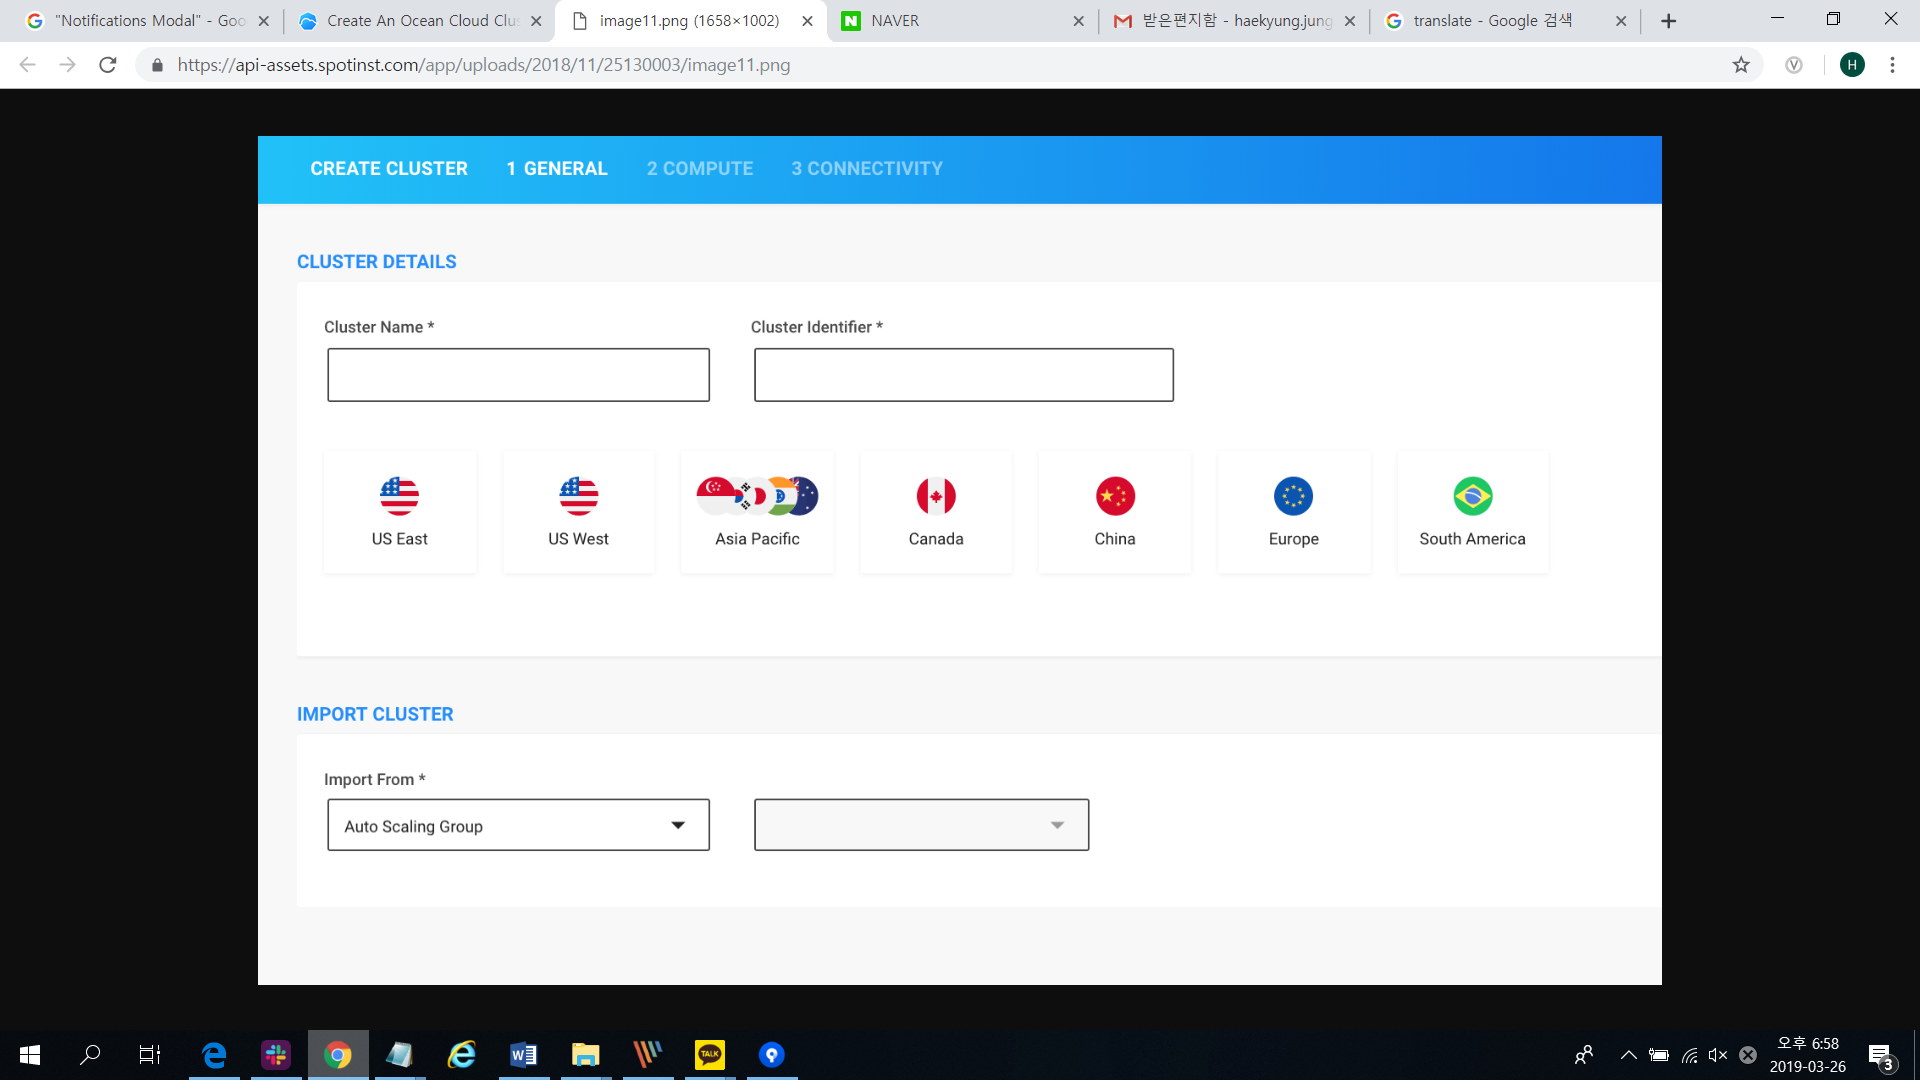
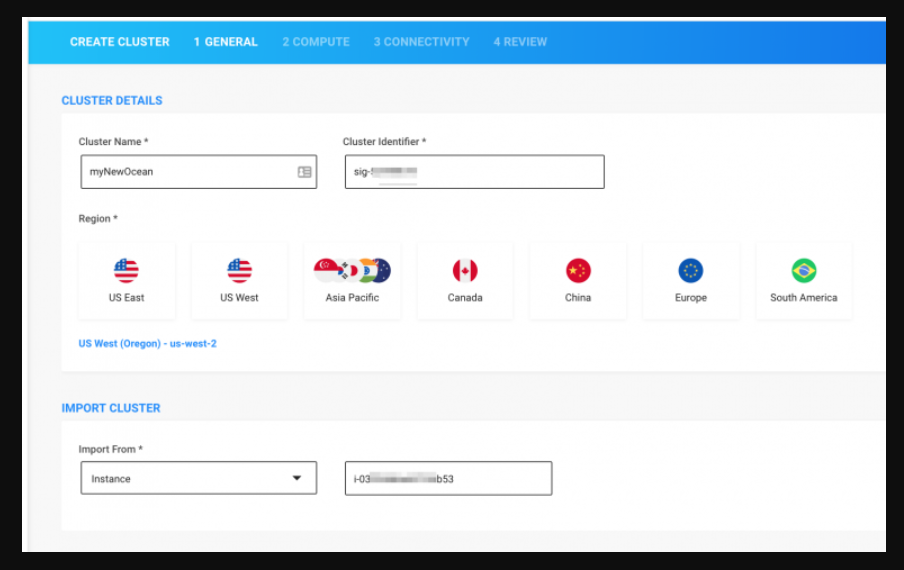
步骤1:创建Cluster
选择用例模板以创建集群。
步骤2:基础设置
输入集群名称和标识符,然后选择区域。
选择Auto Scaling组或实例以导入集群配置。
步骤3:设置Compute
查看或更改从Ocean Creation Wizard导入的设置。
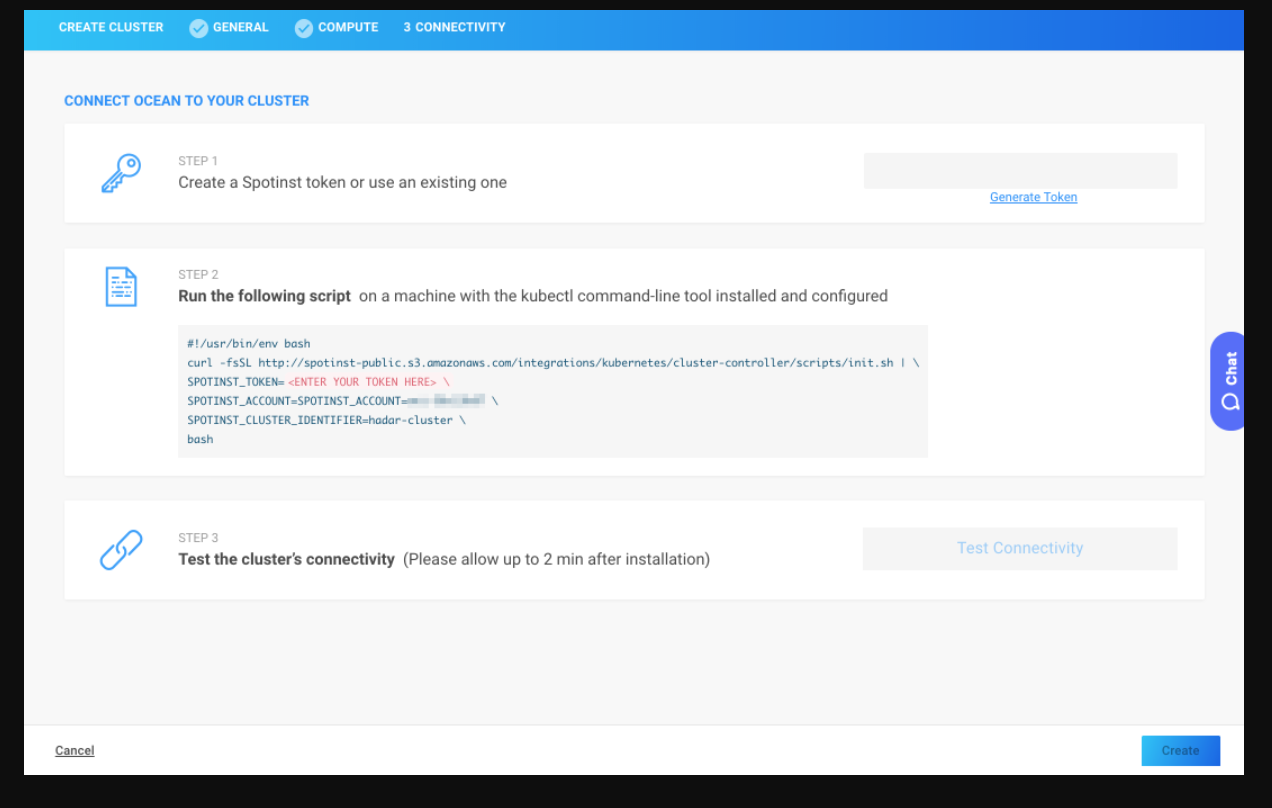
步骤4:连接性
创建AutoSpot Token或使用现有Token。
安装AutoSpot Controller Pod。请点击此处参阅更多关于AutoSpot Controller Pod和Ocean的内容。
点击 Test Connectivity查看控件功能。
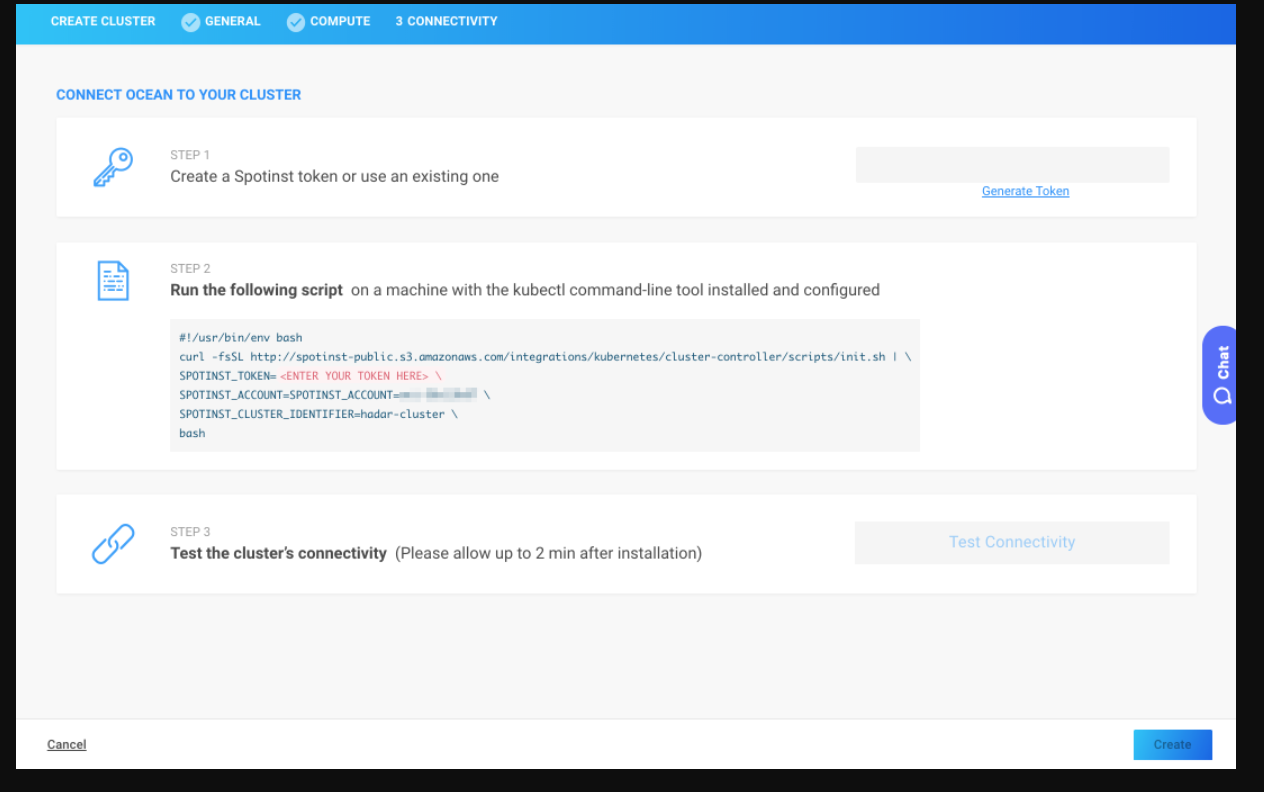
现在已准备就绪。Ocean现在将为集群提供最具成本效益的容量和大小。
将现有Elastigroup迁移到Ocean
下一教程将介绍如何将运行Kubernetes集群的现有Elastigroup导入到Ocean。
参考事项
Ocean管理所有的K8集群节点。如果节点分散在多个Elastigroup中,则须一次性迁移所有的Elastigroup。 `
前提条件
若要完成本教程,请收集以下信息。
与目标Kubenetes集群相关联的Elstigroups 列表
为各个Elastigroup存储以下数据供以后使用。- Autoscaler labels
- User-data script
- AMI id
从其中一个Elastigroups中获取Cluster Identifier(ID)。此标识符用于将安装在Kubernetes集群上的现有AutoSpot Controller关联到Ocean。
Elastigroup中实例的Instance ID。所选实例用于获取集群配置。
步骤1:在导入 Elastigroups中停用AutoScaling
第一步是在源组中停用AutoScaling功能,从而用Ocean替代。
- 前往Kubernetes集群中配置的Elastigroup。
- 在各个组执行以下步骤。
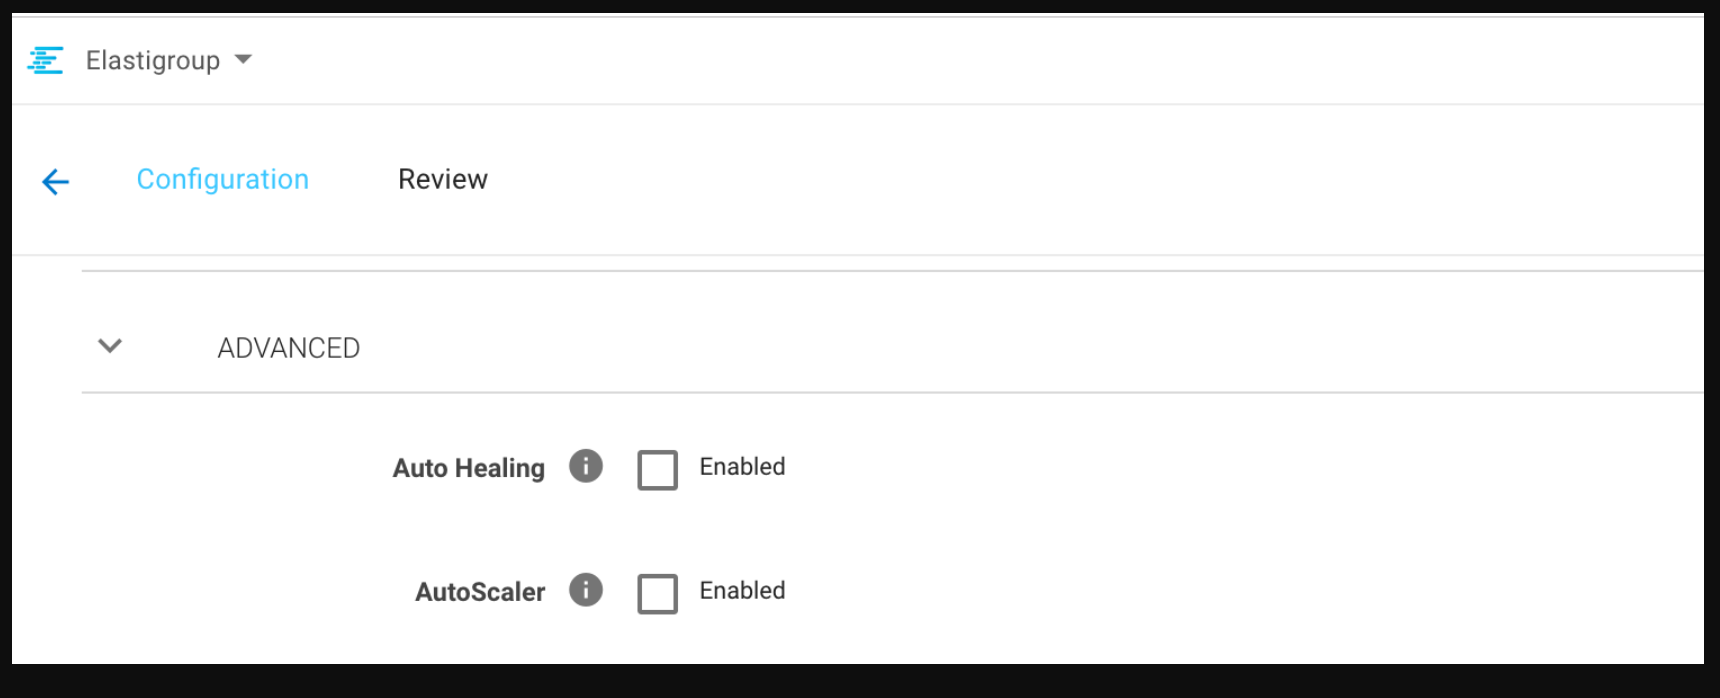
- 在Actions菜单中点击Edit Configuration。
- 下拉至Advanced部分。
- 删除Autoscaler选择。
- 前往检查页面,点击Update提交更改内容。
![]()
步骤2:创建Ocean Cluster
- 在左侧边栏中选择Ocean下的Cloud Cluster。
- 点击右上方的Create Cluster按钮打开Ocean Creation Wizard。
- 输入集群名称和Elastigroup的集群标识符。
- 选择要部署Ocean集群的区域。
- 输入要导入集群配置的实例ID。
- 点击Next。
查看或修改Ocean Creation Wizard导入的配置。
![]()
点击Test Connectivity查看控件功能。
![]()
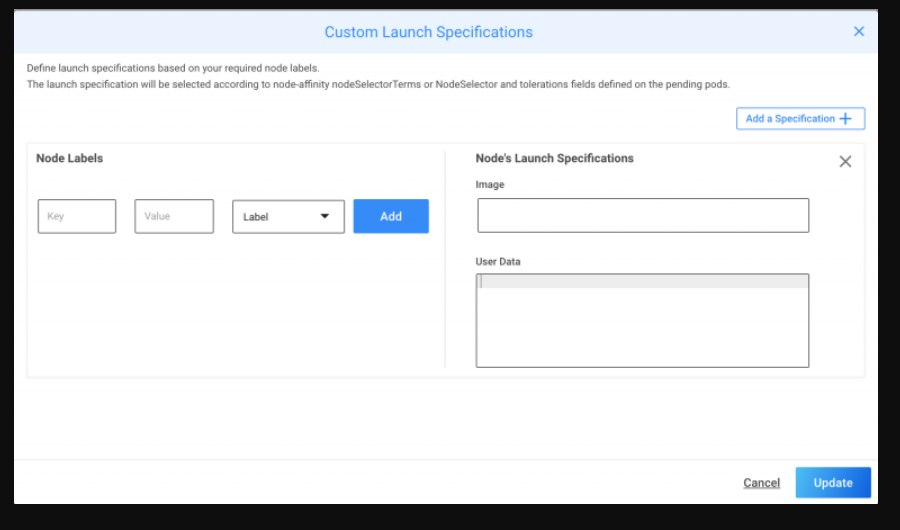
步骤3:配置Ocean Custom Launch Specifications
下面配置Ocean集群来处理现有Elastigroup中配置的其它Label集。
- 前往Ocean集群。
- 点击Actions菜单后选择Custom Launch Specifications。
- 在执行Worker Node的各Elastigroup中
点击Add Specification。
添加作为前提条件已收集的Label集。
设置映射的User-Data和AMI。 - 点击Save Changes应用更改内容。
步骤4:缩减源Elastigroup
最后一步是缩减现有的worker node,以便让 Ocean可以启动符合集群需求的实例。
- 前往Kubernetes集群中配置的Elastigroup。
- 在Actions菜单中点击Manage Capacity
- 减少目标容量
📜 提示: 建议分批次每次减少10-20%的容量,并重复这一步骤直至彻底完成目标容量缩减。
- 前往Ocean Cluster,确认已启动所需的资源,并确认集群中是否在处理进行中的Pod。
![]()
步骤5:Ocean准备完成
使用过程中如有任何问题,请通过在线工具或 邮件联系技术支持团队。
启动与新EKS Cluster关联的Ocean集群
在新的EKS Cluster中运行Ocean
本教程介绍运行Amazon EKS并创建 Ocean管理集群 worker node的需求事项。
前提条件:
1. kubectl (Amazon EKS-vended)
2. awscli 1.16.18+
3. aws-iam-authenticator
步骤1:创建Ocean和EKS Clusters
CloudFormation
若想创建新的Ocean和EKS集群,按照以下链接执行CloudFormation模板,并输入模板的参数后,点击Create按钮。

Terraform
为创建新的Ocean和EKS集群,下载并执行以下Terraform计划。
Download: ocean_eks.tf
步骤2:将Ocean管理的Worker Nodes配置成关联到EKS Cluster
- 使用以下命令下载EKS集群配置。
aws eks update-kubeconfig --name $CLUSTER_NAME - 将kubectl关联到EKS集群。
kubectl get svc - 安装AutoSpot Kubernetes Controller。
步骤3:更新AWS Authentication Config-Map
- 下载AWS authenticator configuration map。
curl -O https://amazon-eks.s3-us-west-2.amazonaws.com/1.10.3/2018-06-05/aws-auth-cm.yaml - 在aws-auth-cm.yaml文件中,用EKS cluster CloudFormation Stack的Output选项下的NodeInstanceRole值替代
<ARN of instance role (not instance profile)>部分。 - 在集群中应用更新的aws-auth-cm.yaml。
kubectl apply -f aws-auth-cm.yaml
注意:请勿修改此文件中的其它行。
现在Ocean就可以管理Worker Node了,并会优化资源使用,帮助最大程度地节省竞价实例费用。
问题解决
- 如果出现
aws-iam-authenticator错误,是因为运行文件不在$PATH路径中,kubectl未配置AWS EKS。更多详细信息,请参阅Configure kubectl for Amazon EKS。 - 可以使用以下命令罗列集群节点。
kubectl get nodes
使用KOPS将 Elastigroup升级到Ocean
本教程介绍使用KOPS将已创建的Elastigroup升级到Ocean的过程。
您是第一次使用Ocean吗?
使用AutoSpot Ocean,您可以在使用基本VM基础设施时, 无需担心产生运营成本使用K8容器。使用竞价实例和预留实例,可以提高集群可视性,大幅减少费用。更多Ocean的详细内容请参阅Ocean Product Page。KOPS相关信息请点击 此处查阅。
📜 提示: 使用Ocean过程中,如不满意可随时返回到Elastigroup。
前提条件:
- KOPS版本:1.11.1以上版本
- 要升级的Elastigroup列表
步骤1:修改KOPS Feature Flag变量
此步骤在使用AutoSpot KOPS官方供给版本创建了K8的假设下进行。
- 如果您在AutoSpot中使用了非官方版本的KOPS,我们建议您将 ASG迁移到官方版本。官方版本会优化AutoSpot UI和K8集群的可视性。迁移到官方版本的具体操作请参阅本
이 文档的步骤3。找到AutoSpot脚本的位置修改00-env.sh文件的环境变量。
修改以下变量。
export KOPS_FEATURE_FLAGS=+Spotinst,SpotinstOcean
步骤2:将当前Elastigroup从UI升级到Ocean
前往AutoSpot Console选择要升级的Elastigroup。
点击右上方菜单中的Upgrade to Ocean 图标后,在弹窗中选择“Upgrade”。
![]()
请等待验证升级已完成的以下信息出现。
![]()
步骤3:修改Ocean Cluster Name
在Ocean集群页面中依次点击Actions > Edit Cluster。
![]()
在REVIEW标签中切换到查看JSON。
![]()
点击Edit mode切换按钮。
![]()
删除前缀Ocean::后更改组名称。
![]()
现在KOPS就可以管理升级的Ocean集群了。您也可以无需担心基础设施体验服务环境了。
警告:使用多个实例组时,需要按照实例组分别执行此流程。
添加Azure云账户
在AutoSpot中添加Azure账户之前,请先确认要添加的Azure账户是否已经登录到了服务门户 > 云账户 菜单中。
如果已在服务门户中登录了Azure账户,那么就可以在AutoSpot菜单中添加Azure账户了。
添加Azure账户过程中,需要按照以下顺序往返于AutoSpot账户添加页面和Azure门户页面,粘贴复制各种值。
- 如果您是第一次在AutoSpot添加账户,请点击AutoSpot添加账户页面中间或页面左上方的添加账户按钮。
- 选择Azure。
- 在Azure门户中注册一个应用程序。在AutoSpot账户添加页面中点击步骤1的应用程序注册按钮跳转到Microsoft Azure门户页面。
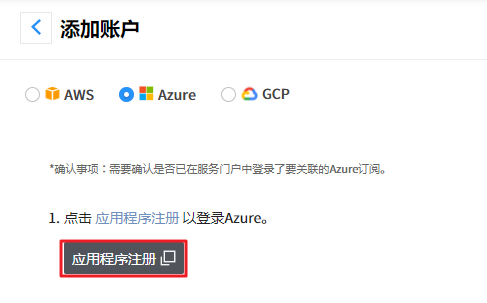
您需要有足够的权限才能在Azure AD租户上注册应用程序,并在Azure订阅中给应用程序分配角色。详情请参阅Azure门户文档。
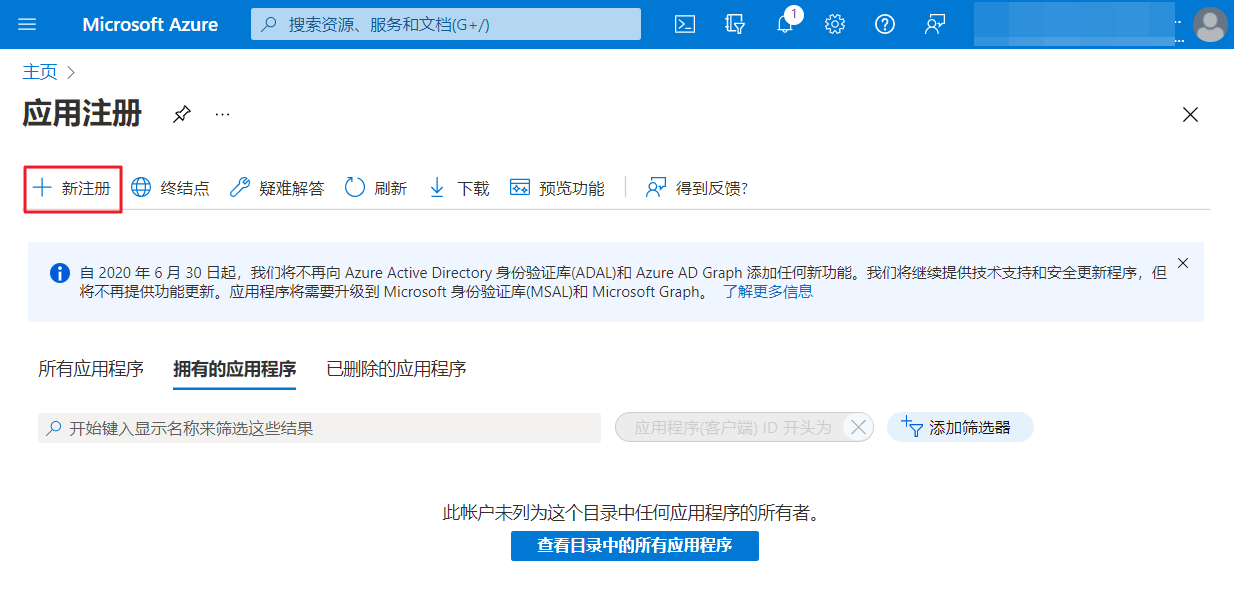
- 在主页 > 应用注册页面中点击+ 新注册按钮。
- 如下输入名称、受支持的账户类型、重定向URI。
| 输入项 | 输入值 |
|---|---|
| 名称 | AutoSpot |
| 受支持的账户类型 | 仅此组织目录中的账户(默认目录) |
| 重定向URI | 网络,https://spot.io/ |
📜 提示: Spot是SpotInst的新名称。
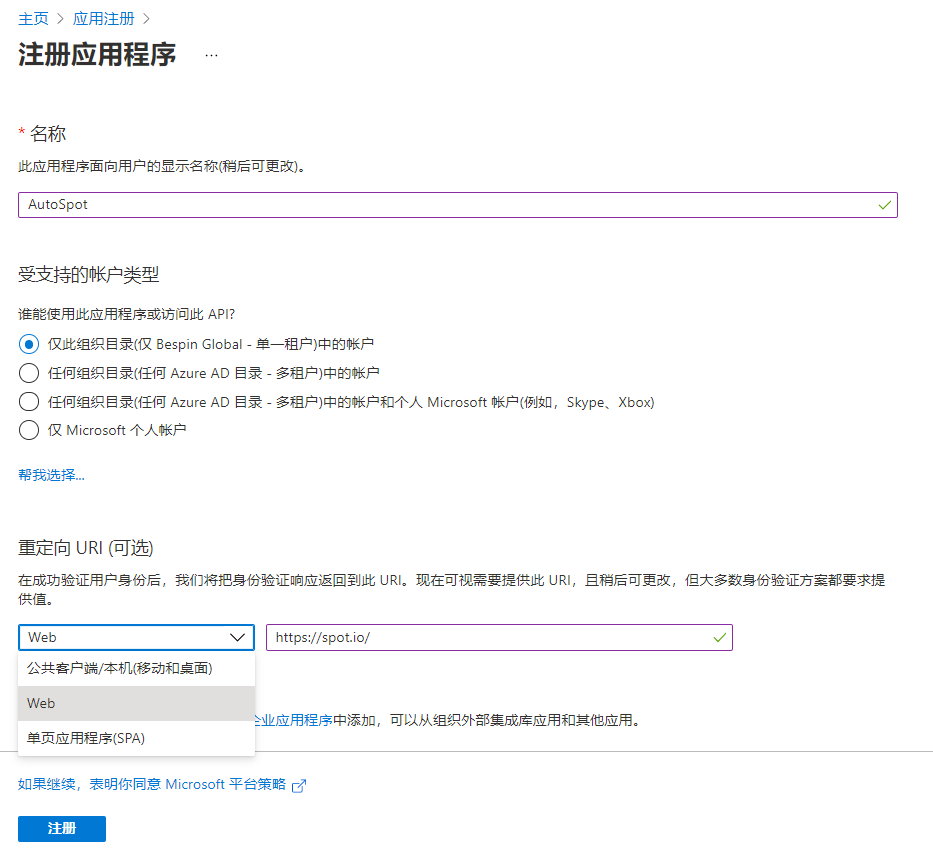
点击注册按钮,完成应用程序注册。
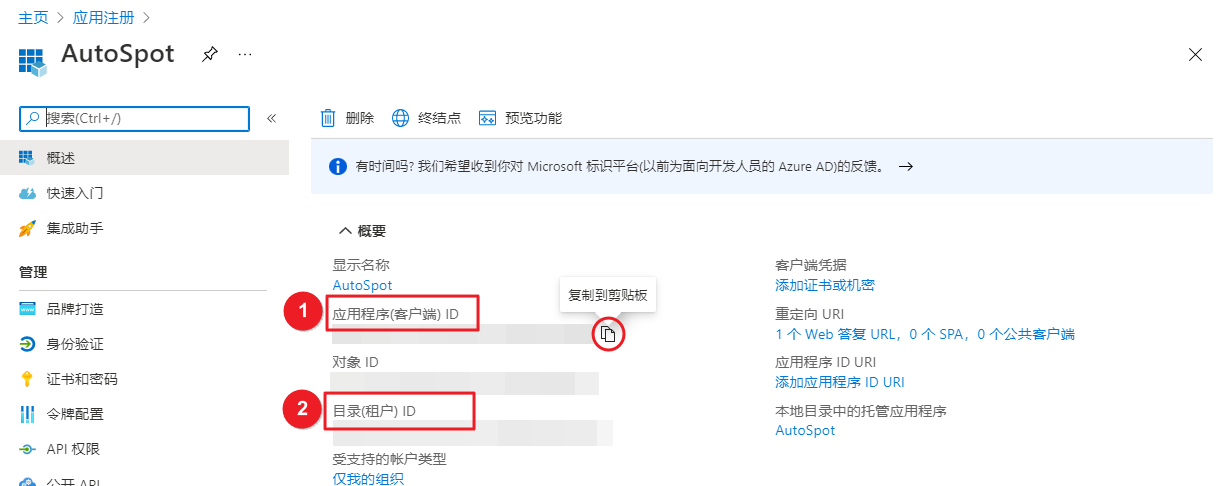
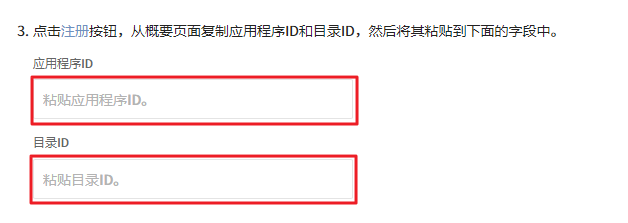
在新创建的应用程序基础信息中复制① 应用程序(客户端)ID和② 目录(租户)ID,然后将其粘贴到AutoSpot账户添加页面步骤3的输入框中。
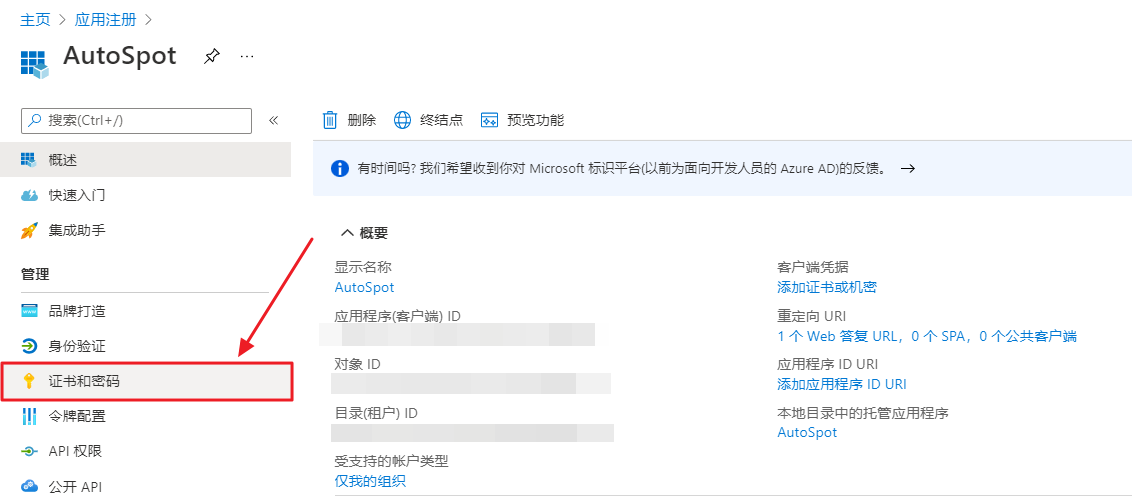
- 重新返回到Azure门户页面,点击页面左侧的证书和密码菜单。
- 点击+ 新客户端密码。
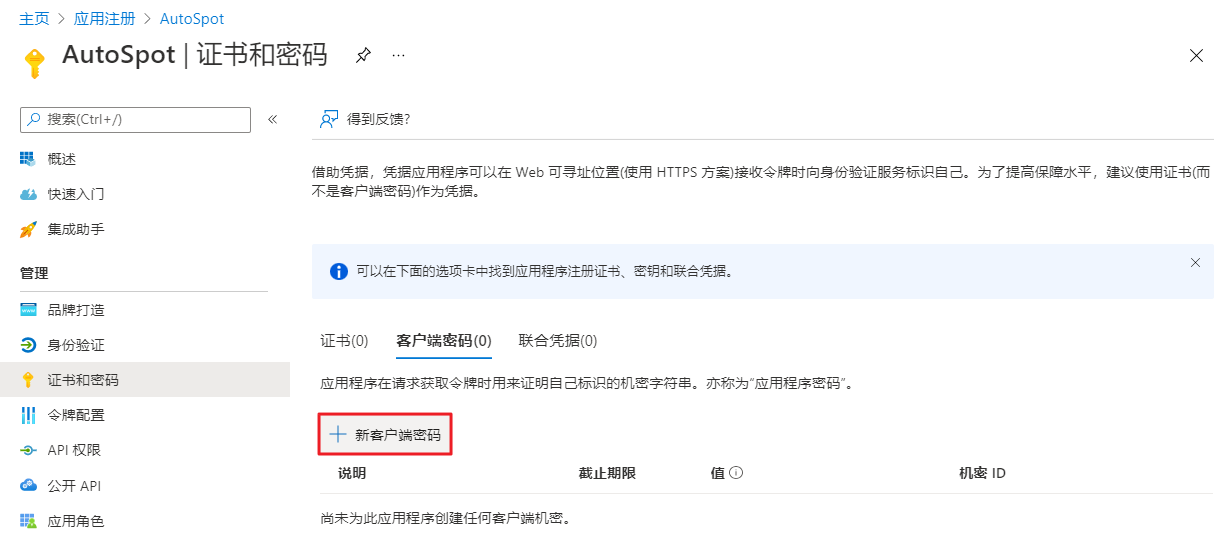
- 输入说明和截止期限后,点击添加按钮。
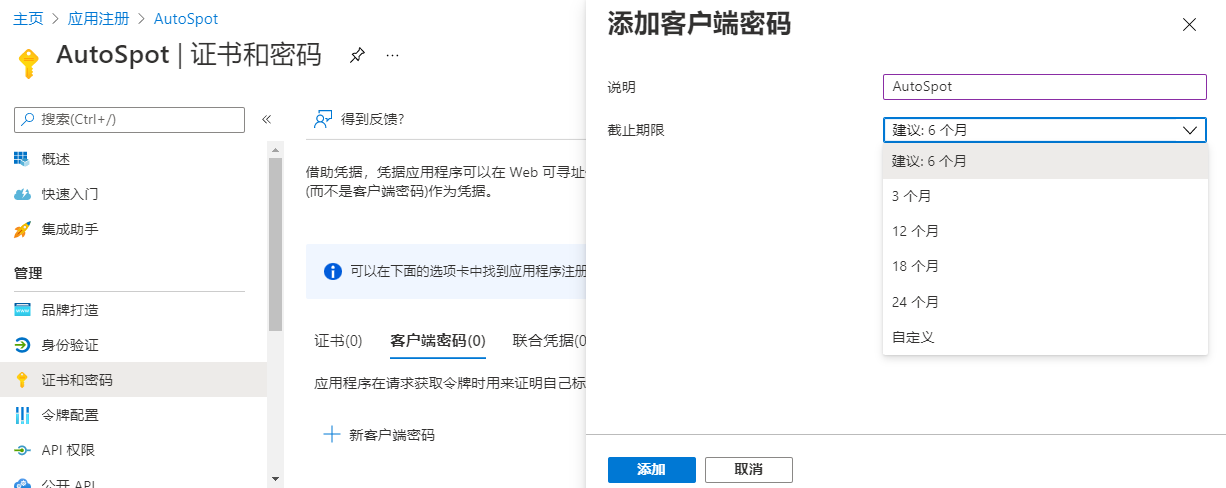
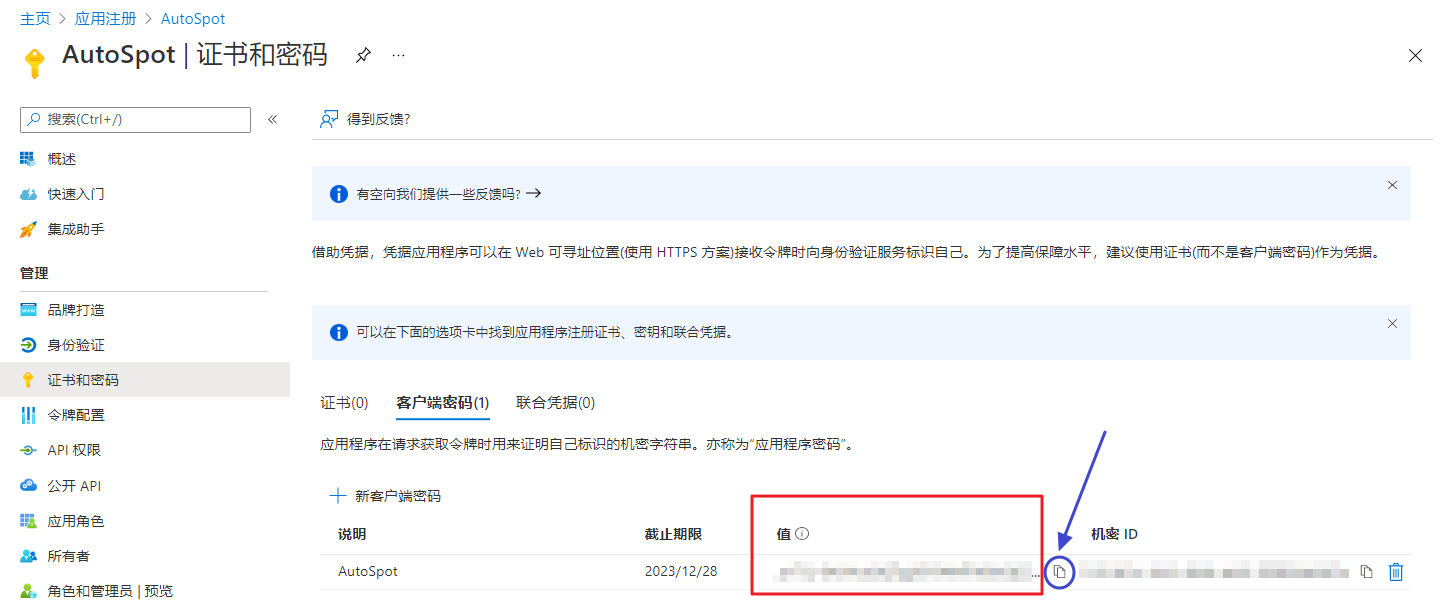
- 复制客户端密码后,输入到AutoSpot账户添加页面步骤5的输入框中。

AutoSpot账户添加页面步骤6的订阅ID列表,显示当前与登录到服务门户的Azure账户相关联的订阅ID。在列表中选择要用作AutoSpot的Azure订阅ID。
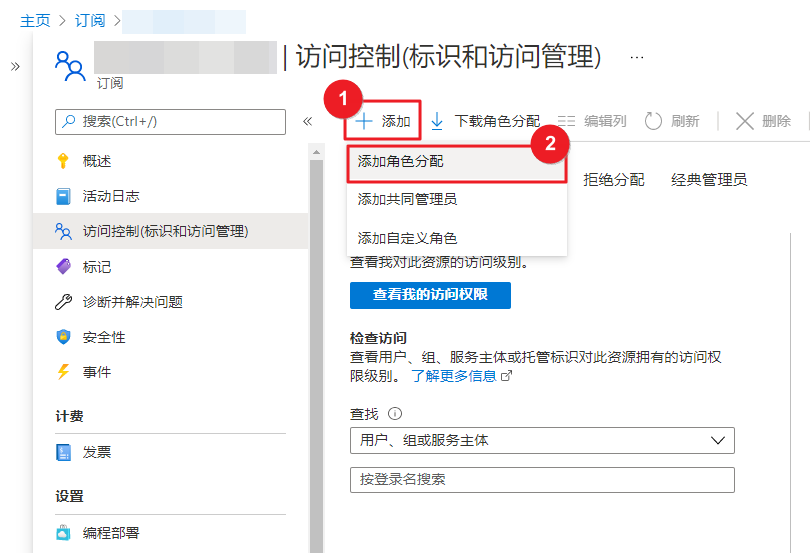
点击使用订阅ID按钮前往相应订阅的Azure门户访问控制(IAM) 页面。
点击添加按钮,然后选择添加角色分配。
- 将角色选为贡献者,然后点击下一步按钮。
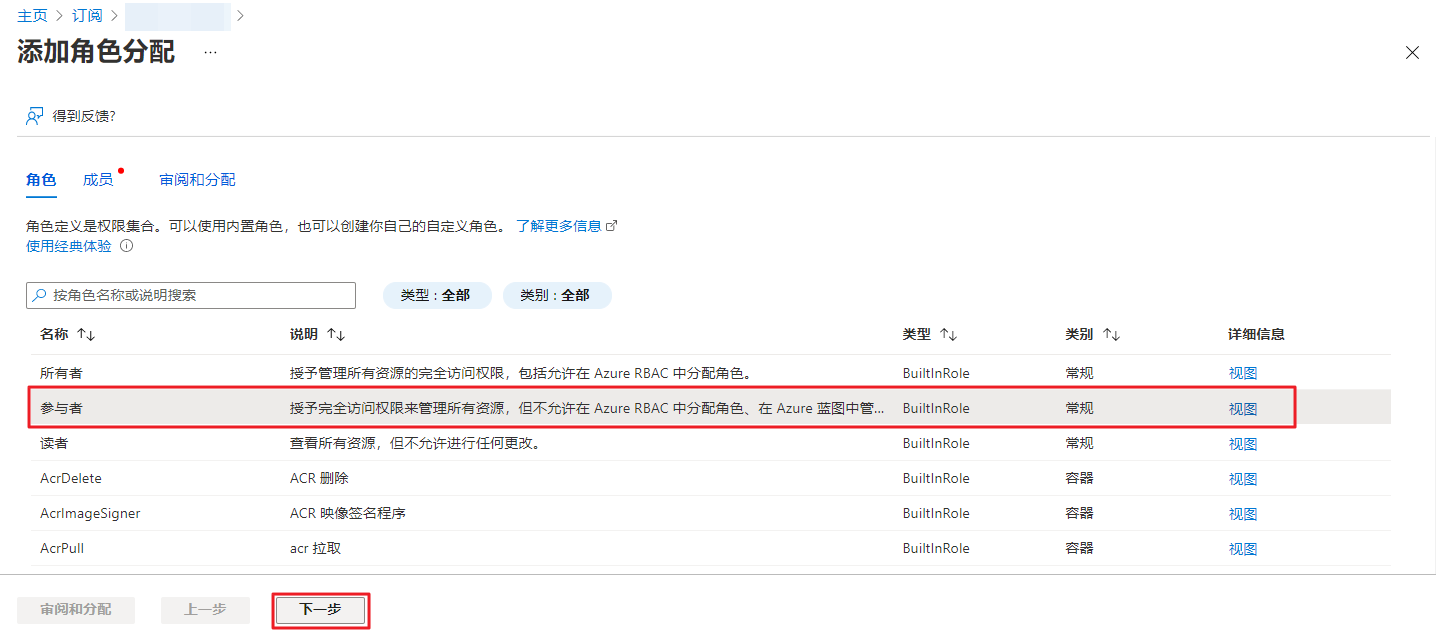
- 根据需要输入成员,在订阅中输入AutoSpot。
如果页面下方的检查 + 分配按钮是已激活的状态的话,则代表已输入了所有需要的内容。然后点击检查 + 分配按钮。
最后返回到AutoSpot添加账户页面,点击页面右下方的添加按钮完成Azure账户添加。
添加GCP云账户
在AutoSpot中添加GCP账户之前,请先确认要添加的GCP账户是否已在服务门户 > 云账户菜单中登录。
如果已经在服务门户中添加了GCP账户,那么就可以在AutoSpot菜单中添加GCP账户了。
- 如果您是第一次在AutoSpot添加账户,请点击页面中间或左上方的添加账户按钮。
- 选择GCP。
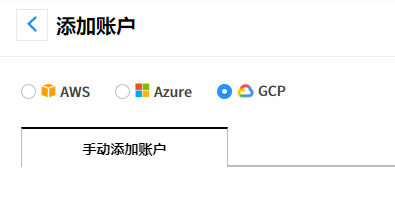
- 按照AutoSpot账户添加页面步骤1点击登录按钮,前往登录GCP控制台页面登录。
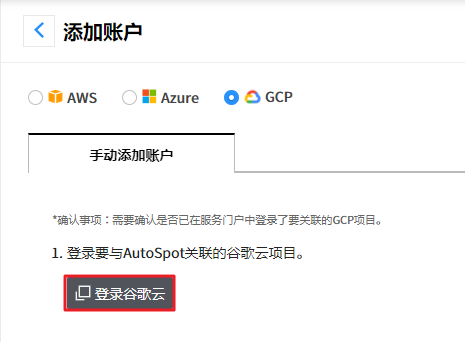
- 选择要和AutoSpot服务关联的GCP项目(①),然后前往服务帐号页面(②)。
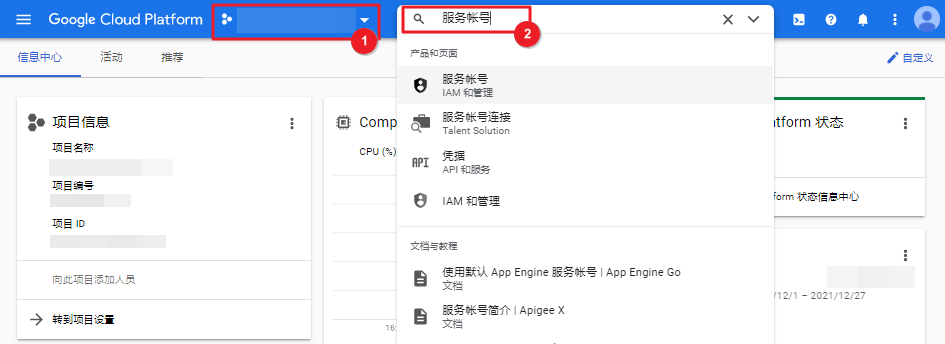
- 点击 + 创建服务帐号创建新的服务账户。

- 在服务账户名称中输入
autospot-role。
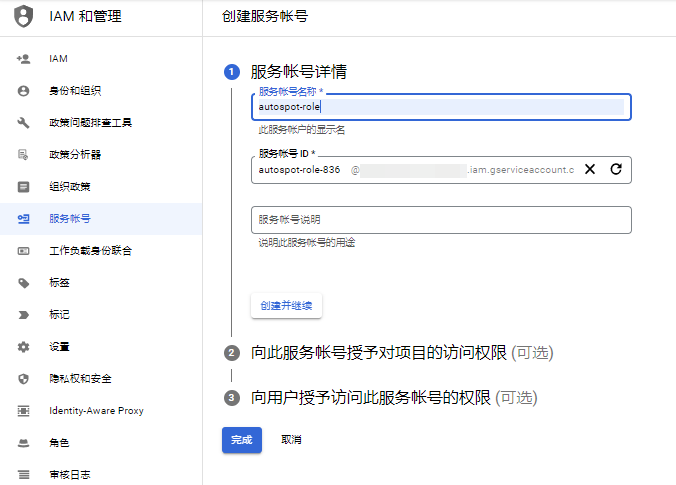
点击注册完成并继续按钮创建服务账户。即使不经过步骤2和3,也已经在此步骤中创建了服务账户。
在步骤2选择阶段,给服务账户赋予编辑者的权限后,点击继续按钮。因用户权限的限制可能不能设置编辑者权限。如遇此情况,请联系账户负责人。
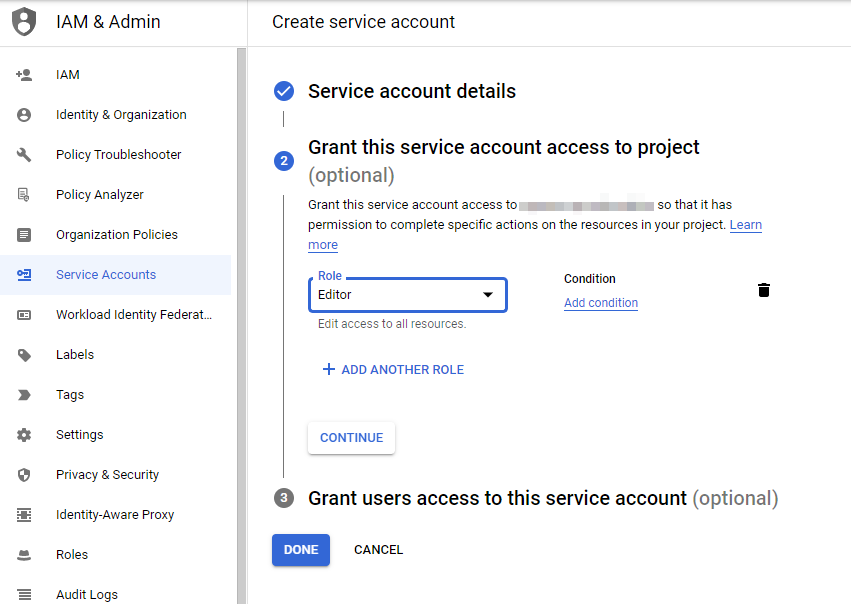
在API库中搜索
Identity and Access Management (IAM) API和Compute Engine API,并确认API是否已激活,如果未激活请一定点击使用按钮激活。获取新的服务账户密钥后,在AutoSpot账户添加页面步骤5中点击上传私钥按钮,上传获取的JSON密钥。
点击AutoSpot账户添加页面右下方的添加按钮完成GCP账户添加。
支付与折扣
费用管理 > 支付与折扣 > 折扣记录
[Discount & Credit] menu provides the details of the discounted charge applied and the remaining credit information.
View Discount History
Check your discount information by account.
- Click the column name to view the data in ascending/descending order.
- The discount amount is in USD ($).

📜 Note: Please contact your Service Contract Representative or Account Manager for details on discounts. To manage the discount information, go to the [Admin Cost Management > Customer Information > Cost Adjustment Settings] page.
View Remaining Credits
费用管理 > 支付与折扣 > 信用信息
You can check the status of credit issuance and the remaining credit status.
- Consolidated Credits are applied to the Company’s billing account.
- Individual Credits are applied to each user’s account.
- Individual credits are exhausted before consolidated credits.
⚠ Attention: If you do not configure consolidated credit or individual credit, the remaining credit may run out depending on your cloud usage.
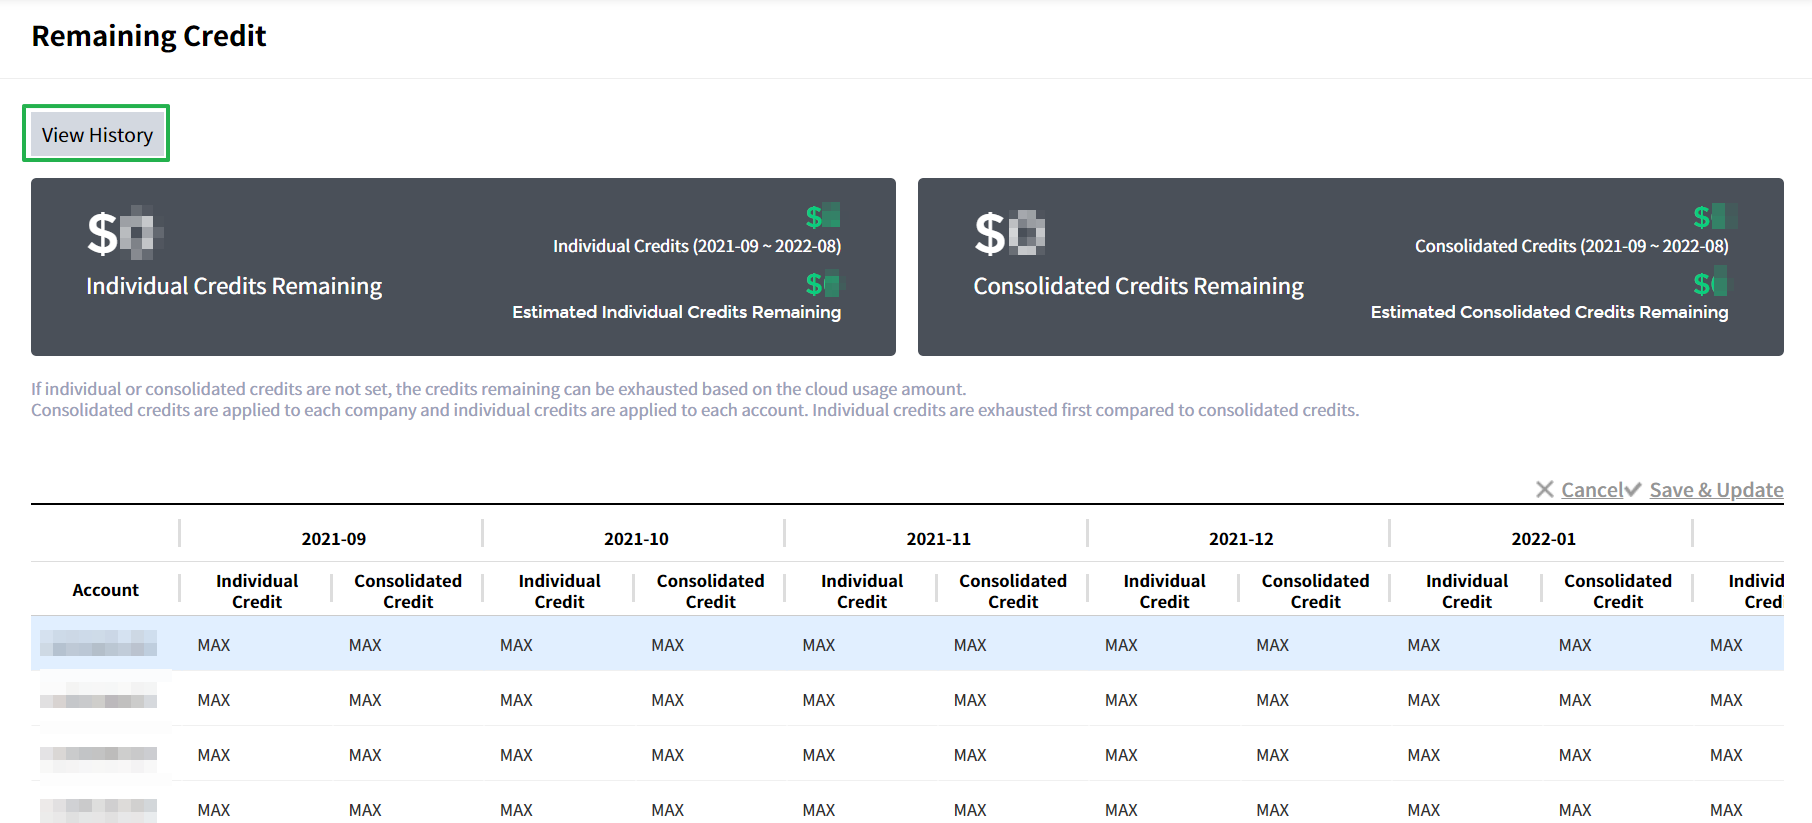
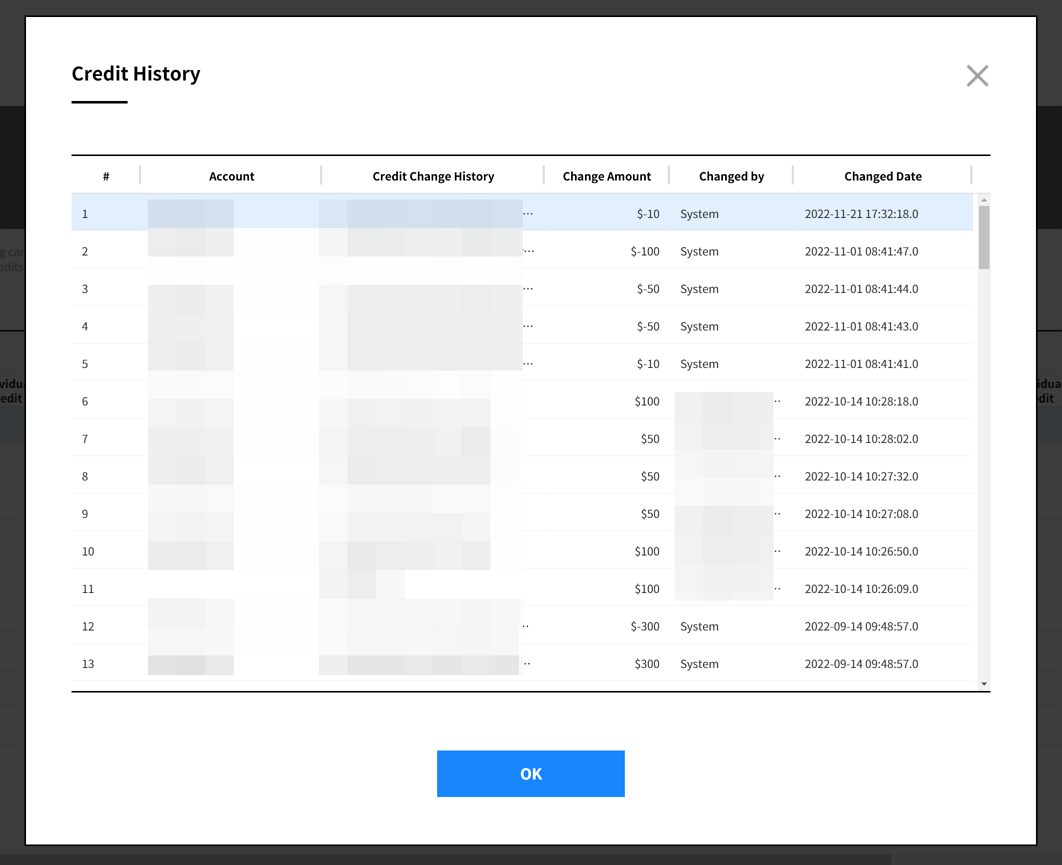
View Credit Change History
On the [Remaining Credit] page, click the [View History] button to see details of the credit change history.
If a credit is applied to a monthly charge, System will automatically exhaust the credit in that month. If a user has added or changed credit information, you can view the user information in the ‘Changed by’ column.
报告
为方便用户使用,我们会提供多款默认报告模板,用户也可根据个人意愿自行组建自定义报告,报告可直接下载或者发送至邮箱。
默认报告
费用管理 > 报告 > 默认报告
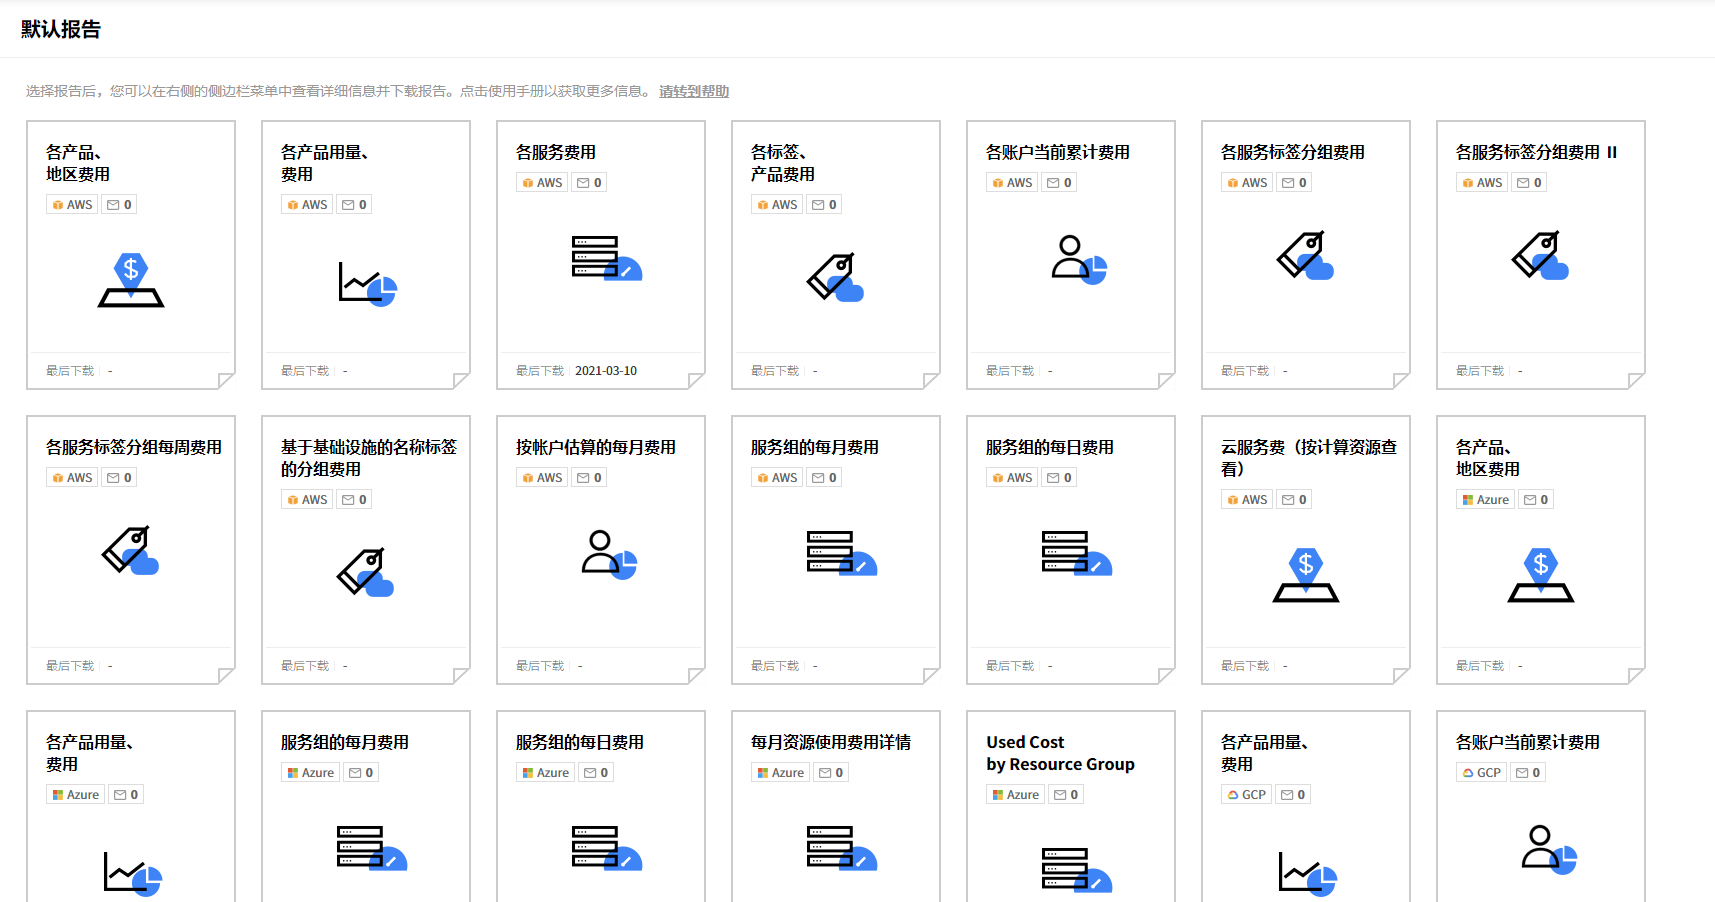
我们会按照云服务提供多款报告模板。
点击各个报告模板,右侧会显示如下所示的菜单。
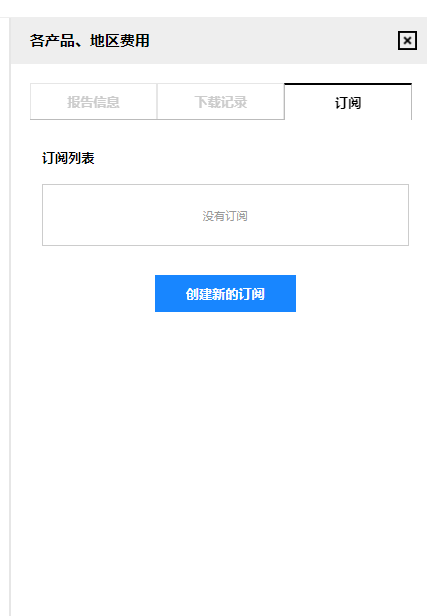
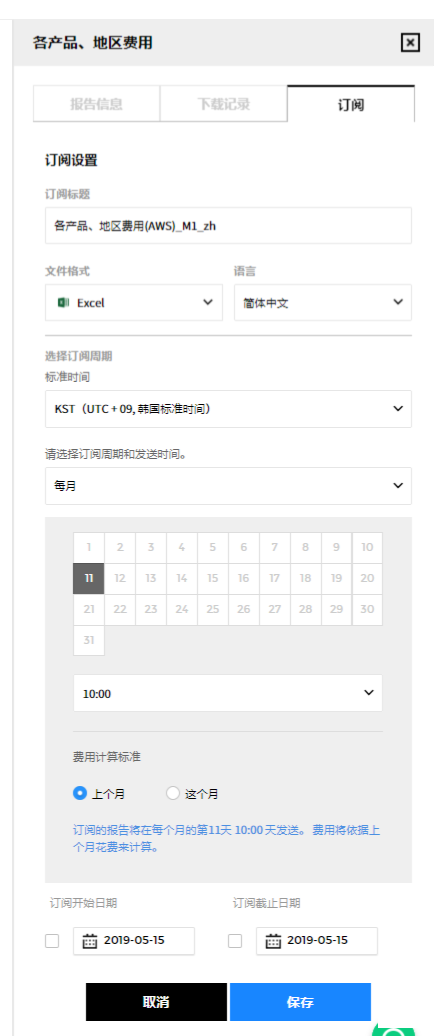
报告信息:您可设置报告创建日期、报告下载的文件格式并指定服务组。您还可在下端的详细信息板块中查看以上的信息及详细说明。
日志:此处显示按照已选模板所创建报告的下载记录。您可重新下载创建的报告。
订阅:您可以用已注册的邮箱订阅所选的报告。订阅各报告时,您不仅可将订阅周期设置为每日、每周或者每月,还可以设置订阅的发送时间。订阅报告列表中既包括您本人设置的订阅内容,也包括拥有【订阅设置】权限的其他人将您指定为订阅者的订阅内容。您可对自行设置的订阅列表进行创建、删除、修改。但当其他人在【订阅设置】菜单中将您指定为已创建订阅的订阅人时,您只能对该订阅进行查询。
![]()
创建新的订阅
若要创建新的订阅,您需要输入【订阅标题】、【文件格式】、【语言】、【标准时间】、【订阅周期】、【发送时间】。创建时会显示由报告标题、订阅周期、设置语言等信息构成的默认订阅标题。并且同样的报告模板不能设置为同样的订阅周期。
![]()
修改订阅
您可对【订阅标题】、【文件格式】、【语言】、【标准时间】、【订阅周期】、【发送时间】进行修改。并且同样的报告模板不能设置为同样的订阅周期。
自定义报告
根据国家或地区,该功能可能无法使用。
费用管理 > 报告 > 自定义报告
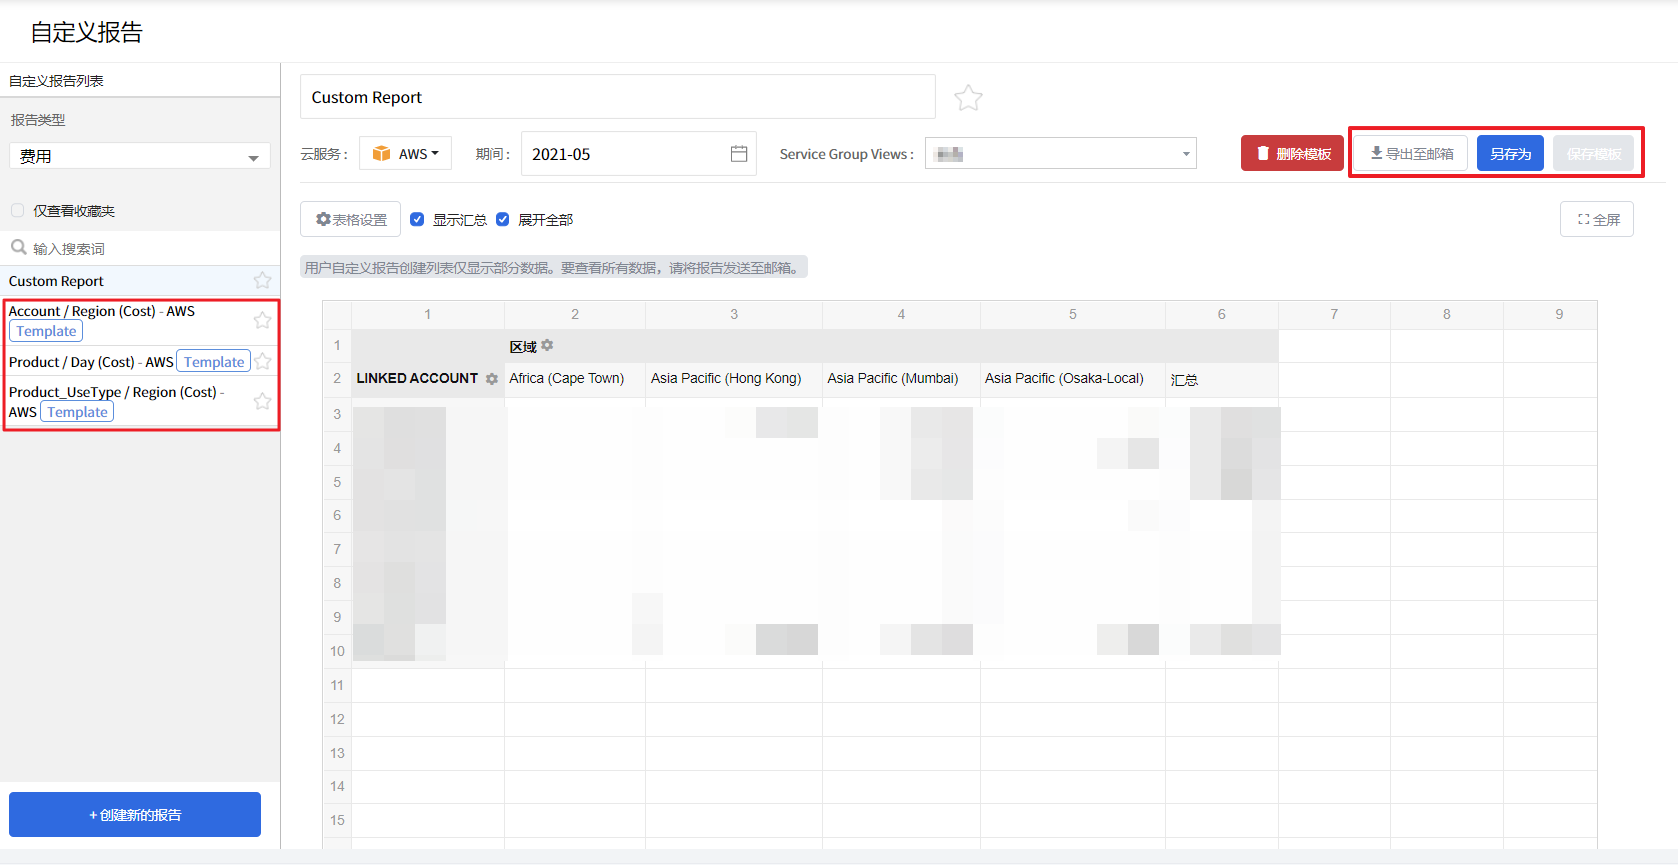
我们默认提供以下几款报告模板:各账户/地区费用报告、各产品/每日费用报告、各产品/地区费用报告。
您可选择其中一种默认报告模板,点击【另存为】然后根据意愿自行创建报告,或者点击【创建新的报告】按钮创建全新的报告。
由于自定义报告页面的目的在于创建报告,所以仅显示部分数据,如要查看所有数据,请点击【导出至邮箱】将报告导出到当前登录使用的邮箱中。
根据报告数据大小的不同,创建及传送报告所需要的时间也会产生差异。
创建自定义报告
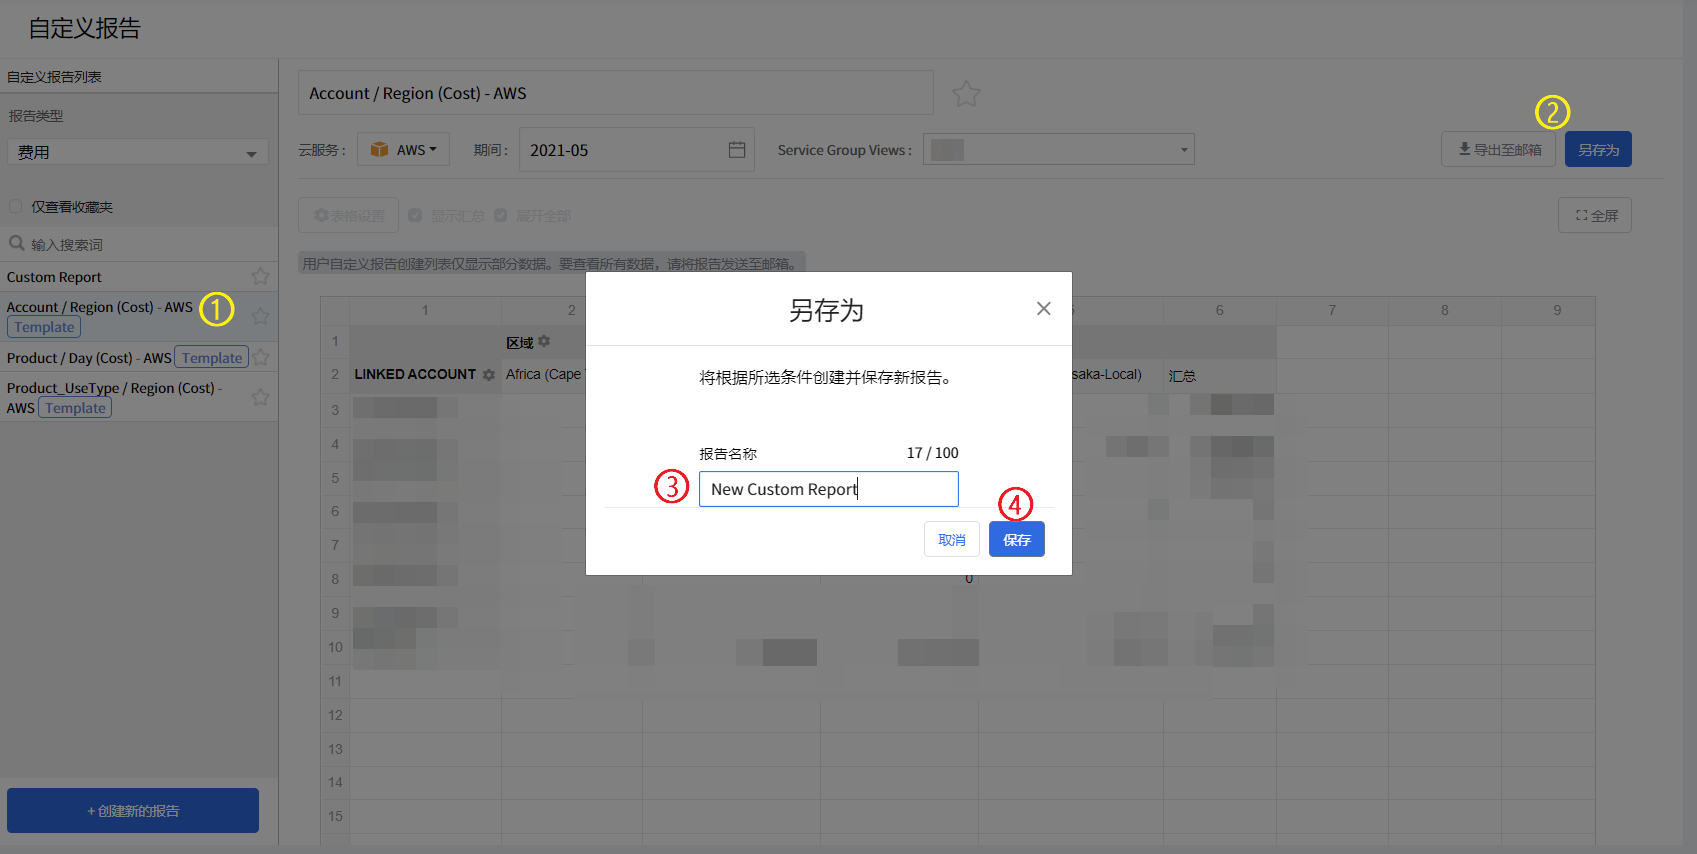
- 选则一个默认报告模板。
- 点击【另存为】按钮,开始创建新的自定义报告。
- 输入新的报告标题。
- 点击【保存】按钮。
或者您可点击页面左下角的【创建新的报告】按钮开始创建新的自定义报告。
此时自定义报告会被添加到页面左侧的自定义报告列表。
点击星标后可将该报告模板添加到收藏夹。再点击一次星标可取消收藏。
如果报告数量较多,您可使用搜索栏进行检索,快速地找到想要的报告。
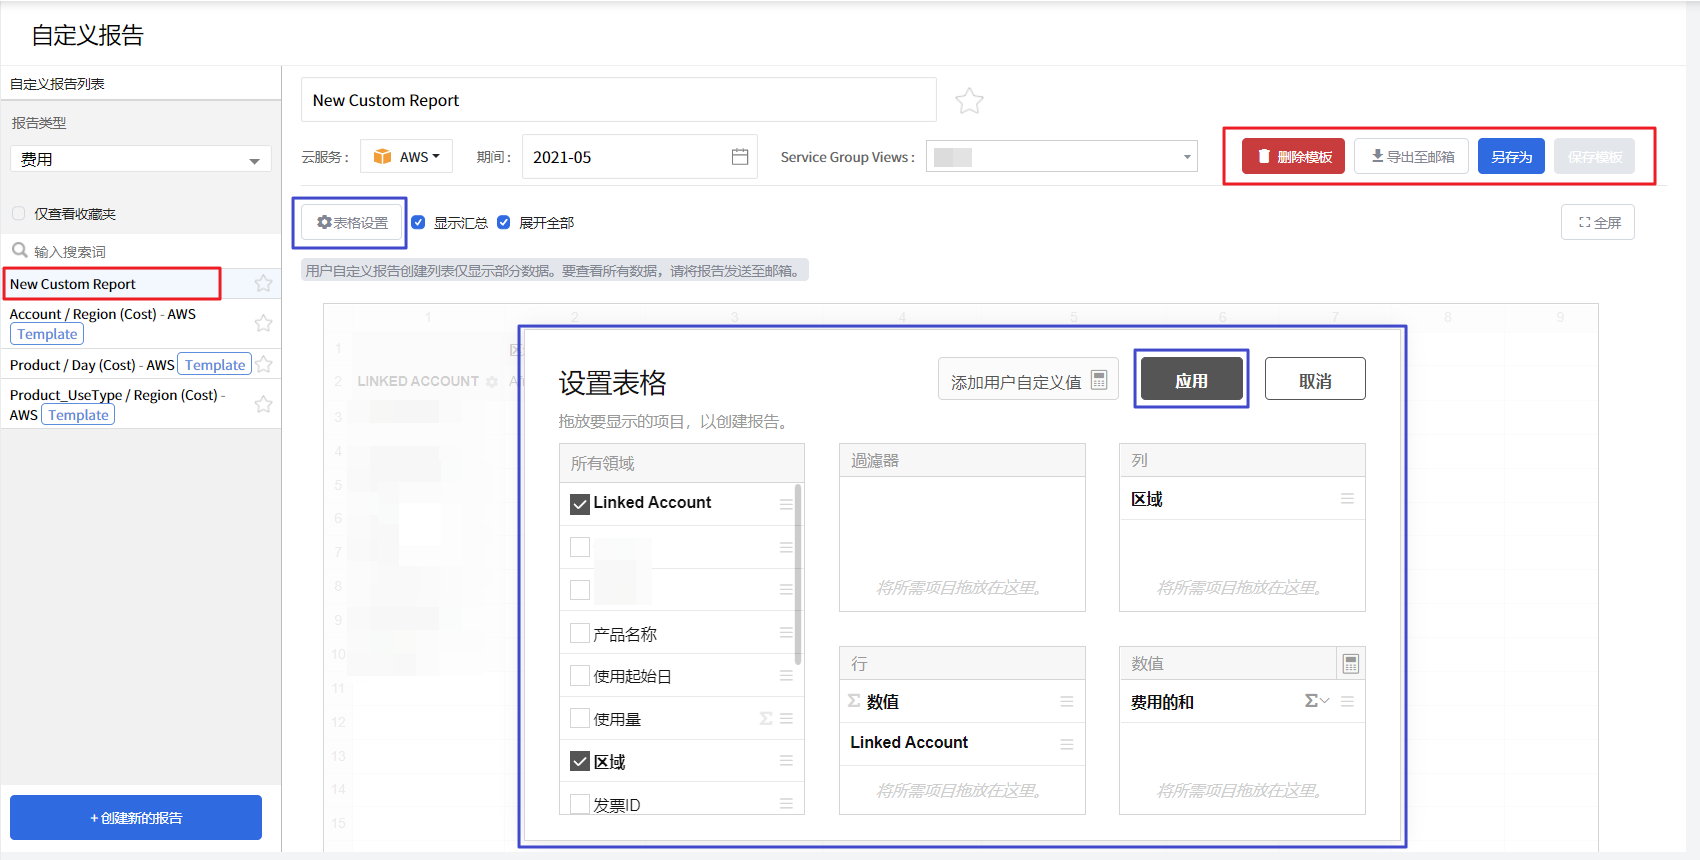
当新的自定义报告添加完成时,右上角会显示【删除模板】、【保存模板】按钮。
目前该功能仅支持AWS。未来计划支持其他云商。
订阅期限最多可选择3个月,您可选择非连续的月份。
例如:您可选择2020年 3月、 2020年 9月、 2021年 3月。
您可以勾选显示汇总和展开全部等选项框进行详细查询,也可以取消选择复选框只查看简单的数据。
点击【表格设置】按钮,在报告中选择想要的项目和筛选项,然后点击【保存】。
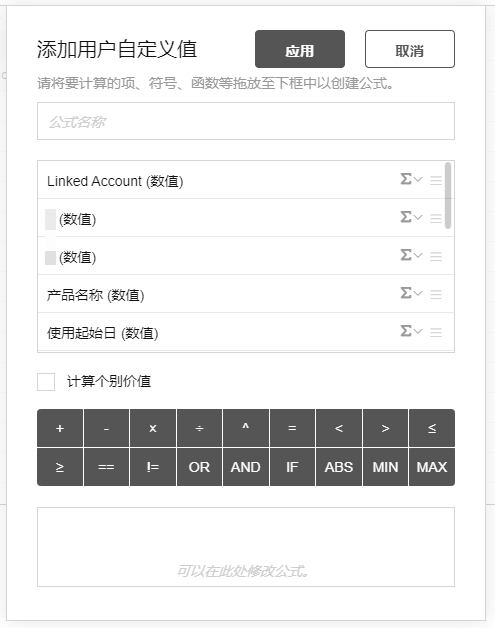
您可以随意添加计算公式。选择想要的项目、符号、函数之后将其拖拽至下端的方框内生成计算公式,然后点击【应用】按钮保存。
下载自定义报告
由于自定义报告页面的目的在于生成报告,所以仅显示部分数据,如要查看所有数据,请点击【导出至邮箱】将报告导出到当前登录使用的邮箱中。因此,由于包含大量数据,页面中查看的报告与实际发送的报告可能会有所不同。
点击邮件正文中的下载报告按钮下载报告。邮件中附带的报告下载链接自报告生成时起7日内有效。如果您想在链接有效期7日后再次下载报告,则可以通过自定义报告菜单中的【导出至邮箱】重新获取链接。
您最多可以选择3个月通过电子邮件发送报告。如果您选择并导出至邮箱的月份没有数据,则将发送一封包含没有数据的邮件给您。
根据报告数据的大小,生成和发送报告所需的时间可能会有所不同。如果您在相同条件下并在一个月内多次生成报告时,则会有3分钟左右的延迟。
报告订阅
使用费用管理服务,并为有权修改报告订阅菜单的所有客户提供自动发送邮件报告功能。通过创建、修改、删除报告订阅,管理每个订阅的历史记录以及下载已发送的文件。还可以创建和删除外部电子邮件或所需的电子邮件提供管理收件人的功能,可以在创建或修改订阅时指定收件人。在订阅历史记录中,不仅可以查看过去的发送历史记录,还可以查看已删除订阅的发送历史记录。
费用管理 > 报告订阅
订阅列表
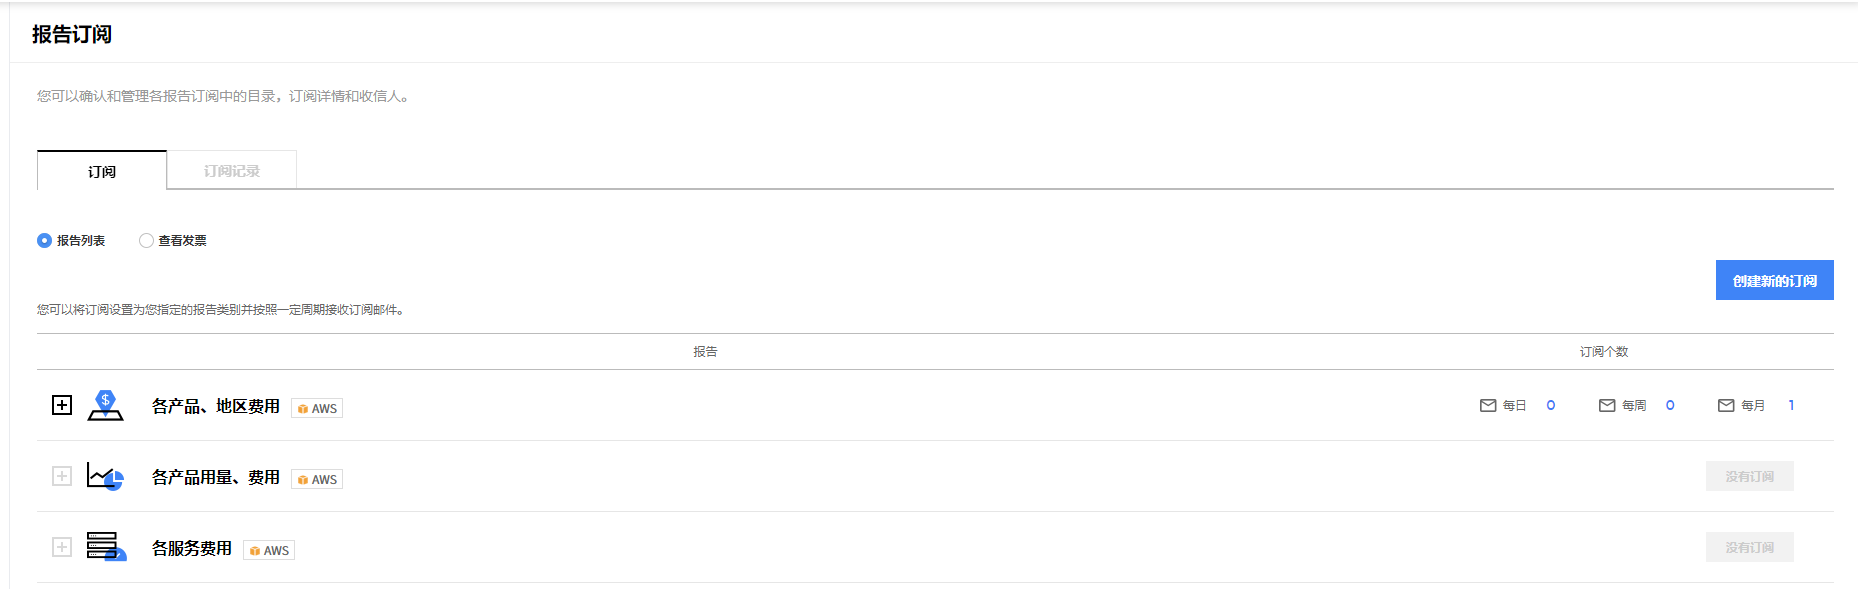
费用管理 > 报告订阅 > 订阅列表
订阅按报告类型进行管理,并通过指定期间(每日,每周,每月),语言和时间等选项生成。在订阅列表中,您可以查找订阅名称、周期、收件人信息、最近发送日期信息,通过创建,删除或修改“创建新的订阅”来管理订阅。
各产品/地区的使用费用,各产品用量、费用,各服务费用,基于基础设施的名称标签的分组费用,各服务组各地区费用,每月资源使用费用详情
创建订阅
创建订阅通过步骤4中的弹出指南进行,其中步骤1,2,3指定每个订阅所需的信息和收件人,步骤4可以查看指定的信息并更改订阅名称。
创建新的订阅步骤1
- 根据所选的报告类型,可以查看当前创建的订阅的订阅名称和周期。
- 费用管理报告提供Excel形式的报告,在账单菜单中导出的费用清单报告支持Excel和PDF格式。
- 可以通过语言选择功能指定要发送的邮件模板的语言。支持韩文、英文、中文三种语言。
- 根据报告类型最多可以创建5个订阅。
创建新的订阅步骤2
- 选择订阅的周期和发送时间。
- 报告发送周期可以选择每天、每周、每月。
- 报告的费用核算基准可以在上个月/当月之间进行选择。
- 如果想要每日接收订阅报告,请在“每日”选项卡上选择时间。
- 如果想要每周接收订阅报告,请在“每周”选项卡上选择时间和星期。
- 如果想要每月接收订阅报告,请在“每月”选项卡上选择日期和时间。
创建新的订阅步骤3
- 在步骤3中可以指定收件人。
- 最多可指定10个收件人。
创建新的订阅步骤4
- 在最后一步中,可以修改默认订阅名称。
- 如果想确认及修改已设置的信息,请点击“上一步”按钮进行修改。
修改订阅
如果需要修改创建的订阅,请从订阅列表中选择要修改的订阅,然后点击右侧的圆珠笔样式的编辑按钮。点击编辑按钮后,可以在弹出窗口中修改当前选定的订阅信息。
删除订阅
如果您不想再订阅,请点击表右侧的【X】按钮删除订阅。
- 在删除订阅之前,再次确认删除,然后点击“删除”按钮完成删除。
- 已删除的订阅的发送历史中有发送记录的话,则可在订阅详情中查看。
订阅记录
费用管理 > 报告订阅 > 订阅记录
您可以查看设置订阅后发送的明细,并且可以在最近发送的明细(一个月内)中下载文件。可以应用报告类型,发送日期和订阅名称筛选。
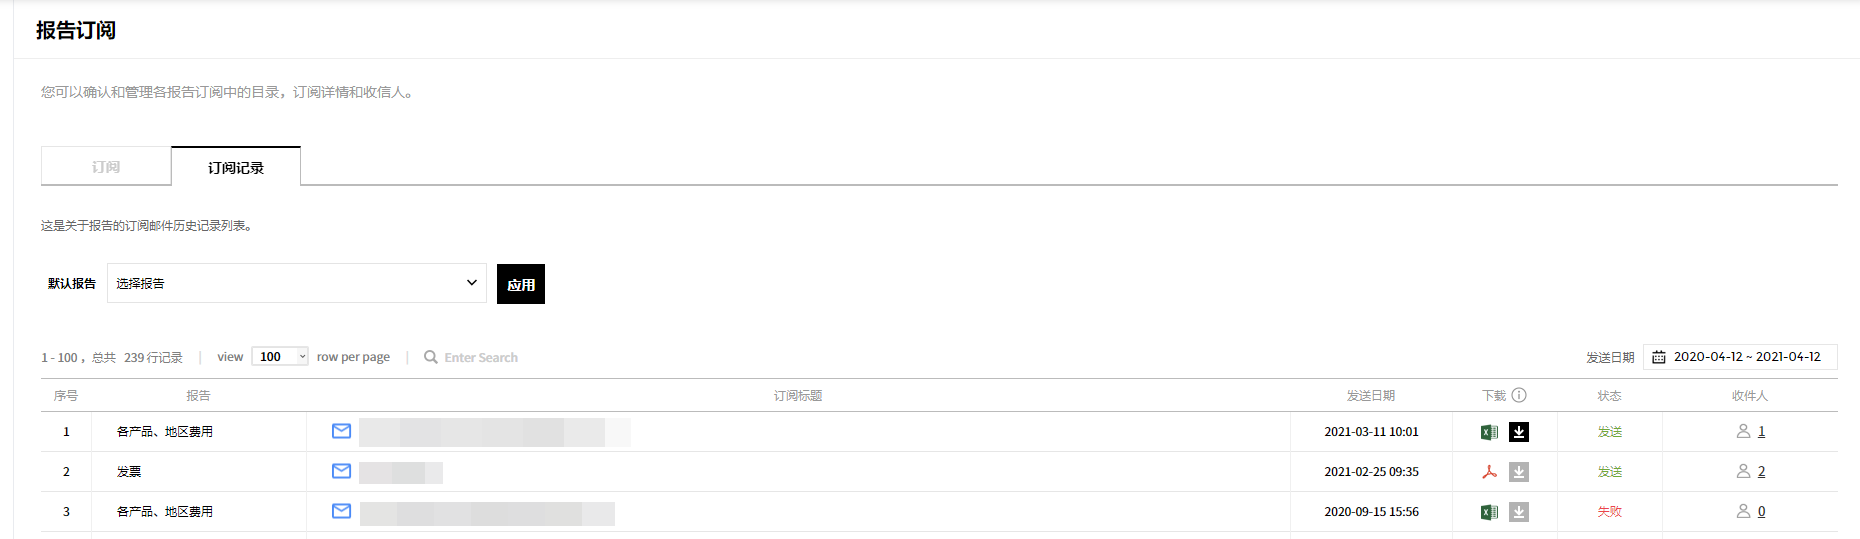
- 报告名称:显示设置订阅时选择的报告的名称。
- 订阅名称:订阅名称设置遵循默认格式,如果有单独设置的名称时,则显示该名称。
- 发送日期:发送日期和时间以YYYY-MM-DD HH:mm格式显示。
- 下载:可以通过页面上的下载图标下载最近一个月的文件。如果文件发送失败或文件已超过一个月,则下载按钮将显示为灰色,并显示为无法下载。
- 发送状态:根据邮件发送状态分别显示为等待/发送完成/发送失败。
- 收件人:显示发送订阅邮件时指定为收件人的收件人数。点击时,可以在弹出窗口中看到收件人列表。
Commitment Discounts
根据国家或地区,该功能可能无法使用。
Cloud Service Providers such as AWS, Azure, and GCP offer various pricing options. For On-Demand Instances, you pay as much as you used the resources based on the actual use time without any commitment. Reserved Instances (RI) make long-term usage commitments and offer significant savings. If you have a consistent and predictive amount of cloud resource usage, the commitment-based discount pricing models can help you maximize savings up to 72%⁕ compared to On-Demand pricing.
Check out the new and integrated [Commitment Discounts] menu to view and monitor all insightful information on one page, and start saving more!
⁕ AWS EC2 Instance Savings Plans provide the lowest price, offering savings of up to 72%, and the more flexible option, which is AWS Compute Savings Plans, helps you to reduce your costs by up to 66%.
Term Definition
- On-Demand Pricing: You pay for On-Demand Instances compute capacity by the hour or second with no long-term commitments.
- Commitments: Commitments let you buy compute capacity at a discounted hourly rate or price in exchange for a commitment to the usage of specific instances for a predefined period. AWS Reserved Instances (RI) and GCP Committed Use Discounts (CUD) are among the most well-known examples.
- On-Demand Cost Equivalent: This is a calculated value of used commitment, based on the public On-Demand prices. It is an estimated cost assuming the On-Demand rates were applied instead of commitment discounts by converting the Used Commitment amount using the On-Demand rates.
- Utilization: One of the indicators of how well you are using or benefiting from the commitment. This is the percentage of the used commitment out of the total purchased commitment. In a sense, the higher the utilization, the greater the cloud cost savings.
- Utilization = (Used commitment amount ÷ Total purchased commitment amount) × 100
- Coverage: Another indicator of how well you are using or benefiting from the commitment. This shows how much of your cloud usage was covered by the purchased commitments.
- Coverage = (On-Demand Cost Equivalent ÷ Total cost) × 100
- Savings Rate: This shows the savings effect of the commitment in numbers. First, we convert the discounted cloud resource cost into On-Demand prices and then subtract the purchased commitment amount from the converted amount. Then, divide this amount by the converted amount, which is the On-Demand Cost Equivalent amount.
- Savings Rate = (Total Savings ÷ On-Demand Cost Equivalent) × 100
- Total Savings: The difference between the On-Demand Cost Equivalent amount and the total purchased commitment amount.
- Total Savings = On-Demand Cost Equivalent - Purchased commitments
- Total Cost: Total cost of commitment-eligible cloud resource usage
- Total Cost = Commitment amount + On-Demand spend not covered by the commitments
- Payment Options:
- All Upfront: You pay for the entire commitment term with one upfront payment. This option provides you with the largest discount compared to On-Demand Instance pricing.
- Partial Upfront: You make a low upfront payment. You will be charged a discounted hourly rate for the instance for the duration of the commitment term.
- No Upfront: You are not paying anything upfront. You will be billed monthly for the commitments.
- Reserved Instances Offering Classes:
- Standard RI: This offering class provides the highest discounts (up to 72% compared to On-Demand pricing). This is a suitable option if your usage is consistent. If you purchase Standard RI, instance types cannot be changed, but it allows you to modify Availability Zone, scope, networking type, and instance size (only with Linux OS).
- Convertible RI: Convertible RI is a type of Reserved Instance with attributes that can be changed during the term. This offers up to 54% savings compared to On-Demand pricing. You can exchange one or more Convertible RI for another Convertible RI with a different configuration, including instance family, OS, and tenancy. There are no limits to how many times you perform an exchange, as long as the new Convertible RI is of an equal or higher value than the original Convertible RI that you are exchanging. The Convertible RI is useful for customers who can commit to using EC2 instances for a three-year term in exchange for a significant discount on their EC2 usage, are uncertain about their instance needs in the future, or want to benefit from changes in price.
- Instance Types: This indicates the type of cloud resources comprised of varying combinations of CPU, memory, storage, and networking capacity. One example is ‘m4.2xlarge’.
Available Pricing Models
AWS Savings Plans (SP)
Savings Plans (SP) are a flexible pricing model that offers low prices on AWS usage, in exchange for a commitment to a consistent amount of usage (measured in $/hour) for a 1- or 3-year term. To maximize the benefits of the AWS Savings Plans, discover the valuable insights in the Commitment Details Savings Plans tab menu such as utilization, coverage, inventory, and so on. You can also dive deeper to see the utilization and coverage trend charts to understand the current status at a glance. Leveraging the abundant information provided in the Commitment Discounts menu, you will get the answers to the following questions:
- How much should I commit for the Savings Plans hourly commitment?
- The Commitment Recommendations page provides specific information required for purchasing Savings Plans, including Savings Plan purchase type, term, Hourly Commitment amount, and payment option.
- Which term should I choose for the Savings Plans commitment?
- 1-year
- 3-year
- What kind of Savings Plans purchase type should I choose?
- EC2 Instance Savings Plans: Applies to instance usage within the committed EC2 family and region, regardless of size, tenancy, and operating system. You can save up to 72% compared to the On-Demand rates.
- Compute Savings Plans: Applies to EC2 instance usage, AWS Fargate, and AWS Lambda service usage, regardless of region, instance family, size, tenancy, and operating system. This is the most flexible Savings Plans pricing type.
- Mixed Savings Plans: Both EC2 Savings Plans type and Compute Savings Plans type are mixed appropriately and apply to your cloud usage.
- Where do the Savings Plans commitment discounts apply?
- Amazon EC2 usage
- AWS Fargate for AWS Elastic Container Service(ECS) usage
- AWS Fargate for AWS Elastic Kubernetes Service(EKS) usage
- AWS Lambda usage
- Amazon SageMaker usage
🔔 Notification: See Comparing AWS Savings Plans and Reserved Instances for a more detailed comparison of AWS Savings Plans and EC2 Reserved Instances pricing models.
📜 Note: For more information, see Savings Plans documentation in the AWS User Guide.
AWS Reserved Instances (RI)
📜 Note: AWS Reserved Instances are also known as ‘Reservations’ and ‘Reserved Instances (RI)’.
Amazon EC2 Reserved Instances (RIs) provide a significant discount (up to 72%) compared to On-Demand pricing and provide a capacity reservation when used in a specific Availability Zone. To maximize the benefits of the AWS RI, discover the valuable insights in the Commitment Details [Reserved Instances] tab menu such as utilization, coverage, inventory, and so on. You can also dive deeper to see the utilization and coverage trend charts to understand the current status at a glance. Leveraging the abundant information provided in the Commitment Discounts menu, you will get the answers to the following questions:
- How many Reserved Instances should I purchase?
- The Commitment Recommendations page provides specific information required for purchasing Reserved Instances, including platform, offering class, instance type, term, payment option, and recommended quantity.
- Which term should I choose for the Reserved Instances commitment?
- 1 year (1 month to 12 months)
- 3 years (12 months to 36 months)
- Which offering class should I choose?
- Convertible, or
- Standard
- Where do the Reserved Instances commitment discounts apply?
- Amazon EC2 usage,
- Amazon RDS usage,
- Amazon Redshift usage, and
- Amazon ElastiCache usage
- For what kinds of resources the recommendations are provided?
- Amazon EC2,
- Amazon RDS,
- Amazon OpenSearch,
- Amazon Redshift, and
- Amazon ElastiCache
🔔 Notification: See Comparing AWS Savings Plans and Reserved Instances for a more detailed comparison of AWS Savings Plans and EC2 Reserved Instances pricing models.
📜 Note: For more information, see Reserved Instances documentation in the AWS User Guide.
Comparing AWS Savings Plans and Reserved Instances
Reserved Instances (RI) are easier to manage since they are purchased based on the instance quantity. However, it is inconvenient for users because they have to buy additional RIs to apply the discount on different OS, instance sizes, and tenancy. On the other hand, the Savings Plans pricing model lets users commit a certain spend per hour, and therefore, they cannot secure certain computing capacity reservations. However, Savings Plans offer flexibility in changes in OS, instance size, AZ, and tenancy. If you want to secure a capacity reservation, you may look into the AWS On-Demand Capacity Reservations (ODCR).
If your compute usage goes over the committed usage using both AWS Reserved Instances and Savings Plans pricing models, any remaining usage is charged at the On-Demand rates. Also, these cannot be canceled, refunded, or exchanged after the purchase or commitment of both plans.
Refer to the table below to find your best pricing models and start saving on cloud costs.
| Item | Compute SP | EC2 Instance SP | Convertible RIs⁕⁕ | Standard RIs |
|---|---|---|---|---|
| Discount rate⁕ | Up to 66% | Up to 72% | Up to 66% | Up to 72% |
| Change instance family (ex: m4 → c5) |
✓ | — | ✓⁕⁕ | — |
| Automatically applies pricing on any instance family |
✓ | — | — | — |
| Instance size flexibility (ex: Large → 2xLarge) |
✓ | ✓ | ✓⁕⁕ | ✓⁕⁕⁕ |
| Automatically applies pricing on any instance size |
✓ | ✓ | —⁕⁕⁕⁕ | X⁕⁕⁕⁕ |
| Automatically applies pricing on any tenancy or OS |
✓ | ✓ | — | — |
| OS Flexibility (ex: Windows → Linux) |
✓ | ✓ | ✓⁕⁕ | ✓ |
| Share commitment across tenancy (ex: Shared → Dedicated) |
✓ | ✓ | ✓⁕⁕ | — |
| Share commitment across AWS organizations |
✓ | ✓ | ✓ | ✓ |
| Offers 1- and 3-year terms | ✓ | ✓ | ✓ | ✓ |
| All Upfront | ✓ | ✓ | ✓ | ✓ |
| Partial Upfront | ✓ | ✓ | ✓ | ✓ |
| No Upfront | ✓ | ✓ | ✓ | ✓ |
| Region flexibility | ✓ | — | — | — |
⁕ Discount rate compared to the On-Demand instance pricing
⁕⁕ User must make the change manually.
⁕⁕⁕ Linux instance size can be changed.
⁕⁕⁕⁕ The size of Regional Convertible RIs and Regional Standard RIs can be changed.
- Comparing supported AWS services
| AWS Service | Compute SP | EC2 Instance SP | Convertible RIs | Standard RIs |
|---|---|---|---|---|
| EC2 | ✓ | ✓ | ✓ | ✓ |
| RDS | — | — | — | ✓ |
| Redshift | — | — | — | ✓ |
| ElastiCache | — | — | — | ✓ |
| OpenSearch | — | — | — | ✓ |
| DynamoDB | — | — | — | ✓ |
| Fargate | ✓ | — | — | — |
| Lambda | ✓ | — | — | — |
- How the discounts are applied
Savings Plans are applied to the highest savings percentage, which is the same as the deepest discount rate, first. For example, if you have Windows c5.xlarge (saving 19%) and Linux c5.xlarge (saving 37%), then Savings Plans will be applied to Linux c5.xlarge first.
Savings Plans and Reserved Instances are applied to the eligible usage in the below order:
- Zonal (Availability Zone) RIs
- Regional RIs
- EC2 Instance Savings Plans
- Compute Savings Plans
- On-Demand Instances
Azure Reserved Instances (RI)
根据国家或地区,该功能可能无法使用。
Azure Reserved Instances (RI) provide a significant discount of up to 72% compared to pay-as-you-go pricing by allowing you to pre-purchase the base costs of your Azure cloud resource usage for a period of 1 or 3 years.
📜 Note: Azure Reserved Instances are also known as ‘Reservations’ and ‘Reserved Instances (RI)’.
- How many Reserved Instances should I purchase?
- The Commitment Recommendations page provides specific information required for purchasing Reserved Instances, including region, instance flexibility group, SKU, term, and Recommended Quantity.
- Which term should I choose for the Reserved Instances commitment?
- 1-year
- 3-year
- Where do the Reserved Instances commitment discounts apply?
- Virtual Machines usage
- Storage usage
- Postgre usage
- MySQL usage
- SQL Database usage
- Azure Database for MySQL usage
- SQL Managed Instance usage
- Azure Database for MariaDB usage
- Redis Cache usage
- For what kind of resources the recommendations are provided?
- Virtual Machines
📜 Note: For more information, see What are Azure Reservations? documentation in the Microsoft Azure Docs.
GCP Committed Use Discounts (CUD)
🔔 Notification: Currently, the commitment recommendations are available only for the Compute Engine product in the Commitment Recommendations.
Committed Use Discounts (CUD) are committed use contracts or commitments in return for heavily discounted prices for GCP VM usage. When you purchase a CUD, you purchase Compute Engine resources—such as vCPUs, memory, GPUs, local SSDs, and sole-tenant nodes—at a discounted price in return for committing to paying for those resources for 1 year or 3 years. Commitments are ideal for predictable and steady-state usage. Unlike AWS or Azure RI, you can choose a certain number of vCPU cores and memory capacity when you purchase the commitment.
- What commitments should I purchase?
- The Commitment Recommendations page provides specific information required for purchasing commitments, including region, duration, resource type, and commitment type.
- Which duration should I choose for the CUD commitment?
- 1 year
- 3 years
- Where do the CUD commitment discounts apply?
- Compute Engine (Virtual Machines)
- For what kind of resources the recommendations are provided?
- Virtual Machines
📜 Note: For more information, see Committed use discounts documentation in the Google Cloud Docs.
GCP Sustained use discounts (SUD)
🔔 Notification: Currently, the Sustained use discounts data is only available in the Commitment Summary menu.
Sustained Use Discounts (SUD) apply to certain Google Compute Engine resources that are used for more than 25% of a billing month and are not receiving any other discounts. The discount increases incrementally with usage and you can get up to a 30% net discount off of the resource cost for instances that run the entire month.
- Sustained use discounts apply to the following resources:
- The vCPUs and memory for general-purpose custom and predefined machine types
- The vCPUs and memory for compute-optimized machine types
- The vCPUs and memory for memory-optimized machine types
- The vCPUs and memory for sole-tenant nodes
- The 10% premium cost for sole-tenant nodes, even if the vCPUs and memory in those nodes are covered by committed use discounts
- GPU devices
📜 Note: For more information, see Sustained use discounts documentation in the Google Cloud Docs.
Commitment Summary
Commitment Discounts > Commitment Summary
You can view the essence of all cloud service providers’ active commitment information on one page in the Commitment Summary menu.
Filter Data
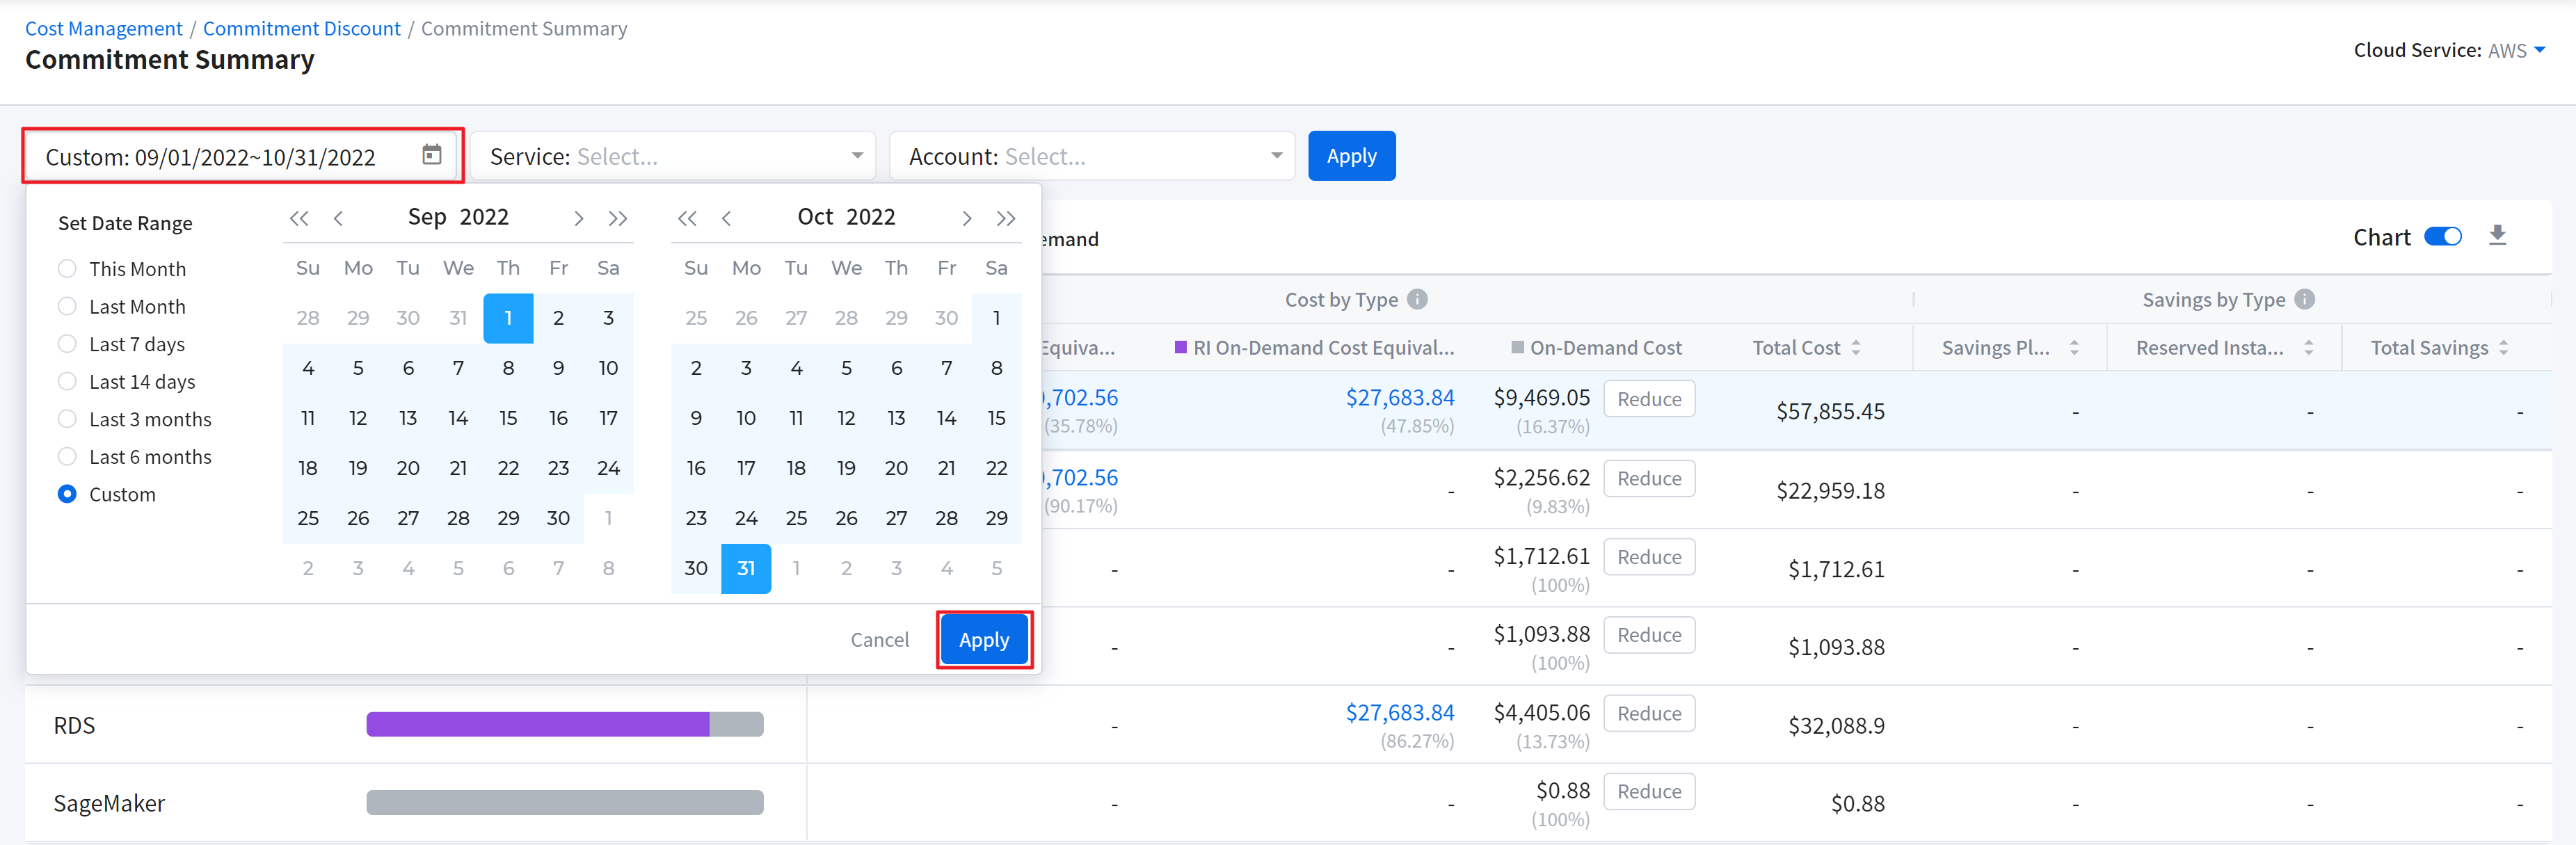
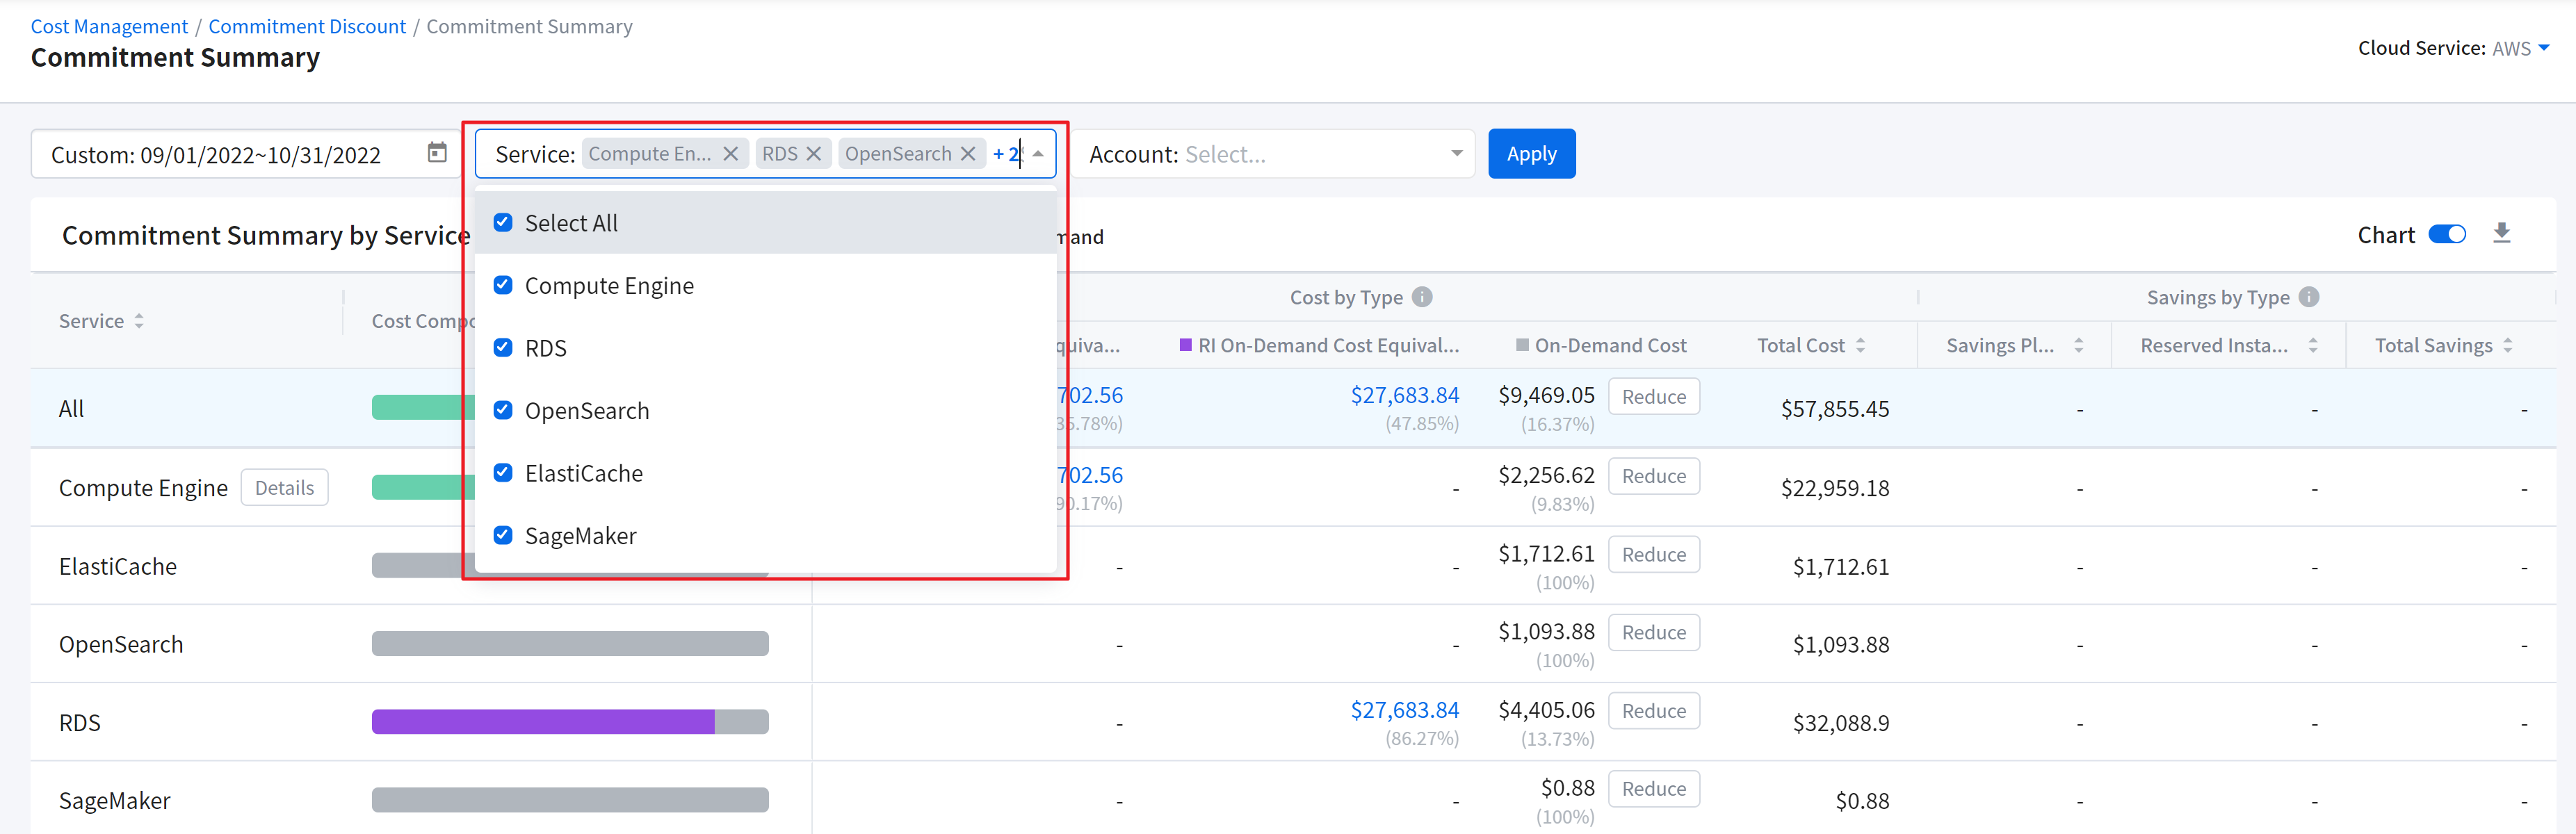
To view the desired commitment discount information, filter data according to the following steps on the Commitment Summary page.
① First, select Cloud Service in the upper right corner. Currently, AWS, Azure, and GCP are supported. For illustrative purposes, AWS is selected here.
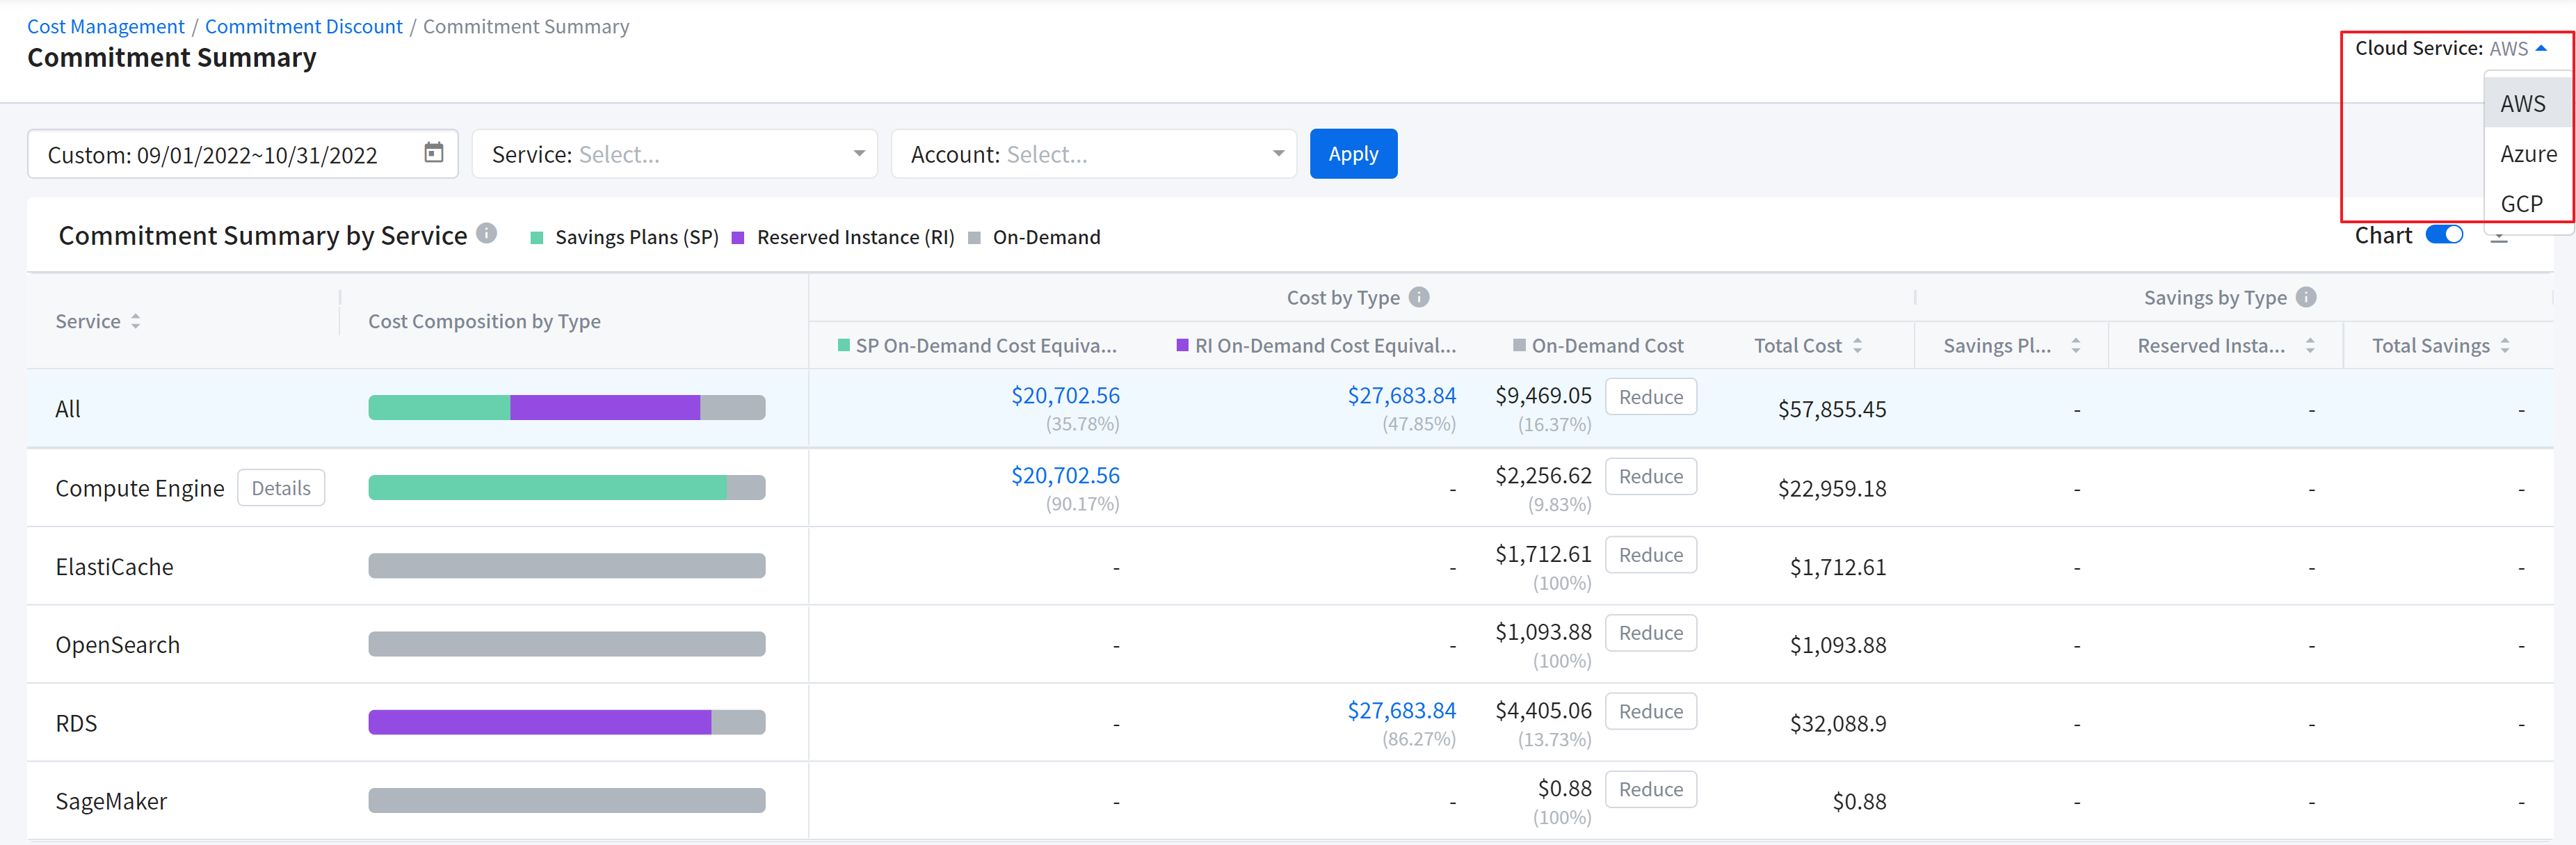
② Click the calendar and set the date range in the upper left corner, and then click [Apply].
③ Select Service. For Azure and GCP, select Product.
④ Select Accounts. For Azure, select Subscriptions and for GCP, select Projects to view data. If you want to view all data, check off [Select All].
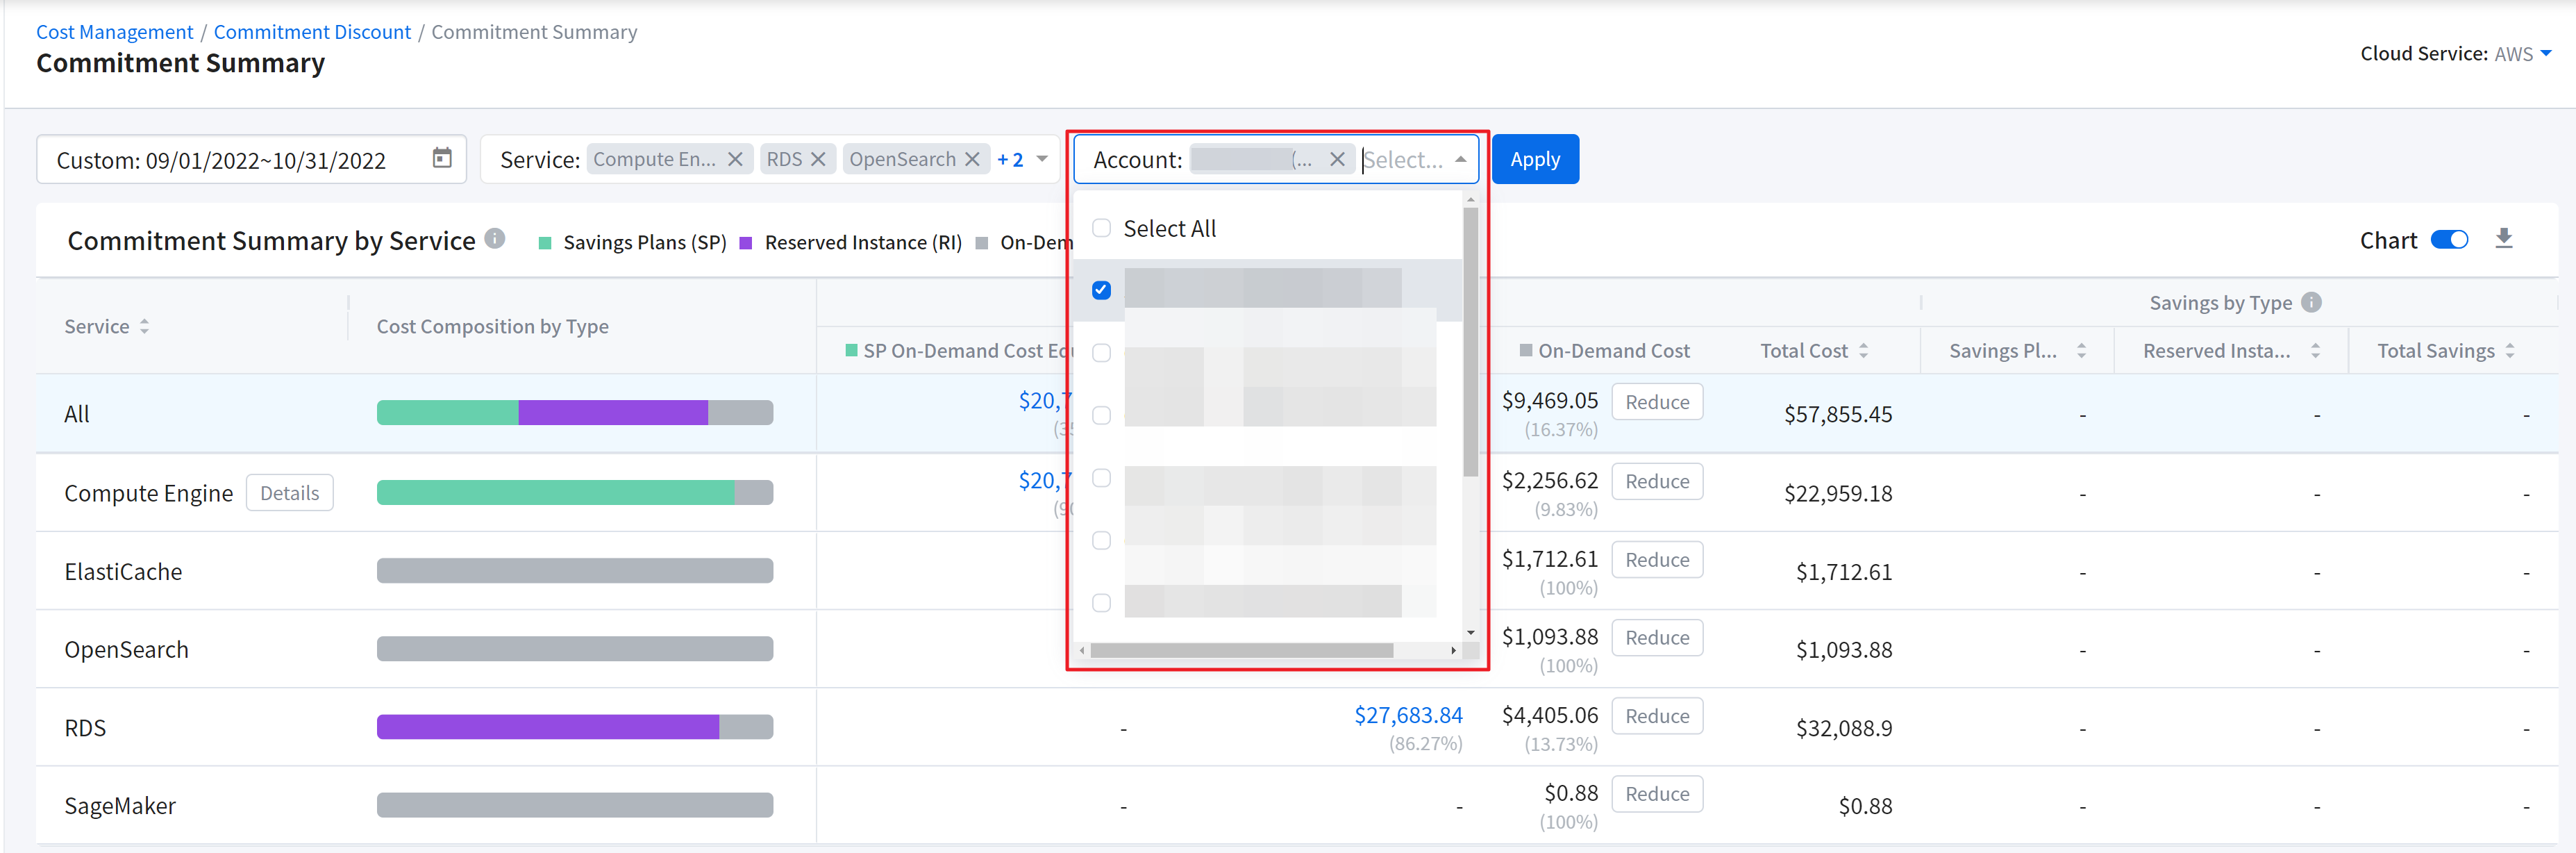
⑤ Click the [Apply] button to apply the data filter. This filter is temporarily saved, so even when you drill down or navigate away from the page, the filter conditions are kept for your convenience.
🔔 Notification: You can also download the filtered data in a CSV file. Click the [Download] icon in the upper right corner of the data table.
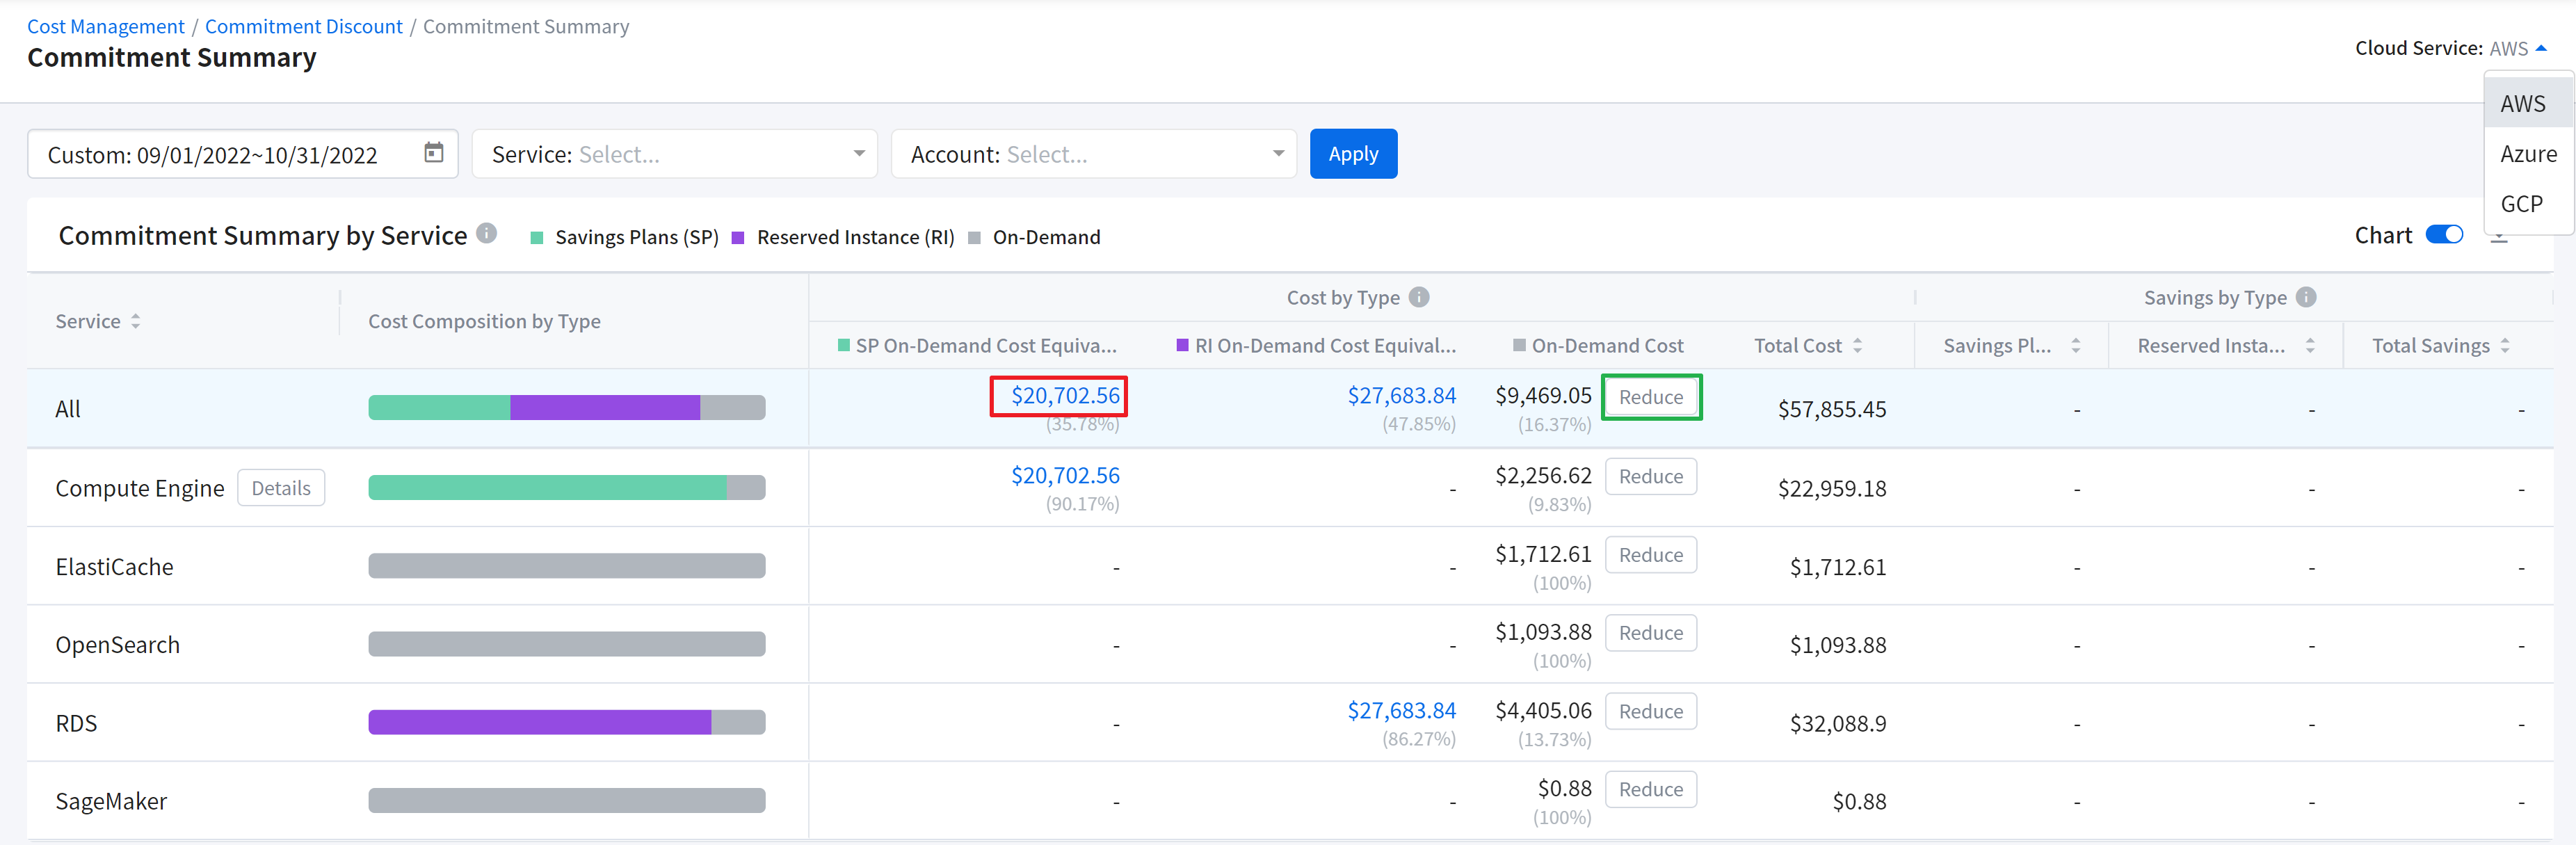
Cost Composition by Type
View the different types of commitments and how many of them are currently in use in the Cost Composition by Commitment Types chart at a glance. You can save more when the proportion of On-Demand costs is lower while that of used commitments is higher. We recommend you purchase more commitments if the proportion of On-Demand costs is high in the chart. You can hide or show the Cost Composition by Commitment Types horizontal bar chart using the toggle switch located on the top of the data table.
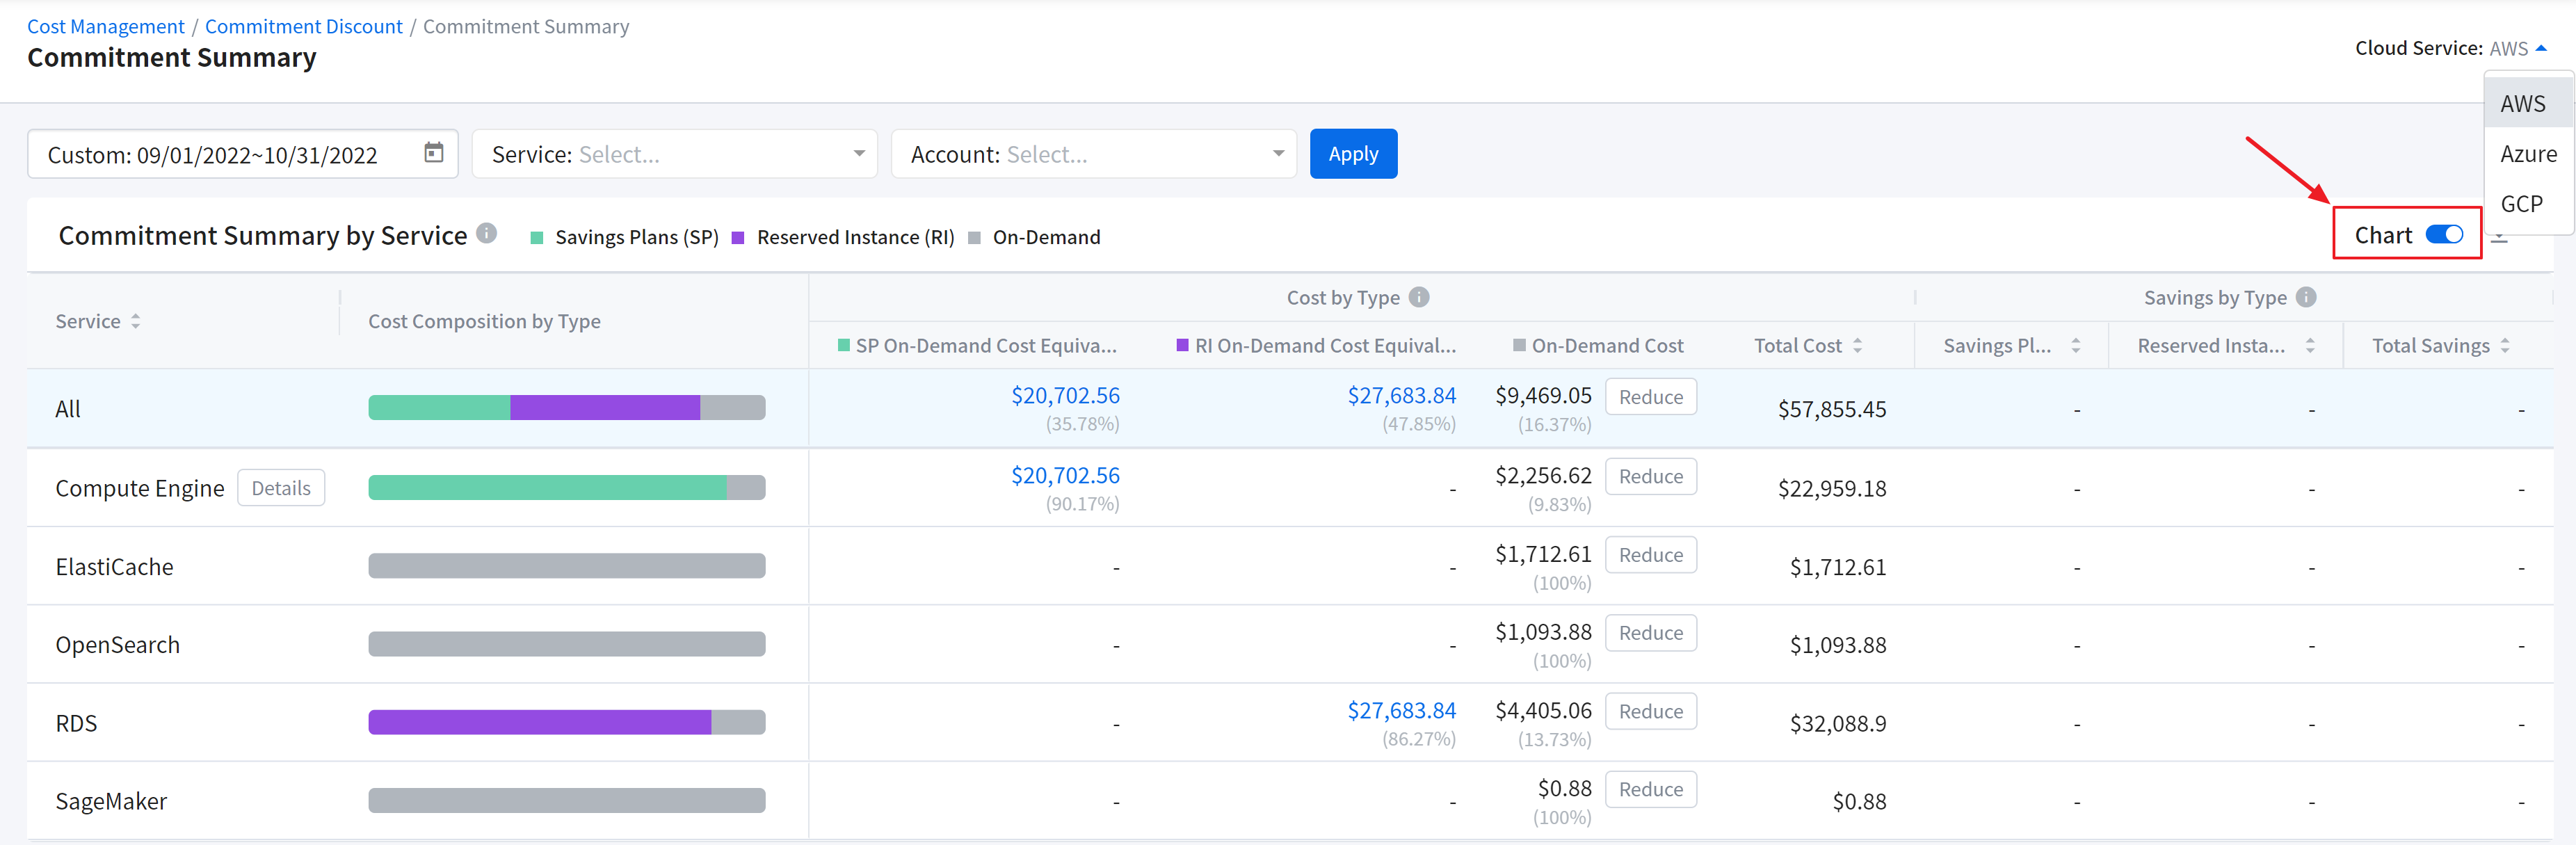
You can view the actual amount under the Cost by Type data table. Click the amount to move to the Details page.
- Click the Commitment On-Demand Cost Equivalent amount, in red box: Navigates to the Commitment Details menu
- Click [Reduce], in green box: Navigates to the Commitment Recommendations menu for more optimal cost-saving information.
![]()
View AWS Compute Engine Info
For AWS’s Amazon EC2, Amazon ECS, Amazon Lambda services, click the [Details] button next to Compute Engine in the Commitment Summary by Service.
[][summary_7]
Commitment Details
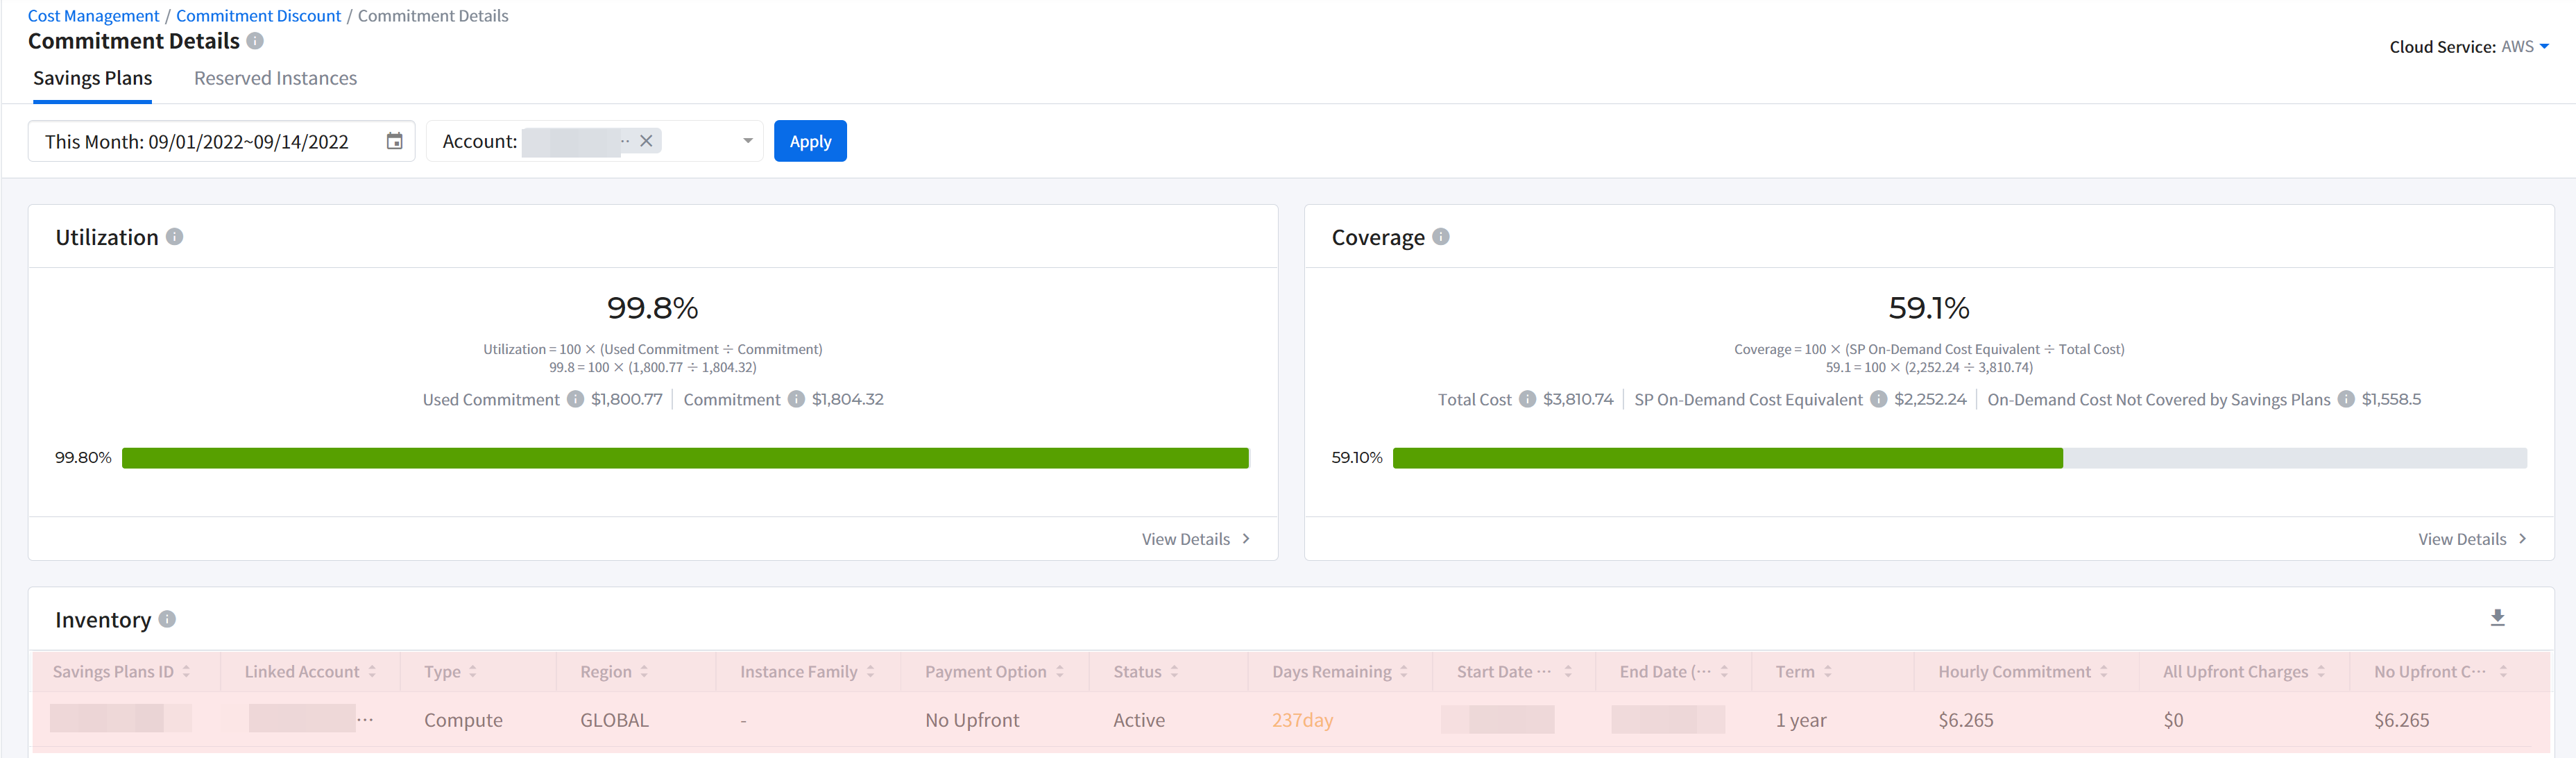
Commitment Discounts > Commitment Details
You can view the utilization, coverage, inventory and even the trends of utilization and coverage of all purchased commitments in the Commitment Details menu.
Filter Data
To view the desired commitment discount information, filter data according to the following steps on the Commitment Details page.
① First, select Cloud Service in the upper right corner. Currently, AWS, Azure, and GCP are supported. For illustrative purposes, AWS is selected here.

② Select the Commitment-type tab menu on the upper left.
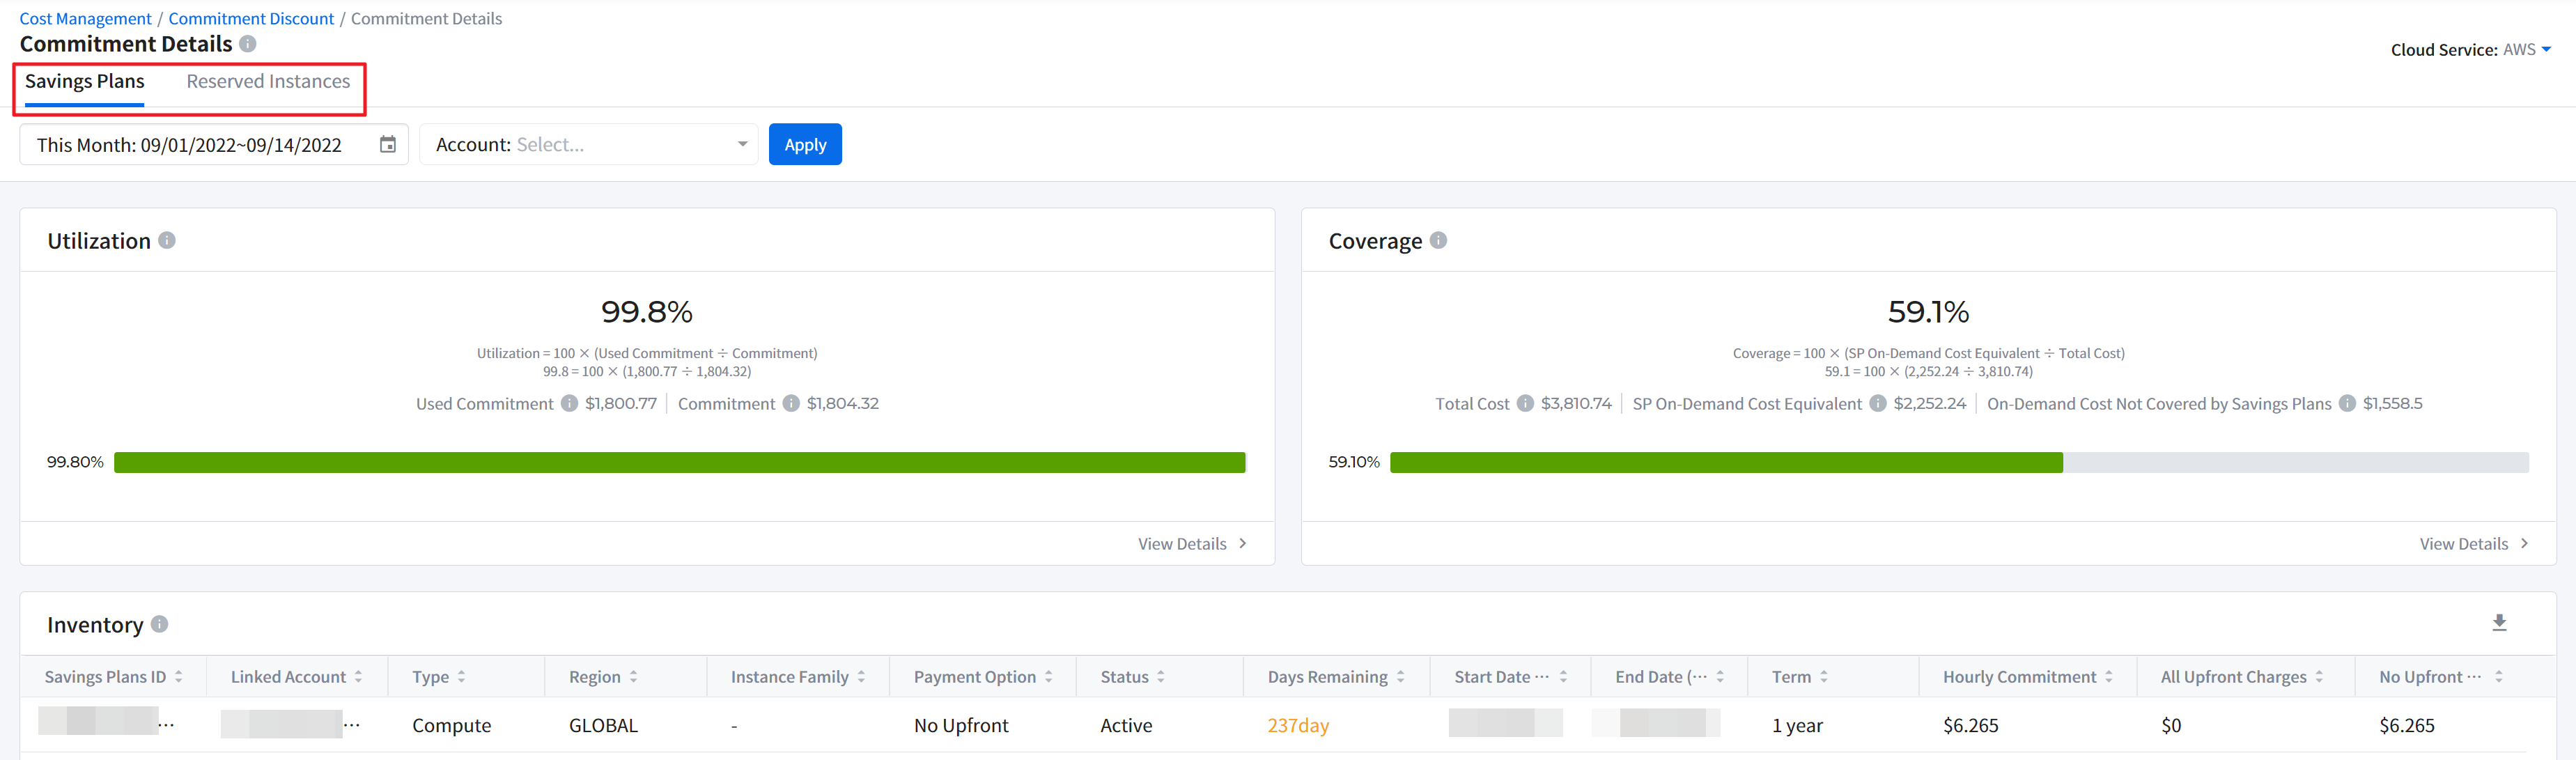
③ Click the calendar and set the date range in the upper left corner, and then click [Apply].
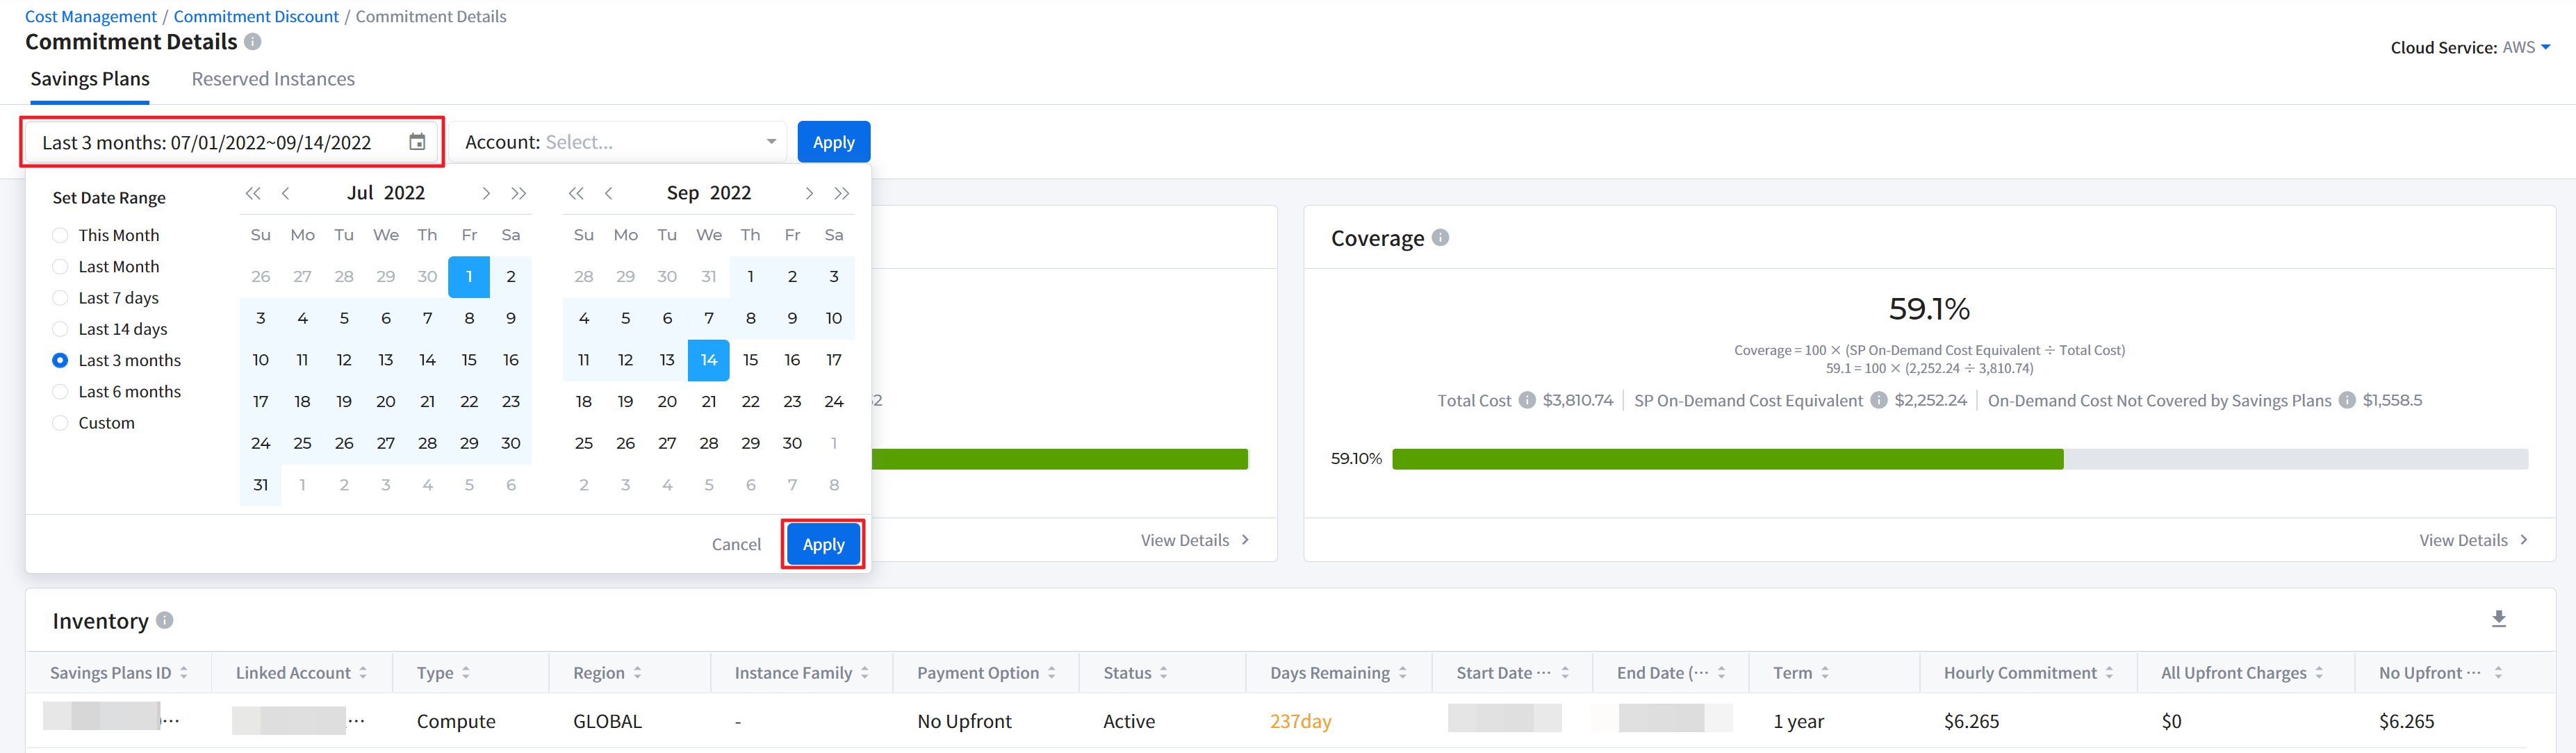
④ Select Accounts. For Azure, select Subscriptions and for GCP, select Projects to view data. If you want to view all data, check off [Select All].
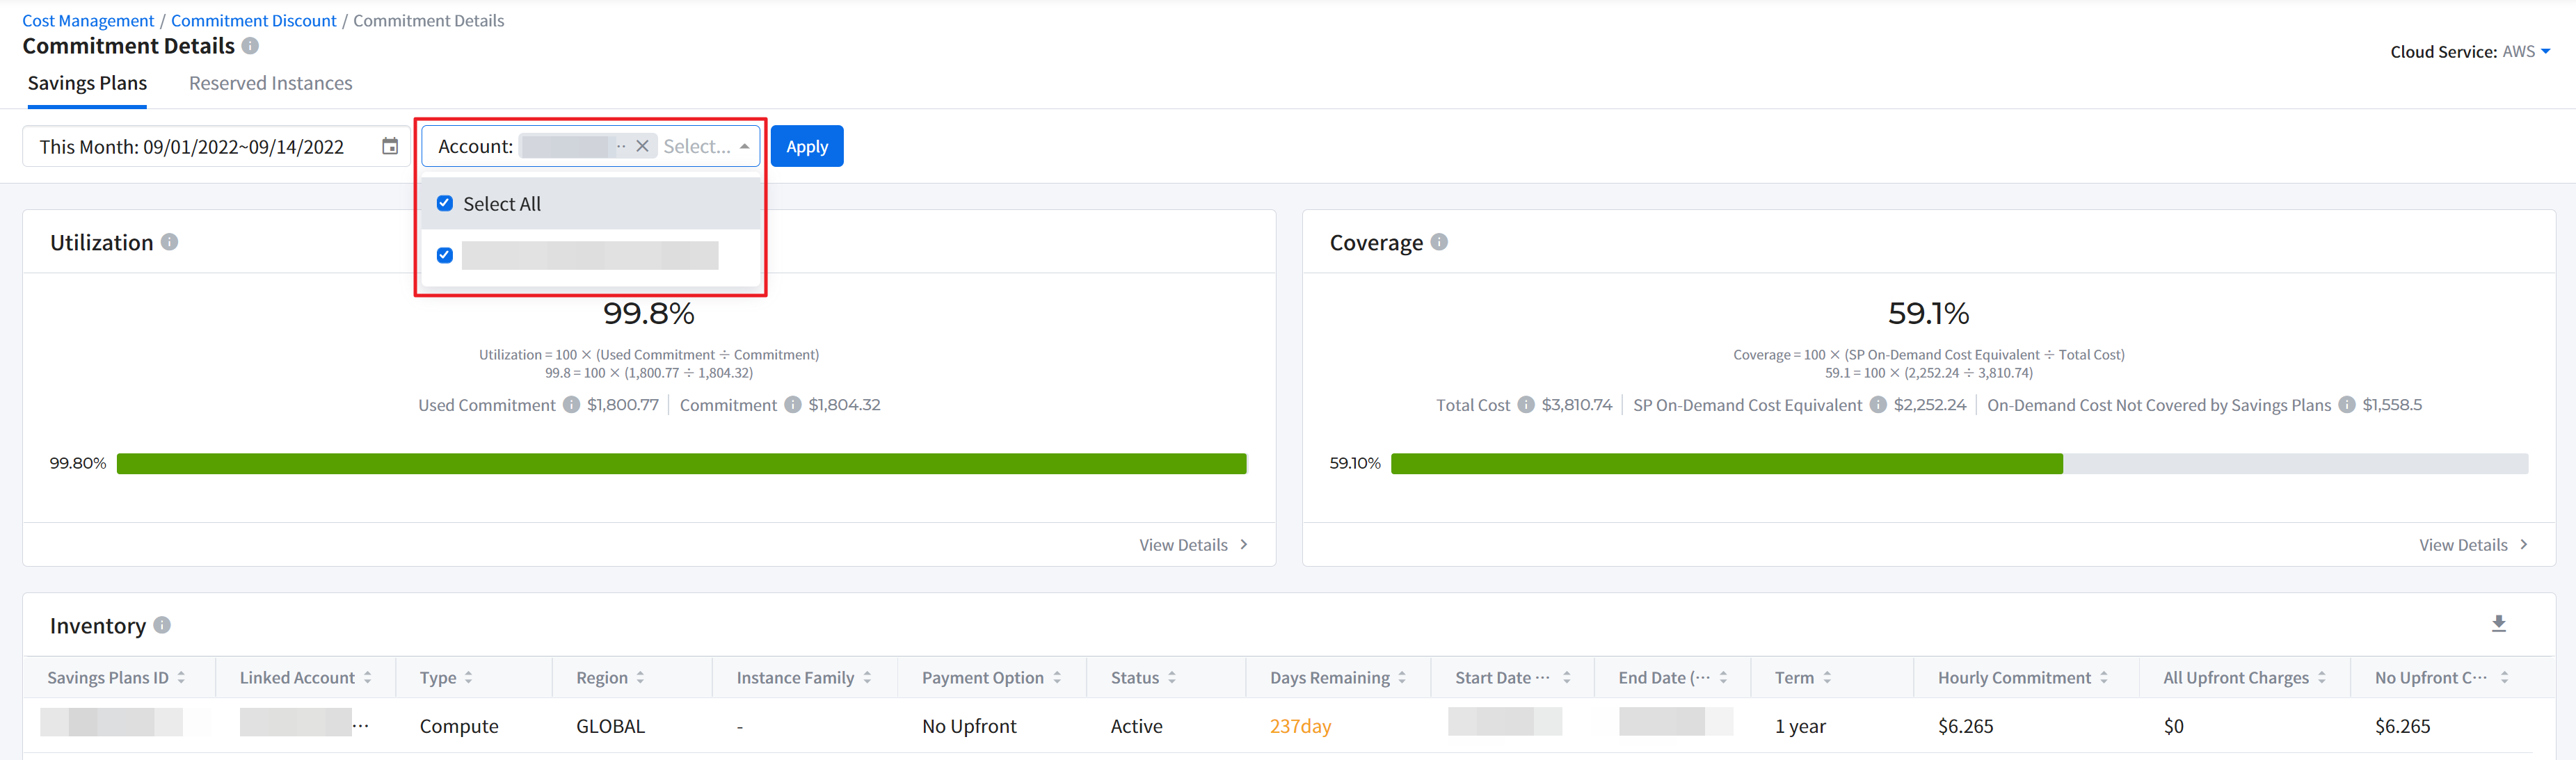
⑤ Select Service. For Azure and GCP, select Product. For AWS Savings Plans, go to ⑥ without selecting anything else.
⑥ Click the [Apply] button to apply the data filter. This filter is temporarily saved, so even when you drill down or navigate away from the page, the filter conditions are kept for your convenience.
🔔 Notification: You can also download the filtered data in a CSV file. Click the [Download] icon in the upper right corner of the data table.
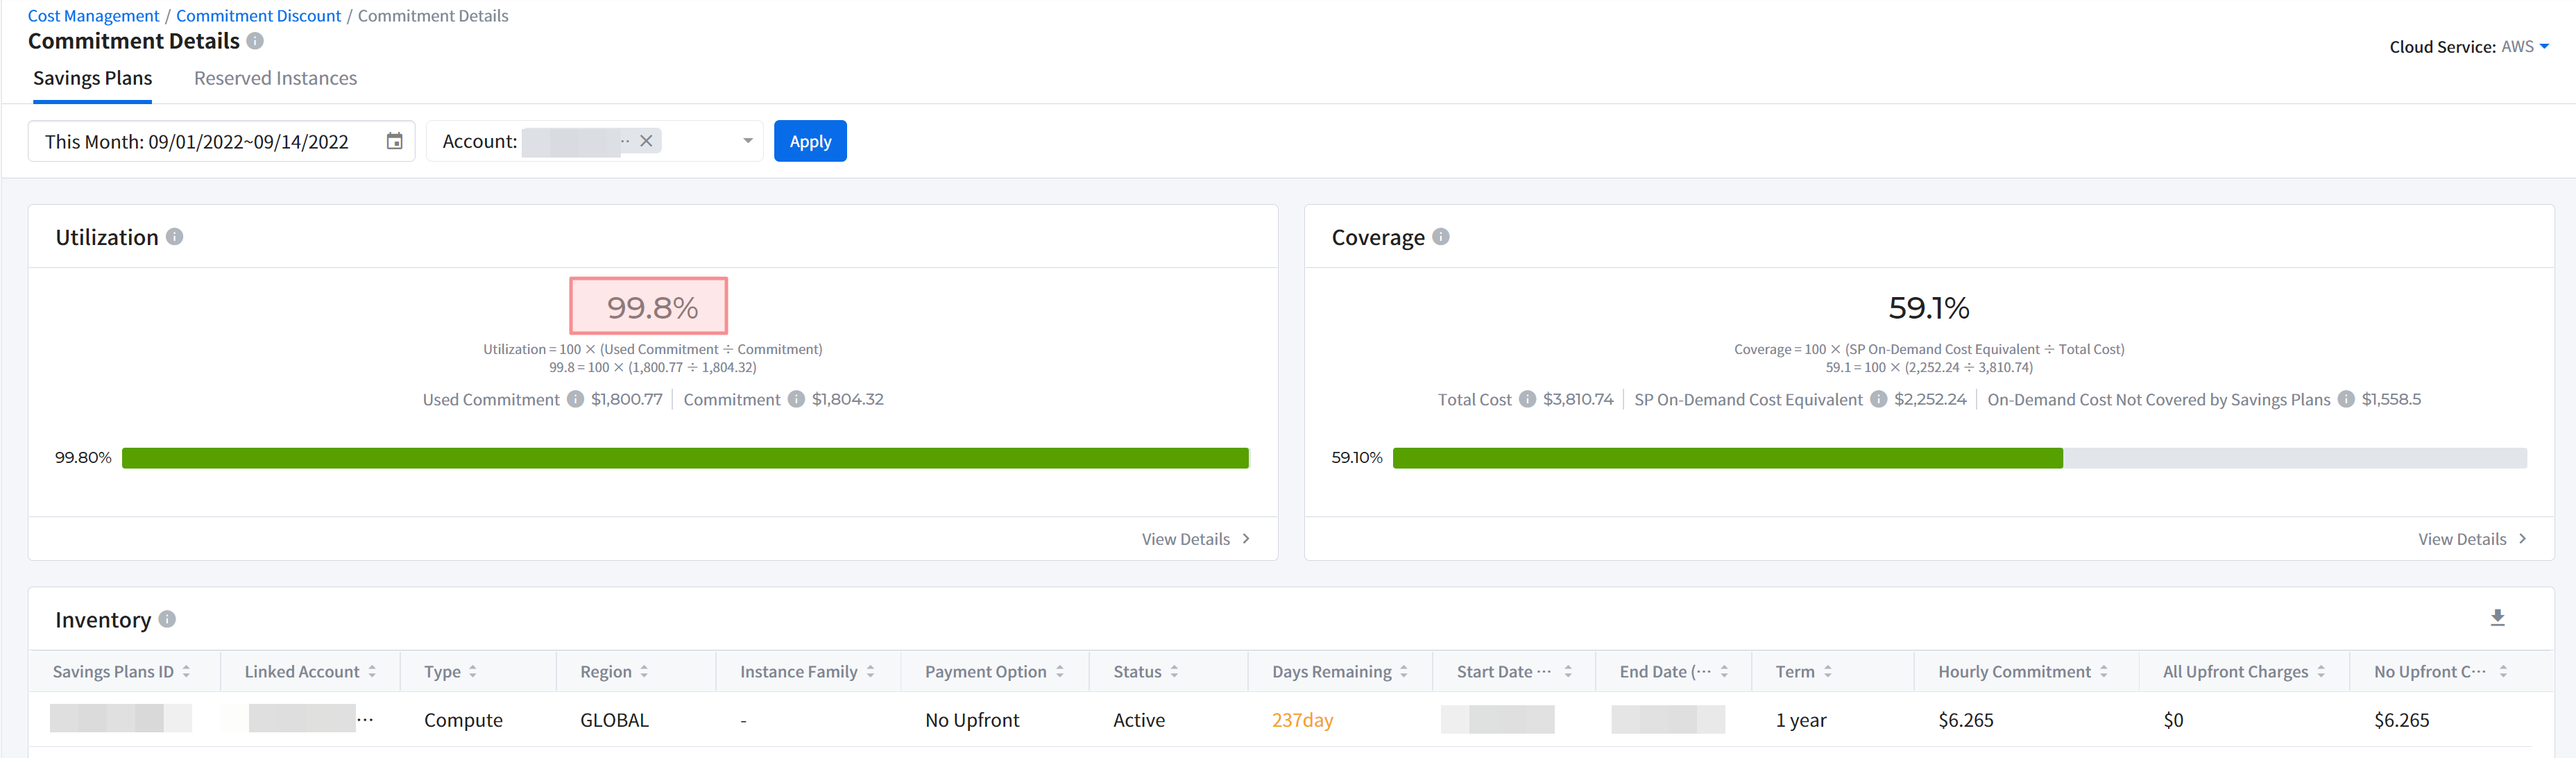
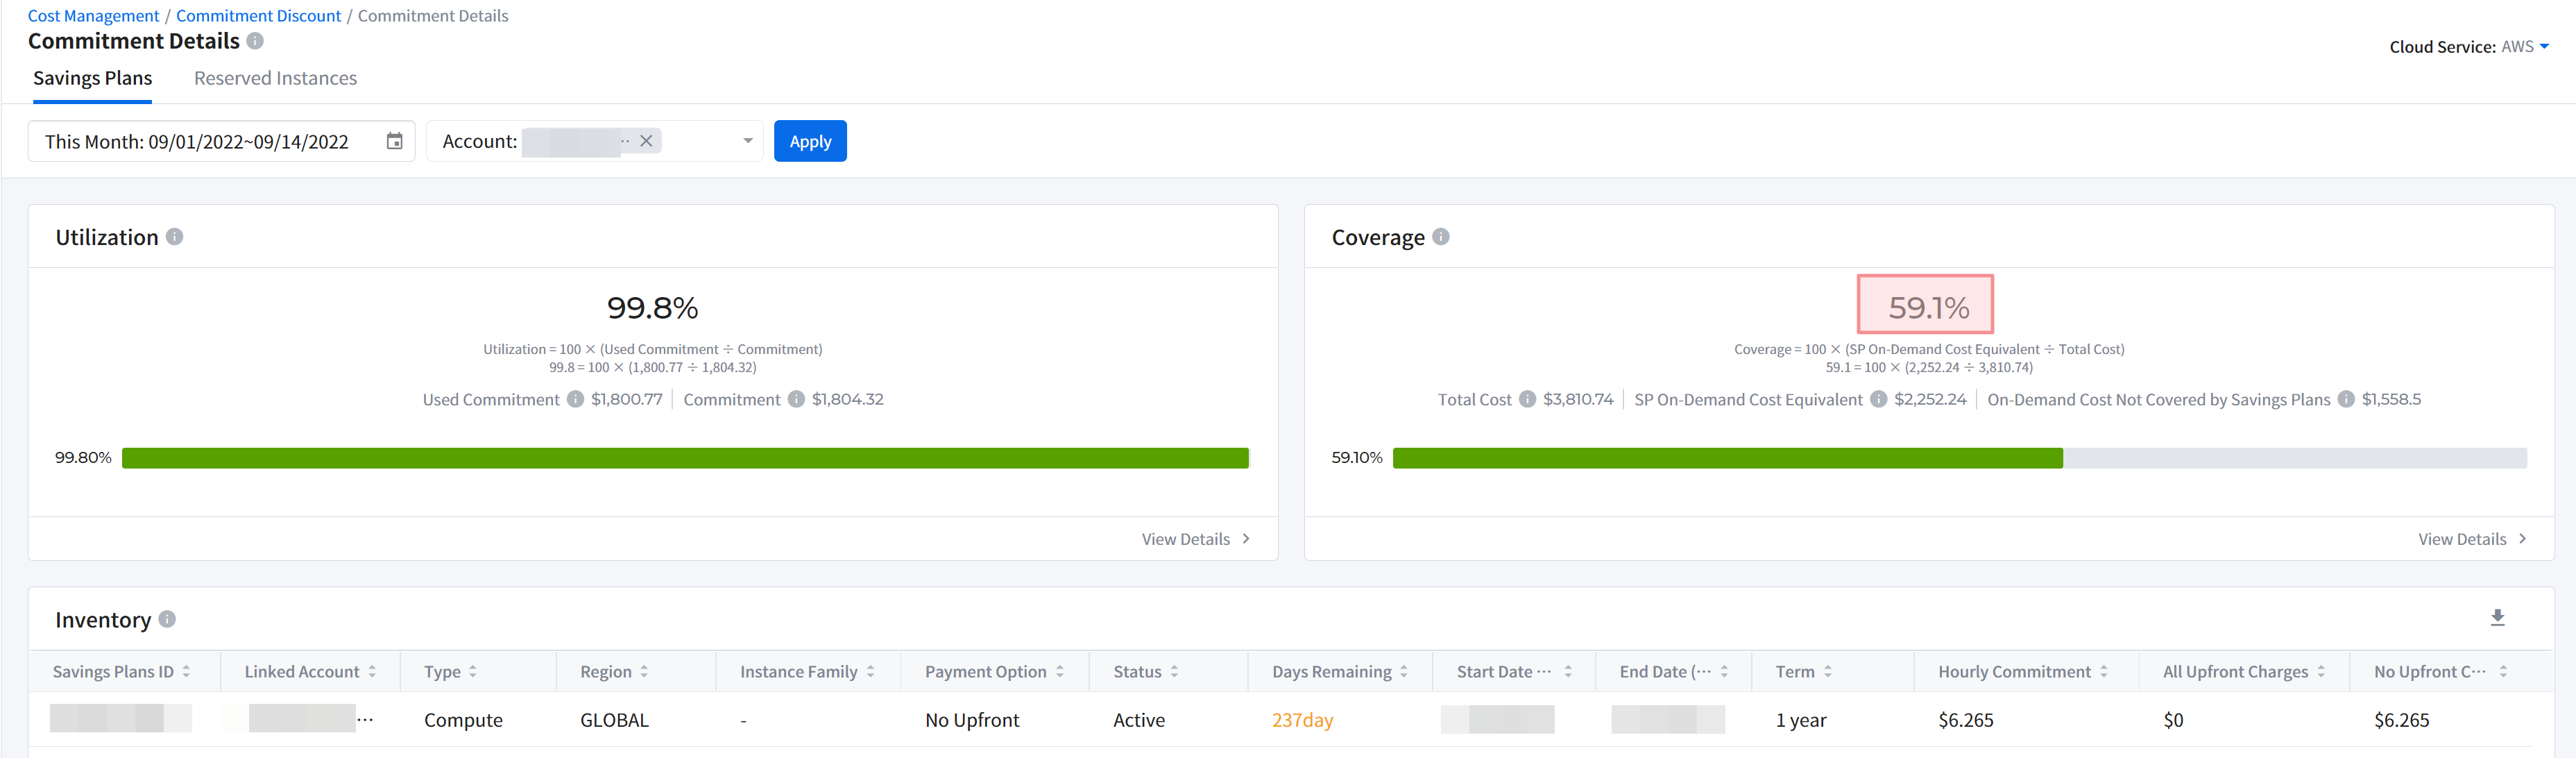
Utilization
Utilization shows how well you are using the purchased commitment. Utilization is calculated as follows:
- Utilization = (Used Commitments ÷ Commitments) × 100
For example, if the committed amount is $100 and the used commitment is $90, then the utilization is 90%.
Low utilization means that there is an excess amount of committed usage compared to the actual usage. You can get the maximum discount benefits when your utilization is high. Consider the following reasons if your utilization is low:
- Decrease in instance usage
- Change in instance type after the commitment purchase
📜 Note: Utilization and Coverage are indicators that conflict with each other. For the cost-optimizing objective, you need to find a balance between the two indicators. When the utilization is slightly higher than the coverage, it can be seen as a stable cost-saving scenario.
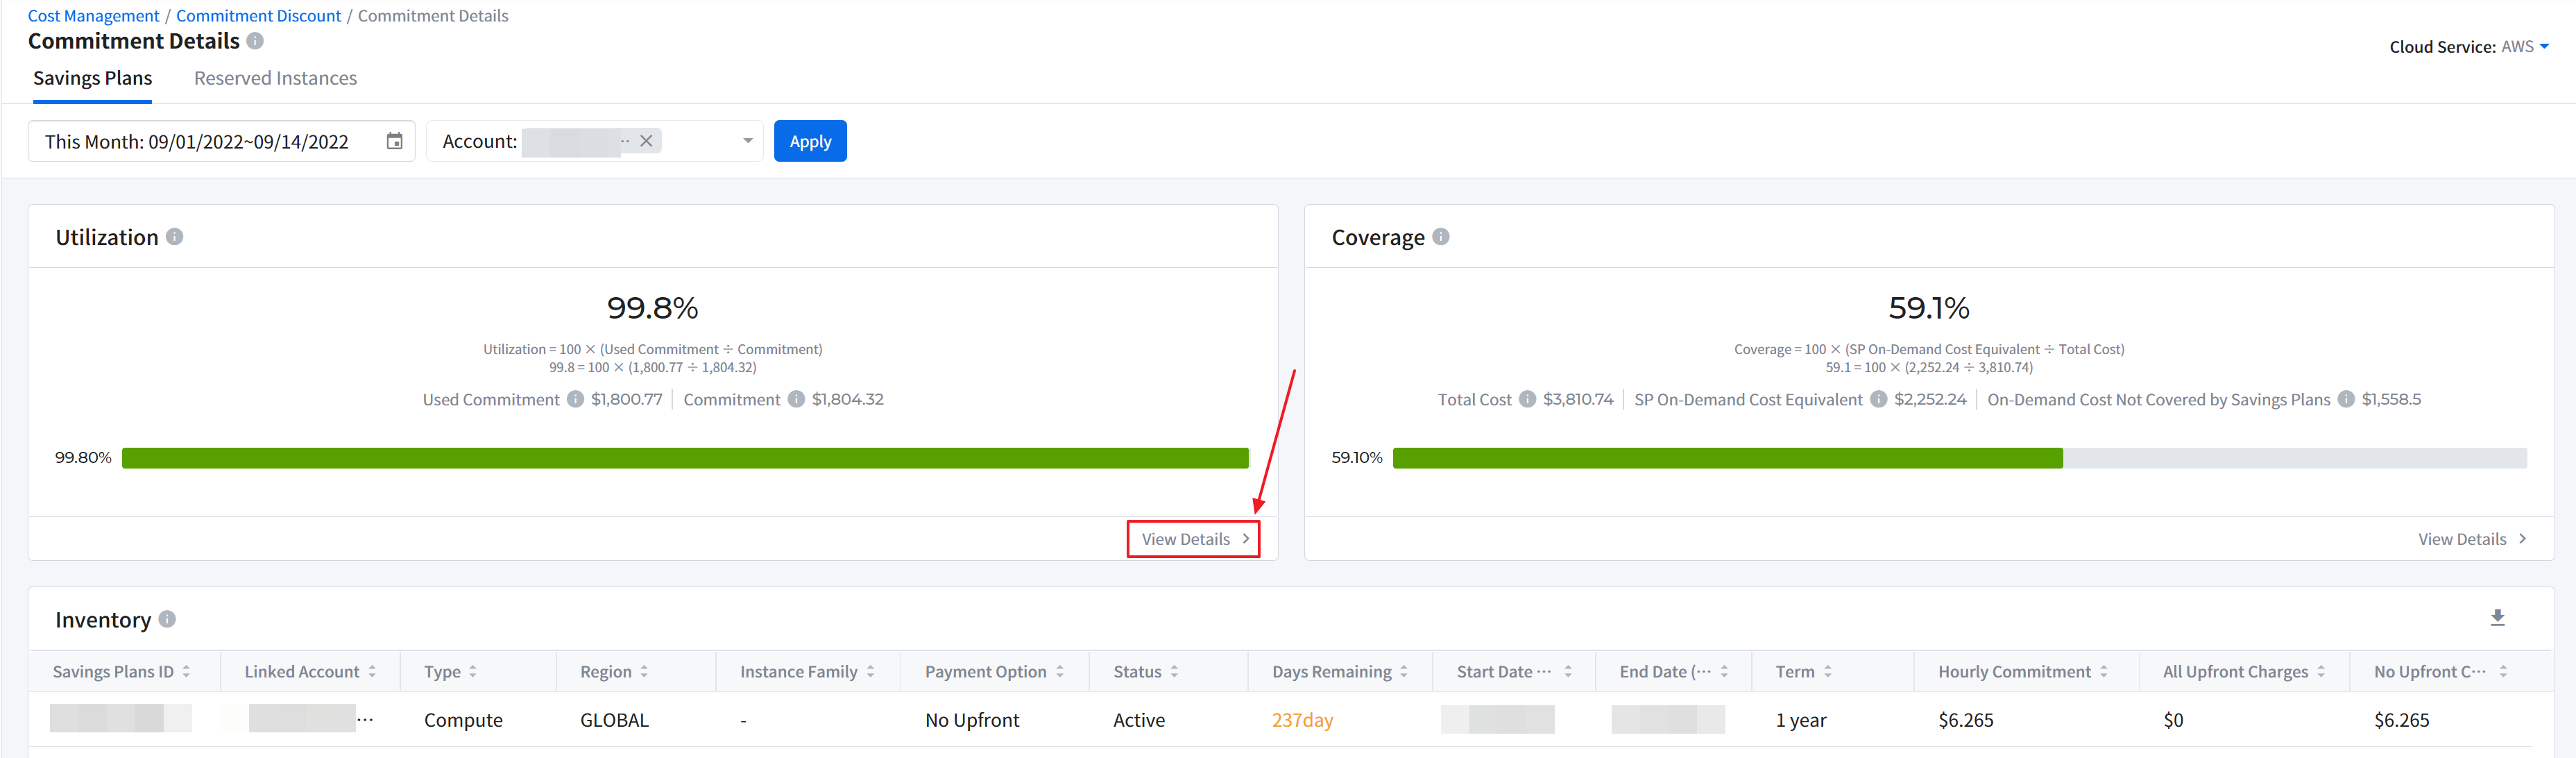
View Utilization Details
To see the Utilization Trend, click [View Details] in the Utilization card view.
Utilization Trend chart shows daily, weekly, or monthly utilization trends in a bar chart or line chart. Below the trend chart, the Utilization Details data table provides detailed information such as commitment types, total cost, and so on.
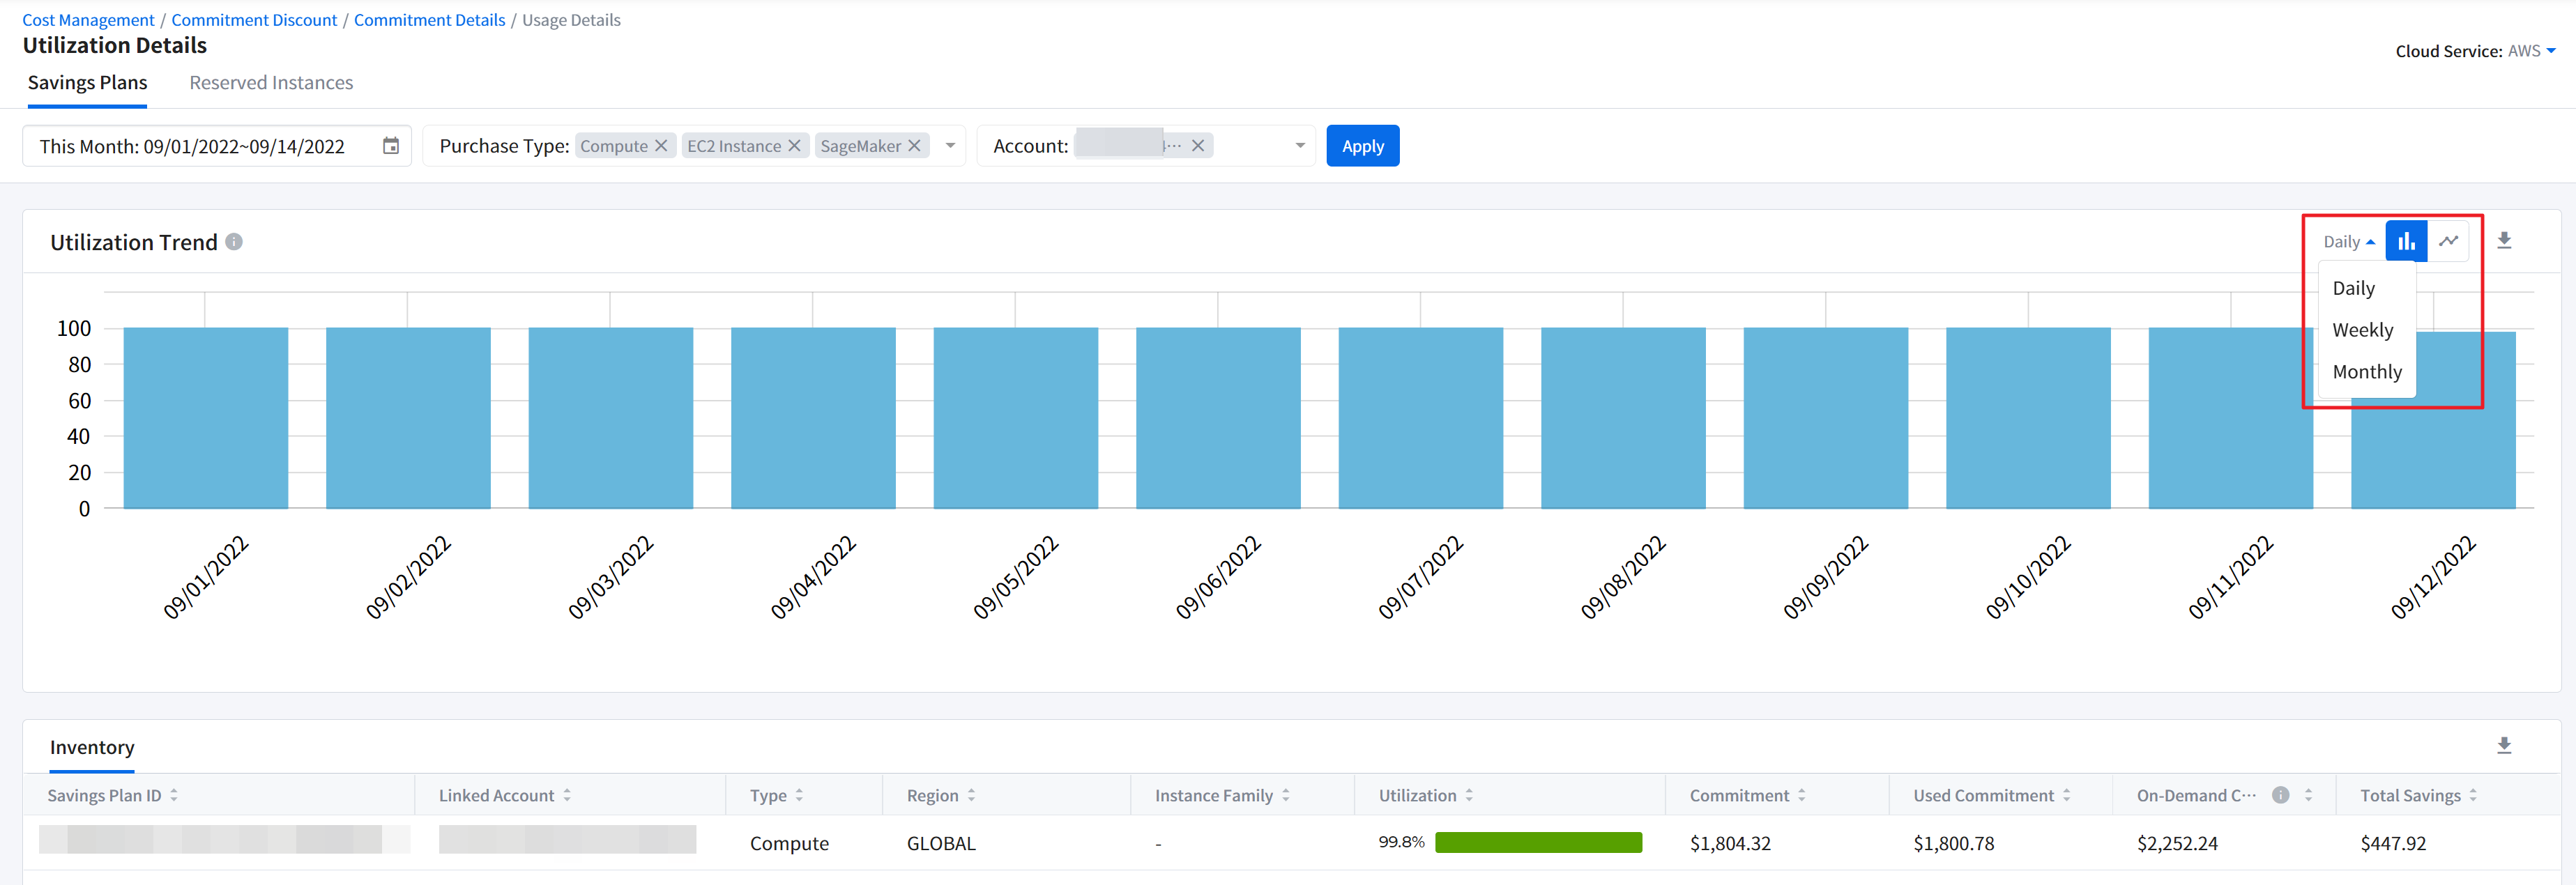
🔔 Notification: You can also download the filtered data in a CSV file. Click the [Download] icon in the upper right corner of the data table.
Coverage
Coverage shows how much of the commitment-applicable cloud resource cost is covered by the commitment. Coverage is calculated as follows:
- Coverage = (On-Demand Cost Equivalent ÷ Total Cost) × 100
For example, let’s say your commitment-applied cloud cost is $50 and its On-Demand cost equivalent is $70. At the same time, the On-Demand cost was $30. The total cost, which is the sum of On-Demand cost equivalent and On-Demand cost, is $100. Then, in this scenario, the coverage is 70%.
In another example, let’s say you have used a total of 100 hours of instances over a certain period of time. Among those, commitment discounts can be applied for the 70 hours of usage, and On-Demand rates are applied to the rest of the usage. Then, the coverage is 70%.
Low coverage means that your potential savings are high. In this case, we recommend purchasing more commitment to maximizing your cost savings. Consider the following reasons if your coverage is low:
- Expiration of existing commitments
- Addition of new accounts
- Increase in usage
View Coverage Details
To see the Coverage Trend, click [View Details] in the Coverage card view.
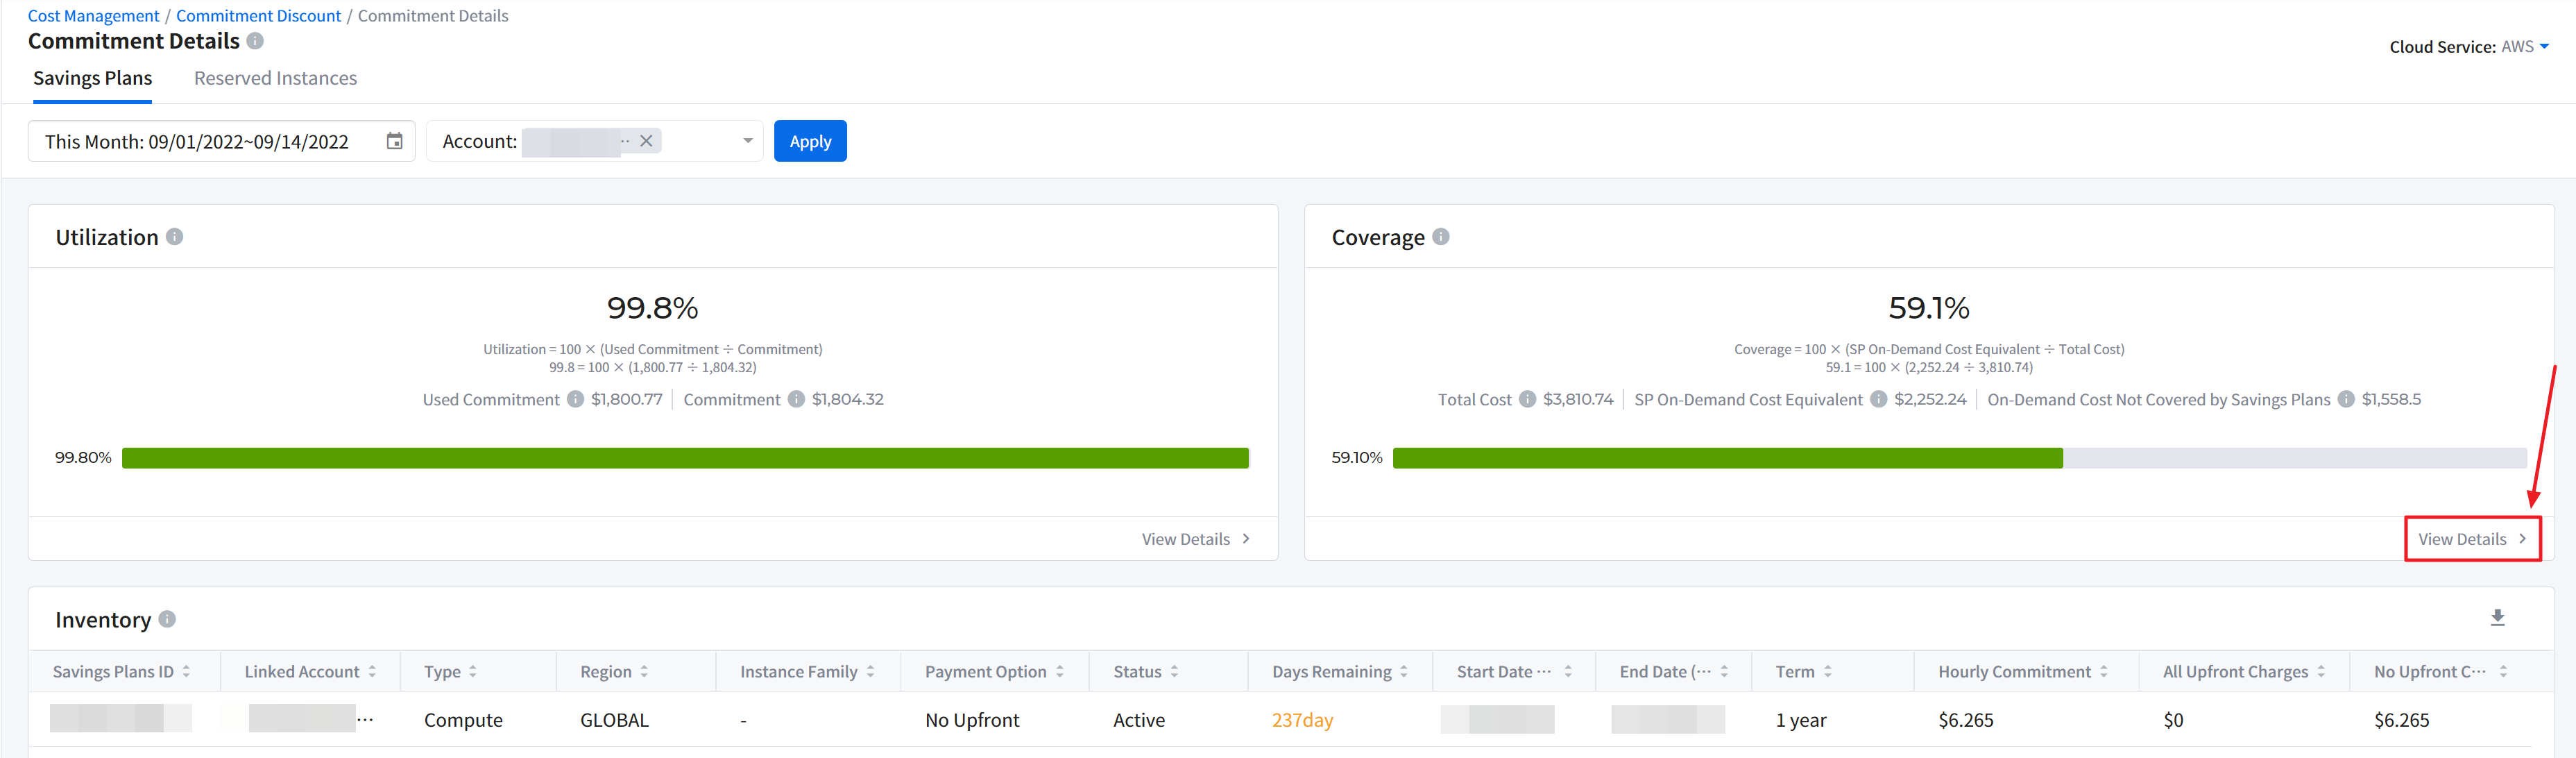
Coverage Trend chart shows daily, weekly, or monthly coverage trends in a bar chart or line chart. View more information under the [Coverage Details] table at the bottom of the page.
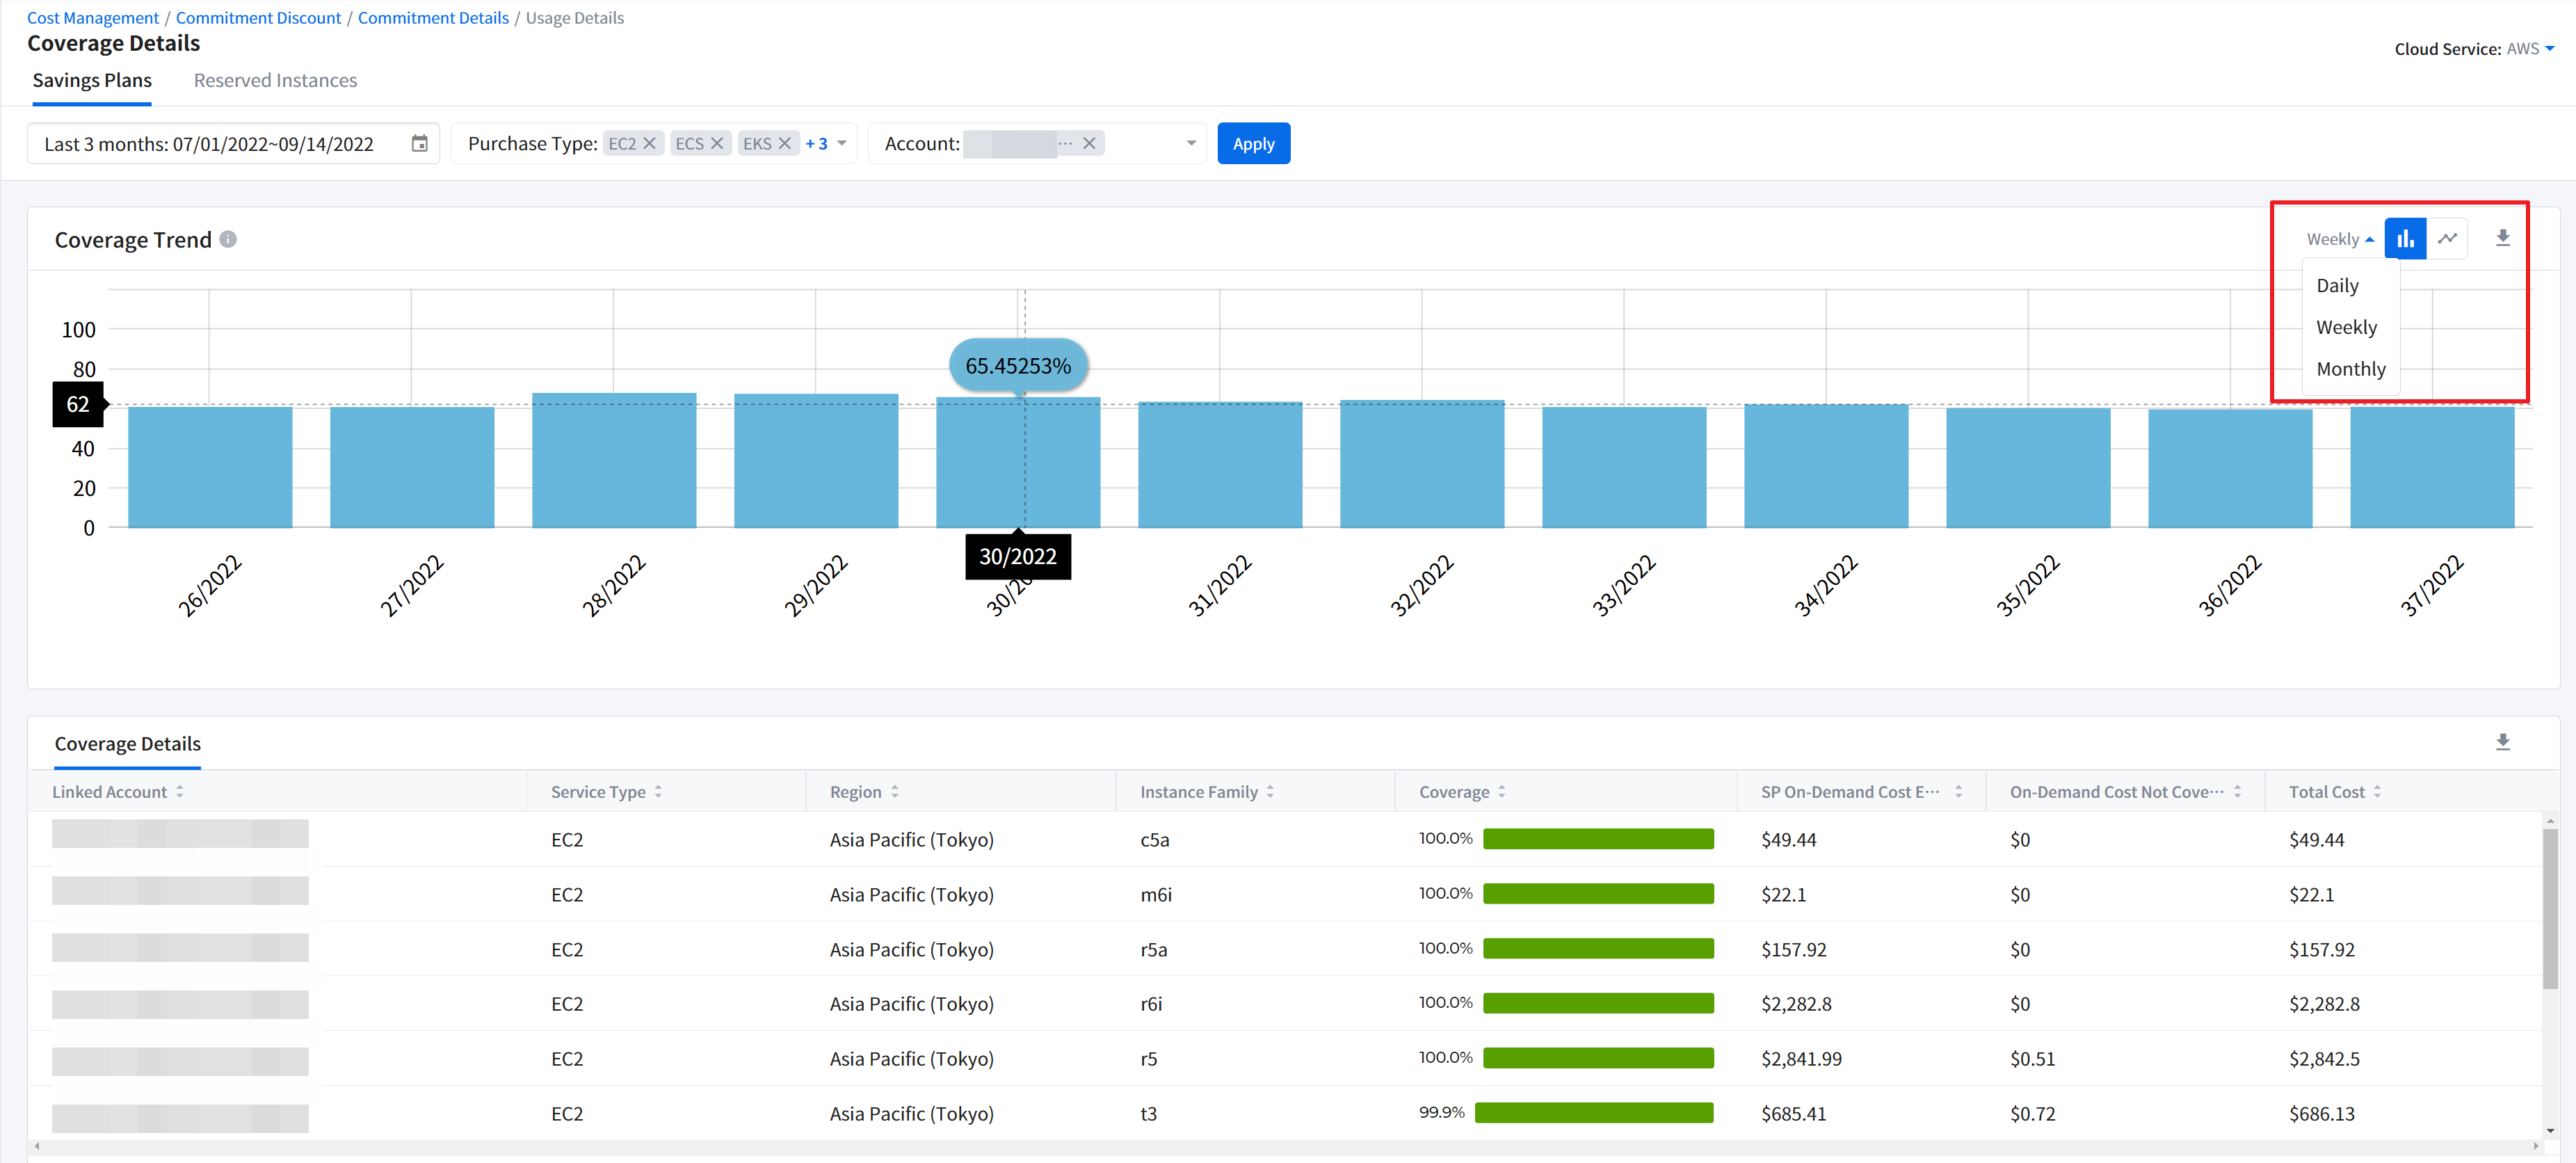
🔔 Notification: You can also download the filtered data in a CSV file. Click the [Download] icon in the upper right corner of the data table.
Inventory
Inventory provides information about your purchased commitments. Learn more about the active commitments that are currently in use. Plan for additional purchases if your commitment expiration date is approaching.
| Table Headers | Description |
|---|---|
| Region | Potential discount can only be realized when you purchase the commitment in the recommended region. |
| RI Count | For AWS and Azure RI, this is the purchase recommended quantity. |
| Hourly Commitment | For AWS Savings Plans, this is the recommended hourly commitment amount. |
| Days Remaining | This shows how many days you have left until the commitment term ends and discounts benefits expire. |
| Payment Option | Three options are available; All Upfront, Partial Upfront, and No Upfront. |
| Offering Class | AWS EC2 RI offers two types; Standard and Convertible. |
| Data Analysis Period | During this period, your usage data is analyzed, and based on this analysis, we make commitment recommendations for you. |
| Term, Duration | This is the recommended purchase term or duration that you should select when you purchase the commitment on the Cloud Service Console. |
| Scope | For Azure RI, reservation scope can be set to select where the commitment would apply. It can be either Single or Shared. |
| Flexibility | AWS EC2 RI offers size flexibility. When the commitment is flexible, it can be applied to different instance sizes within the same region, instance family, and system environment. |
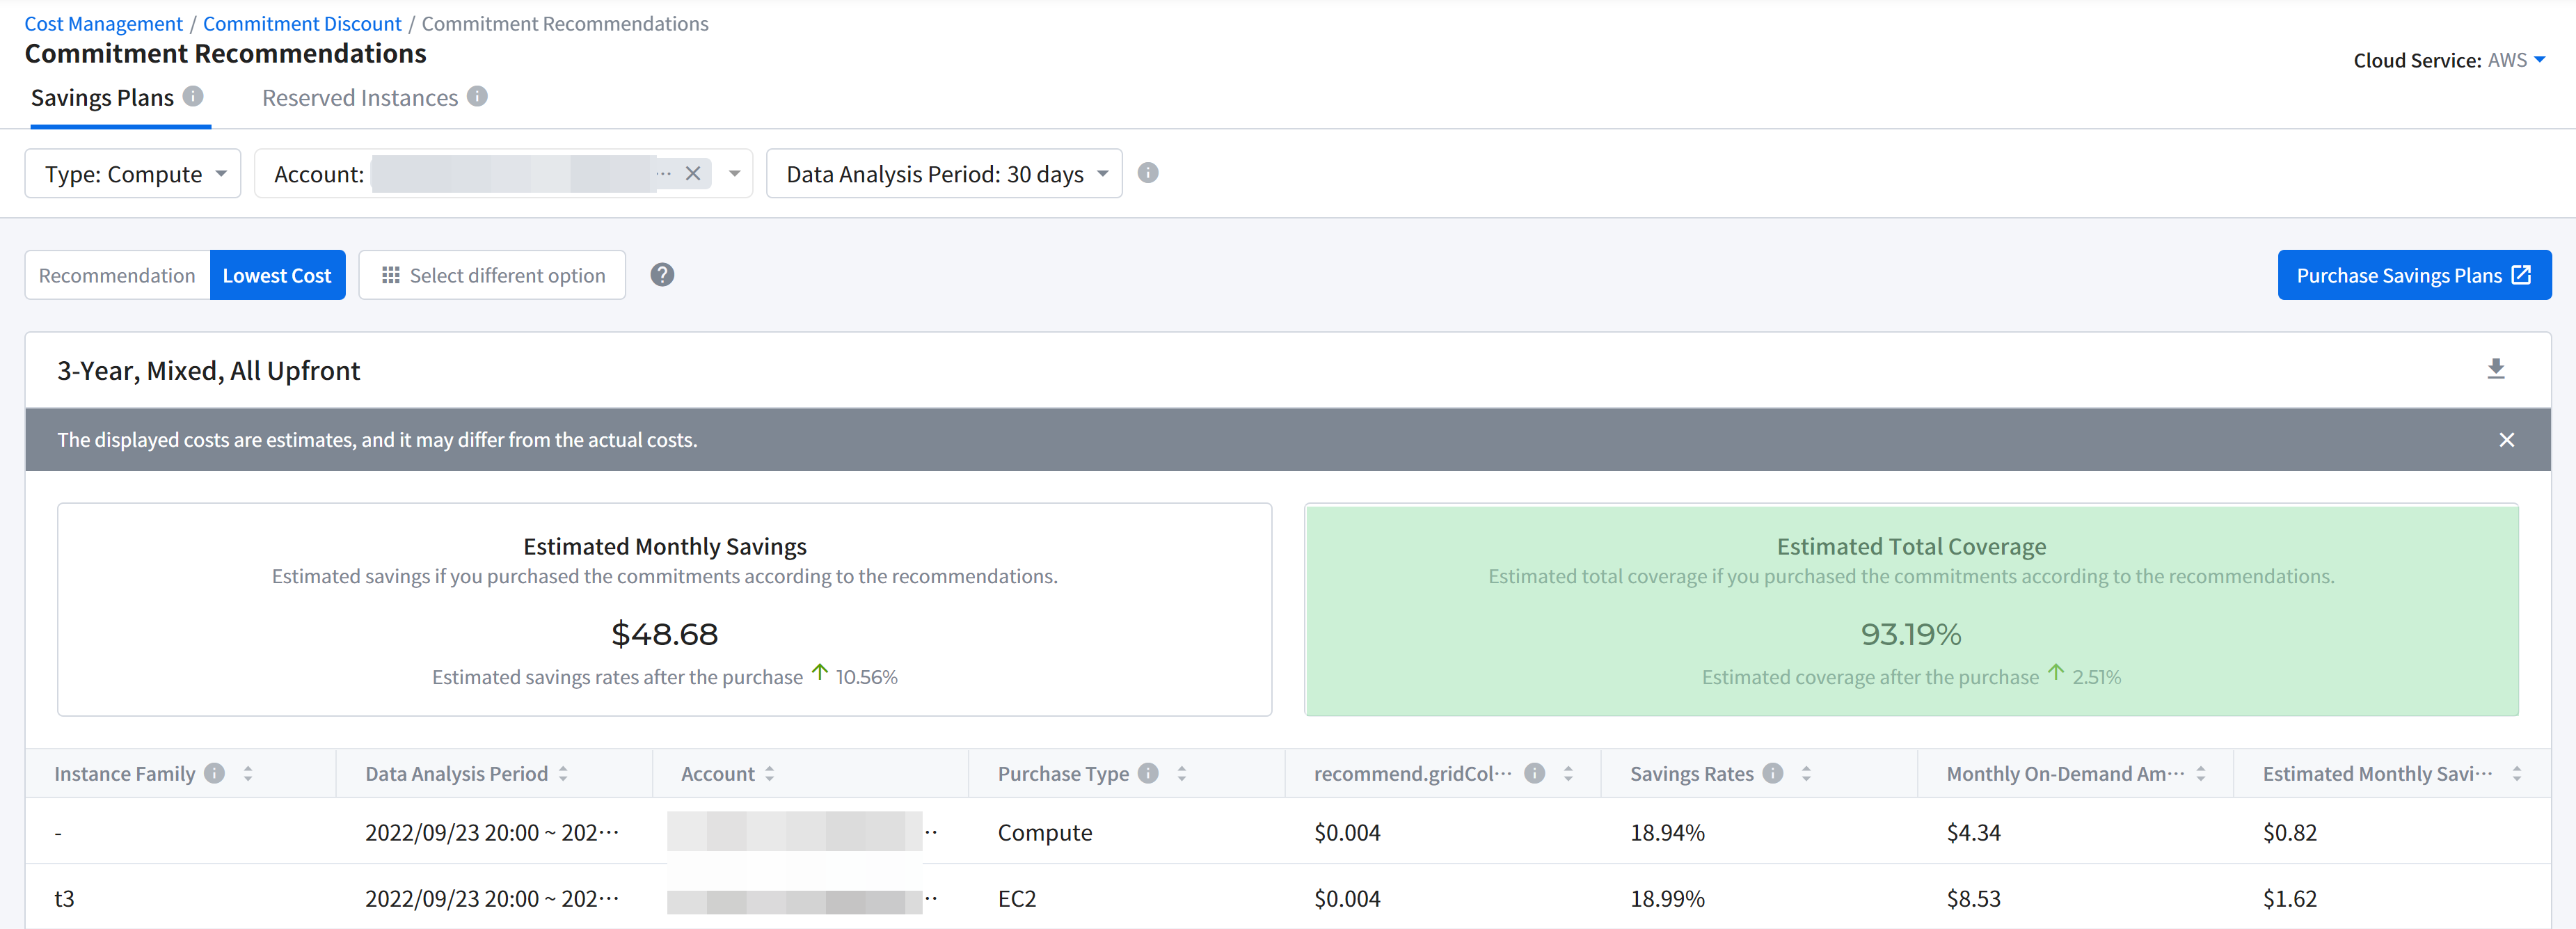
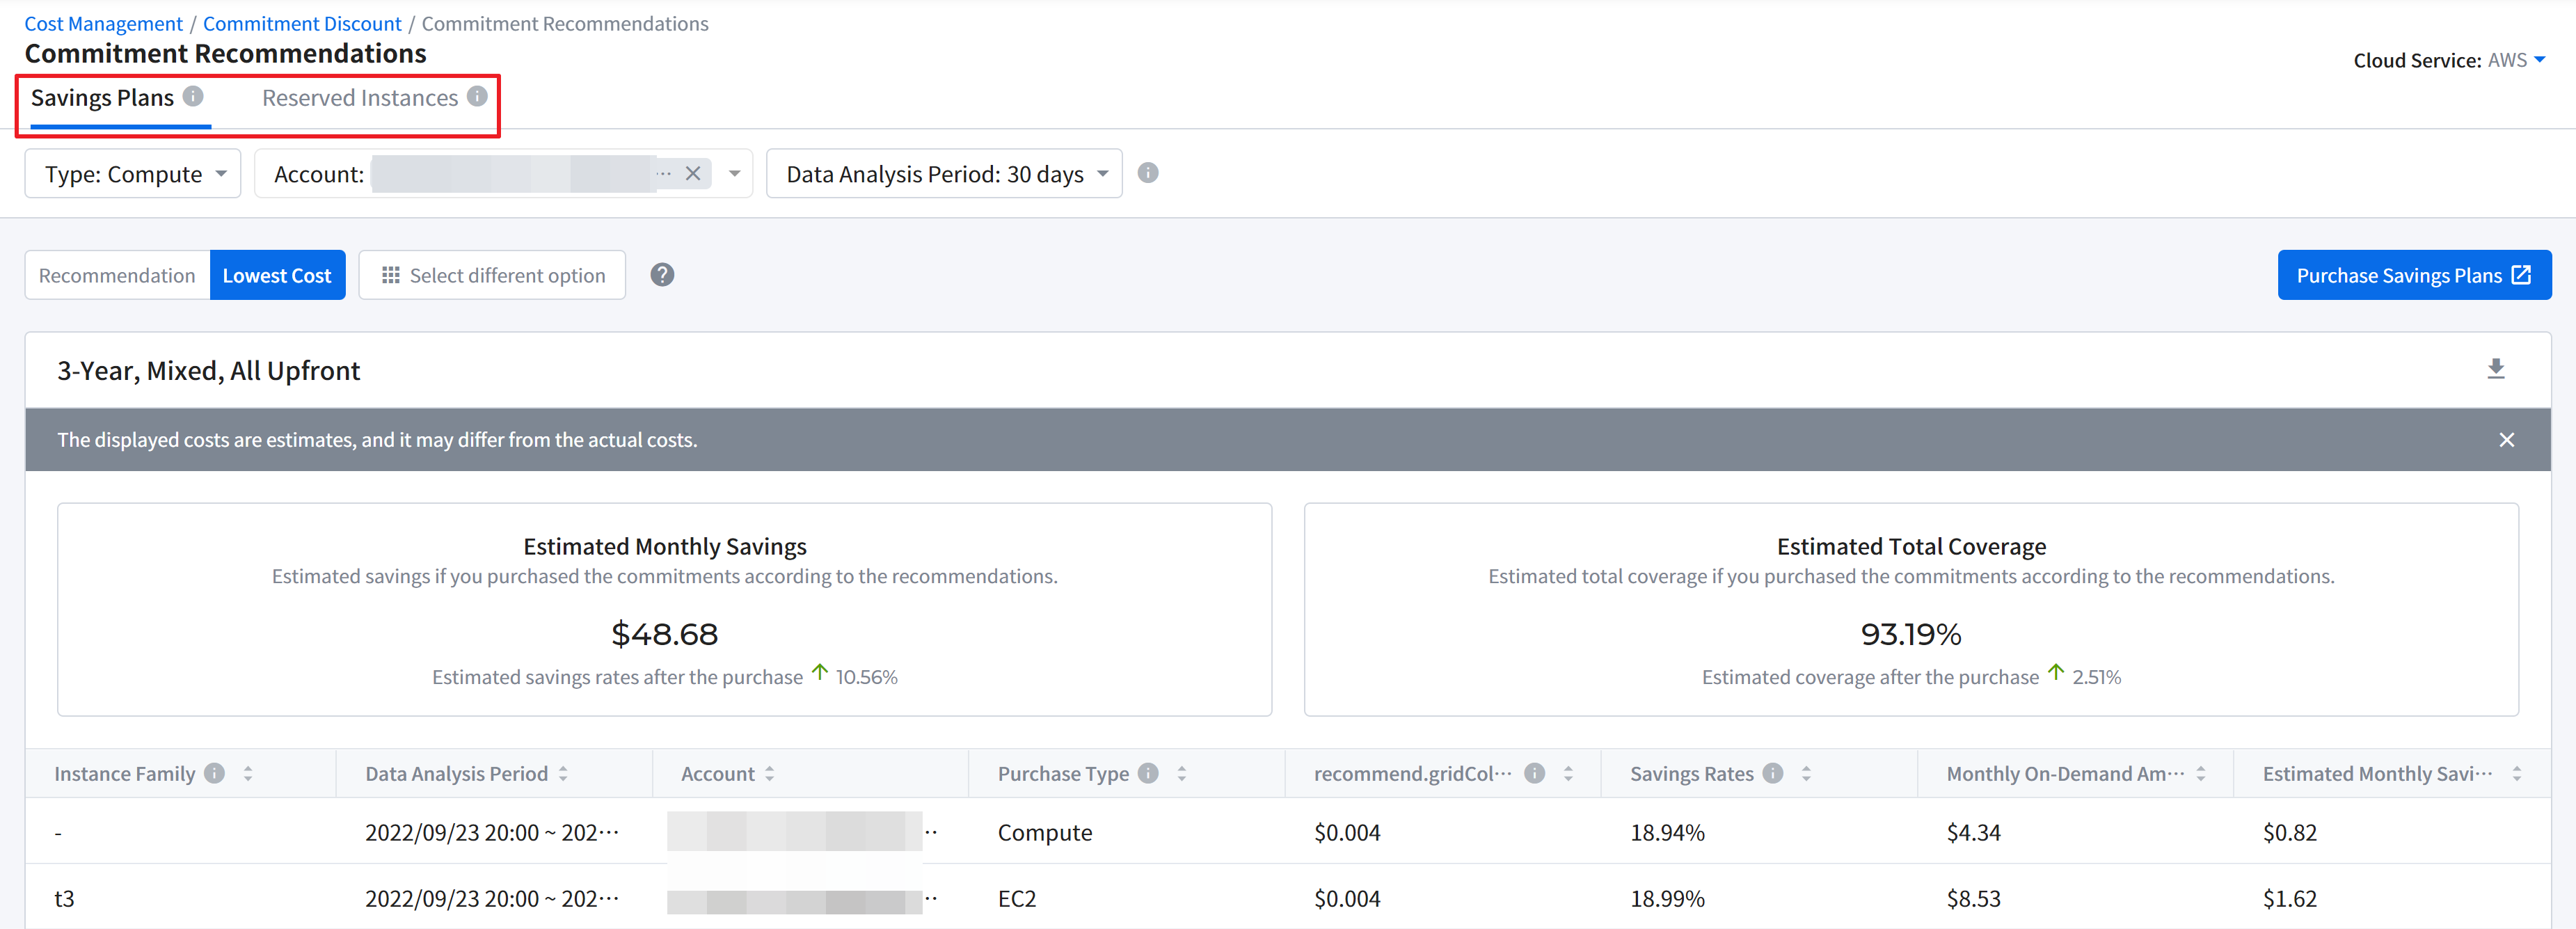
Commitment Recommendations
Commitment Discounts > Commitment Recommendations
Get cost-savings information in the Commitment Recommendations if you want to buy more commitments or if you are currently paying On-Demand rates for your cloud resources.
View Recommended Commitments
To view the commitment recommendations, filter data according to the following steps on the Commitment Details page.
① First, select Cloud Service in the upper right corner. Currently, AWS, Azure, and GCP are supported. For illustrative purposes, AWS is selected here.
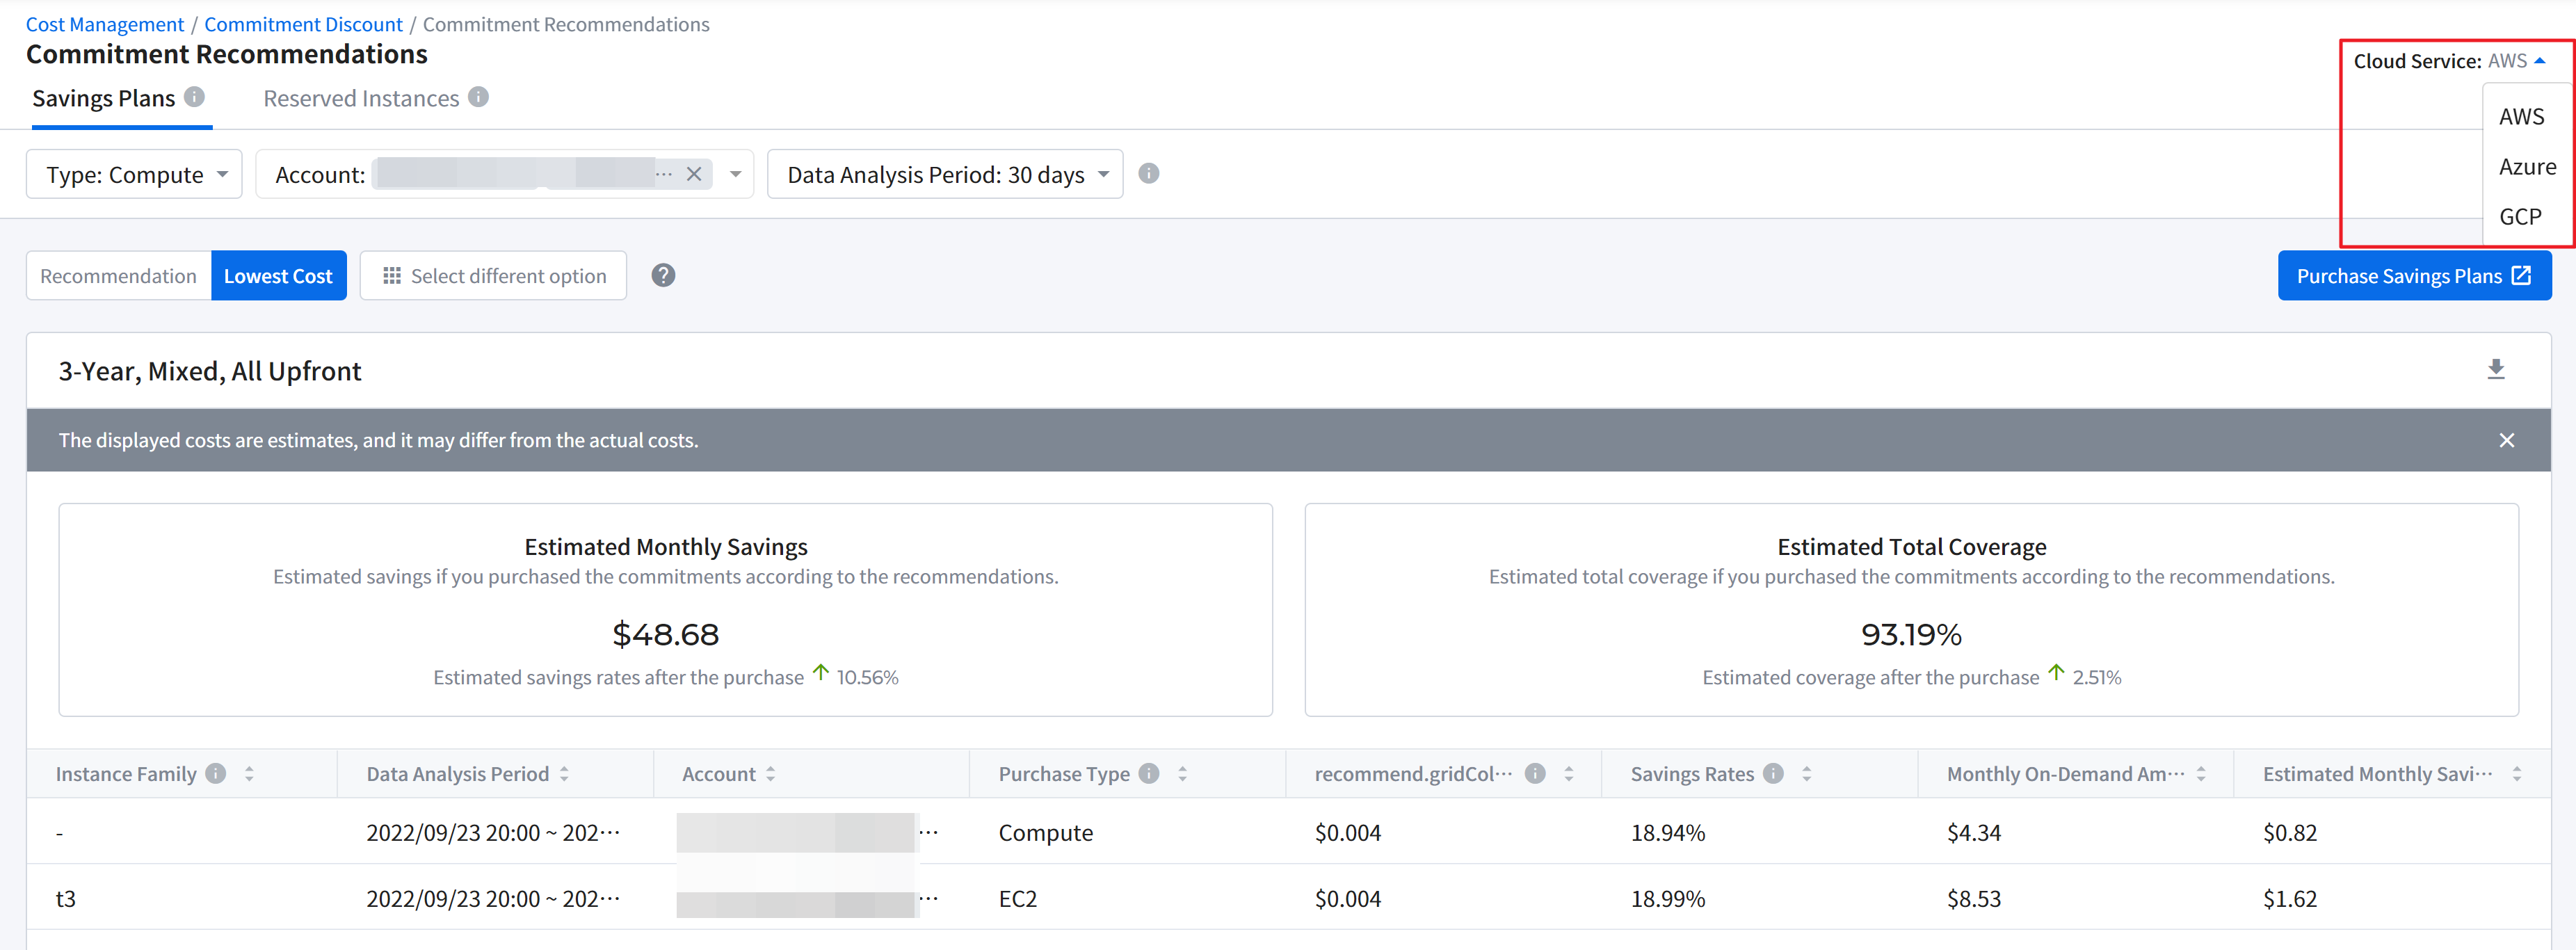
② Select the commitment-type from the tab menu.
③ For AWS, select Service. For Azure and GCP, select Product. For AWS Savings Plans, select Type.
④ Select Accounts. For Azure, select Subscriptions and for GCP, select Projects to view data. If you want to view all data, check off [Select All].
⑤ Select [Data Analysis Period]. We analyze your cloud resource usage data over this period and make commitment recommendations for you based on the analysis. We recommend you select a relatively short period (14 days) if you want to see recommendations based on your recent usage patterns and select a longer period if your overall resource usage fluctuated often.
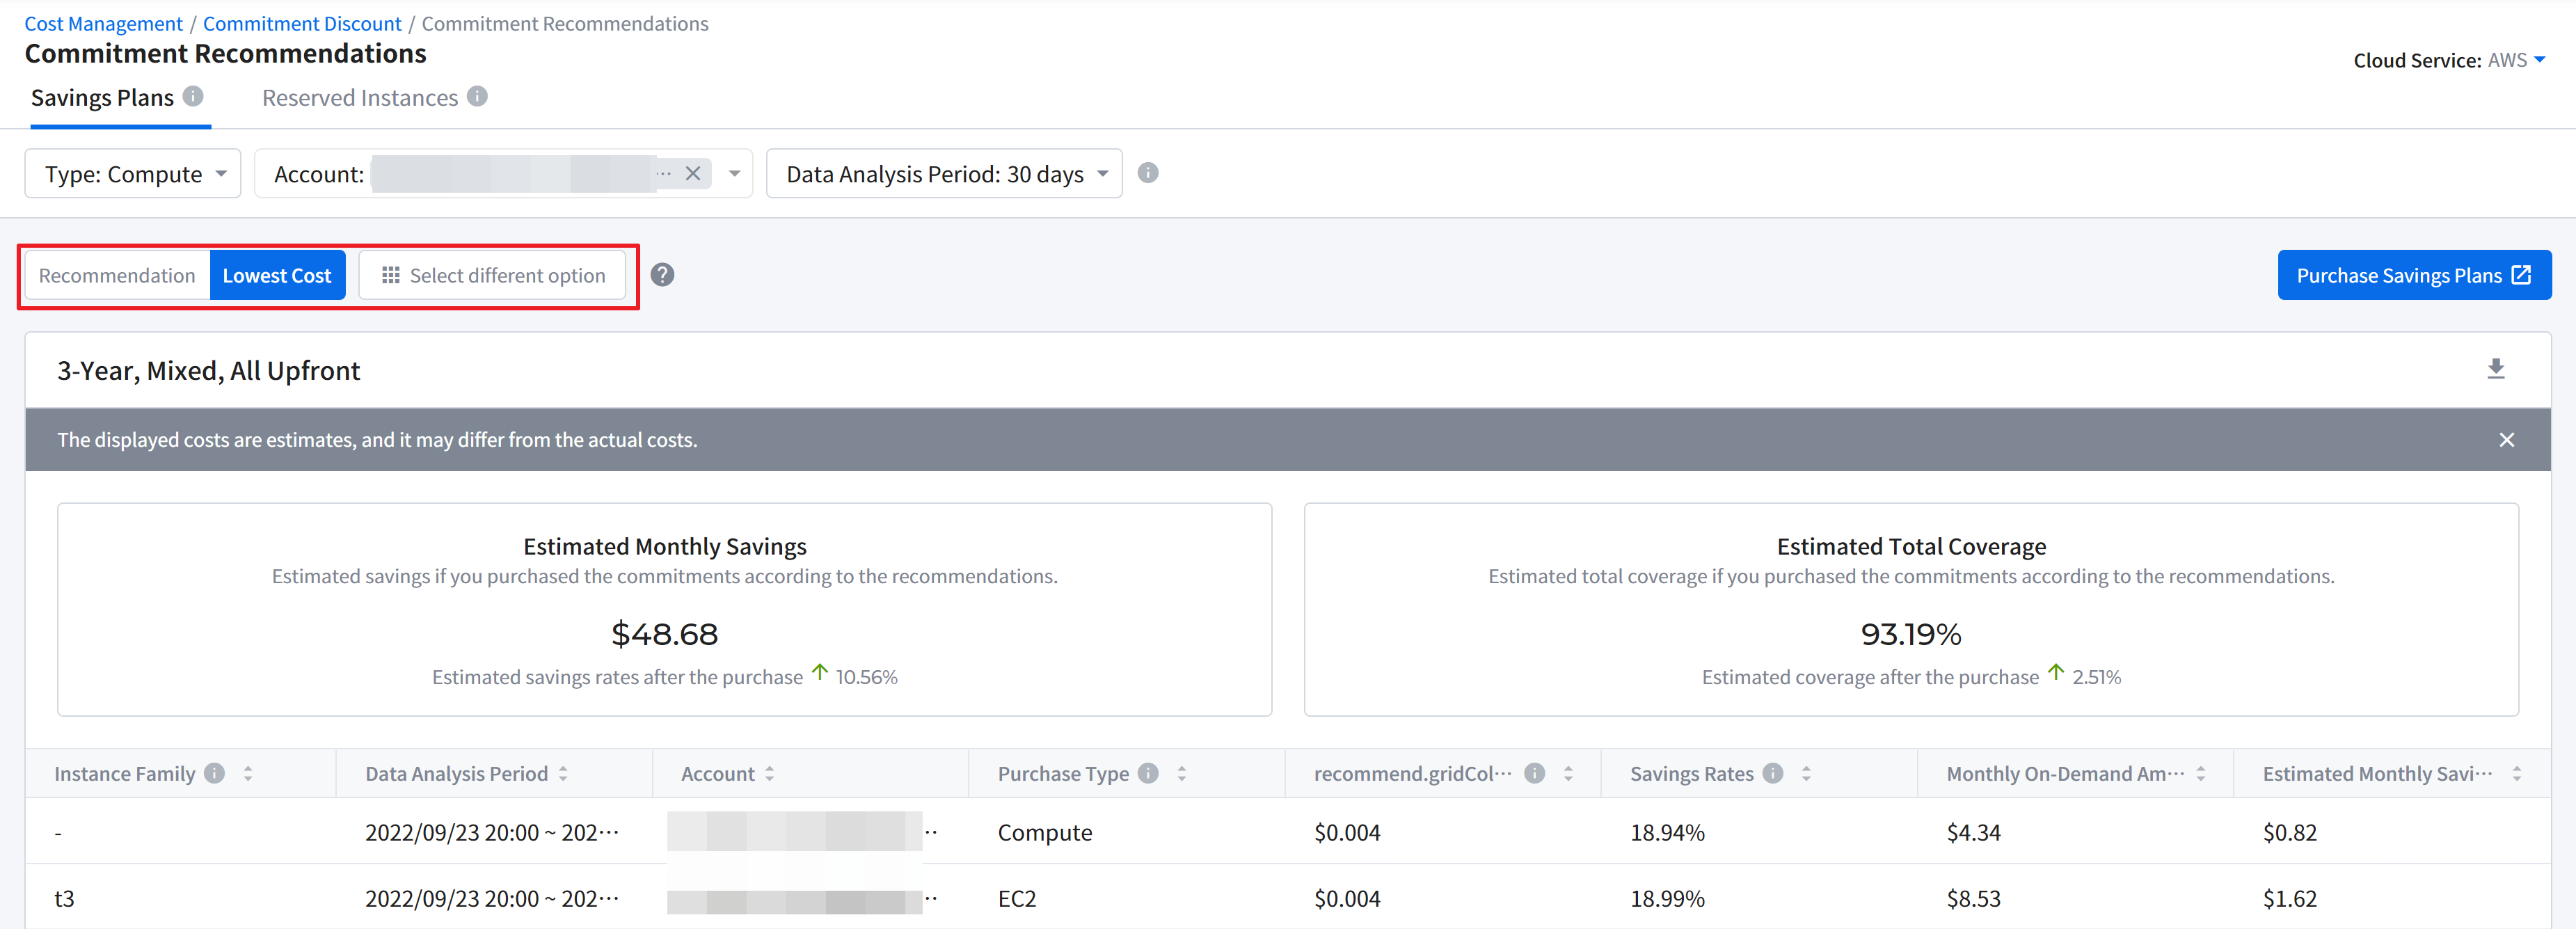
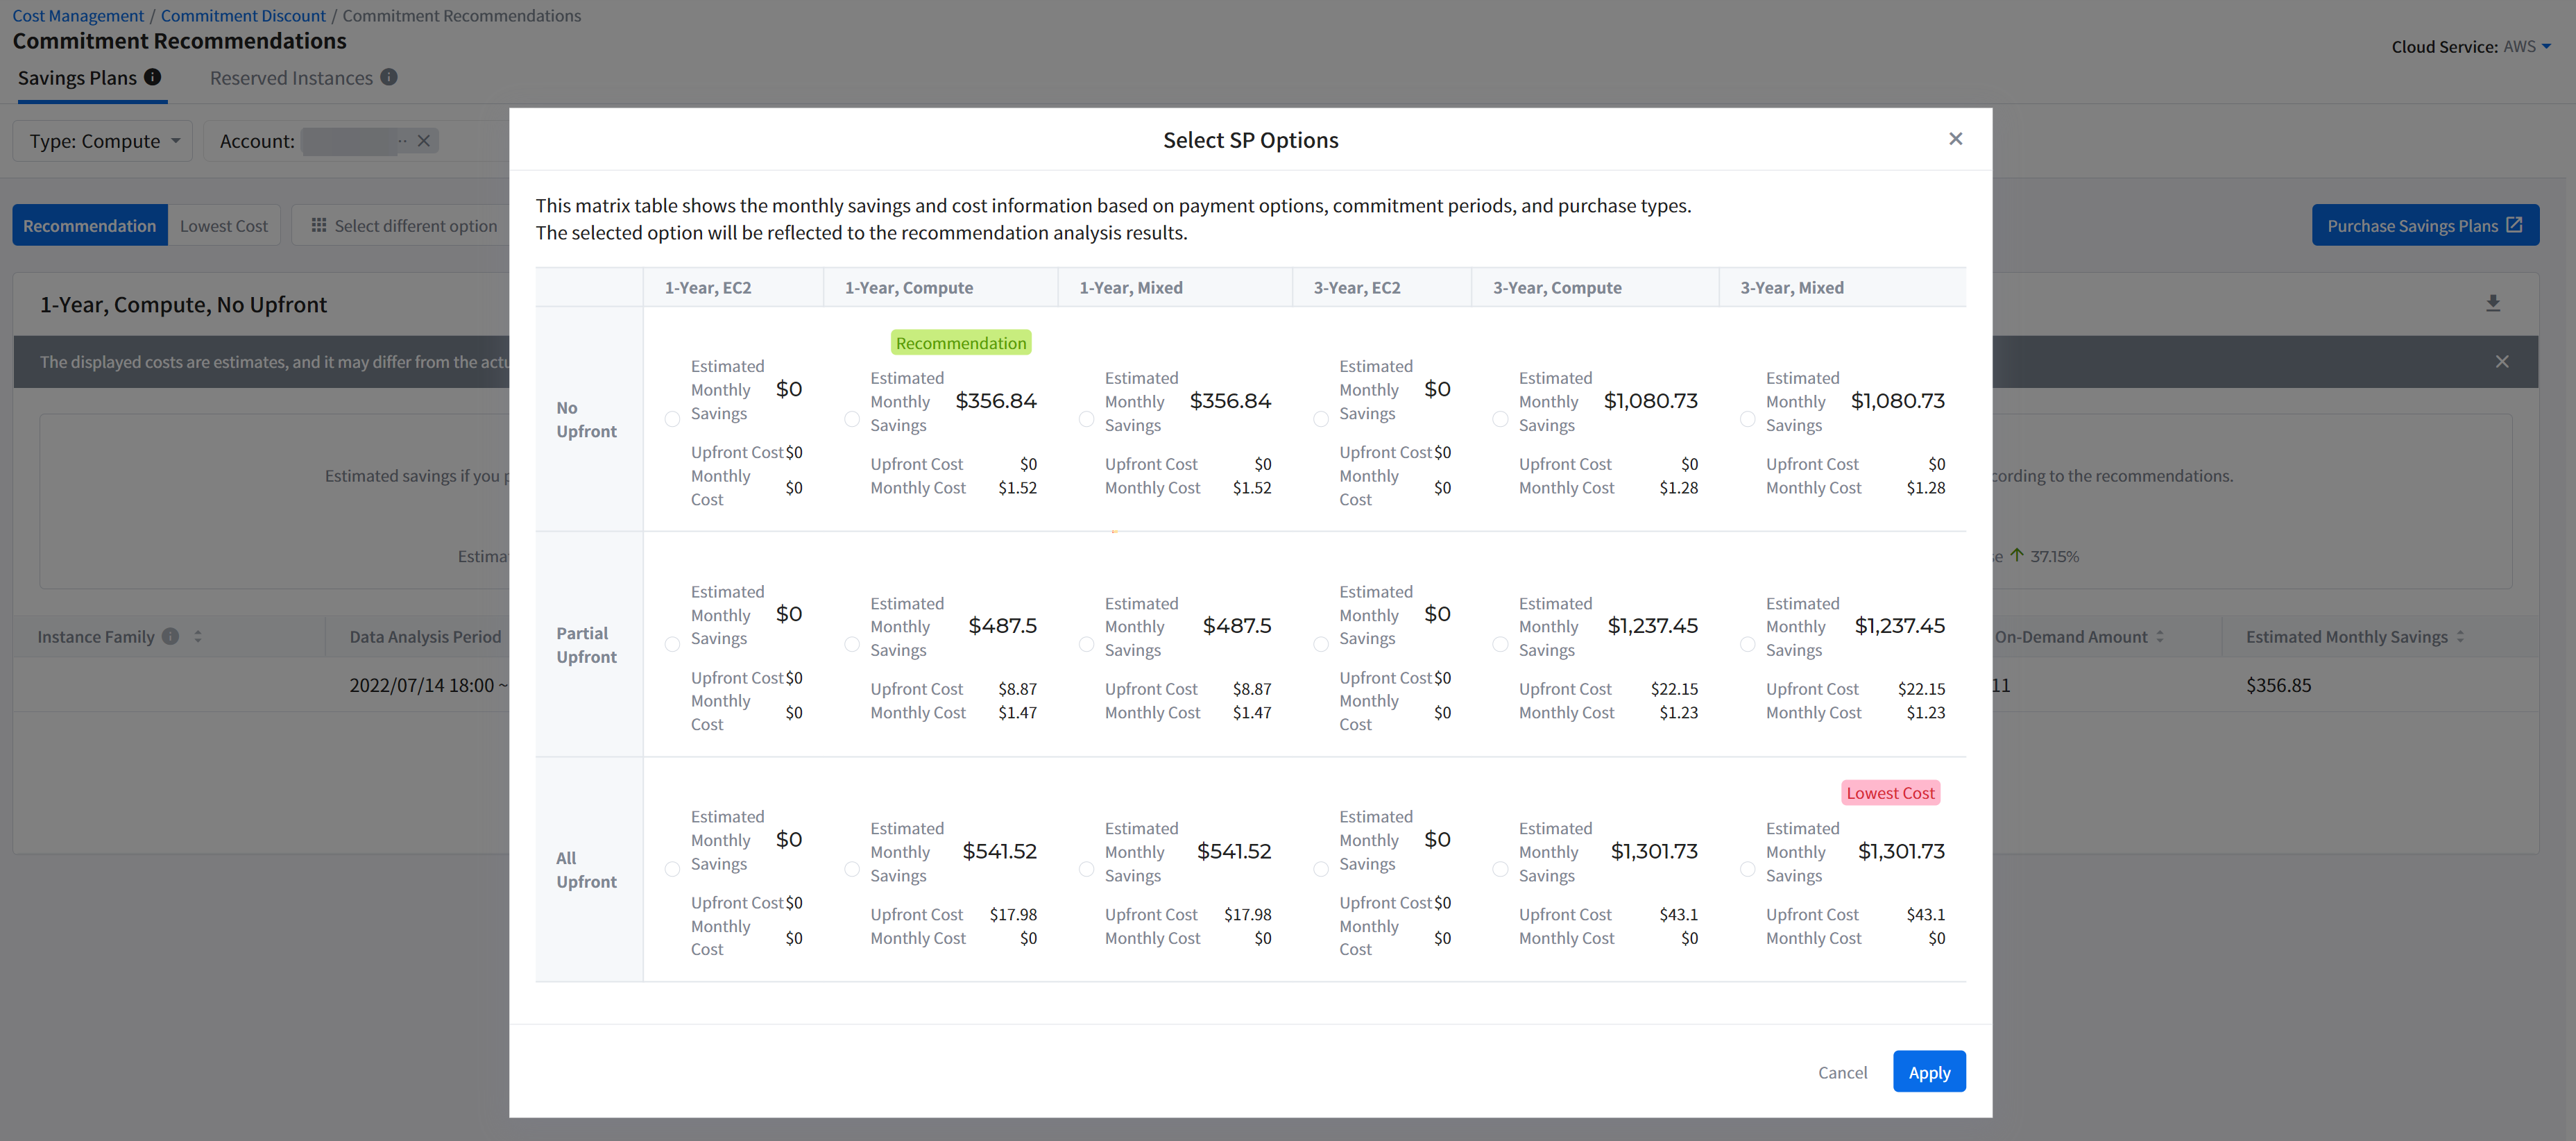
⑥ For AWS and GCP, Recommendation, Lowest Cost, and different options are available. For Azure, there is only one available option, so you only need to select the commitment term; 1-year or 3-year.
- [Recommendation]: The most suitable commitment purchase option for you. 1-Year, No Upfront option is often the best combination in many cases.
- [Lowest Cost]: This is the most powerful cost-saving commitment purchase option, with longer commitment terms and all upfront payments.
- [Select different options]: You can preview estimated monthly savings and costs for each option and select from various combinations of payment options, commitment terms, and offering classes.
![]()
![]()
💡 How long should I make a commitment?
3-year term offers bigger discount than a 1-year option. However, Cloud Service Providers such as AWS, Azure, and GCP continuously introduce and improve pricing models as well as cloud resource types. Therefore, we recommend you purchase a commitment with the 1-year term because you may be able to benefit from those new options every year.
📌 Important: For AWS RDS RI, the ‘No Upfront’ payment option is only available when you purchase a commitment with a 1-year term.
🔔 Notification: You can also download the filtered data in a CSV file. Click the Download icon in the upper right corner of the data table.
⑦ To purchase commitments, click the [Purchase] button on the upper-right side to go to the Cloud Service Provider’s Console. Purchase commitments with the specific conditions recommended by the Commitment Recommendations page.
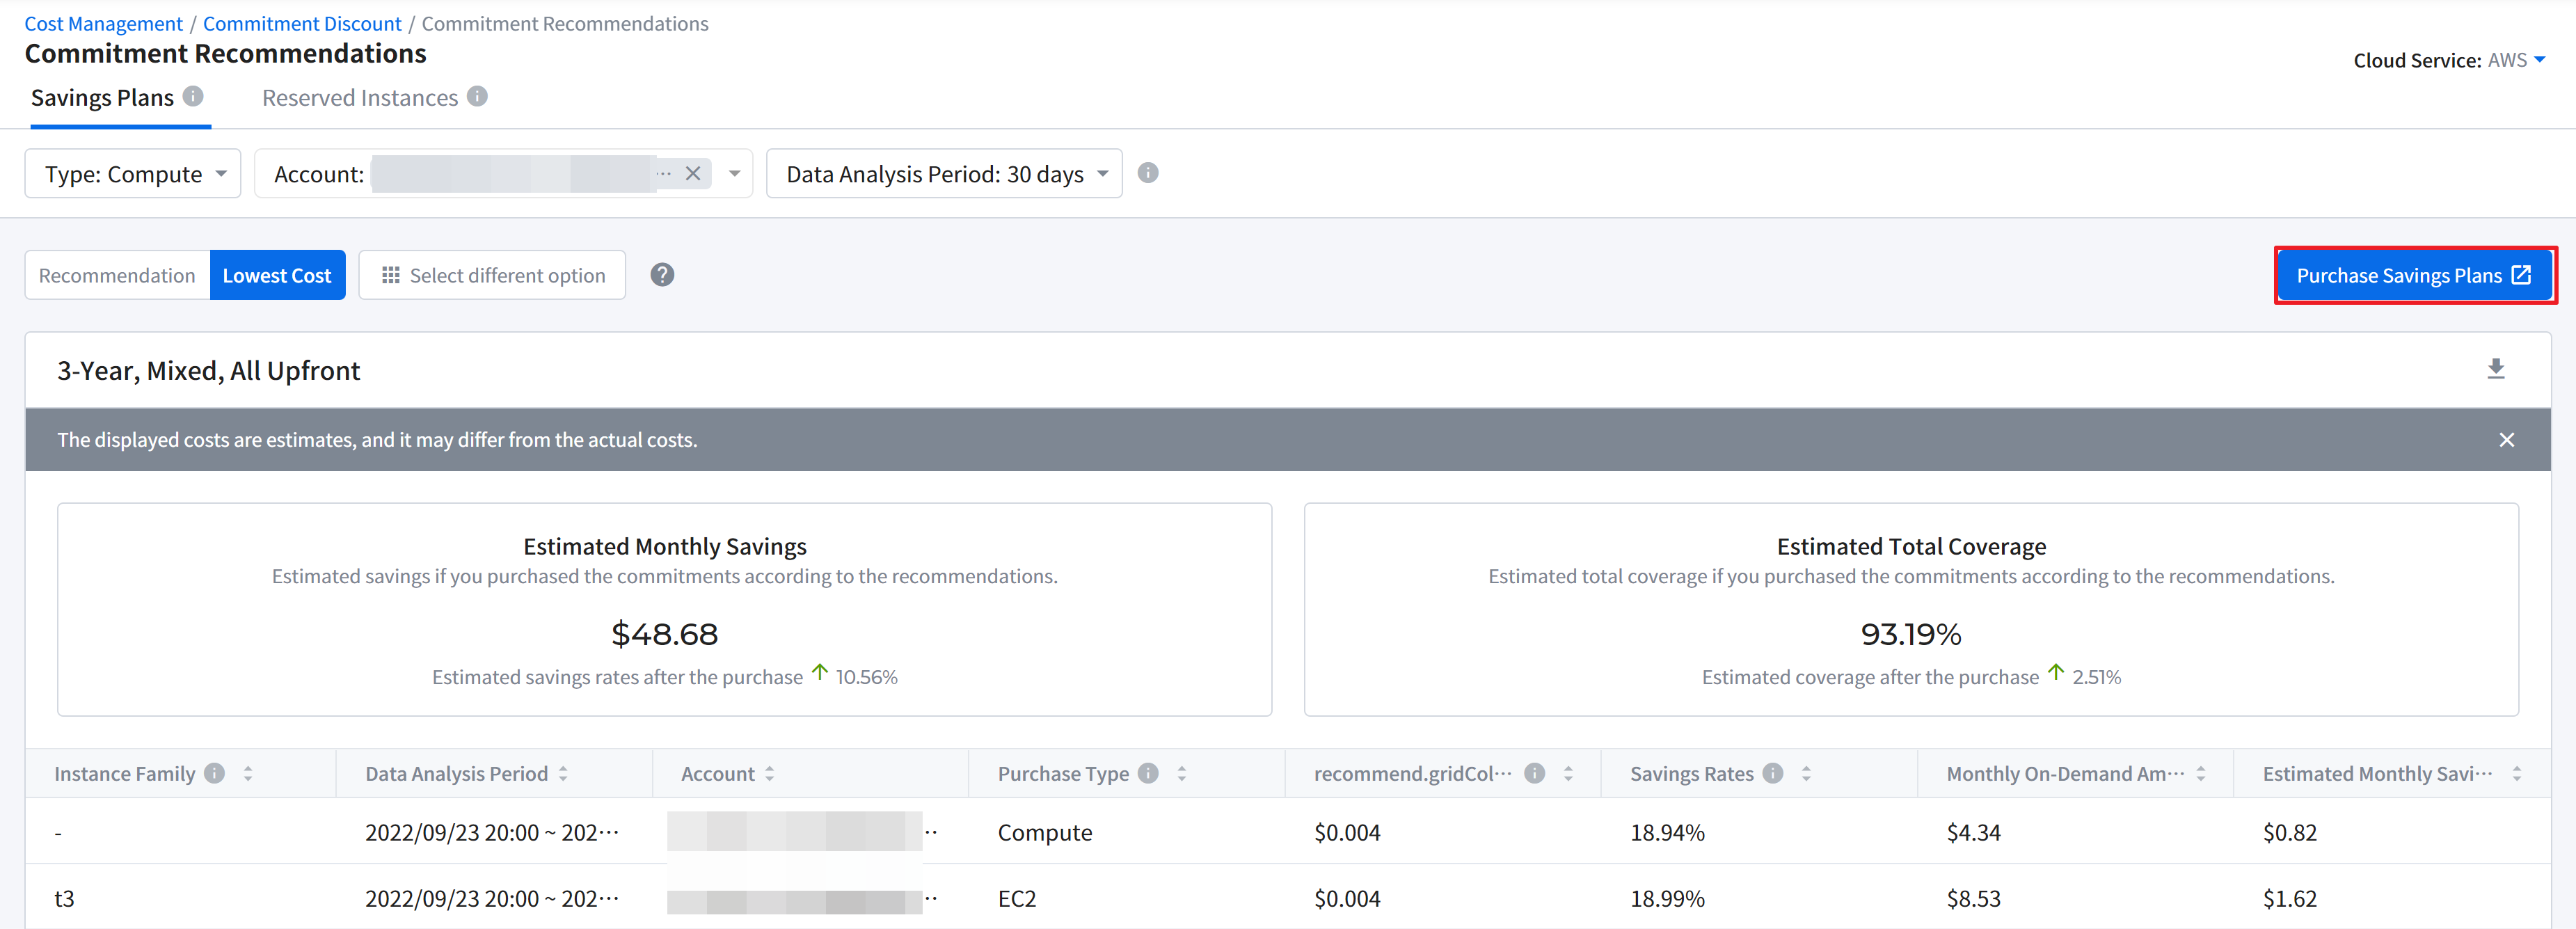
Estimated Monthly Savings
You can learn how much you could save if you purchased the commitments according to the recommendations.
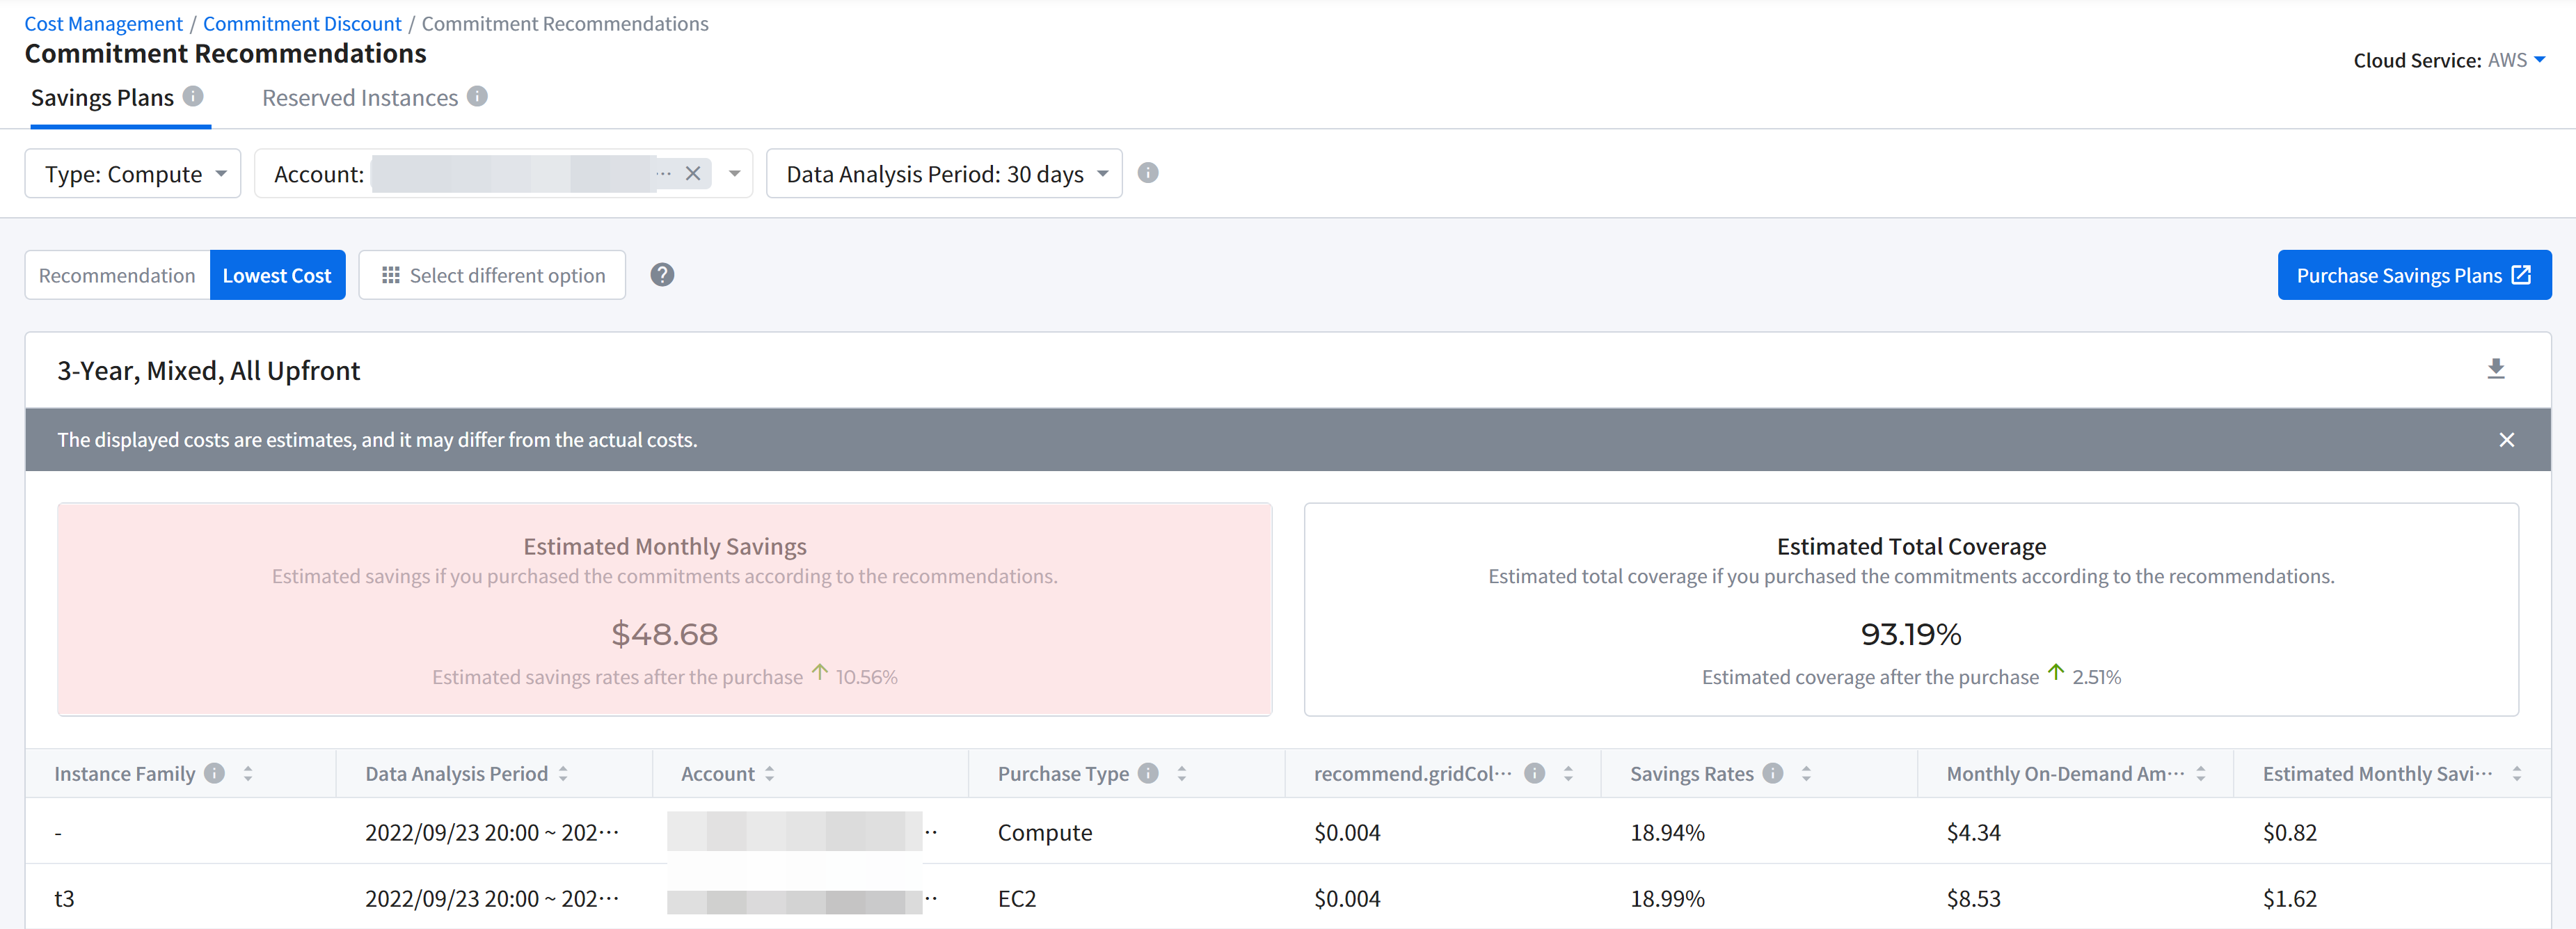
Estimated Total Coverage
This shows the estimated total coverage if you purchased the commitments according to the recommendations. For example, if you are thinking of purchasing more of the AWS commitments, this total coverage provides insight, considering both Savings Plans and Reserved Instances upon the purchase of recommended commitments.