Service Portal
You can view the summary of active services, and control user permissions, cloud account, console brokerage, and service group.
Quick Start Guide
This guide shows how to configure basic settings in order to use Service Portal, Cost Management, Asset Management, and AlertNow services. Get started with steps below.
📑 Step 1: Register Cloud Account
You must register your cloud account to properly view data from Service Portal.
It may take a while to load data right after your cloud account has been registered.
Refer to the list below how to register your cloud account.
- Registering AWS Accounts
- Registering Azure Subscriptions
- Registering GCP Projects
- Registering Ncloud Accounts
- Registering OCI Accounts
- Registering Alibaba Cloud Accounts
Expect up to 1 hour and 24 to 48 hours to load resource and cost related data respectively after registering your cloud account.
📑 Step 2: Create User Group and Invite Users
Create a user group by user types and invite users who can use the service. You can assign permissions to services by user groups, and easily manage users by user groups.
📑 Step 3: Grant Permissions
You can grant permission by cloud account and service menu. Link permissions to user groups and manage these permissions. If multiple companies are using the service, you can restrict permissions to access the service and company by using the company group menu.
⚠️Attention
This service is optimized for the latest version of Google Chrome. If you are using an older version or a different browser, some features may not work or performance issues may occur.
Dashboard
Service Portal > Dashboard
Dashboard provides the card view of each service that users are currently using, and shortcuts to go to each service.
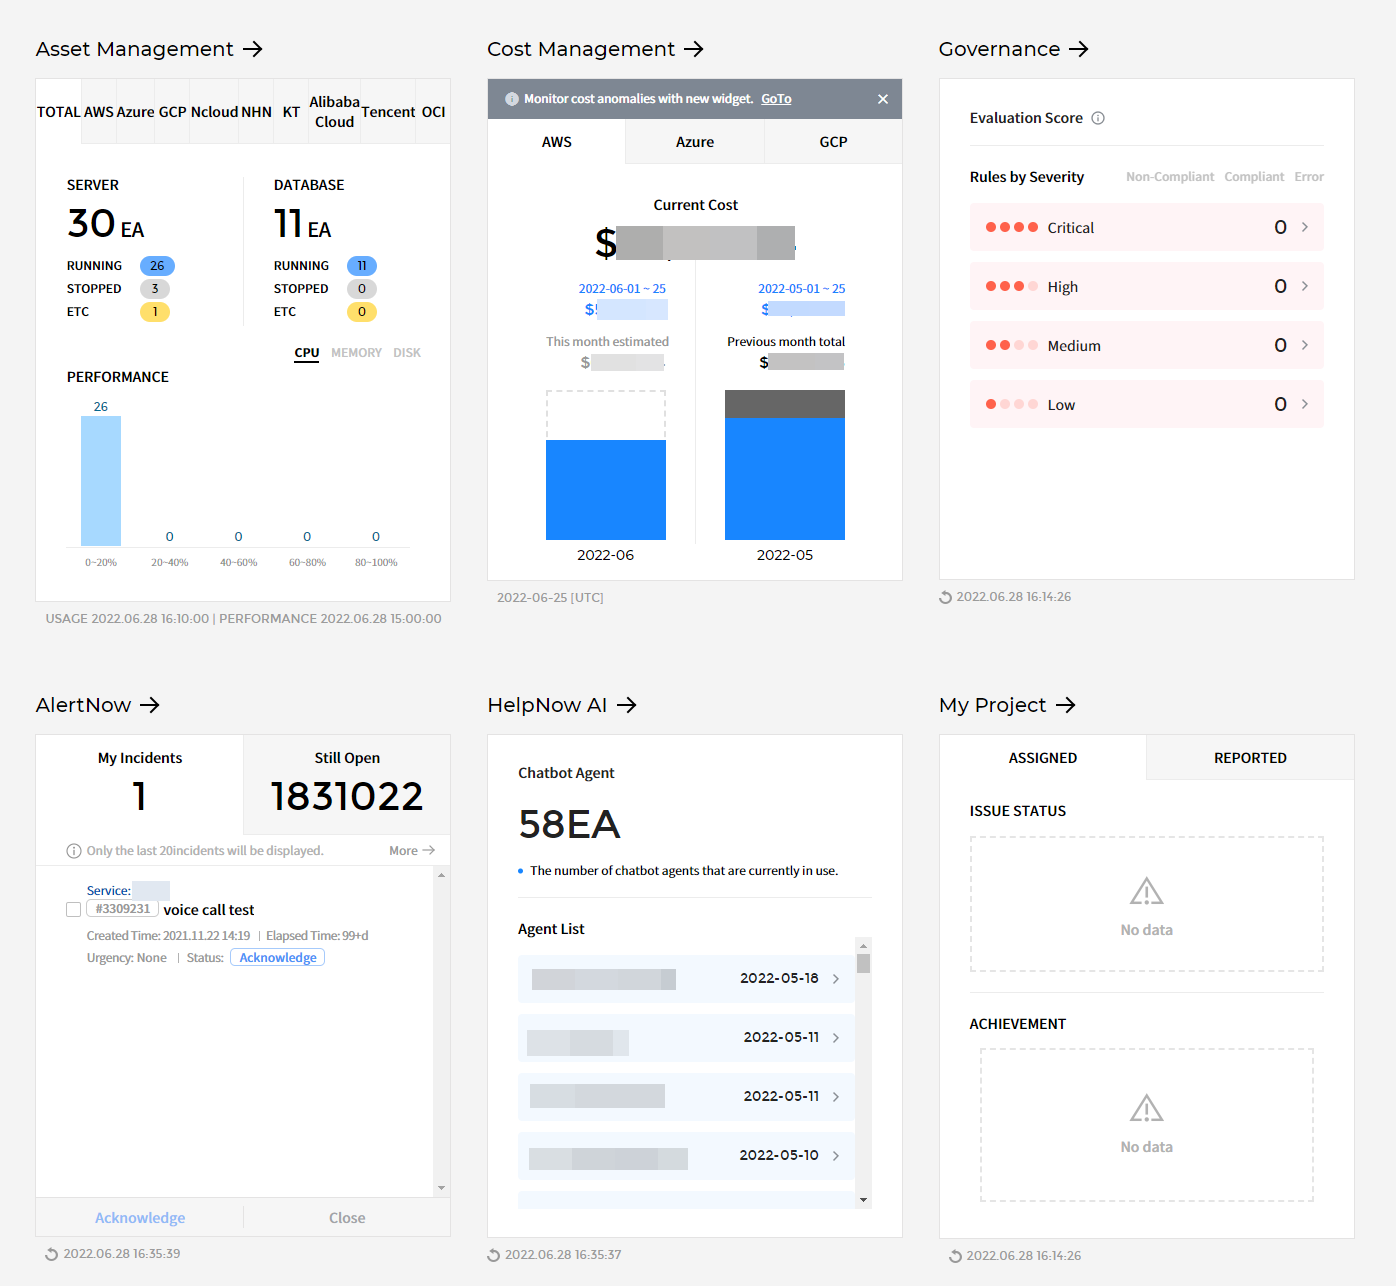
For inactive services or no permissions to acces services, click Learn More to find out more about the services, and click Apply for Service to use the service.
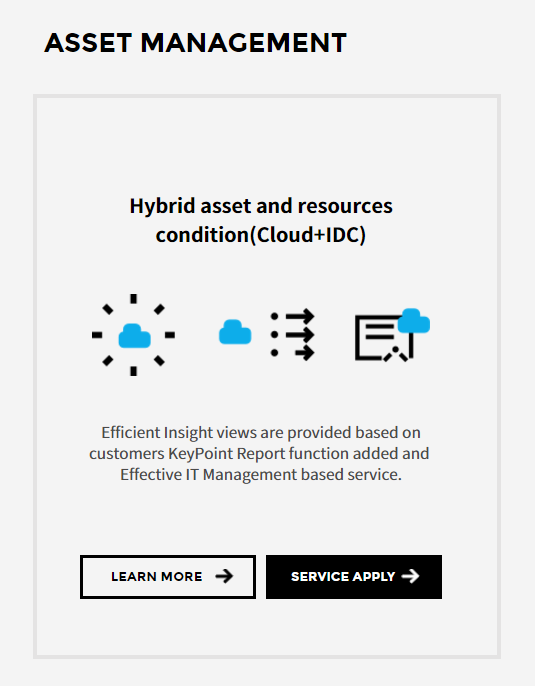
Asset Management
Users can check a brief overview of cloud services, and resource usage and performance at a glance.
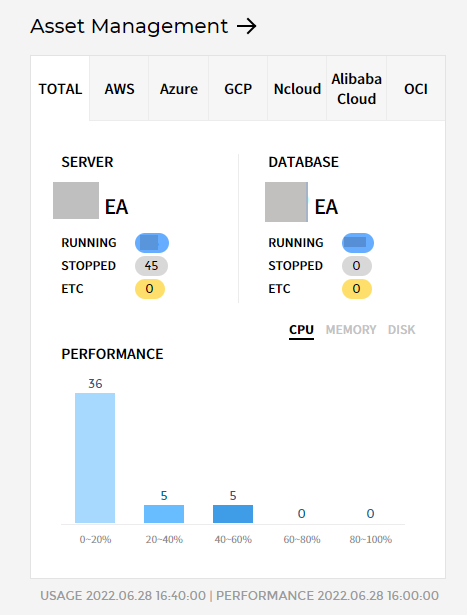
① Shortcut to Asset Management: Click the name of Asset Management on the top or the navigation bar on the left to go to the dashboard.
② Total: Can view volume distribution in accordance with operating status of database and servers of the cloud services in use.
③ Cloud Services: Can view volume distribution in accordance with performance and usage by cloud services such AWS, Azure, GCP, Ncloud, and OCI.
Cost Management
Users can check costs incurred from resources in each cloud service, and compare and analyze spending costs for this month with the previous month.
① Shortcut to Cost Management: Click the name of Cost Management on the top or the navigation bar on the left to go to the dashboard.
② Total: Display costs incurred by all operating cloud services. Costs incurred for this month and the previous month are displayed, and users can check estimated costs for this month based on previous costs.
③ Cloud Service: Can check the cost incurred from each cloud service such as AWS, Azure, and GCP by clicking each service.
Governance
Users can view the compliance scan results displayed as compliant, non-compliant or error, and rules are sorted by severity as critical, high, medium, or low.

① Shortcut to Governance: Click the name of Governance on the top or the navigation bar on the left to go to the dashboard.
AlertNow
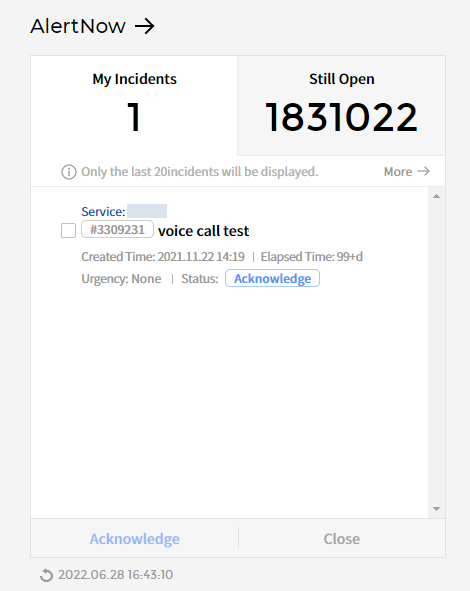
AlertNow is the integrated incident management platform that integrate various monitoring tools to notify the right people at the right time when an event occurs. Users can check the number of my incidents and not acknowledged incidents.
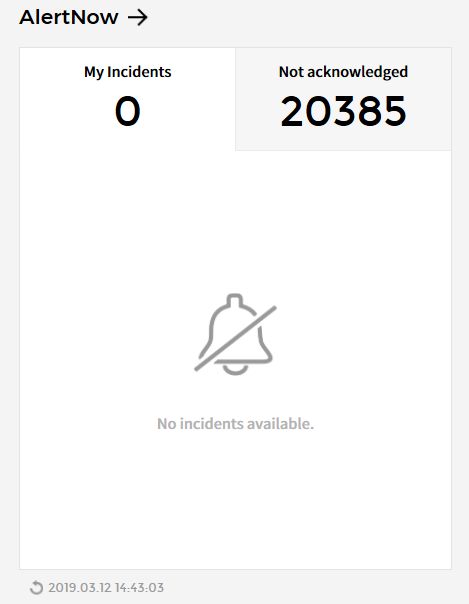
① Shortcut to AlertNow: Click the name of AlertNow on the top or the navigation bar on the left to go to the dashboard.
② My Incident & Not Acknowledged: Users can check the number of incidents that were assigned to the user in My Incident, and the number of incidents that are not assigned yet in Still Open.
HelpNow
HelpNow is the automation solution integrated with NLU, VOC analysis, and call center based on multi-cloud environments. Create intelligent agents suitable for customer service, HR support, marketing and IT help desk in order to provide personalized services to users through automation.

Unused Services
Unused services are the ones you do not use or do not have permission to access. Click Learn More to find out more about the services and click Apply for Service to use.
Cloud Efficiency Index Dashboard
Service Portal > Cloud Efficiency Index Dashboard
Cloud Efficiency Index Dashboard allows you to check whether resources and costs are efficiently managed, and provides metrics to identify and monitor underutilized resources or costs if any.
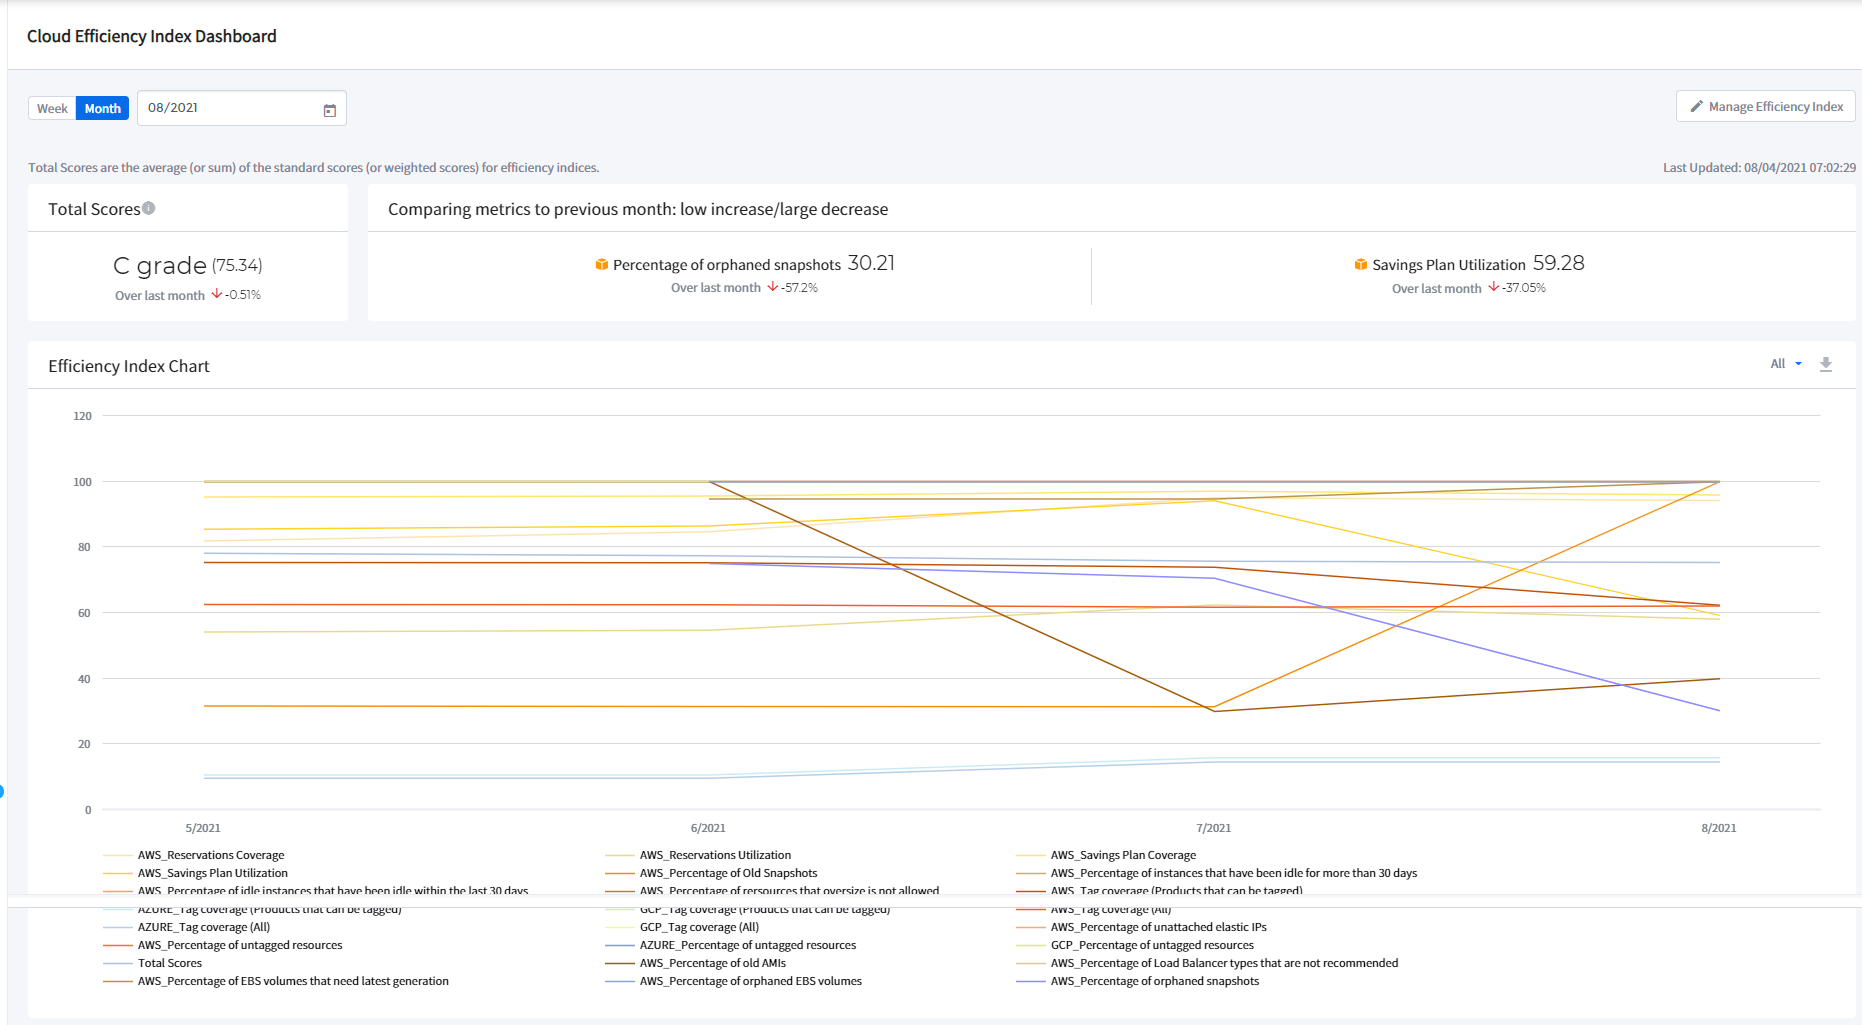
- Total Scores: Calculate the standard score of efficiency index item based on the measurement standard, and divide average values of the standard score into A+, A, B+, B, and C. Each grade is classified as
A+ = 100~95,A = 95~90,B+ = 90~85,B= 85~80, andC=80~. - Comparing metrics to previous month/week: Display items with the lowest increase and/or the largest decrease, at the top of the dashboard, compared to last month/week among all cloud efficiency items.
- Period: Cloud efficiency indices can be viewed monthly or weekly.
- Manage Efficiency Index: Manage and select required items for your need from the efficiency index items provided by the system by default.
Efficiency Index Chart
Efficiency indices can be viewed in a graphical form as charts. You can filter by clicking Cost or Resource from the drop down list on the top-right corner of the page to view the data you need to see. On the bottom of the chart, currently enabled items are displayed, and you can view specific items only by clicking and disabling other items.
Efficiency Index Table
The efficiency index table displays a list of enabled items with detailed information. You can view efficiency indices by All, Cost Efficiency Index or Resource Efficiency Index.
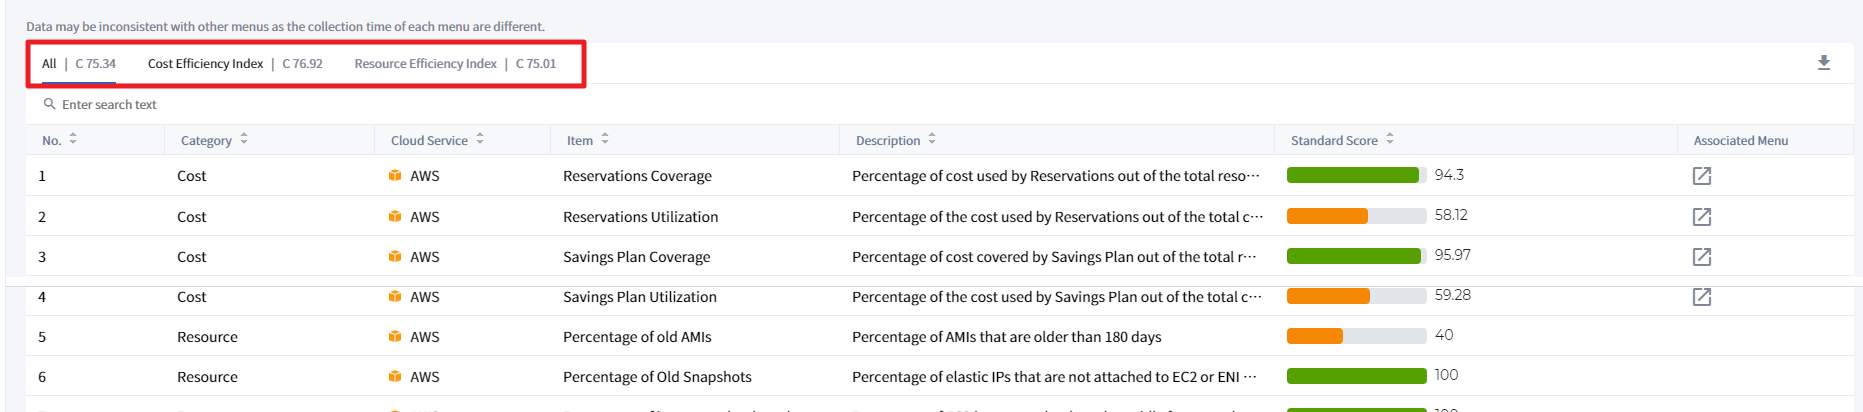
| Item | Description | Note |
|---|---|---|
| Category | Efficiency indices are categorized as Cost or Resource. | |
| Cloud Service | Display Cloud services such as AWS, Azure, and GCP related to enabled items. | |
| Item | List of rules that are applied to calculate scores of resource and cost data. | |
| Description | A detailed description of the efficiency index item. | |
| Standard Score | Users customize target score, weight, target setting, and recommended score, and convert them into percentage. | Tooltip shows calculation formula for each item |
| Weighted Score | Display the weighted score that is applied to the efficiency index item. The weight can be defined in Manage Efficiency Index. | Weighted score = Standard score * set weight / 100 |
| Associated Menu | Move to the associated menu to view the detailed information of the item. | Associated menus are provided for some items only |
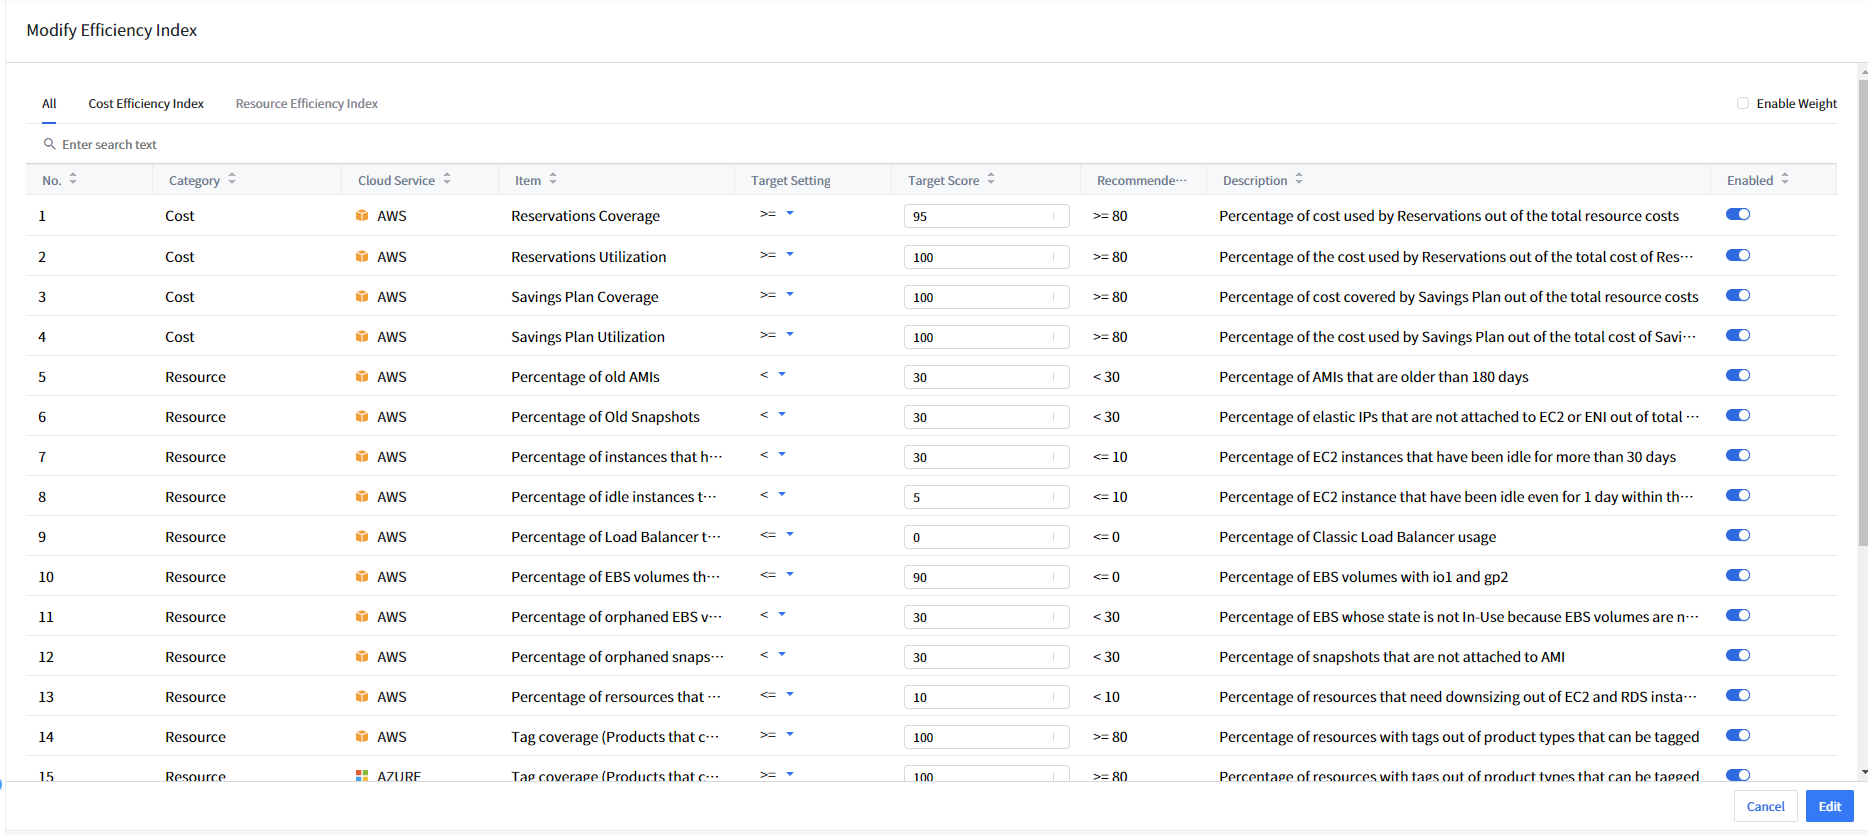
Modify Efficiency Index
Users can select required cost and resource items to manage cloud efficiency indices properly. Index management can be performed for the user’s IT environment based on the criteria set for each cost and resource item.
| Item | Description | Note |
|---|---|---|
| Item | List of rules that are applied to calculate scores of resource and cost data. | |
| Weight | Enter a weight for enabled efficiency index items. Then, converted weight will be applied to each item. The total sum of weight used in all items must be 100. | Select the checkbox on the top-right corner of the screen to disable the weight |
| Target Setting | When setting the measurement standard for each item, set inequality signs to calculate the standard score. | |
| Target Score | Users can set a target score for measuring the indices. Standard scores are calculated based on the target score. | |
| Recommended Score | Recommended score is provided by the system for each item. | |
| Description | A detailed description of the efficiency index item. | |
| Enabled | Users can choose whether to use the efficiency index item. |
📜 Note: Here is the example of how to calculate the standard score of Reservations Utilization.
• Calculation Condition: In the Modify Efficiency Index page, set Target Setting >=, and Target Score = 100, and disabled the weight.

• Formula: Used Reservations Costs/Purchased Reservations Costs * 100
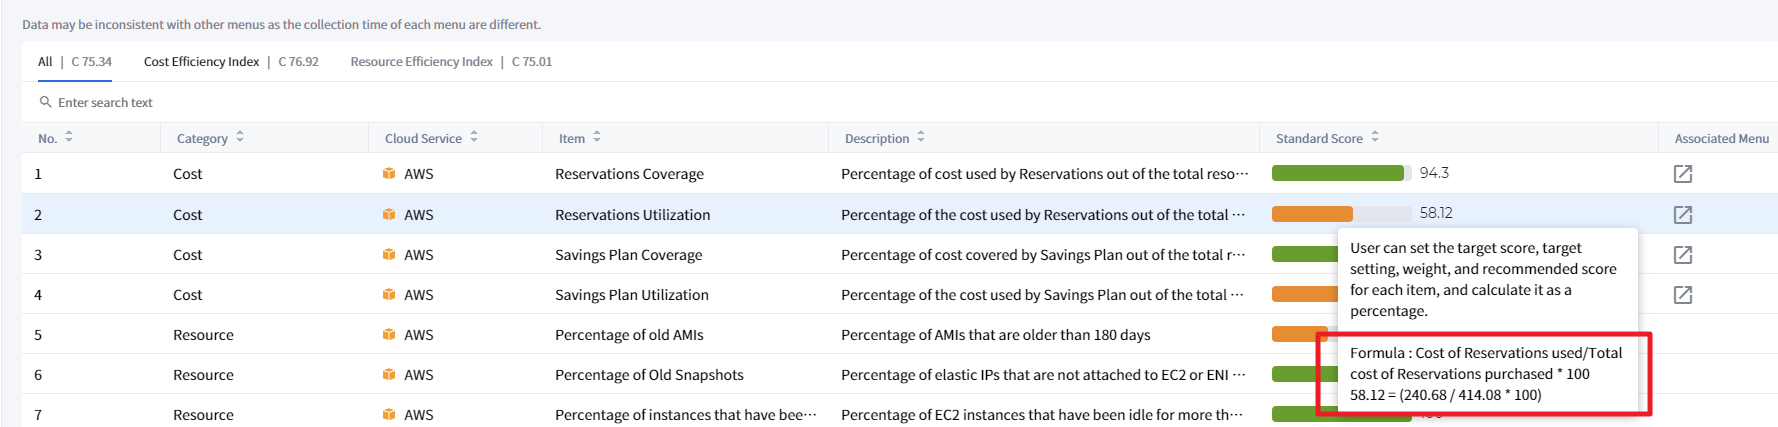
• Result (Standard score): (126.42/615.06) * 100 = 58.12
The calculated result is 58.12 and it means that the ratio of used reservations utilization compared to purchased reservations is only 58.12.
⁕ Now just change the standard score to 80 with the same condition set above, the score will be 72.66. You can see the difference by looking at this example. Depending on the conditions you set, you will have different but meaningful metrics for you.

Optimization Results Dashboard
Service Portal > Optimization Results Dashboard
Optimization Results Dashboard shows the optimization and cost savings results of the resources that were recommended to be optimized in the Resource Optimization menu in the Asset Management service platform. Users can also find out how much more can be saved by following the resource optimization recommendations.
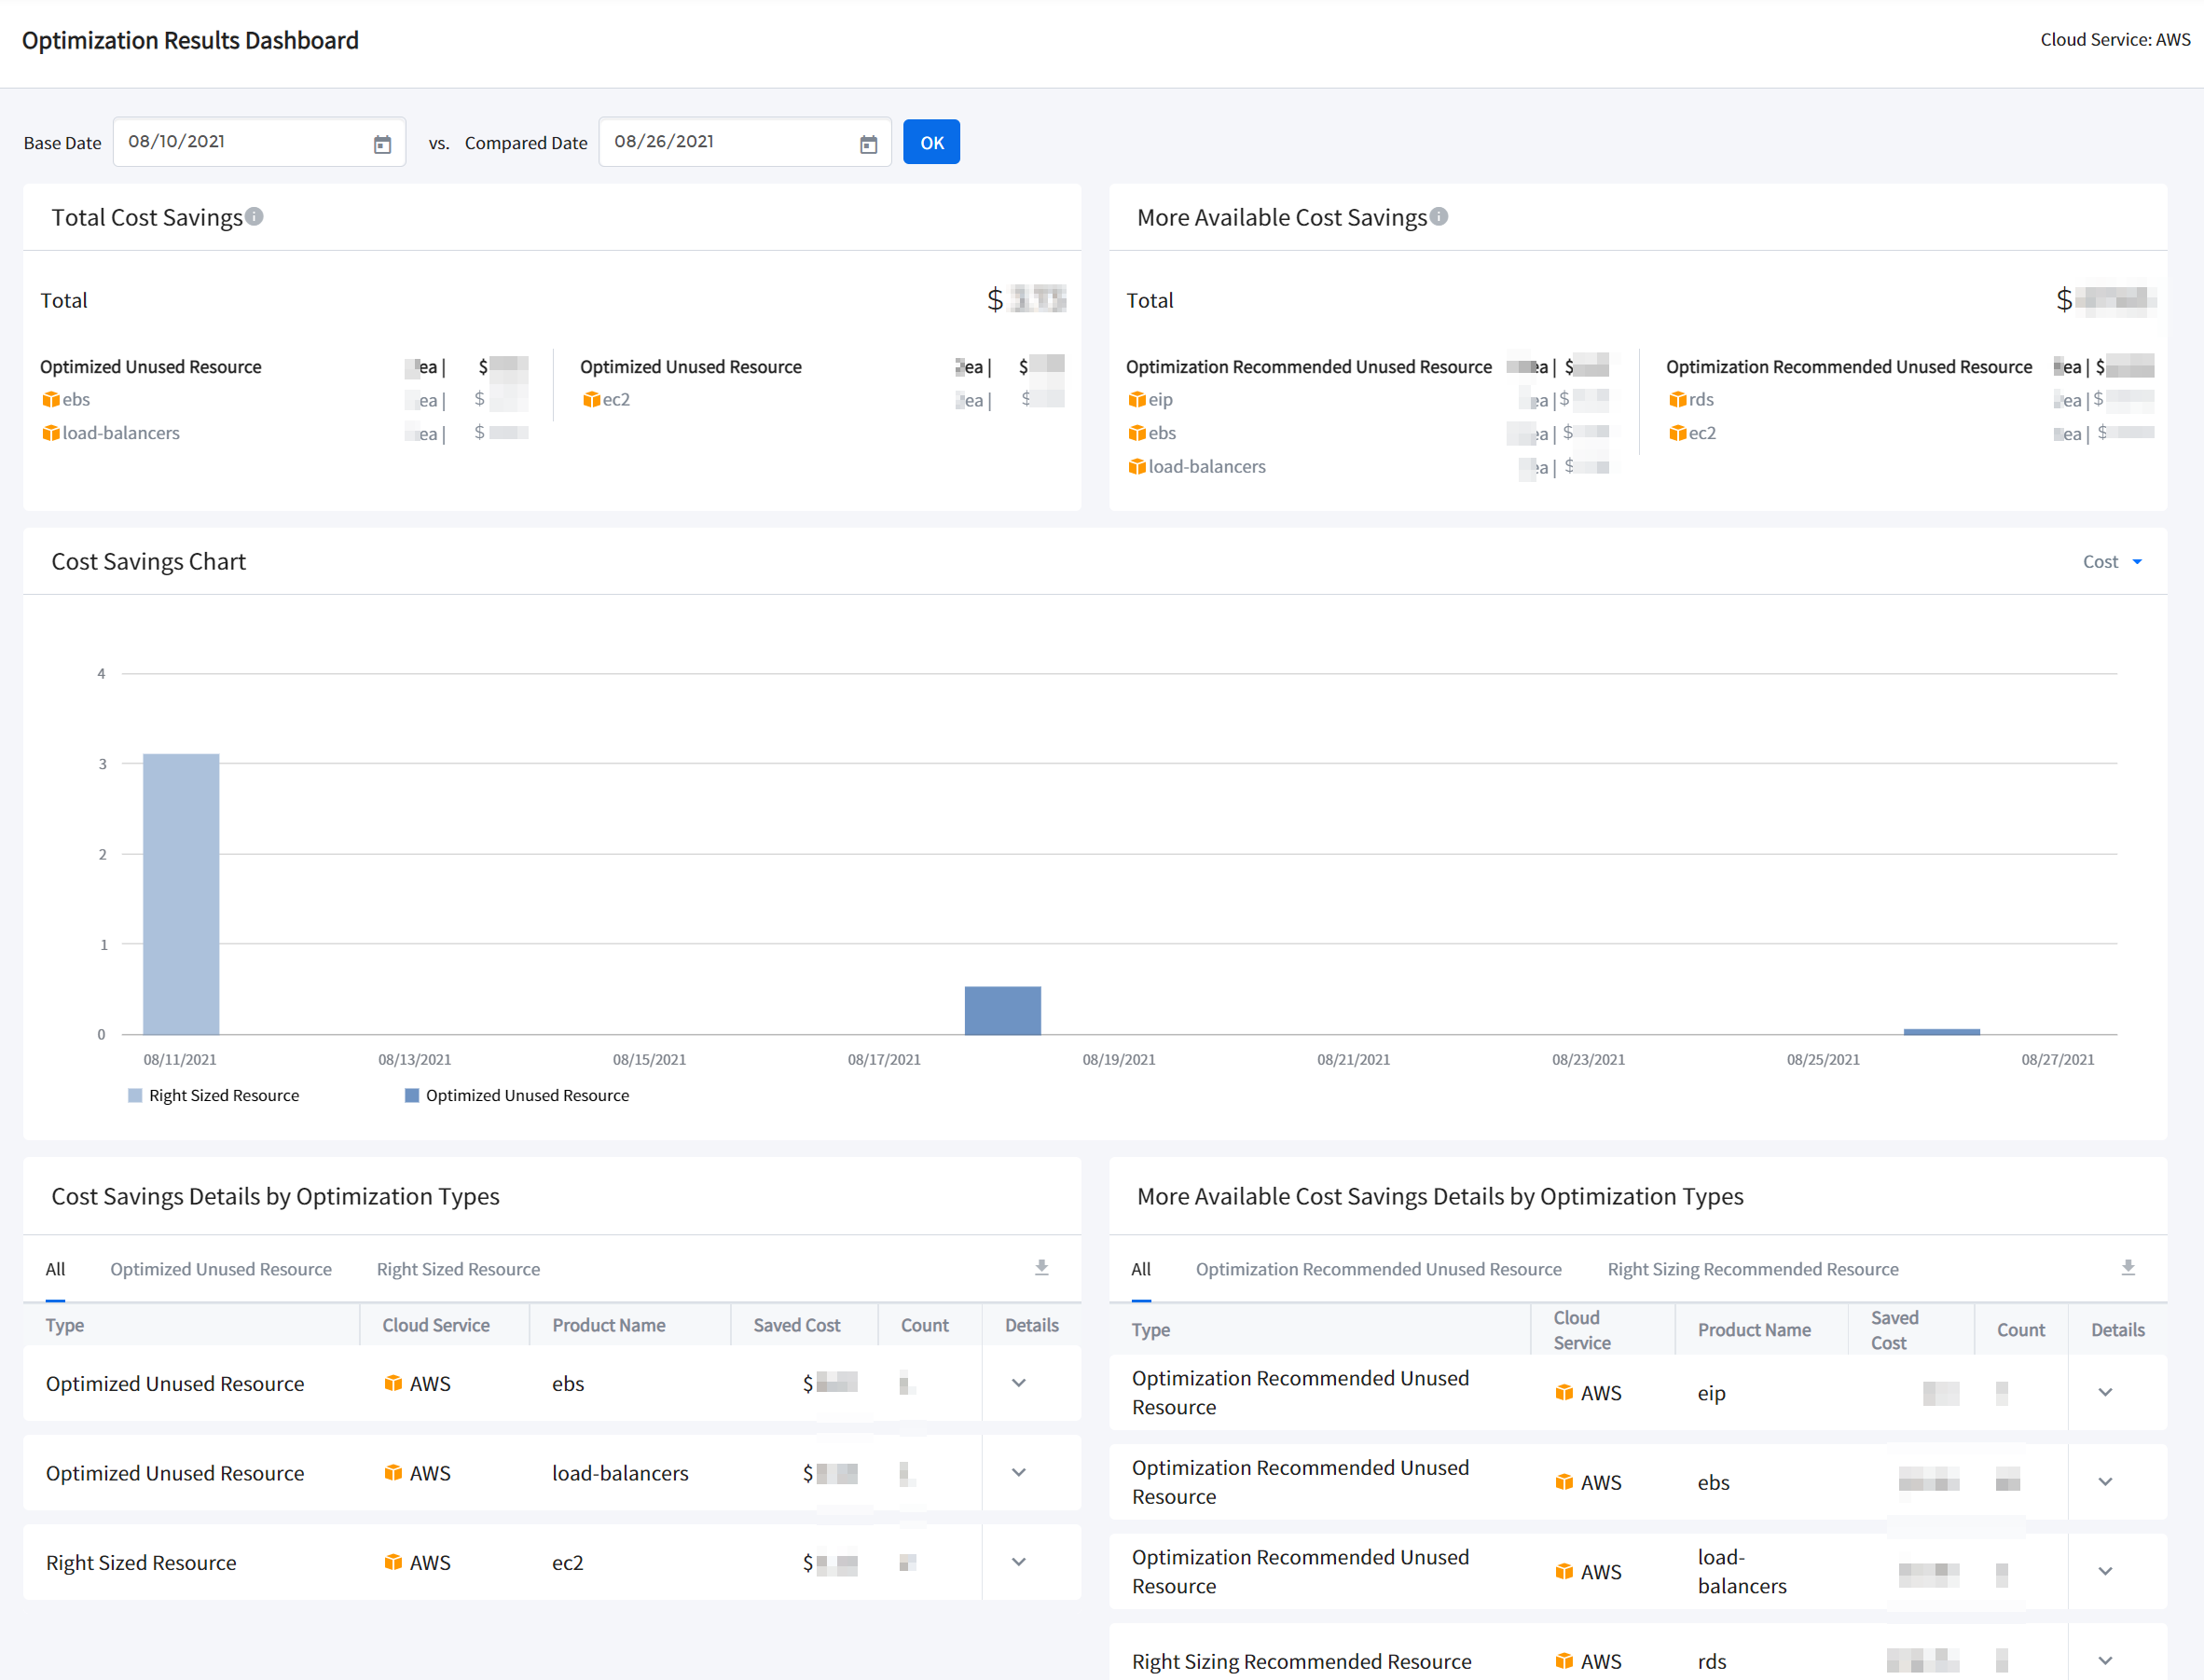
Base Date versus Compared Date
To see the Optimization Results, select Base Date and Compared Date to compare the resource status on each date. Users can easily find out how much costs were reduced between the two dates, Base Date and Compared Date, as well as how much more can be saved when the user optimizes the recommended resource.
Base Date: This date is the first of the two dates when comparing the optimization recommended resource status. If there are records of Right-Sizing recommended resources or Unused Resources on the day of the Base Date in the Resource Optimization menu, they will be compared to the data on the Compared Date.
Compared Date: This date is the second of the two dates when comparing the optimization recommended resource status. The System checks whether the optimization recommended resources were optimized or rightsized since the Base Date and compares the data. The optimization results in cost and count are drawn below in the Cost Savings Chart.
Data Analysis Example: Base Date versus Compared Date
⚠️ Attention: Below example contains fictional data for explanation purposes only.
Base Date: 2021-1-1 versus Compared Date: 2021-2-1
| Item | Count | Cost |
|---|---|---|
| Total Cost Savings | - | $1,000 |
| Optimized Unused Resource | 5ea | $500 |
| Right Sized Resource | 10ea | $500 |
| Item | Count | Cost |
|---|---|---|
| More Available Cost Savings | - | $2,000 |
| Optimization Recommended Unused Resource | 15ea | $1,000 |
| Right Sizing Recommended Resource | 20ea | $1,000 |
📜 Note: Analysis
- Comparing the resource status of January 1st and February 1st, 2021, the total cost saving was $1,000 on February 1st compared to January 1st.
- A total of 5 Unused Resources recommended for optimization were optimized appropriately, saving $500.
- A total of 10 Right-Sizing resources recommended for optimization were downsized, saving $500.
- Among the resources recommended for optimization on January 1st, 2021, the incurred cost of resources that are still not optimized is $2,000 as of February 1st, 2021.
- You can save $1,000 more if you optimize the recommended 15 Unused Resources.
- You can save $1,000 more if you downsize the recommended 20 Right-Sizing recommended resources.
Cost Savings Chart
When you select Base Date and Compared Date, the daily saved cost data is drawn on the Cost Savings Chart. You can select Cost or Count filter from the drop-down menu at the top right of the chart.
- X-axis: Date Optimized
- Y-axis: Cost ($)

Click the bar to see detailed optimization type and cost information for a certain date.
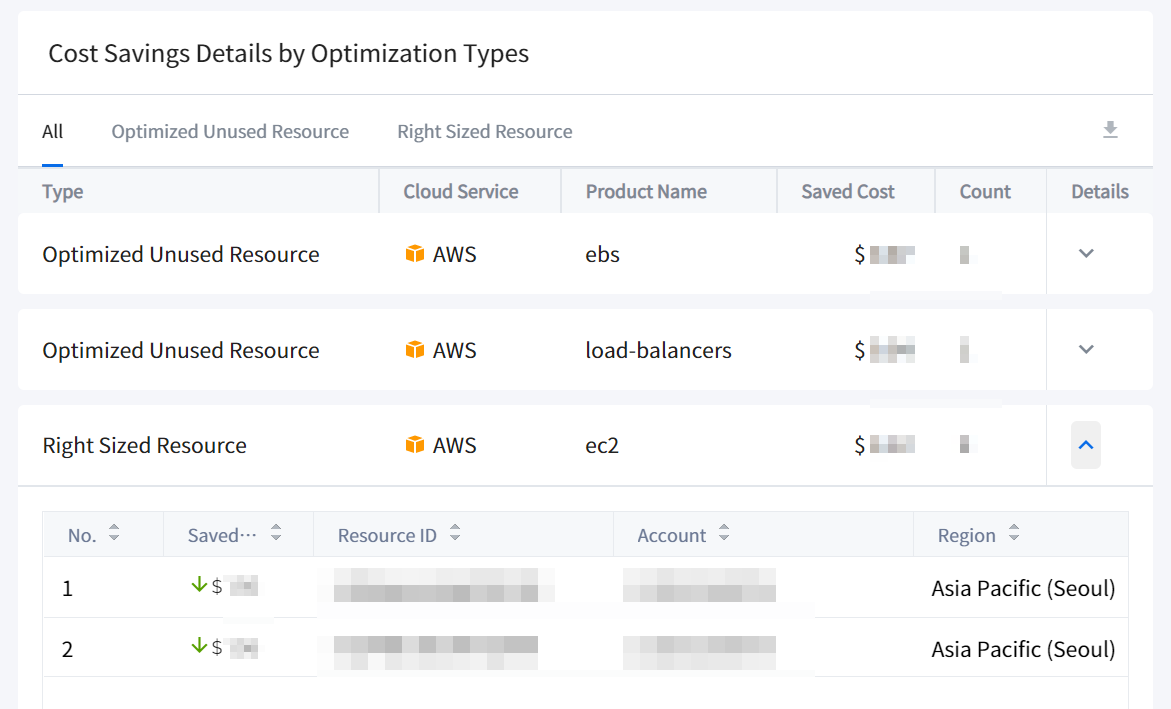
Cost Savings Details by Optimization Types
See Cost Savings Details by Optimization Types table, located on the lower left, to check Total Cost Savings data. There are three tabs:
- All
- Optimized Unused Resource
- Right Sized Resource
Click the downward arrow button under the Details column to see more data. You can view detailed data such as Saved Cost, Date Optimized for each Resource ID. Date Optimized refers to the date when the resource was optimized after it was recommended as optimization targets in the Resource Optimization menu.
For example, if the Base Date is January 1st, 2021,
- There was an Unused Resource on January 1st, 2021, and,
- It was recommended as an optimizable resource, and,
- If the resource was optimized between January 1st and the Compared Date,
then the Date Optimized field shows exactly when the resource was optimized.
More Available Cost Savings Details by Optimization Types
See More Available Cost Savings Details by Optimization Types table on lower right to check More Available Cost Savings Details. Users can view the data categorized by the below three tabs.
- All
- Optimization Recommended Unused Resource
- Right-Sizing Recommended Resource
Click the downward arrow button under the Details column to see more data. You can view detailed data such as Status, Resource Status, Date Added to Optimization Target for each Resource ID. Date Added to Optimization Target refers to the date when the resource was recommended as optimization targets in the Resource Optimization menu. Based on this date, users can search the resource on the Cloud Service Provider’s platform to appropriately optimize the resource.

📜 Note
To download Cost Savings Details by Optimization Types data and More Available Cost Savings Details by Optimization Types data in Excel files, click the Download button on the upper right on each table.
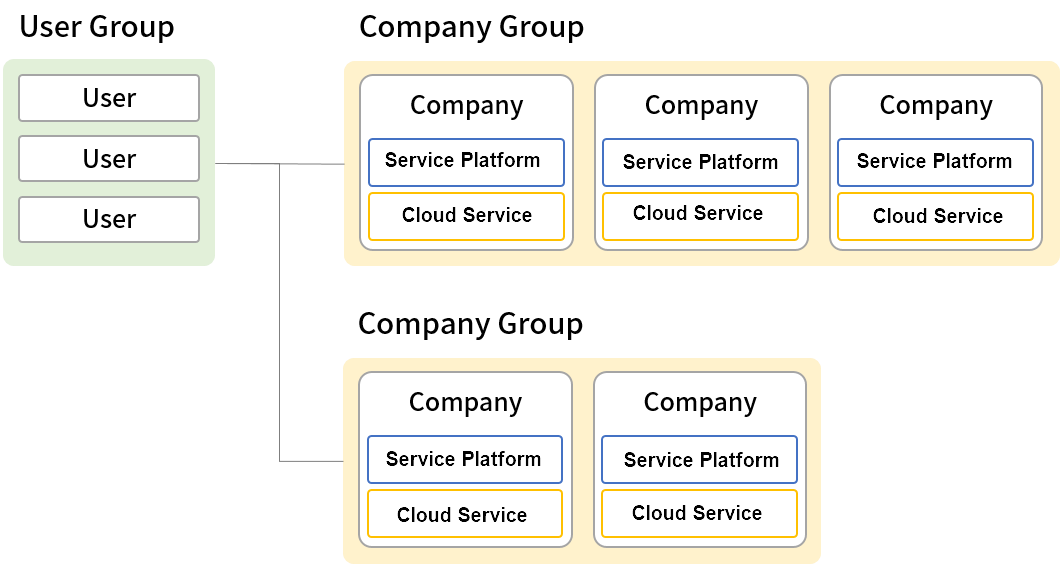
User Group
Service Portal > User Group
You can manage user permission through a User Group. By linking a company group to a user group, you can manage and edit permission of all users to the user group at the same time. Multiple company groups can be linked to a user group, and users in a user group have permission for cloud services, its menu and cloud accounts that belong to a company group.
Such groups are interlinked in the structure as below.
Create New User Group
You can create a new user group, and set permission for a user group by linking a company group to the user group.
① As shown in the figure below, click the [Add Group] button.

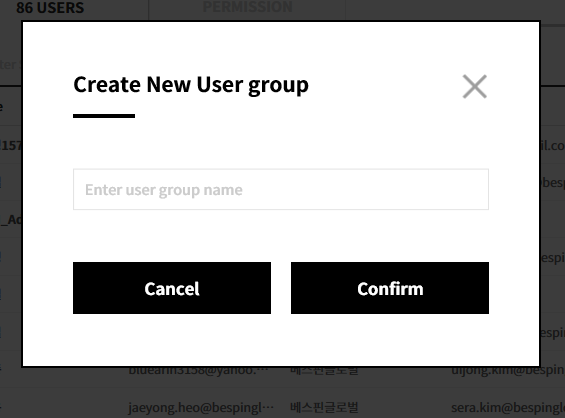
② Then, Create New User Group pop-up appears.
Enter the name of a new user group and click the [Confirm] button.
③ The new user group has been added in the user group list.
Invite User to User Group
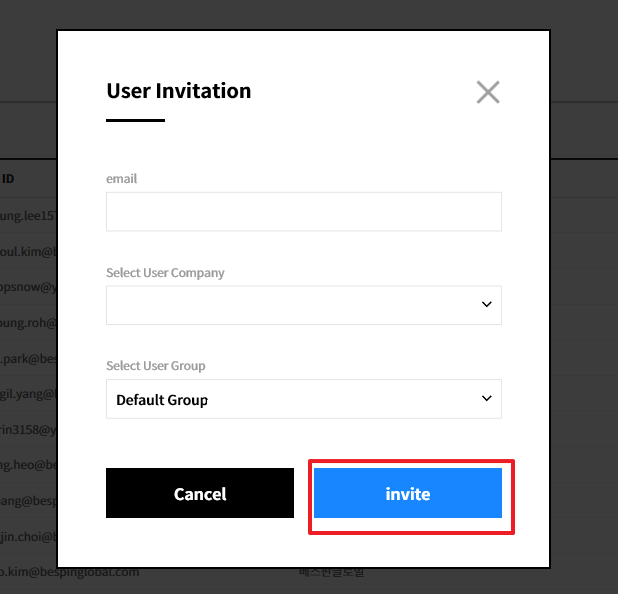
① On the right-side of the screen, click the [User Invitation] button to invite a user.

② [User Invitation] pop-up appears. Enter email address, company, and group information, and click the [Invite] button.
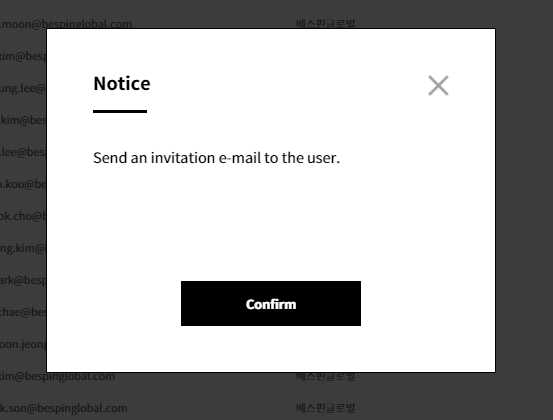
③ Notice popup appears to confirm that the invitation to a user has been sent.
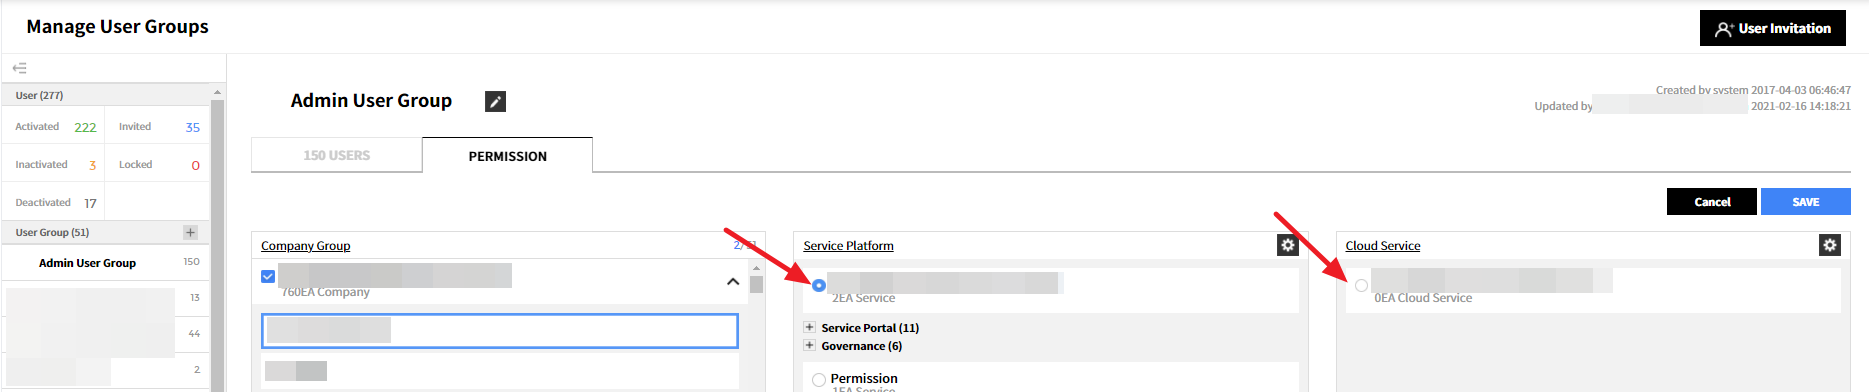
Set Permission to User Group
① Select a company group you want to link to a user group. Click Permission tab and select a checkbox of a company group from the company group list. Multiple company groups can be selected, and creating and managing company groups can be done in the Permission menu.
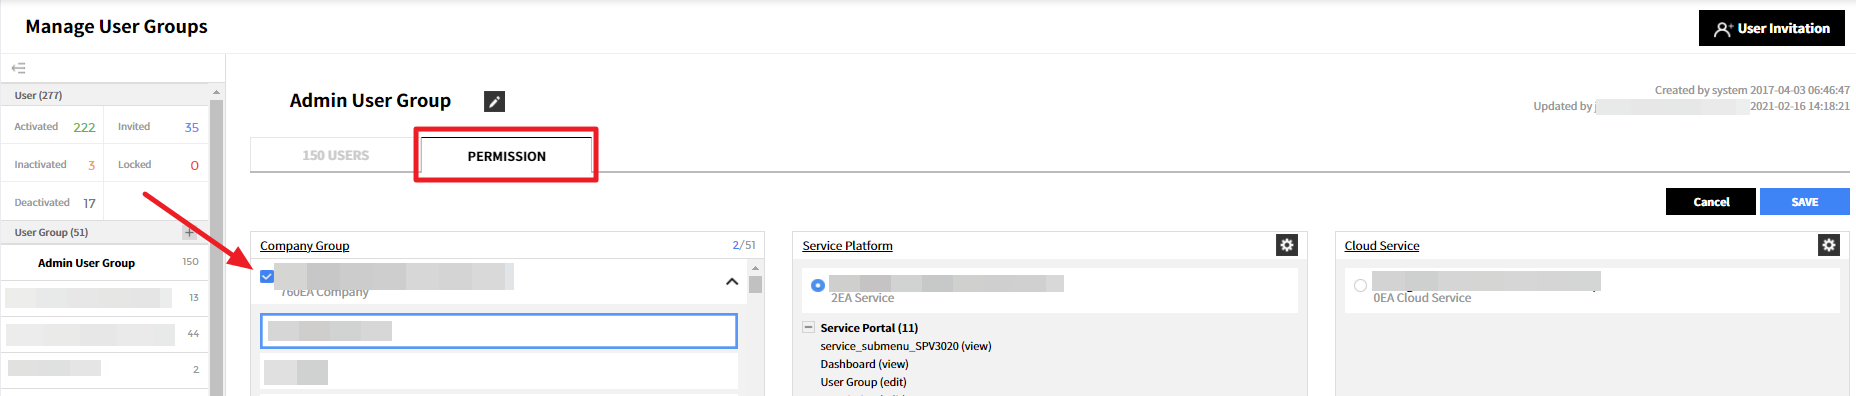
② Unfold the list of company groups to check linked companies. As you select a company, the “Service Platform” list and “Cloud” list which are linked to the selected company will be shown. Then, you can set permissions to Service Platform and Cloud by each company.
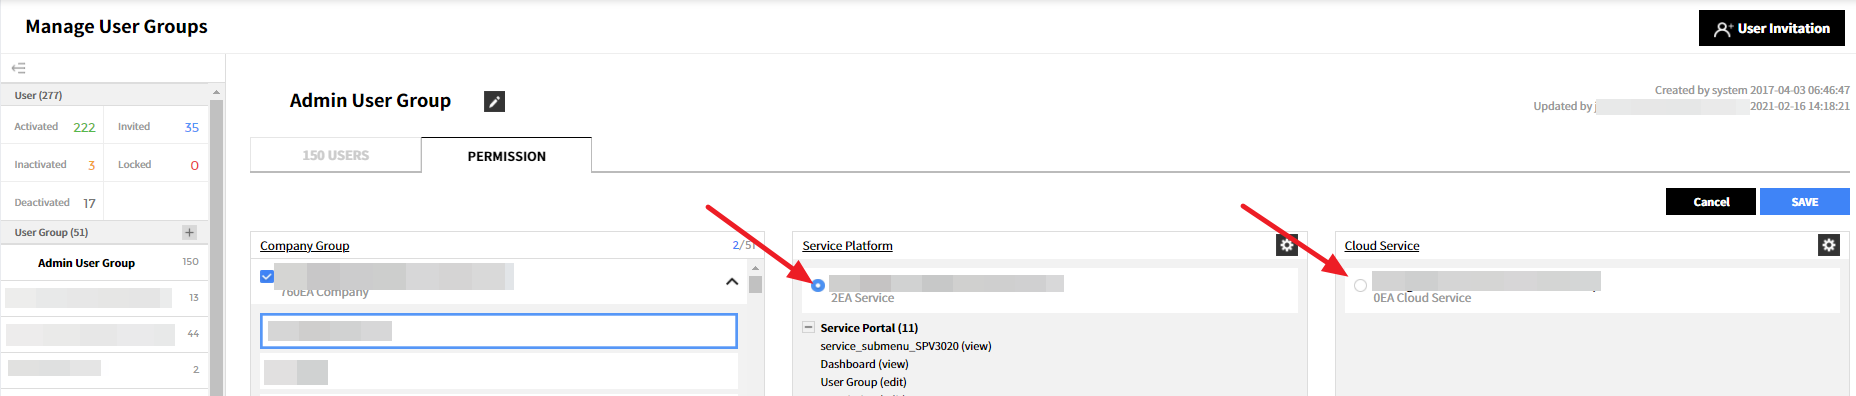
③ Click [Save] button.
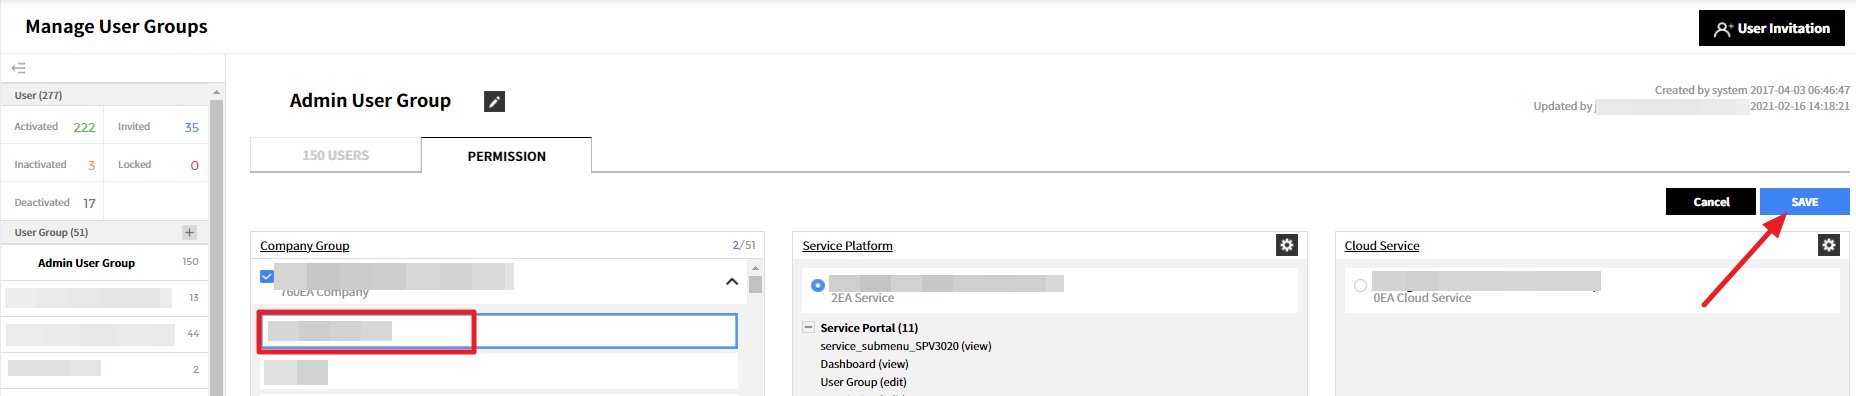
④ From the user group list, you can check that permissions are granted as you selected.
Modify User Group
You can edit members of an existing user group and modify permissions of its members as well.
Add or Remove User
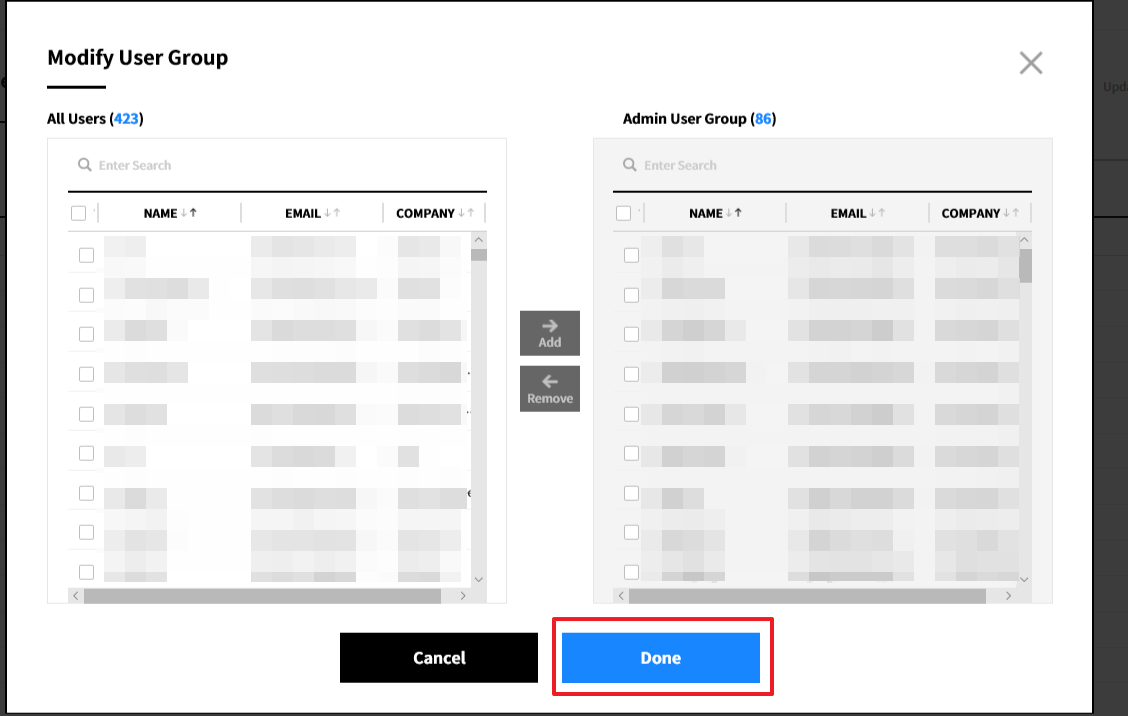
① Click the Modify User Group button located on the far-right side of the screen in order to add or remove a member from a user group.

② Then, ‘Modify User Group’ pop-up appears. To add a user, select a member from the All Users and click the [Add] button to add the user to the selected user group. To remove a user, select a member from the Admin User Group and click the [Remove] button to remove the user.
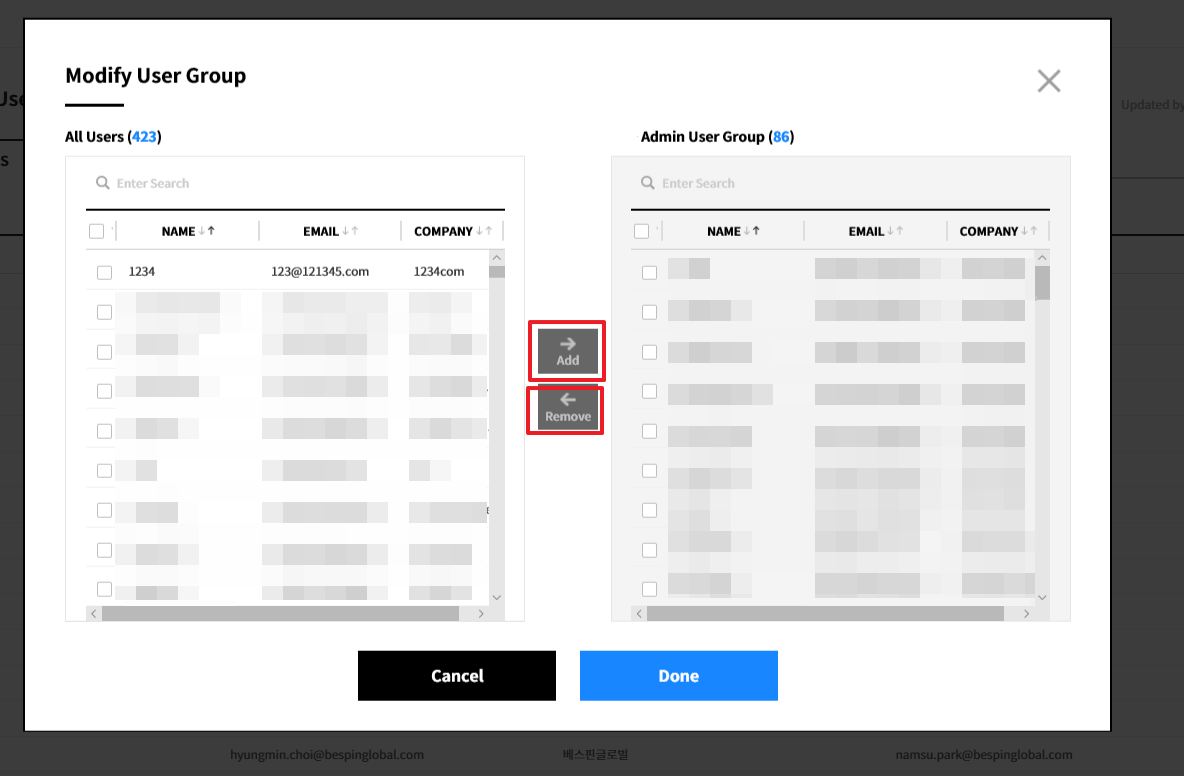
③ Click the [Done] button after adding the user.
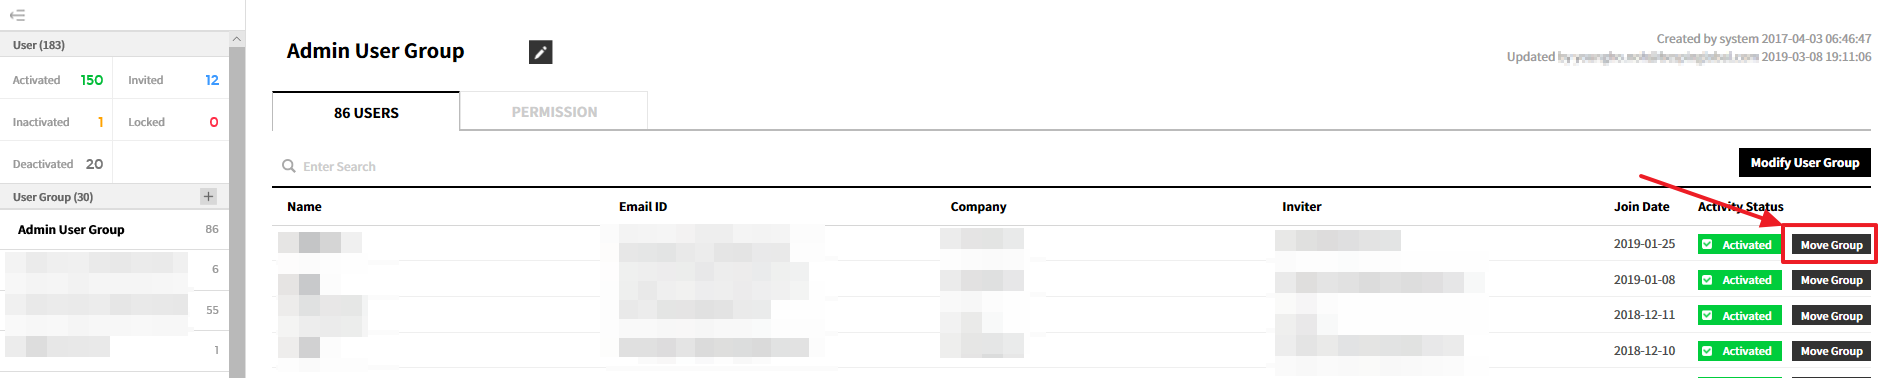
④ Click [Move Group] button to modify a user group.
⑤ ’Move User Group] pop-up appears. Enter a name and email address of a user you want to move to a different user group, and select a user group. Then, click the [Done] button to complete.
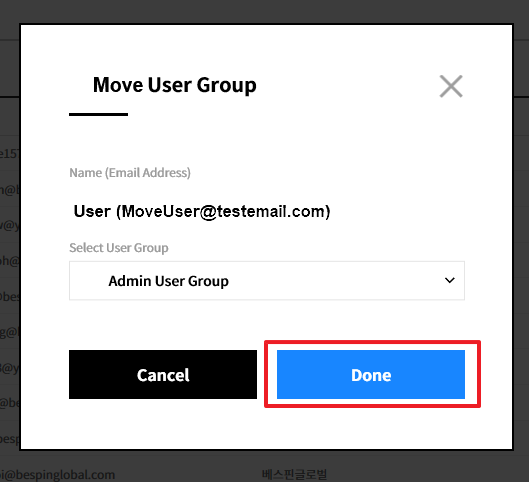
⑥ You can check whether the user has been moved to a different group from the user group list.
📜 Note: You can check and modify user status from the user group list. Click [Activated] button which is located on the far-right side of the screen to change user status from Activated, Inactivated or Deactivated. In addition, status of all users can be checked on the top left corner with [Activated], [Inactivated], [Deactivated], [Invited], and [Locked].

| Item | Description |
|---|---|
| Activated | It represents that users have been activated. |
| Inactivated | It represents that users have applied for using the service, but did not receive the approval from the administrator. |
| Deactivated | It represents that users are no longer using the service. |
| Invited | It represents that users have been invited but not responded yet. |
| Locked | It represents that users wrongfully input passwords more than 5 times and now have some restrictions to use the service. |
Modify Permission of User Group
① On the user group list, select a user that you want to change the permission. Then, click the ‘Permission’ tab.
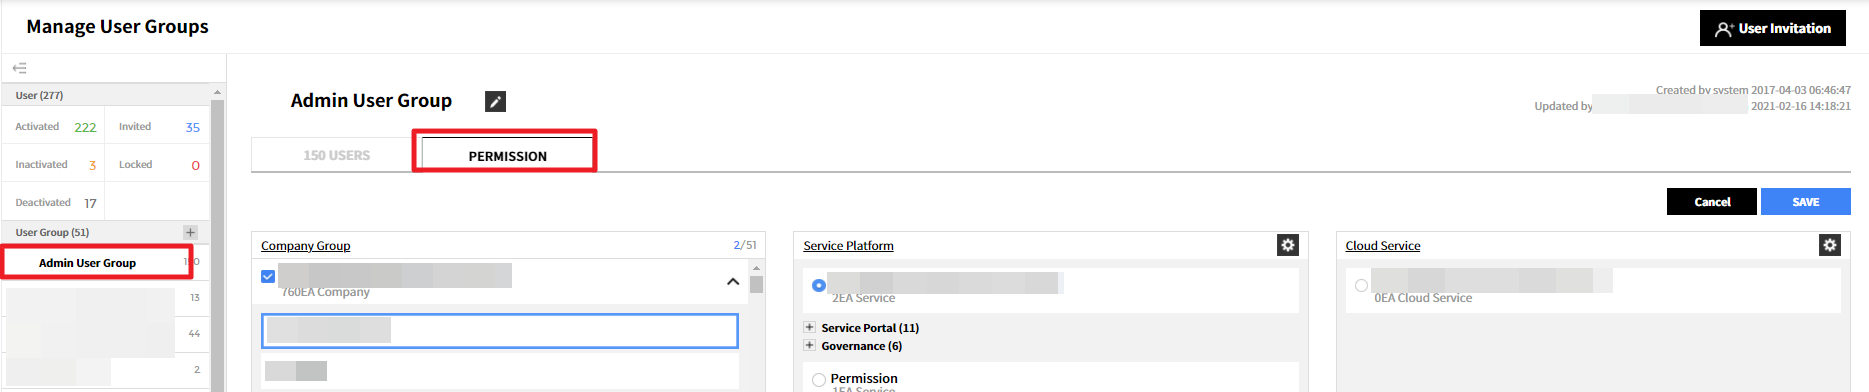
② Select ‘Service Platform’ and ‘Cloud Service’ in sequential order after clicking a company group that you want to link.
③ Click the [Save] button to save changes.
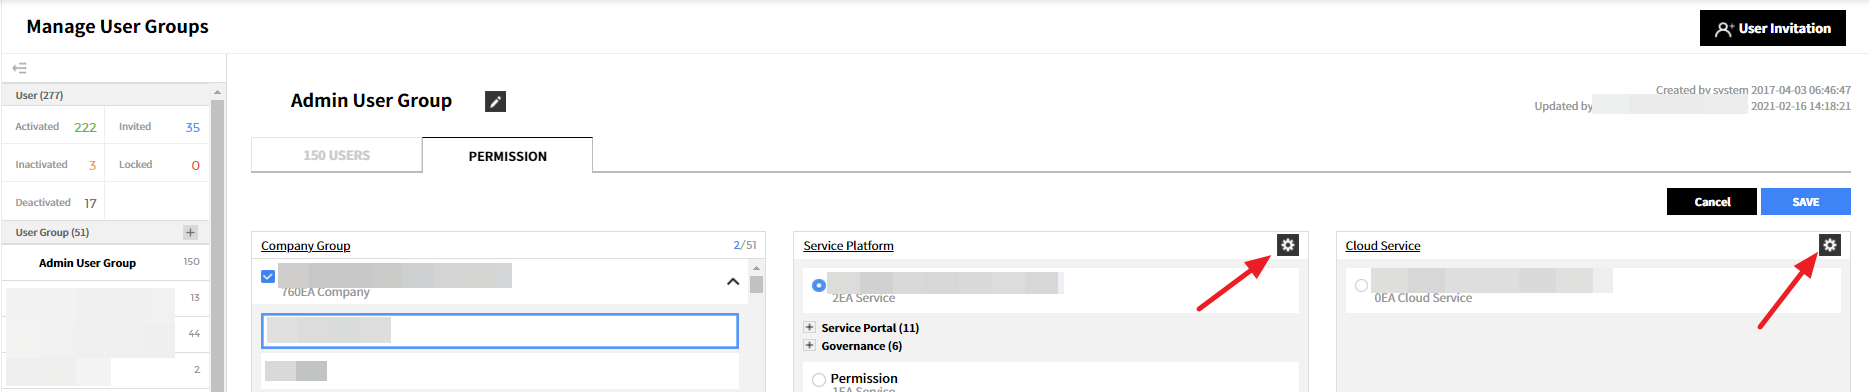
④ Company Group, Service Platform and Cloud Service under the ‘Permission,’ can be set in the Permission menu. You can go to each service just by clicking the gear icons as shown in the figure.
Delete User Group
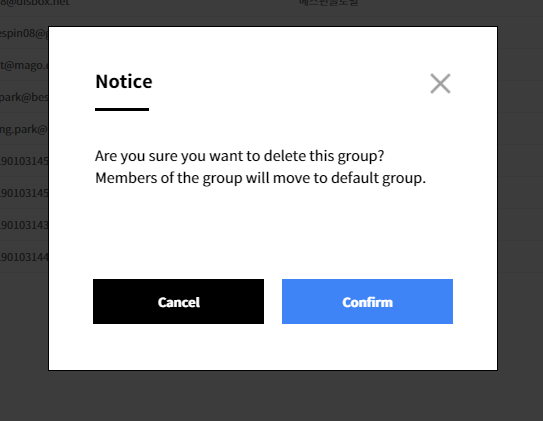
You can delete a user group. However, if you delete a user group, users in the user group will be moved to a default group.
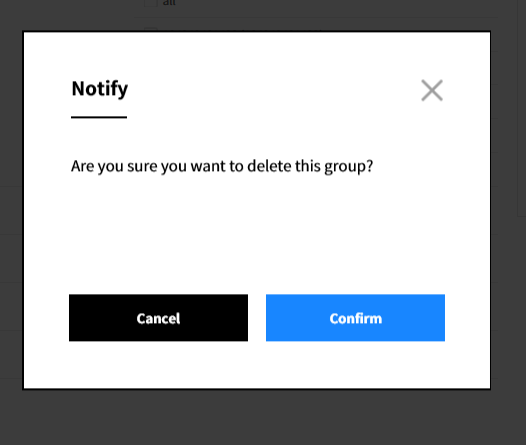
① Select a user group you want to delete and click the [X] button on the right side of the user group name.

② When you click the [X] button, a pop-up appears asking whether you want to continue deleting it. Click [Confirm] button to delete the user group, and users in that user group will be moved to a default group.
Permission
Service Portal > Permission
Accessible cloud account data depends on your User Group’s permission setting. In other words, you can only view cloud account data that your user group has permission to.
You can group the certain permission settings by company, by service platform, and by cloud service accounts. Permissions can be granted to a user by linking these groups to the user’s user group.
In Permission menu, you can configure groups with companies, service platforms and cloud service accounts, and can edit and delete such groups.
- Company Group: You can manage multiple companies by grouping them as a group.
- Service Platform: You can manage permissions of service and each menu by grouping them as a group.
- Cloud Service: You can manage cloud services and service accounts by grouping them as a group.
Such groups are interlinked and structured as below.
Company Group
Service Portal > Permission > Company Group
Individual companies can be bound in a company group. It also binds and manages users subscribed under a name of department as a company or grouping affiliates as a group company.
View Company Group
You can check information about a company group already added.
① On the company group list, click a company group you want to check.

② On the right-side pane, a list of companies that belong to the selected company group is displayed. Click [+] button to check what kinds of services the selected company is using.

Create Company Group
You can create a new company group, and add a company to the company group.
① Click the [+] button to add a Company Group.

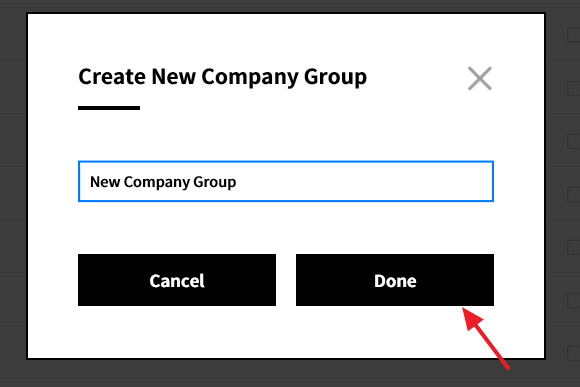
② The Create New Company Group pop-up appears.
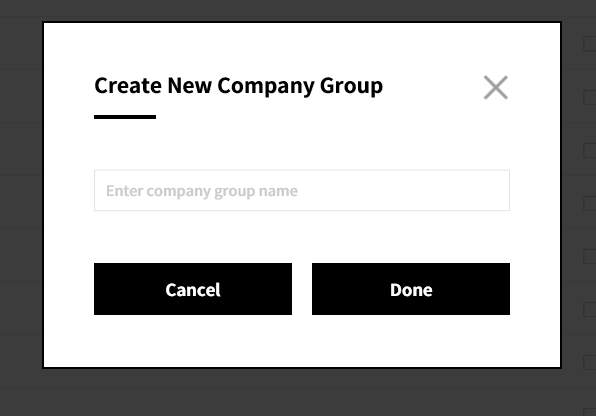
③ In the Create New Company Group pop-up, enter the name of a new company group and click the [Done] button.
④ The company group lists show that a new company group has been added.
⑤ On the right-side pane, a list of companies available for a company group is shown. Select a company you want to add by selecting its checkbox.

⑥ Click the [Save Changes] button.

⑦ The new company group is added.
Rename Company Group Name
You can change the name of a company group already added. Also, you can add a new company or remove an added company.
① On the company group list, select a company group you want to change. Then, click the [Edit] button next to the name of a company group.

② Then, the input field becomes editable.
Enter a new name for a company group.

③ After changing the name, click the [Check] button.

④ Successfully renamed it.
Delete Company Group
You can delete the added Company Group.
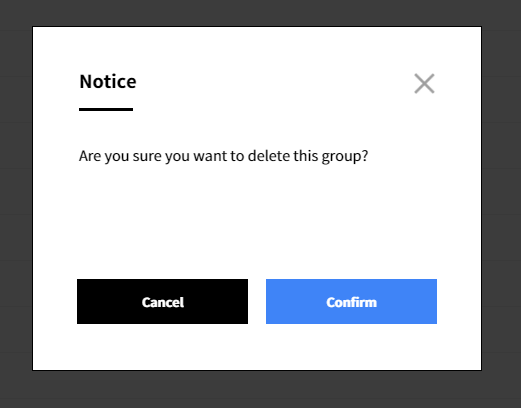
① On the company group list, select a company group you want to delete. Then, click the [X] button.

② A pop-up appears asking whether you want to continue deleting it. Click the [Confirm] button to delete it.
③ The company group is deleted.
Service Platform Group
Service Portal > Permission > Service Platform
You can make a group of services and menu by permissions so that you can grant the same permission to menus in a certain service. You can link a service platform group to a user group so that you can easily set permissions for each menu.
📌 Important
For certain menus, permission control based on the cloud service account cannot be applied. In such cases,tooltip icon appears next to the menu title. When the menu is activated, users can access all of the cloud account’s data.
View Service Platform Group
You can check detailed information about Service Platform.
① On the service platform list, click a service platform group you want to check.

② Available services for the selected service platform are shown on the right side of the page.
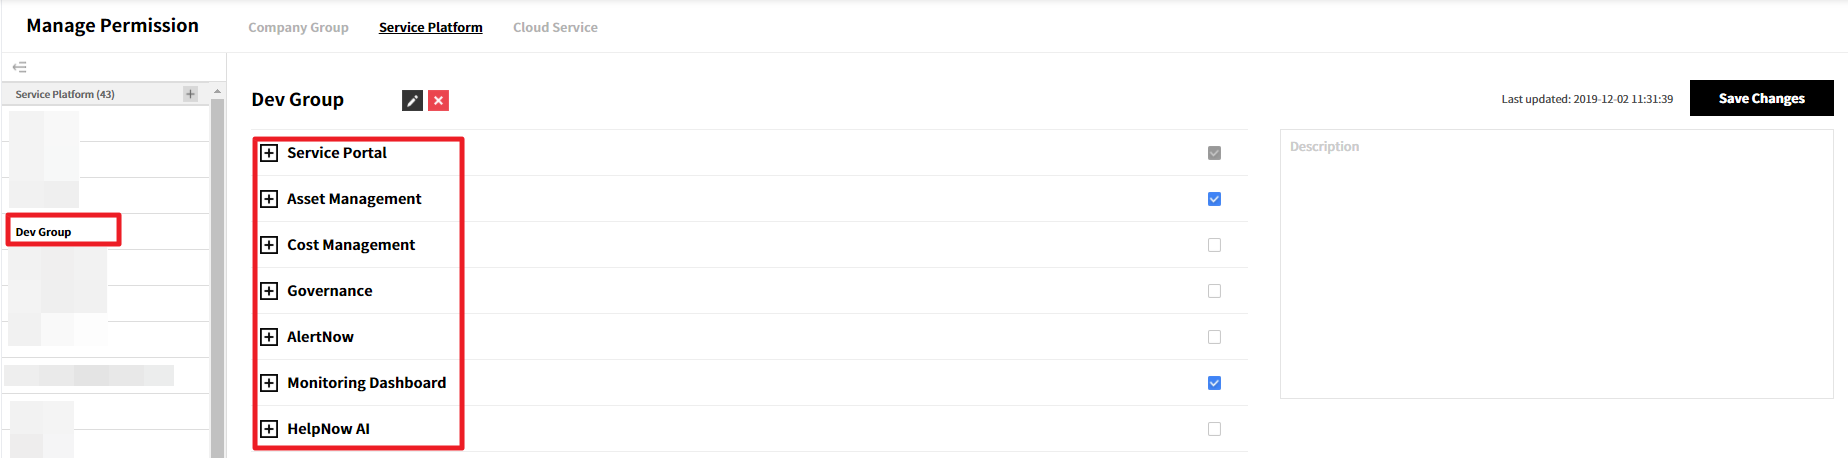
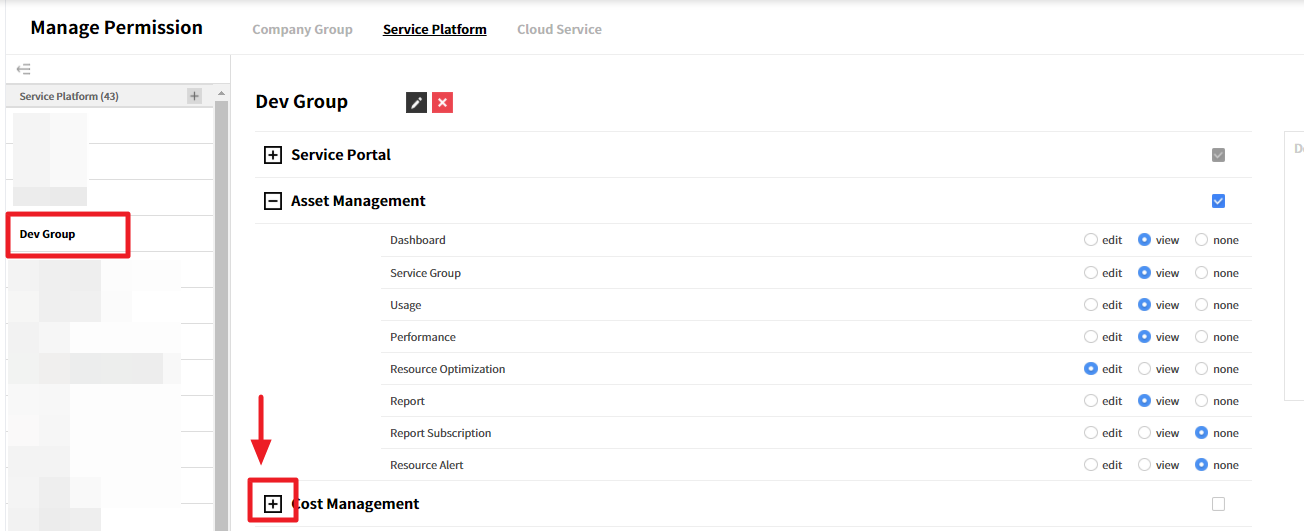
③ Click the [+] button of each service to check available menus and permission of each menu.
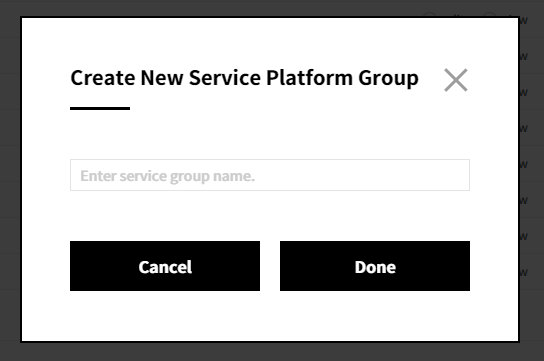
Create Service Platform Group
You can create a new service platform, and set permission for each service and menu.
① Click the [+] button to add a new service platform.
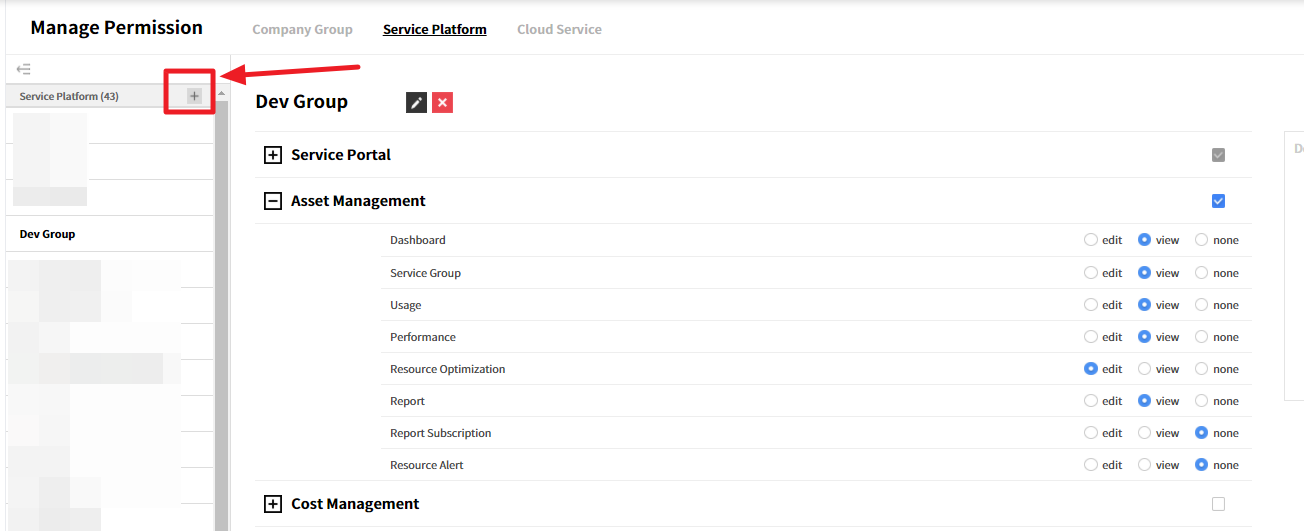
② The “Create New Service Platform Group” pop-up appears. Then, enter a name of the group and click the [Done] button.
③ Now, the new service platform group is added.
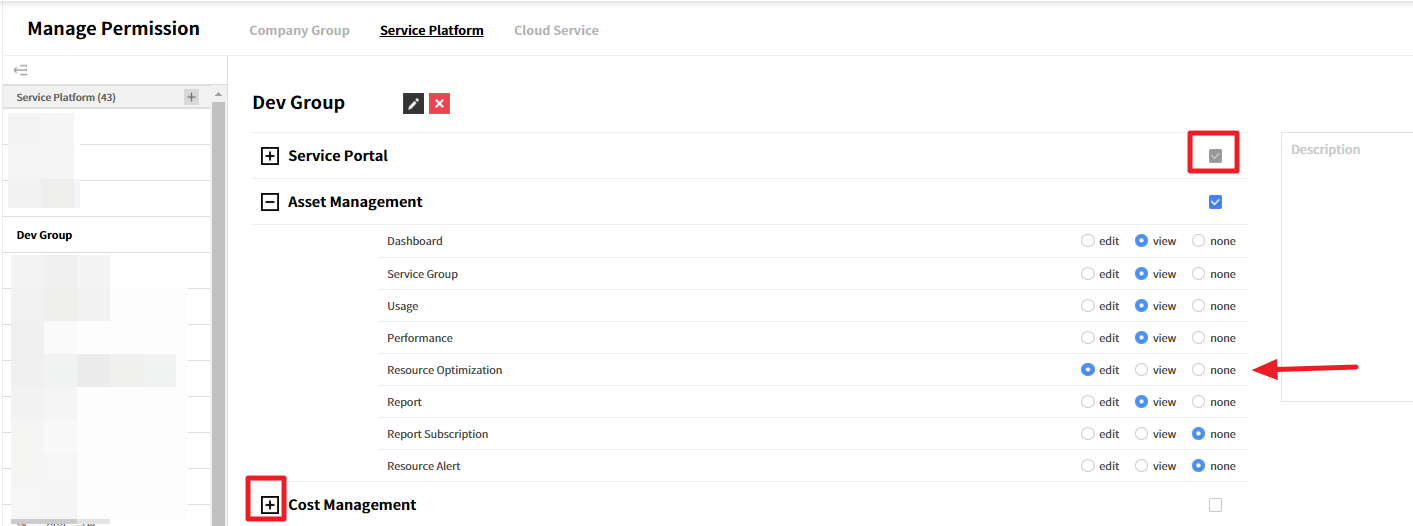
④ On the right-side pane, available services for the selected service platform are displayed. Click [+] button on the right side of each service to see details. Select the checkbox, and then set permissions to each menu.
⑤ Click the [Save Changes] button.

⑥ The new service platform group is added.
Edit Service Platform Group
You can change the name and permission of a service platform group.
Rename Service Platform Group
① On the service platform group list, select a service platform group you want to change. Detailed information about the selected service platform group is displayed on the right-side pane.

② Click the [Pencil icon] button next to the name of a service platform group.

③ Then, the input field becomes editable. Enter a new name for the service platform group.

④ After changing the name, click the green checkbox.

⑤ Name of the service platform group was changed.
Modify Service Platform Group Permission
① On the service platform list, select a service platform you want to modify permission. On the right-side pane, available services for the selected service platform are displayed.
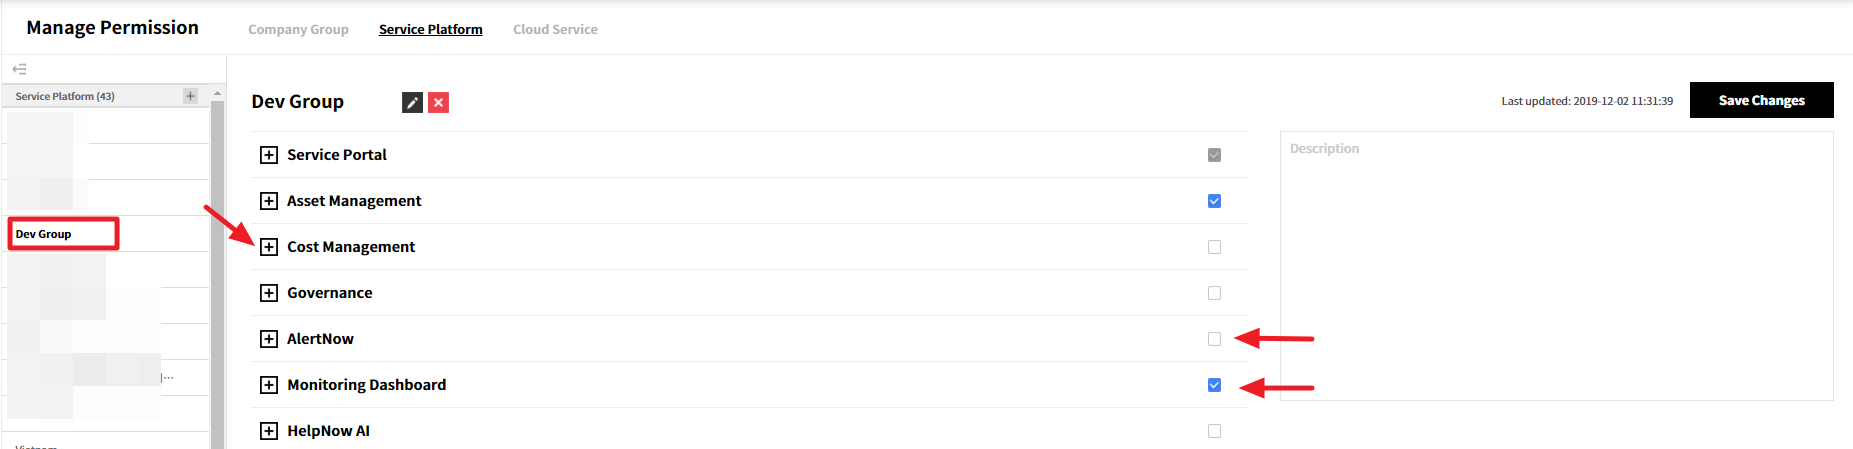
② As shown in the figure below, you can grant, remove or edit permissions of each service by selecting or deselecting the checkbox.
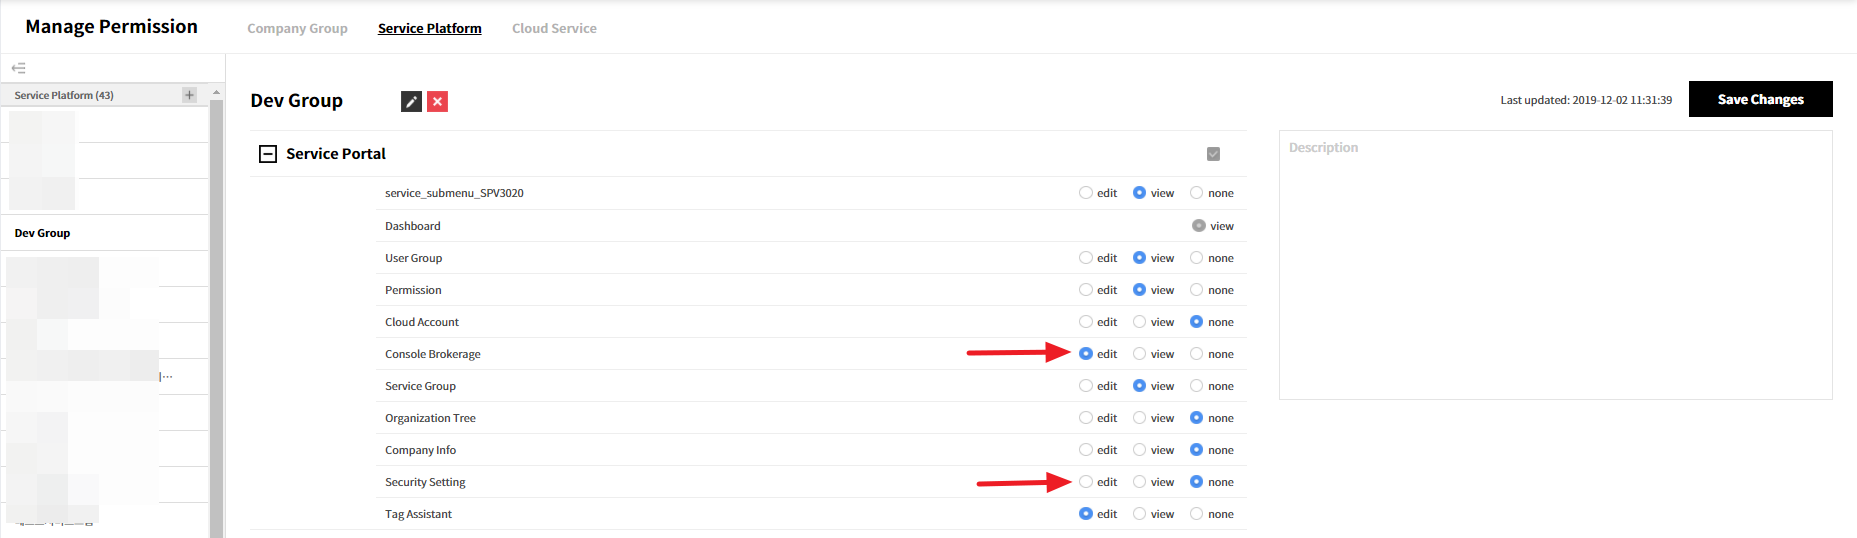
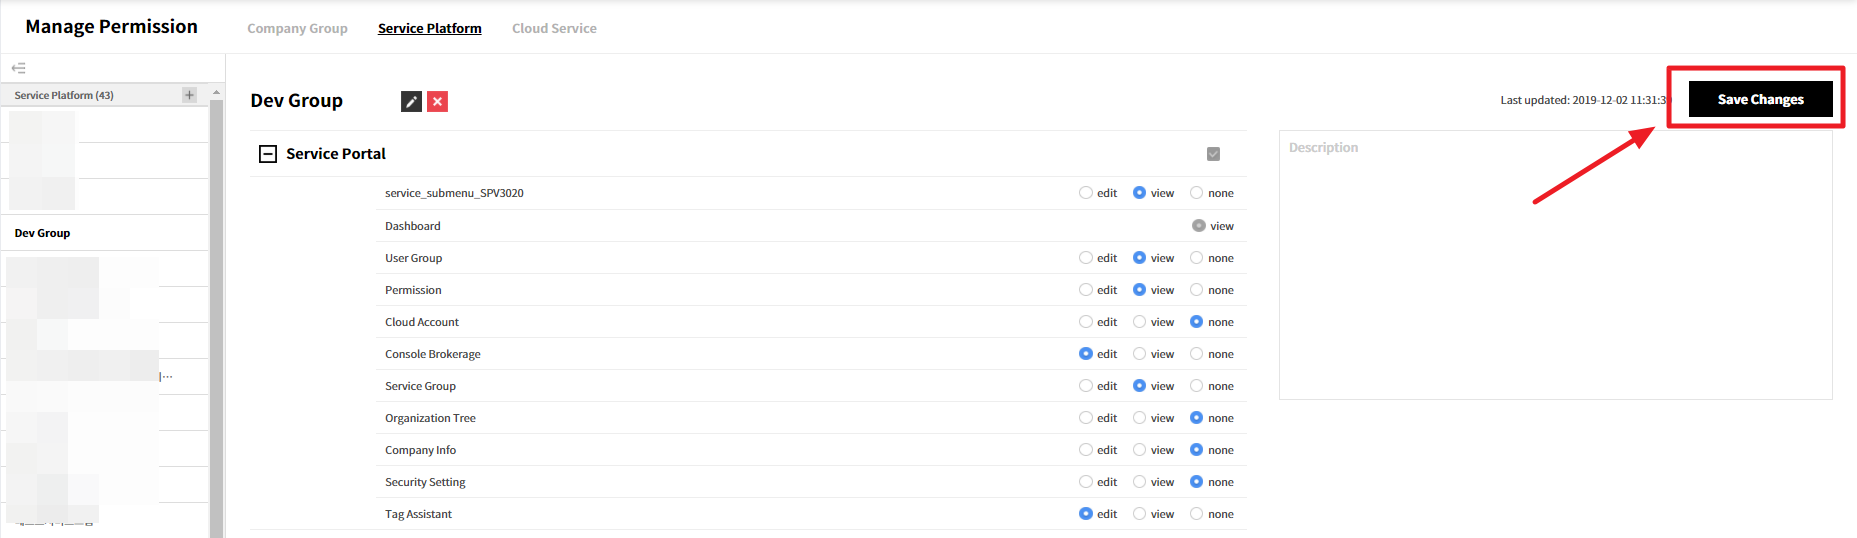
③ Click the [Save Changes] button.
④ The permission of the service platform group is modified.
Delete Service Platform Group
You can delete service platform groups.
① On the service platform group list, select a service platform group you want to delete. Click the [X] button located on the right side of the group name.
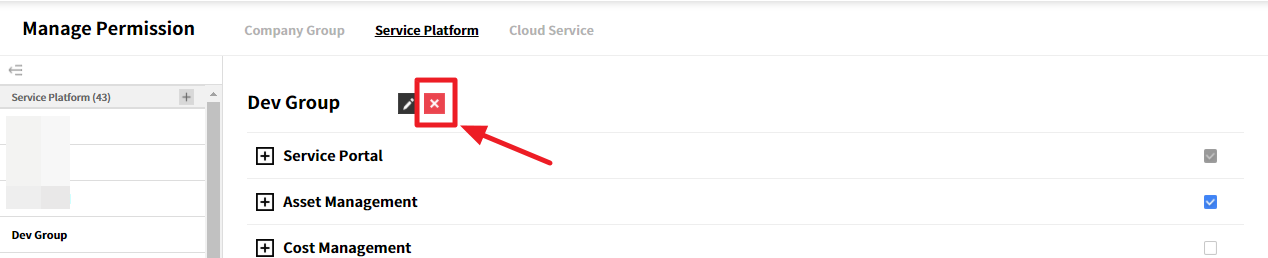
② A pop-up appears asking whether you want to continue deleting it. Click the [Confirm] button to delete it.
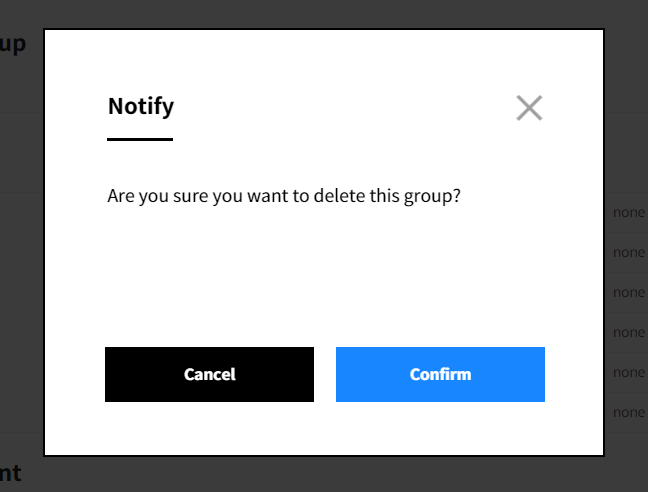
③ The service platform group is now deleted.
Cloud Service Group
Service Portal > Permission > Cloud Service
You can make a group of permissions to access cloud services and its accounts. It allows you to grant permissions to users in the user group to access cloud services and its accounts by linking a cloud service group with a user group.
📜 Note: For Admin Group, all cloud service accounts are already Selected all and the checked boxes cannot be unchecked by default. For groups other than the Admin Group, users can select the accounts by cloud service providers. Users can view the selected cloud service account data according to their user group’s permission setting.
View Cloud Service Group
You can check the information about cloud service groups.
① On the cloud service group list, click a cloud service group you want to check. Information regarding public cloud services that belong to the selected cloud service group is displayed.

② Click [+] button on each public cloud service to see available accounts of each service group.

Create Cloud Service Group
You can create a cloud service group, and set available public cloud services and its accounts in the service group.
① Click the [+] button to create a cloud service group.

② The Create New Cloud Group pop-up appears.
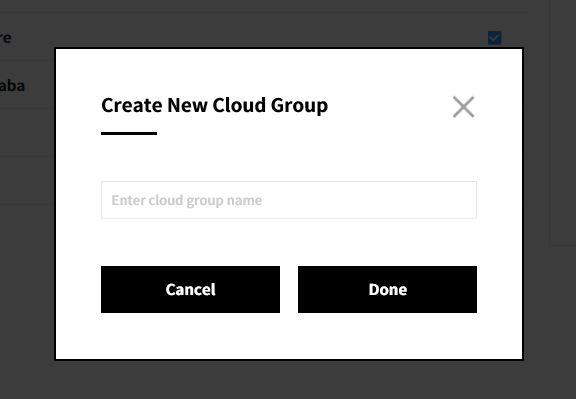
③ On the Create New Cloud Group pop-up, enter a name of a new cloud service group and click the [Done] button.
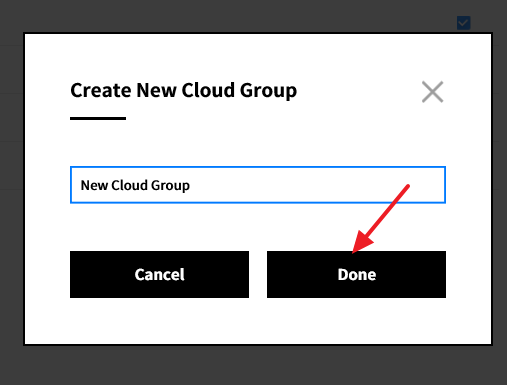
④ The new cloud service group is now added.
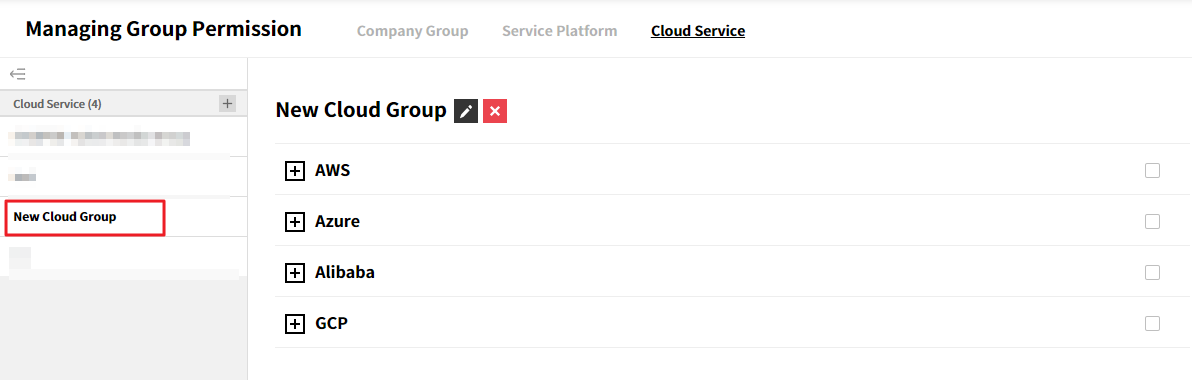
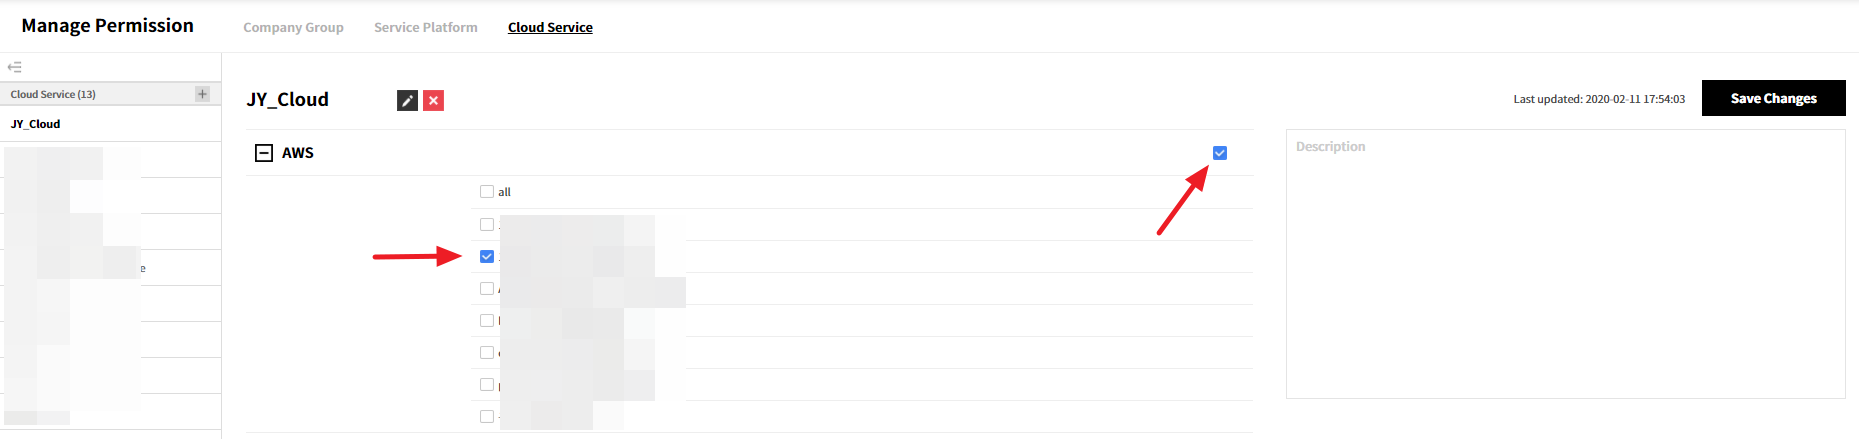
⑤ On the right-side pane, a list of available public cloud services and its accounts are displayed. Public cloud services and its accounts displayed on the list can be registered on the Service Portal > Cloud Account menu. As shown in the figure below, you can select cloud services that you want to use by selecting a checkbox. Check the checkbox of each account you want to use.
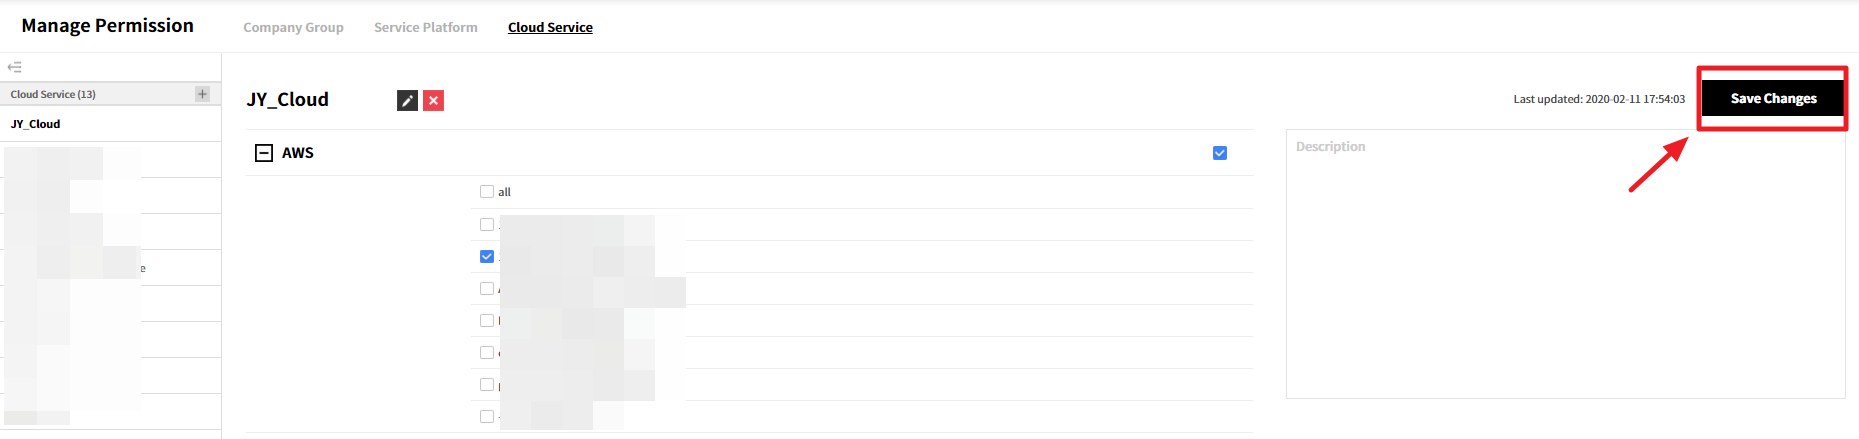
⑥ Click [Save Changes] button.
⑦ The new cloud service group is now added.
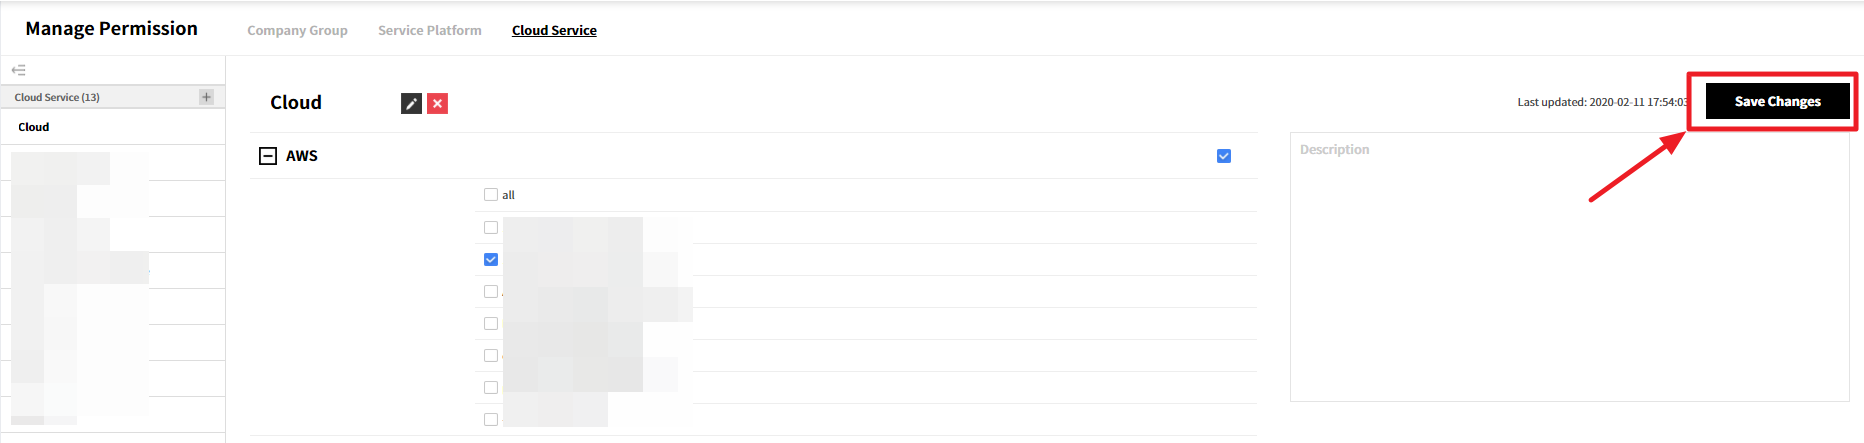
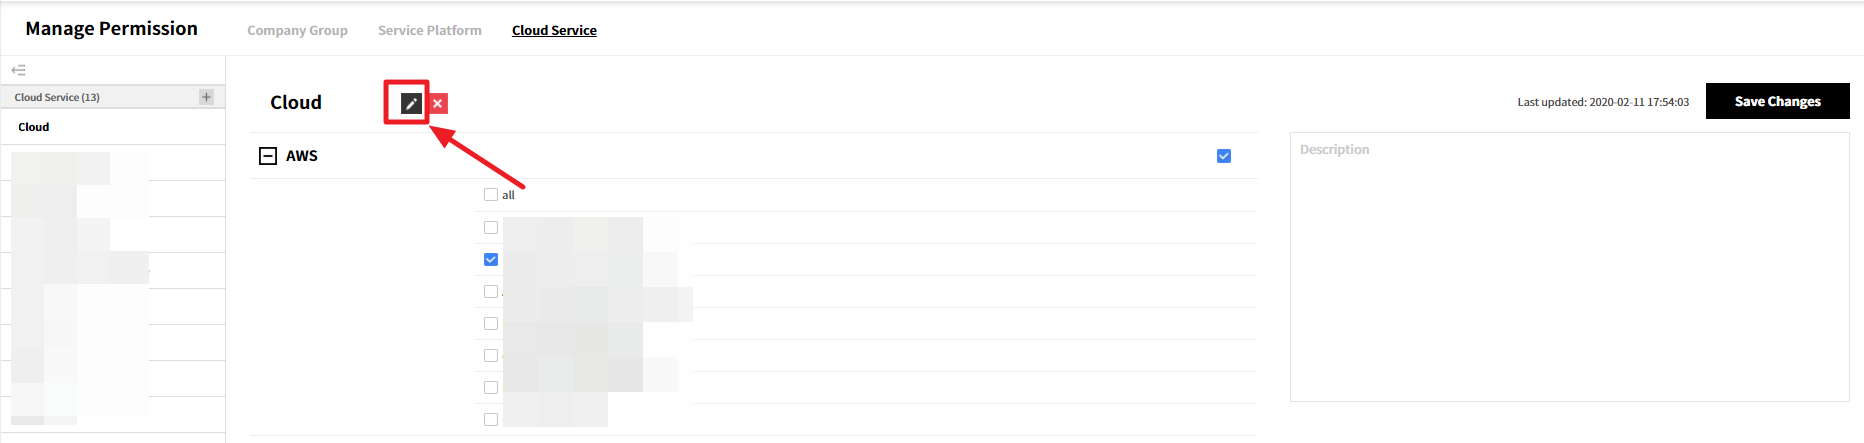
Rename Cloud Service Group
① On the cloud service group list, select a cloud service group you want to change. The information regarding the selected group is displayed as shown in the figure below. Click [Pencil] icon located right next to the name of the group.
② Then, the input field becomes editable. Enter a new name for the cloud service group.
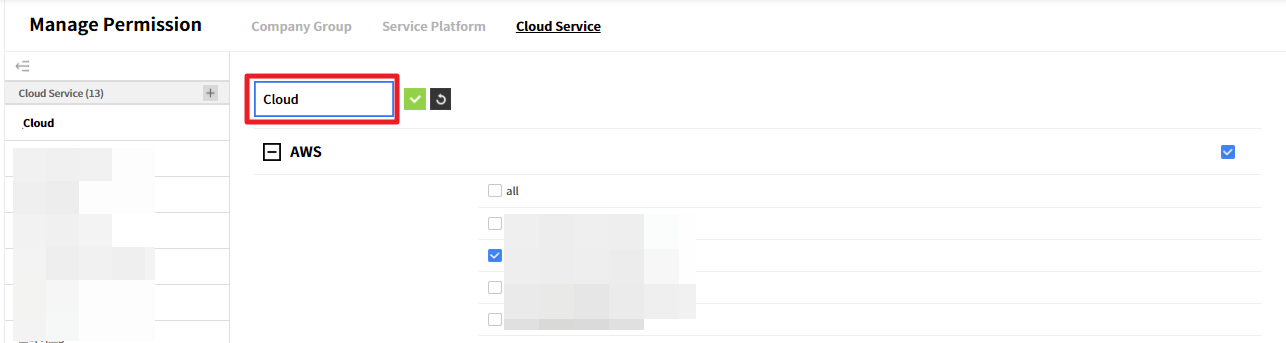
③ After changing the name, click the green check box to complete it.
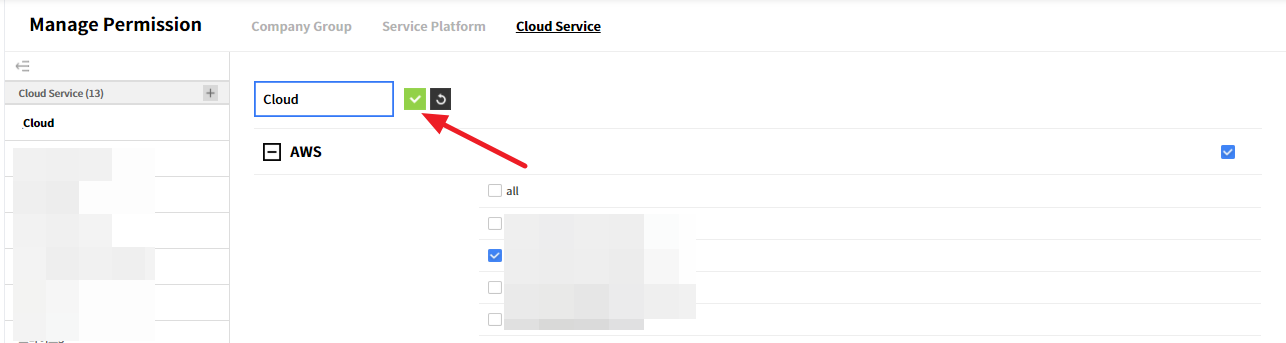
④ The name of the cloud service group has now changed.
Modify Cloud Service Group Permission
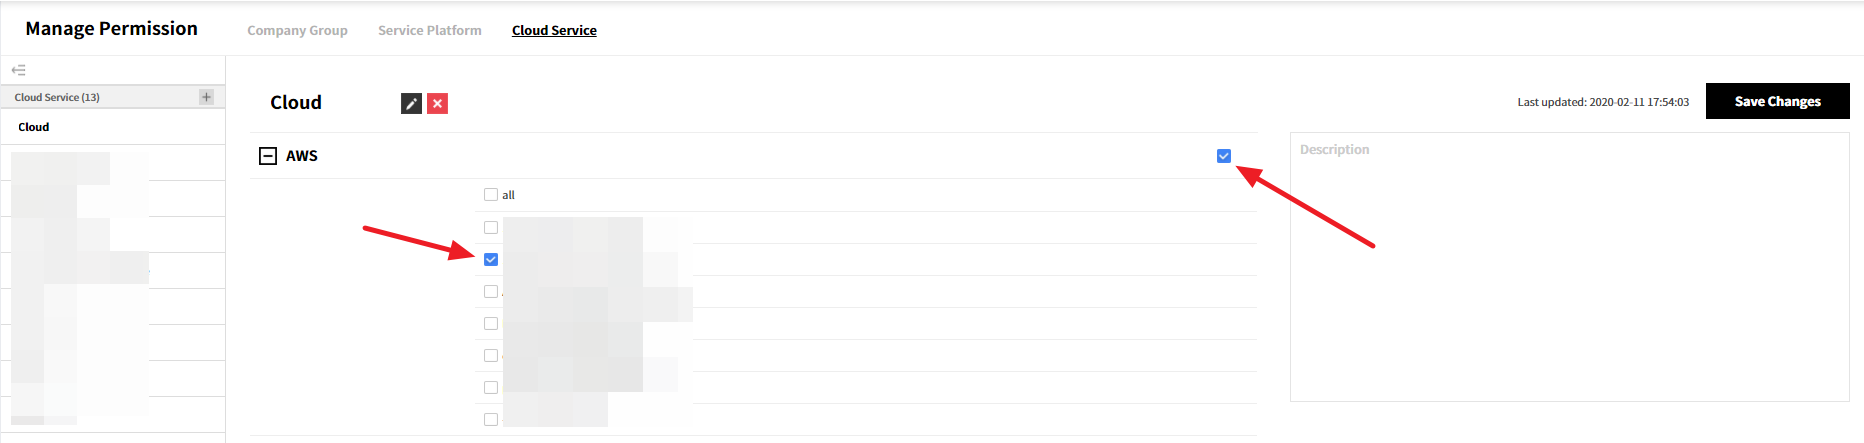
① On the cloud service group list, select a cloud service group you want to modify. As shown in the figure below, you can check available public cloud services and their accounts from the list.
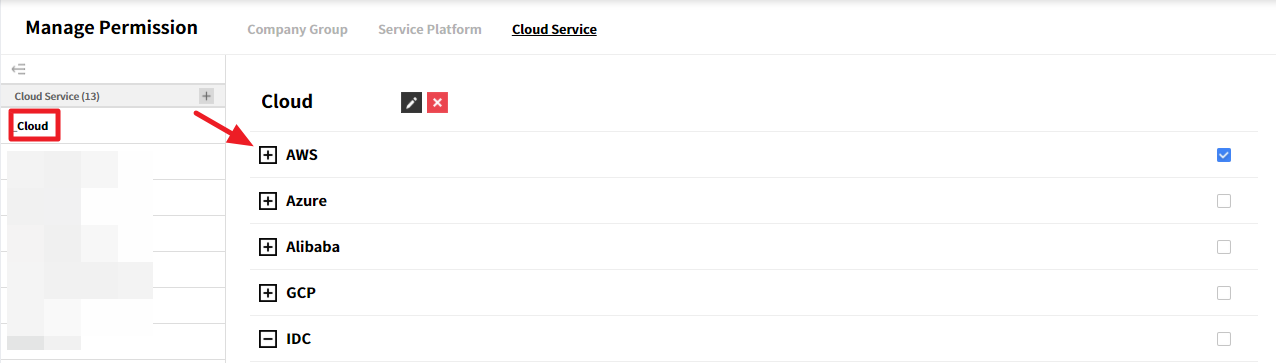
② As shown in the figure below, you can grant, remove or modify permissions of each cloud service and its account by selecting or deselecting the checkbox.
③ Click the [Save Changes] button.
④ Permission of the cloud service group is now modified.
Delete Cloud Service Group
You can delete a cloud service group.
① On the cloud service group list, select a cloud service group you want to delete. Click the [X] button.
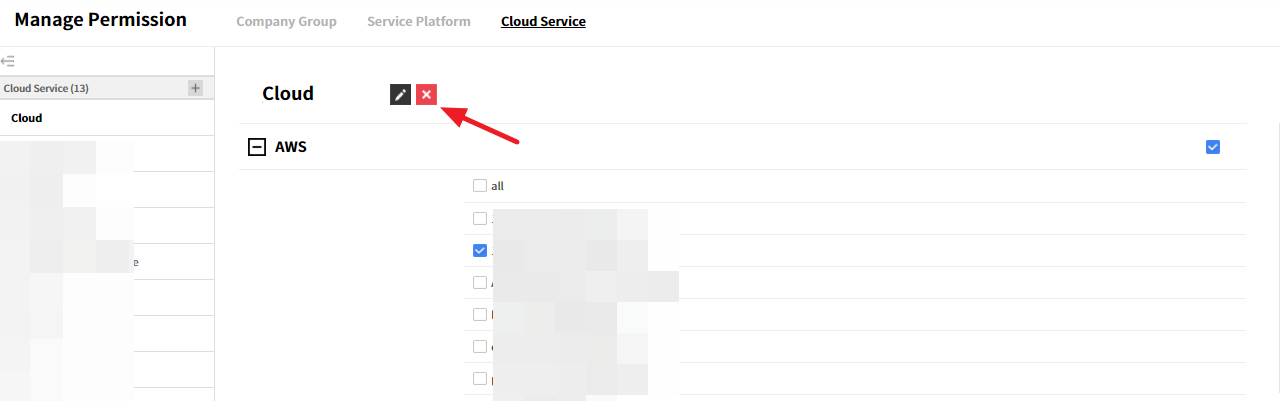
② A pop-up appears to confirm whether you want to continue deleting it. Click [Confirm] button to delete.
③ The cloud service group is now deleted.
Cloud Account
Service Portal > Cloud Account
You can manage your resources and costs incurred from cloud services like AWS, Azure, GCP, Ncloud, OCI, and Alibaba by adding your cloud accounts to Service Portal. Cloud Account feature allows you to add your accounts to each cloud vendor, and you must register your account first in order to use Asset Management and Cost Management services.
⚠️ Warning
It may take a while to load data after adding a new account.
Register AWS Accounts
Select AWS from the Cloud Account page of Service Portal.
📌 Important
It is strongly recommended that you register your AWS account using Cross-Account Access option for security consideration.
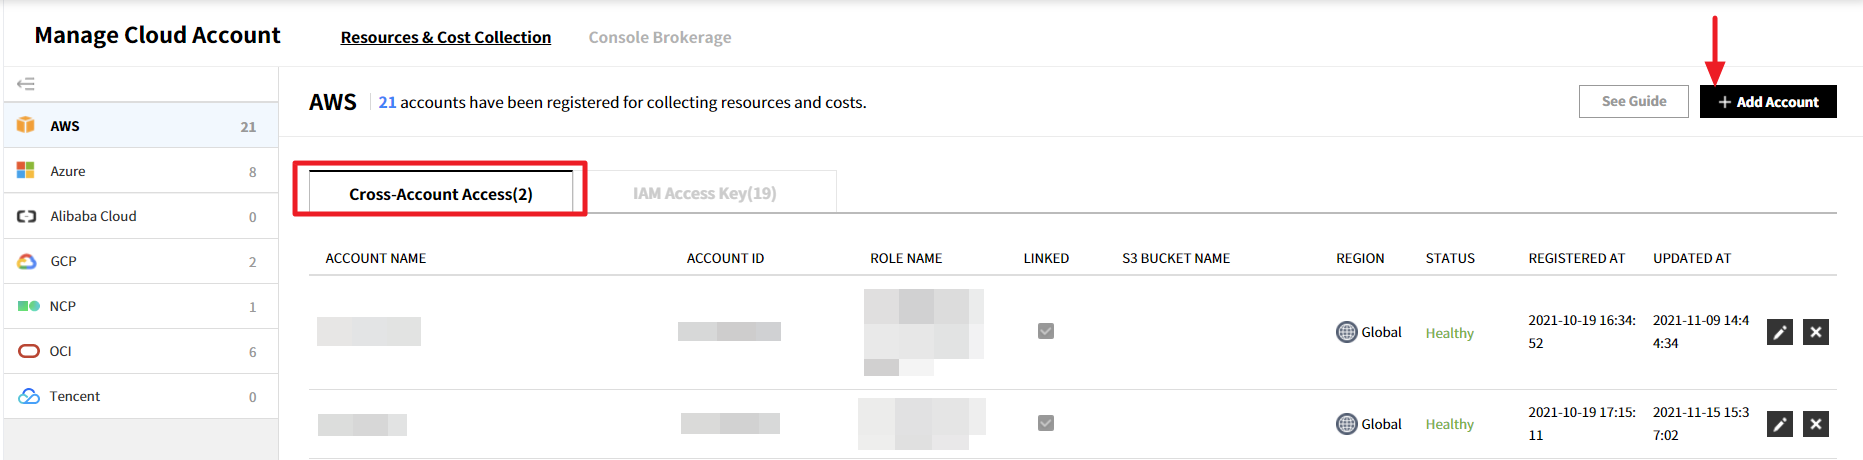
Register with Cross-Account Access
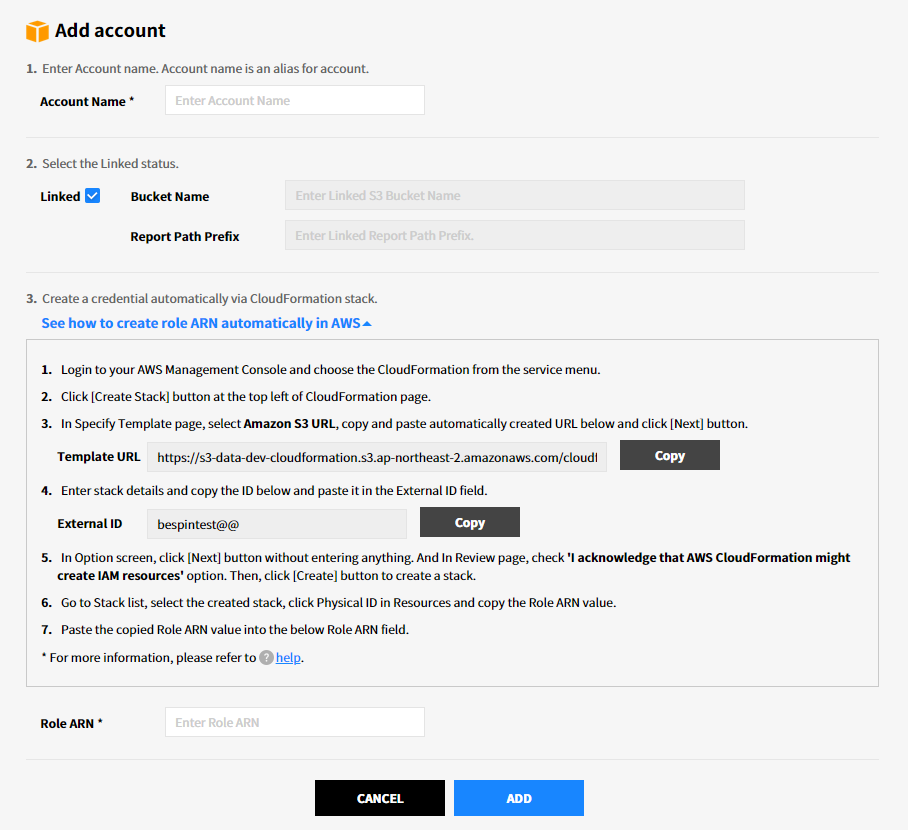
① In Cloud Account > Resources & Cost Collection menu, select AWS. Choose Cross-Account Access, and click the [+ Add account] button.
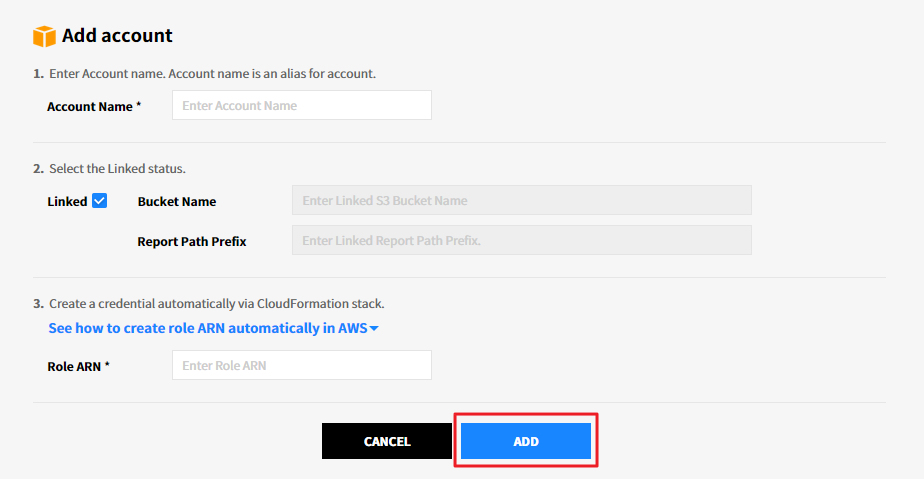
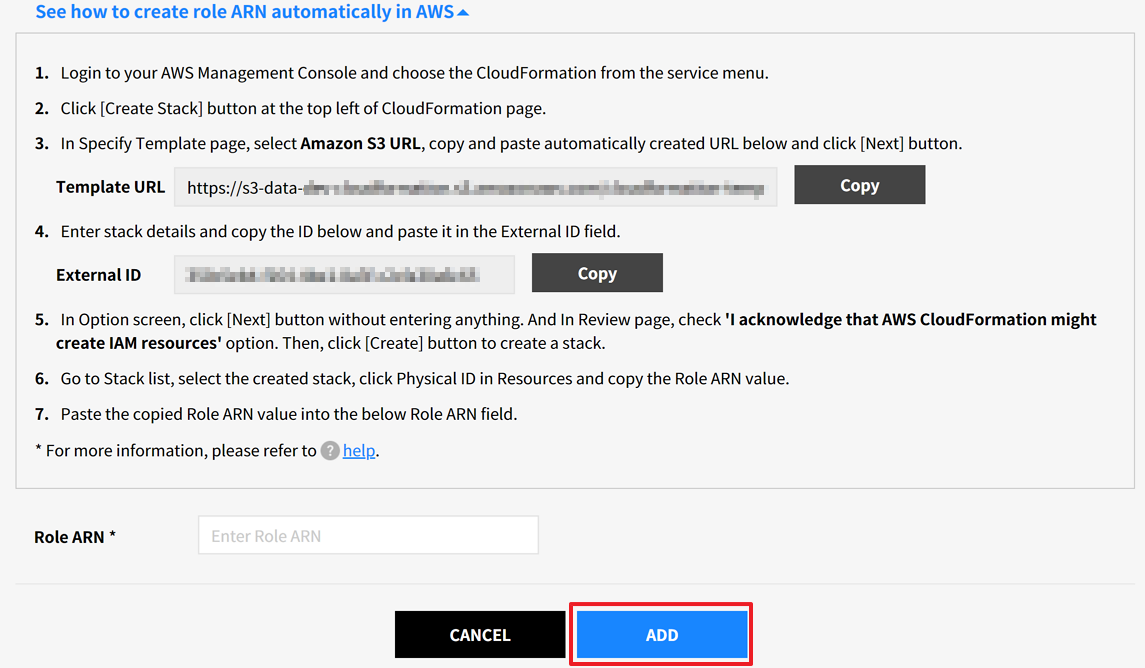
② Click the [Add] button after entering the required information for registering your account. See the below guide on how to find Role ARN information on the AWS Console.
See How to Create Role ARN Automatically in AWS
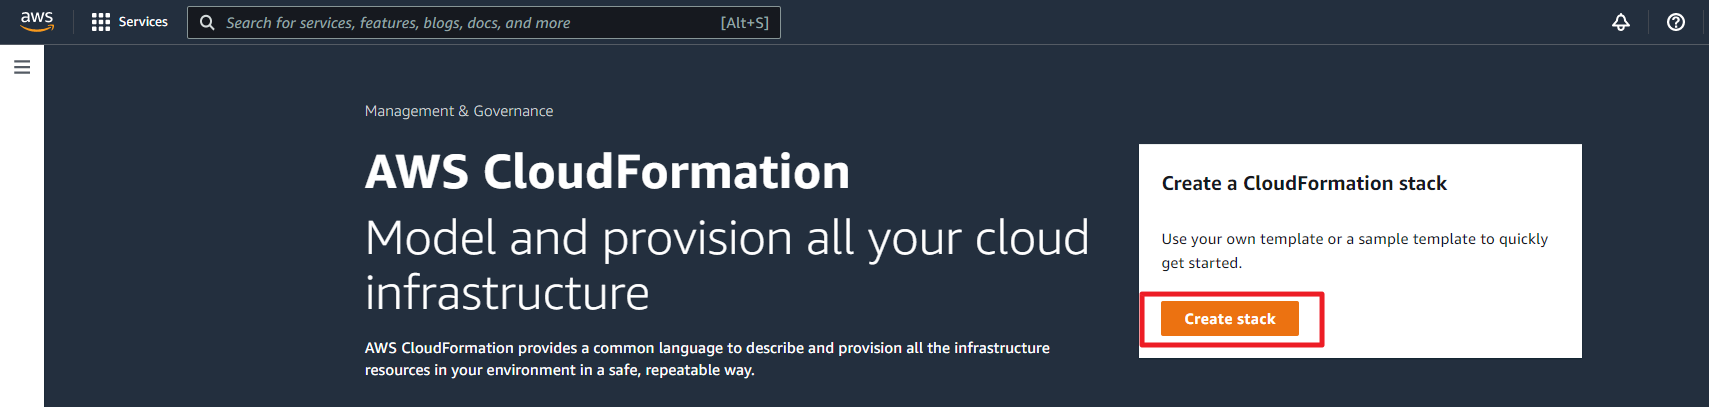
① Sign in to the AWS Management console, and click [CloudFormation].

② Create a new stack by using one of the following options.
Click [Create Stack] in the CloudFormation console if you have no running stacks.
![]()
Click [Create Stack] on the Stacks page and then choose [With new resources (standard)] if you have a currently running stack.
![]()

③ Next, enter the URL in the Amazon S3 URL field and click [Next] in the Specify Template page
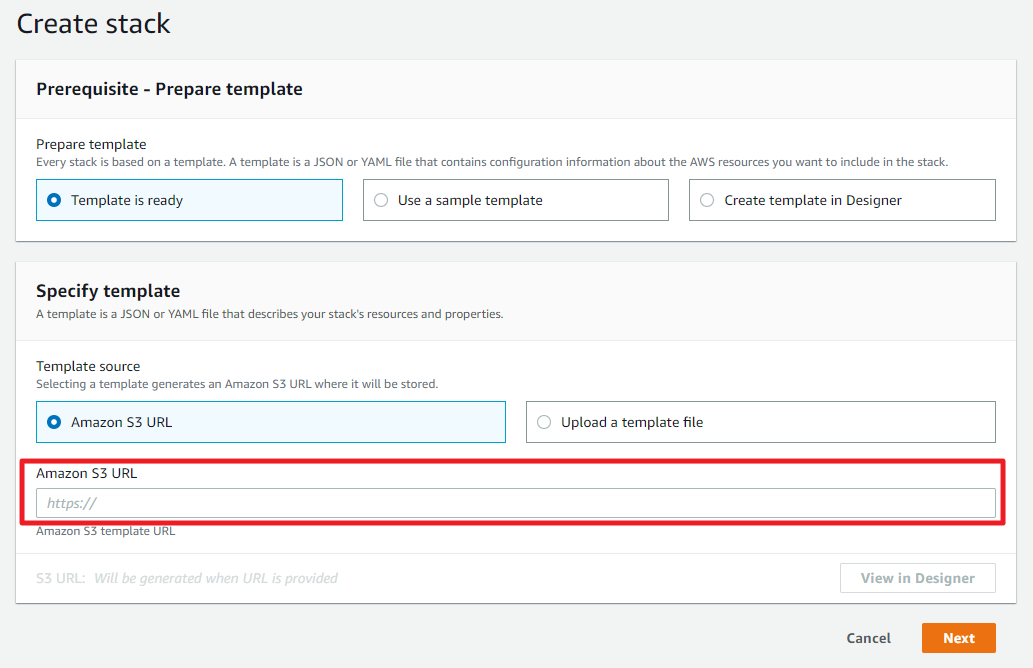
④ The URL you entered can be found in the Template URL from See how to create role ARN automatically in AWS of Service Portal.
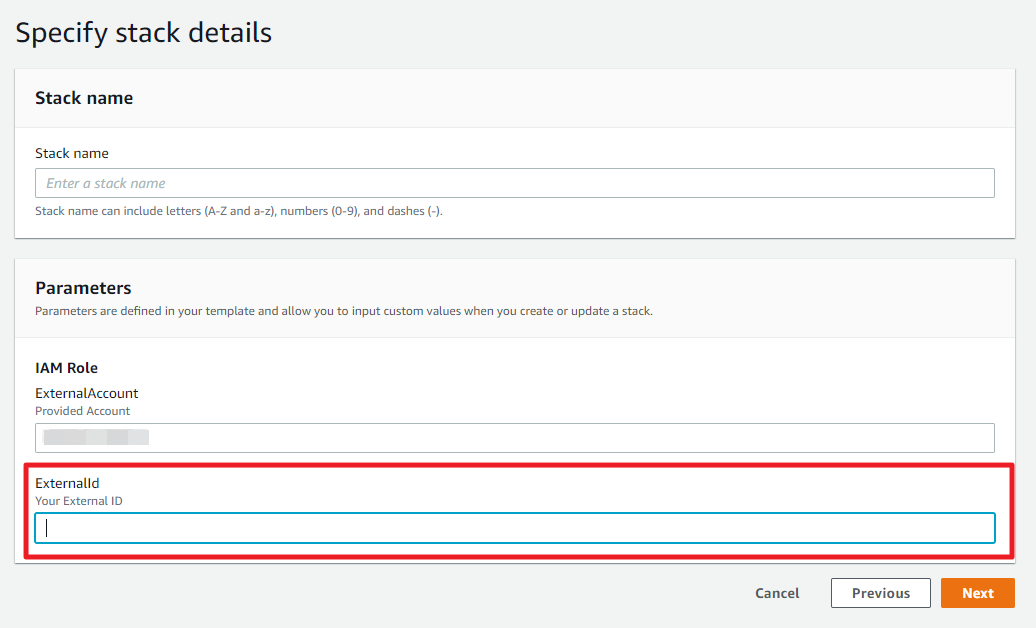
⑤ Enter the required information and click the [Next] button. Stack name can include letters (A-Z and a-z), numbers (0-9), and dashes (-). ExternalAccount will be automatically inserted, and for ExternalId, copy External ID from See how to create role ARN automatically in AWS of Service Portal.
⑥ In Options page, click the [Next] button without entering anything.
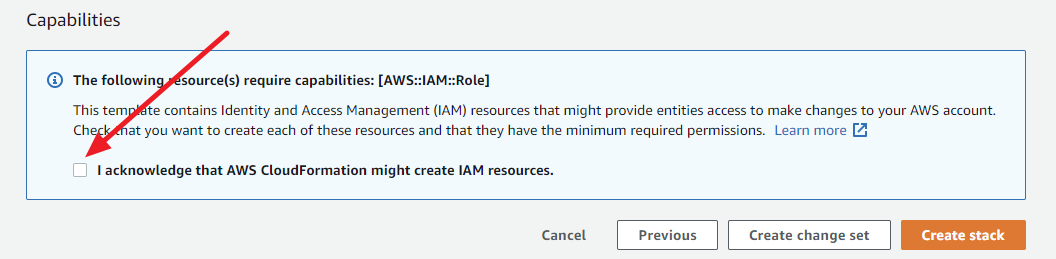
⑦ Check the input fields in the Review page, select [I acknowledge that AWS CloudFormation might create IAM resources.] checkbox. And click [Create stack] to create a stack.
⑧ Choose the stack created from the stack list, and click [Physical ID] in Resources tab.
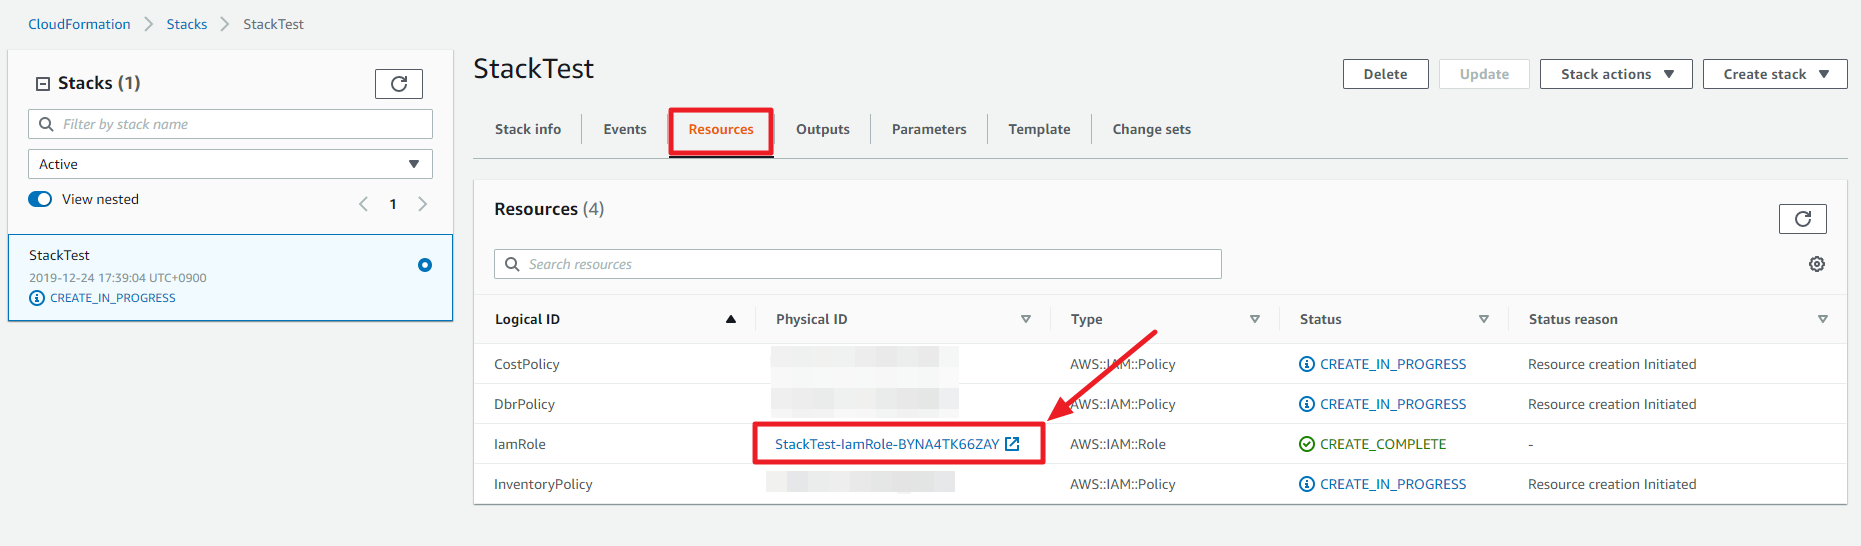
⑨ When you click an item from [Physical ID] list, the summary page appears. Click the [Copy to clipboard] icon next to Role ARN to copy the value. Then, paste the copied value in the Role ARN field of Service Portal.
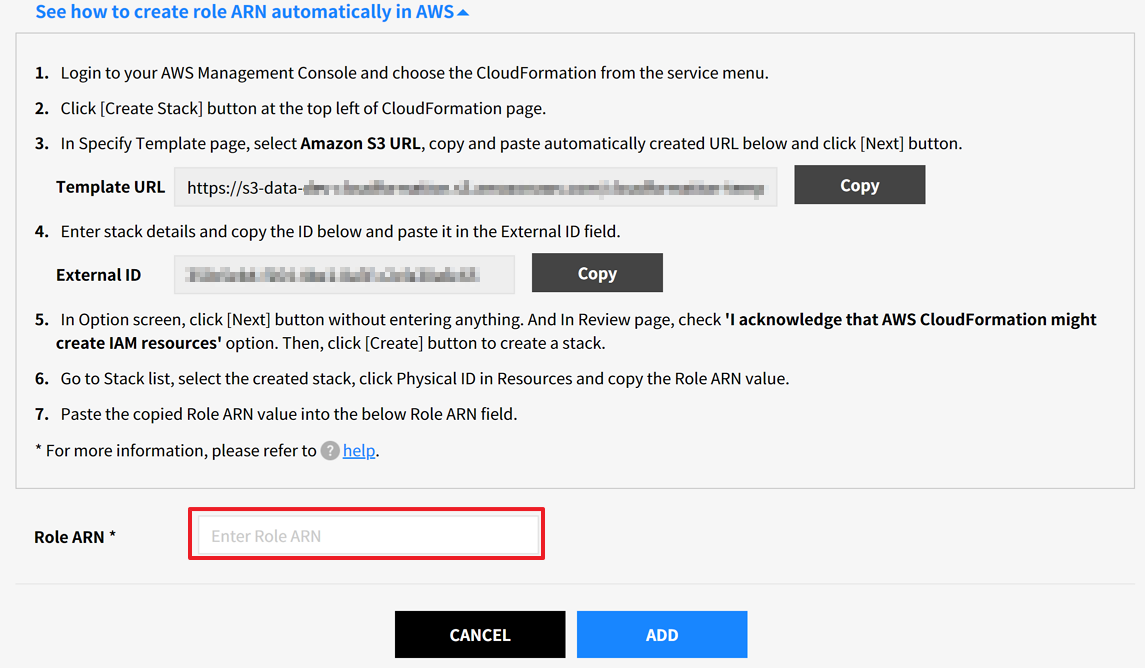
⑩ Click the [Add] button to add your AWS account in the Creating Roles Automatically.
- Reistration Demo Video - Register with Cross-Account Access
Register with IAM Access Key
📌 Important: We strongly recommend you to use Register with Cross-Account Access rather than IAM Access Key to add your account for security considerations.
① In Cloud Account > Resources & Cost Collection menu, select AWS and click the [+ Add account] button.

② Enter the information for registering the account.

- The input items are as follows.
| Asset Management | Cost Management | |
|---|---|---|
| Account Name | Required | Required |
| Account ID | Required | Required |
| Access Key | Required | Optional (Required when using Cost Optimization service) |
| Secret Key | Required | Optional (Required when using Cost Optimization service) |
| Linked or Non-linked Account | - | Required if it is a linked account |
| S3 Bucket Name | - | Required to enter S3 Bucket Name if it is not a linked account |
⚠️ Attention: The required information is varying for Asset Management and Cost Management services respectively.
Enter Account Name & Account ID
① You can randomly set an Account Name. Go to AWS Console to log in, click Account, and copy and paste the information in [Account ID].


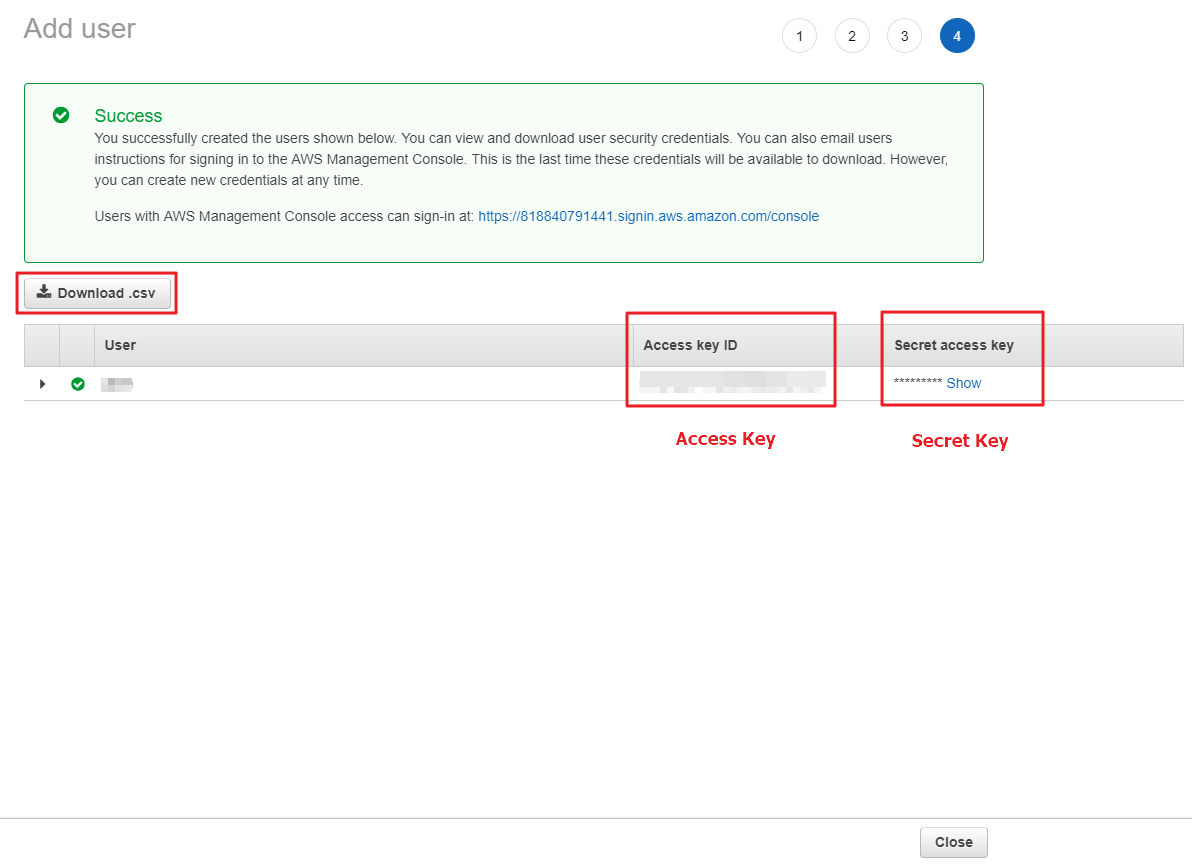
Get Access Key and Secret Key
To connect AWS Cloud as read-only, you need Access Key ID and Secret Access Key. If the key is deleted with or without intention, you need to reissue it.
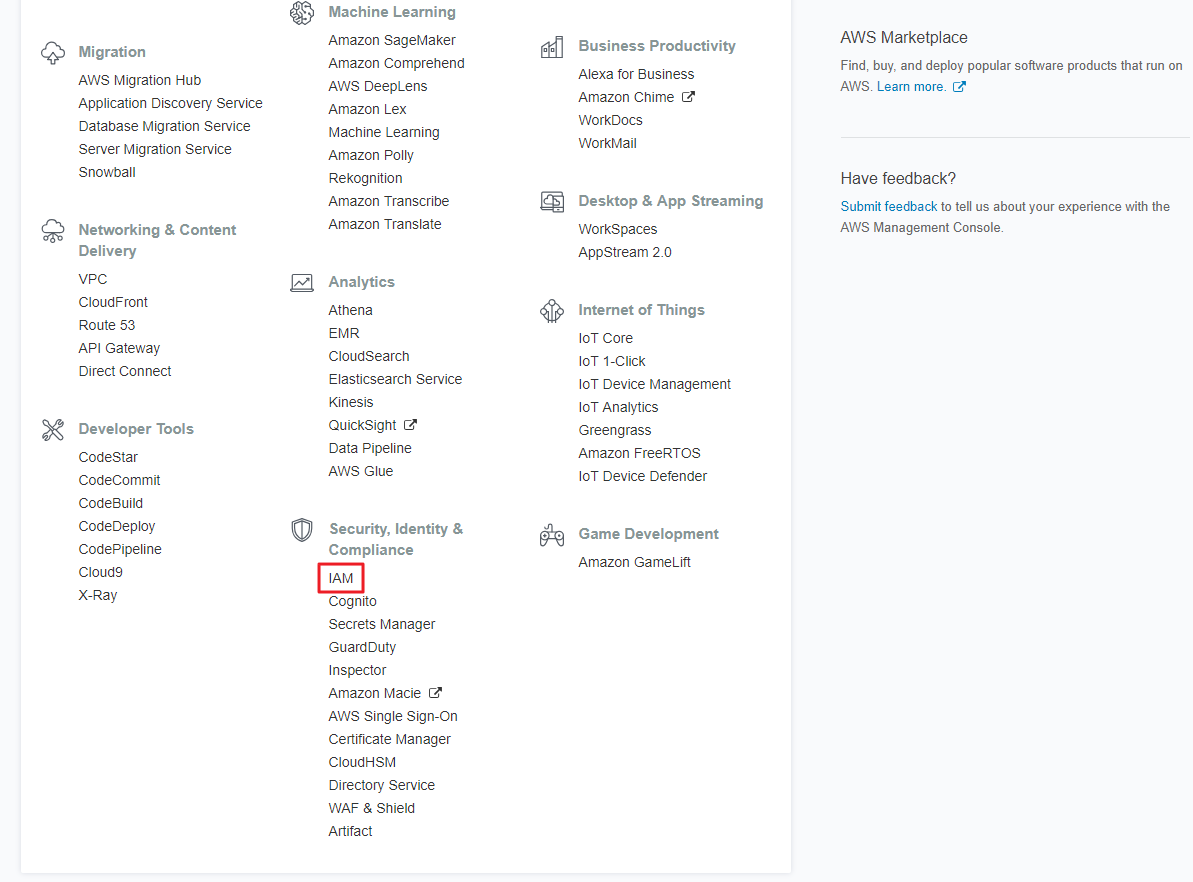
① In AWS Console > Security, Identity & Compliance, click [IAM].
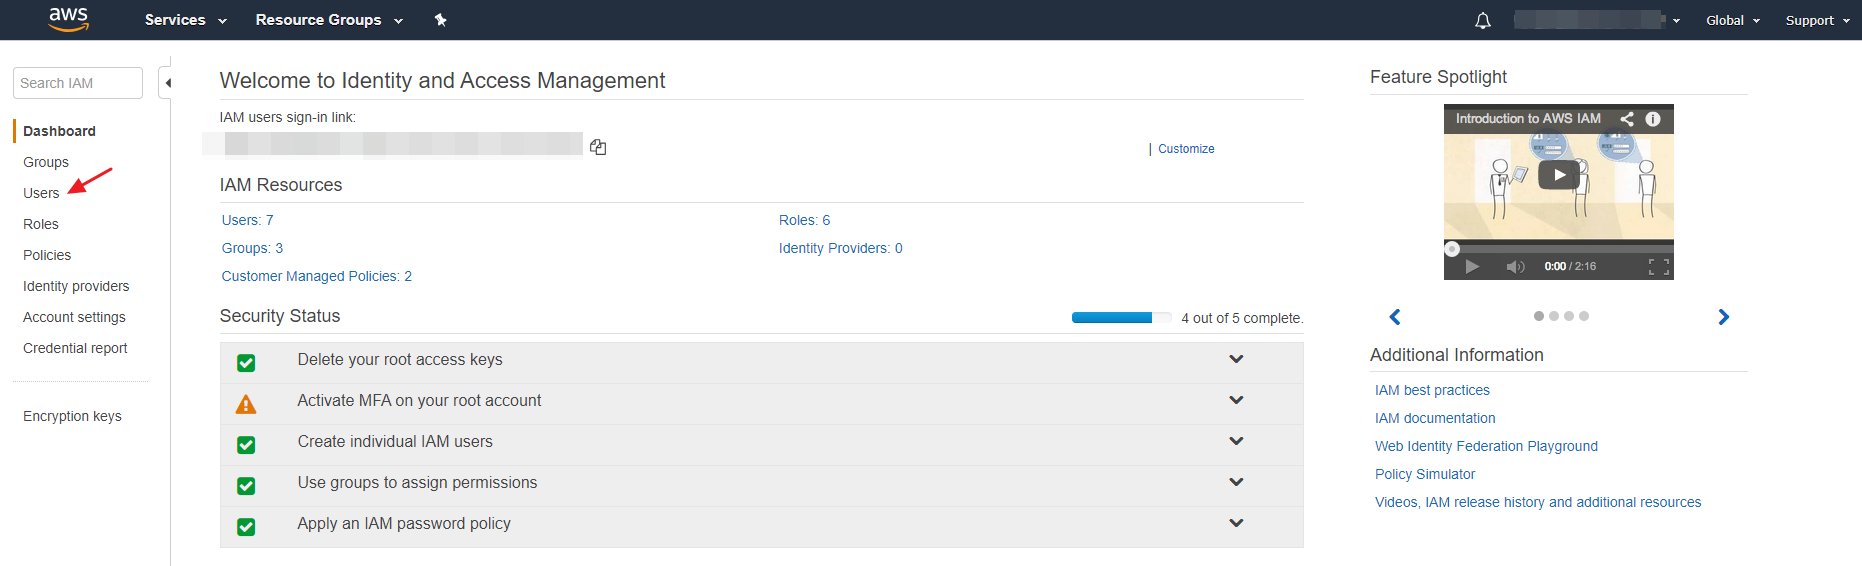
② In IAM screen, click the [Users] menu.
③ Click Add user button.
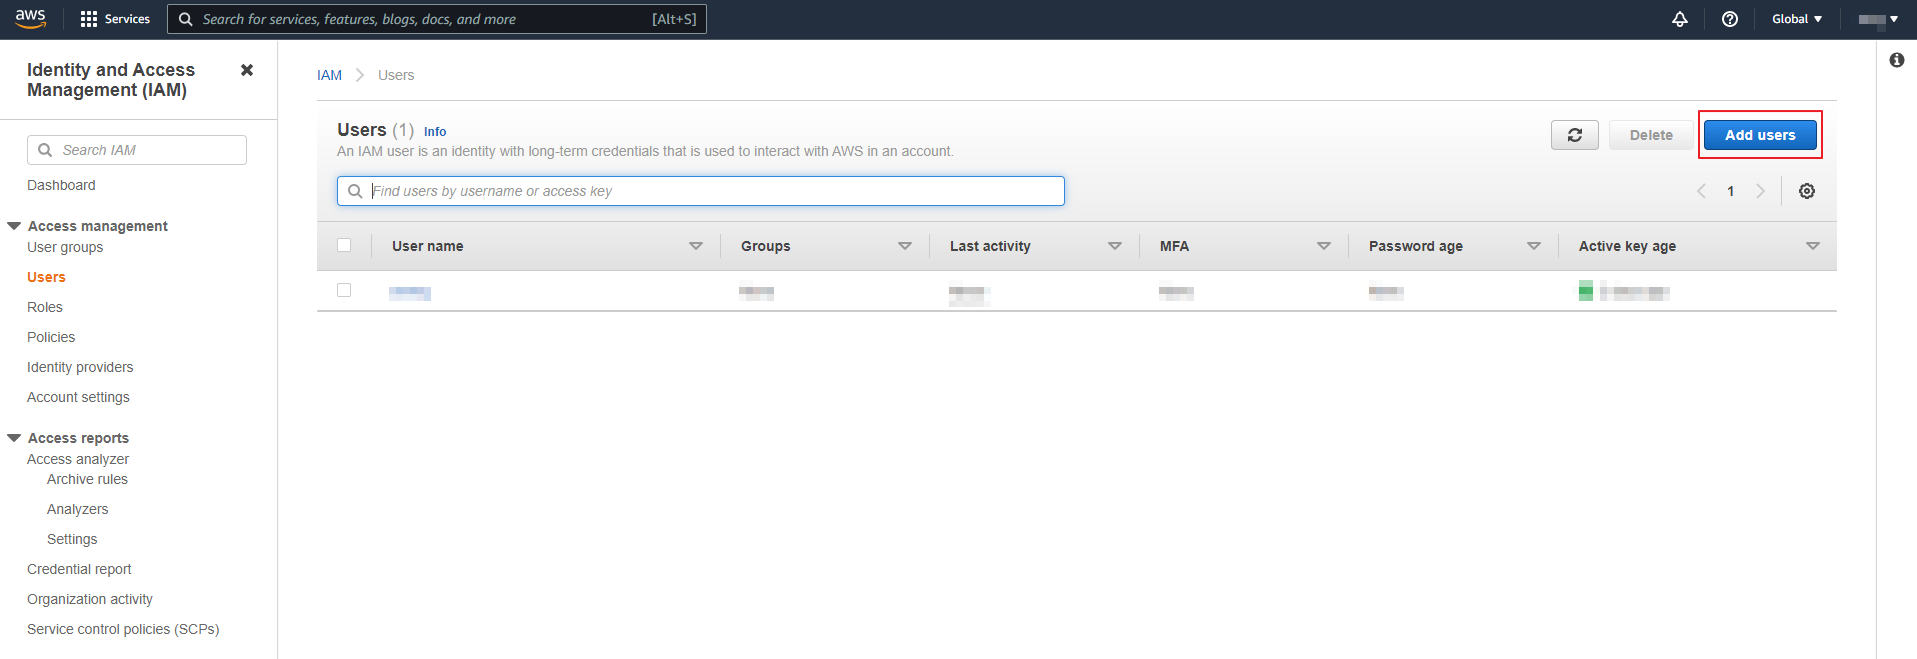
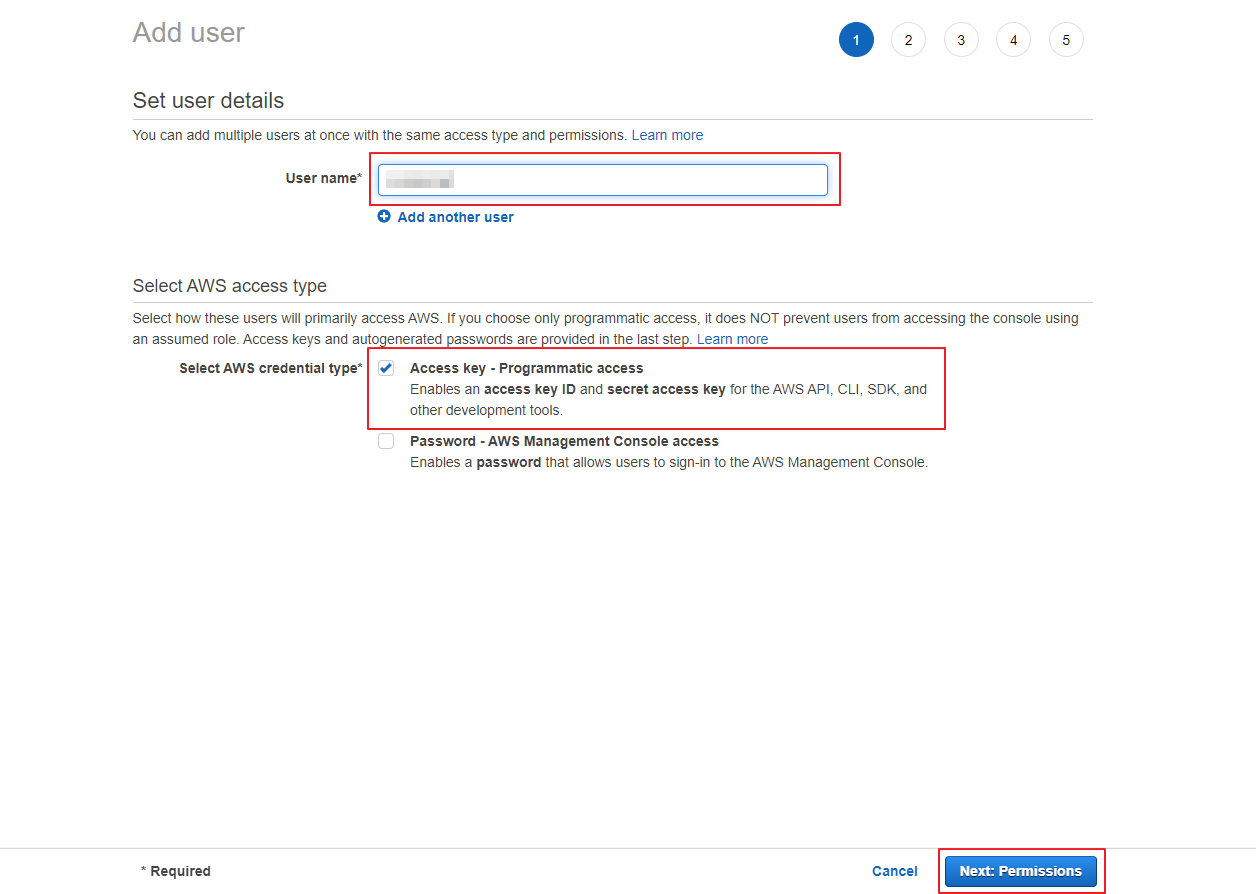
④ Enter User name, and select Programmatic access as AWS access type.
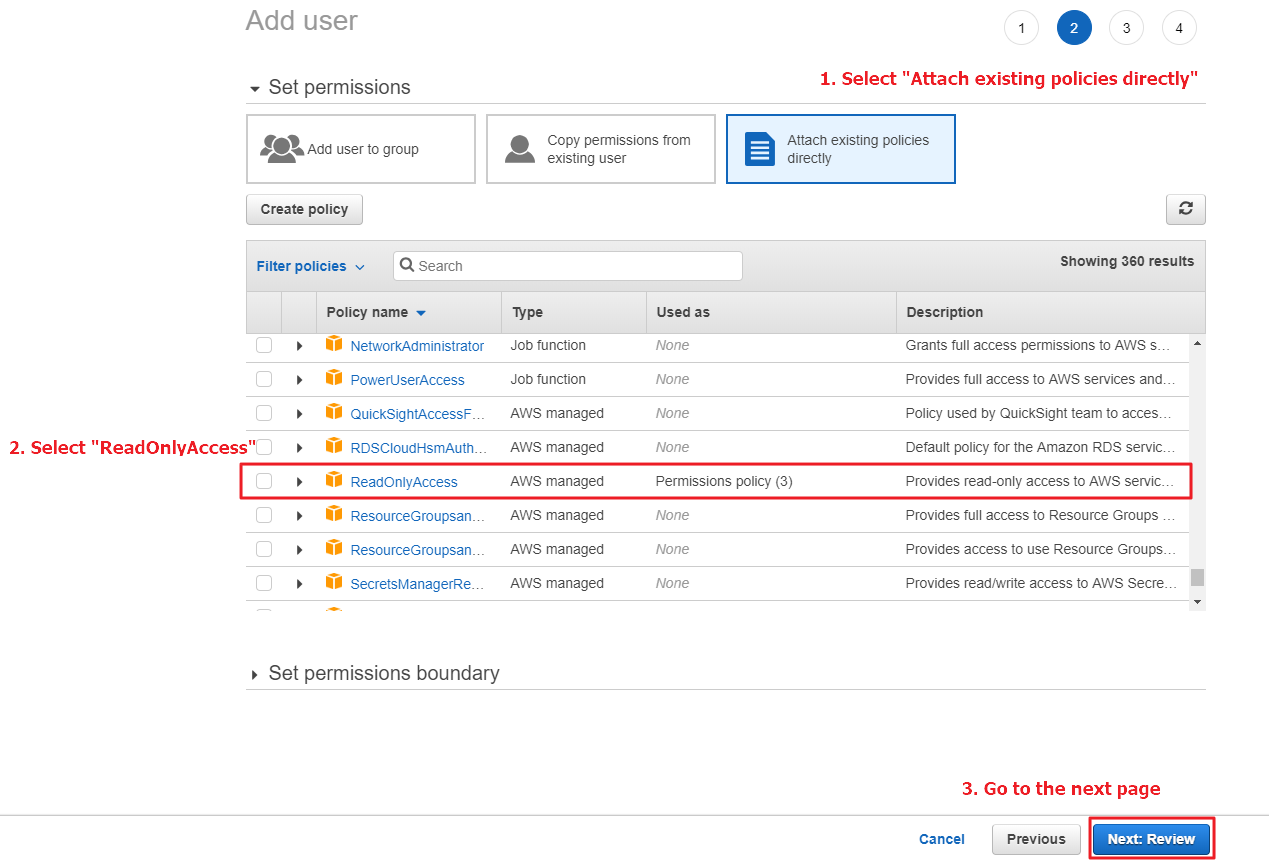
⑤ Select ‘Attach existing policies directly’ and select [ReadOnlyAccess] policy.
⑥ Check the summary information of IAM account, click the [Create user] button.
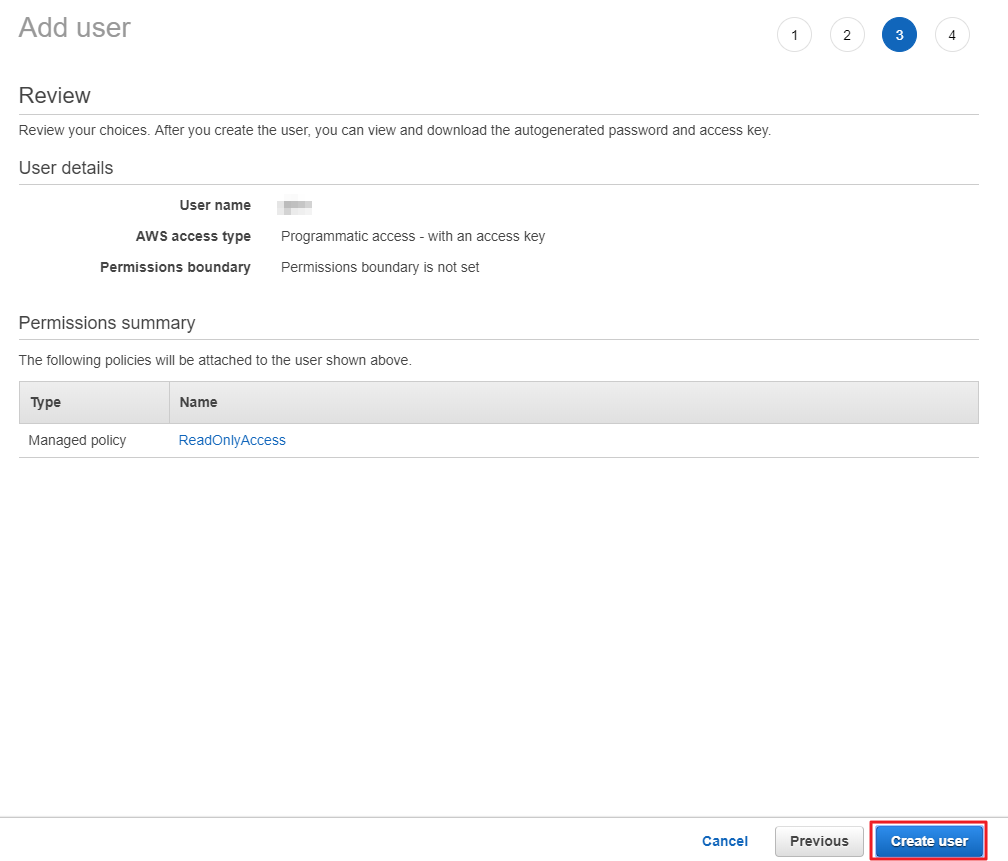
⑦ Access Key and Secret Key will be issued upon IAM account creation. You can either directly copy and paste the keys or click [Download .csv] button to download in csv file.
Create S3 Bucket for Billing Data
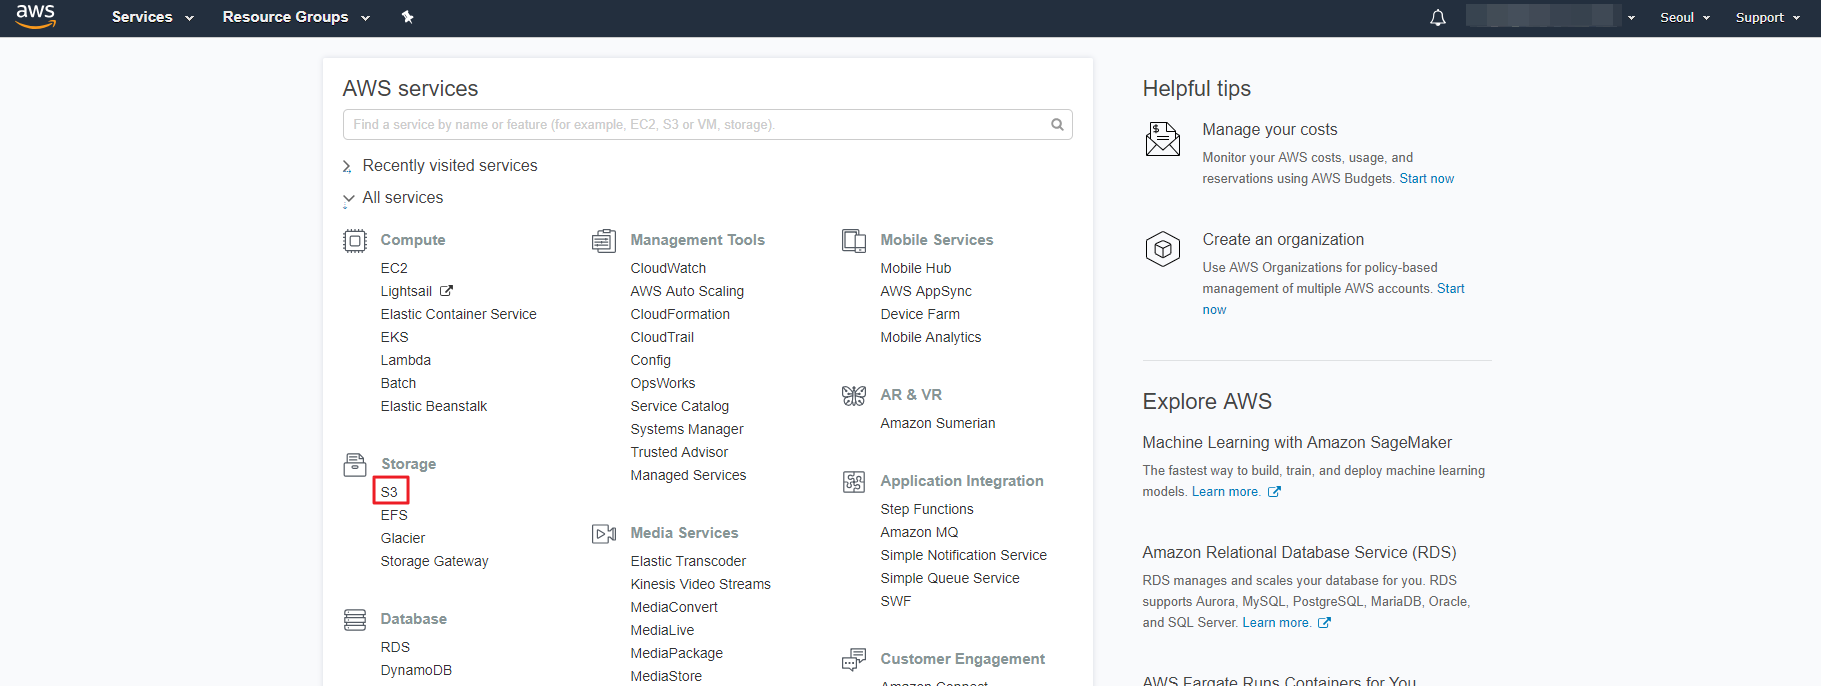
If your account is not a linked account when using the Cost Management service, you need to create an S3 Bucket. Skip this step if your account is linked to a payer account.
① In AWS Console, go to the Storage and click [S3].
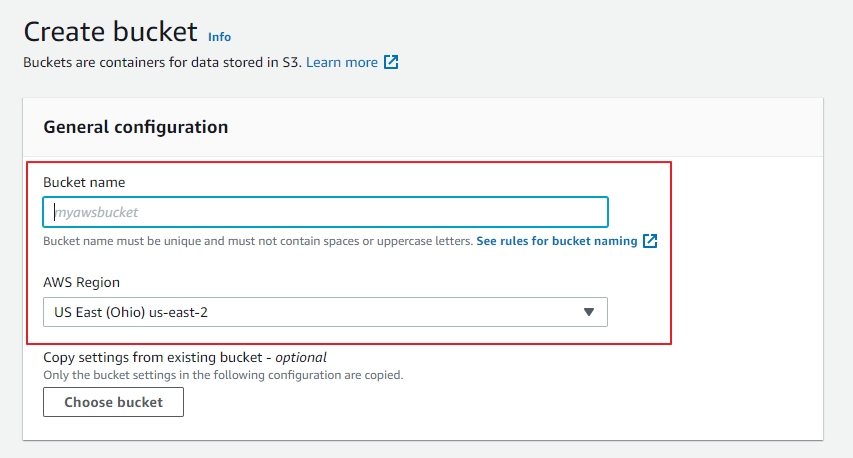
② Click [Create bucket] button.

③ Enter a name for your bucket and choose the AWS Region where you want the bucket to reside, and then click the [Create bucket] button.
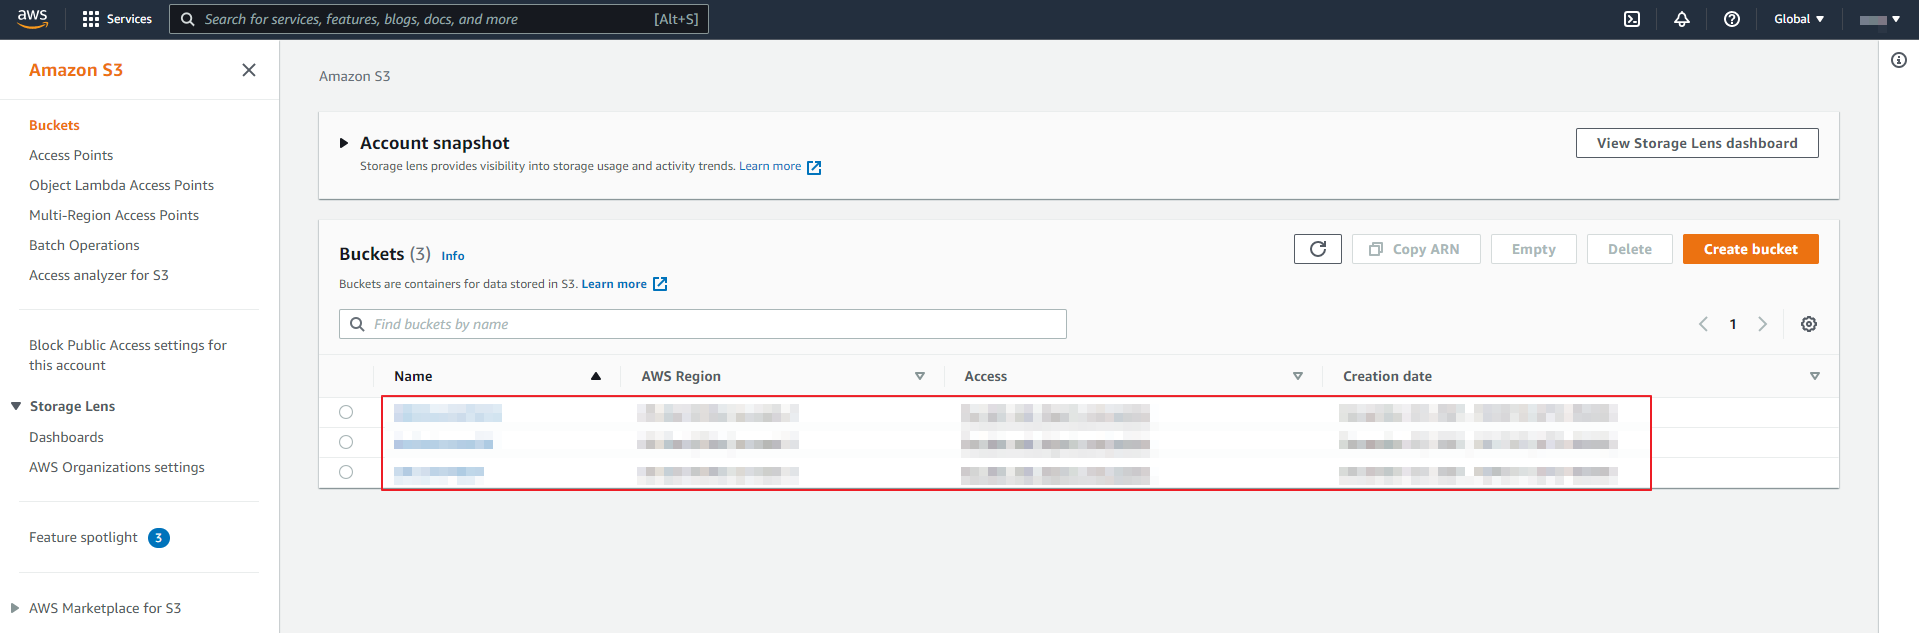
④ Check the bucket created.
Load Billing Data into Amazon S3
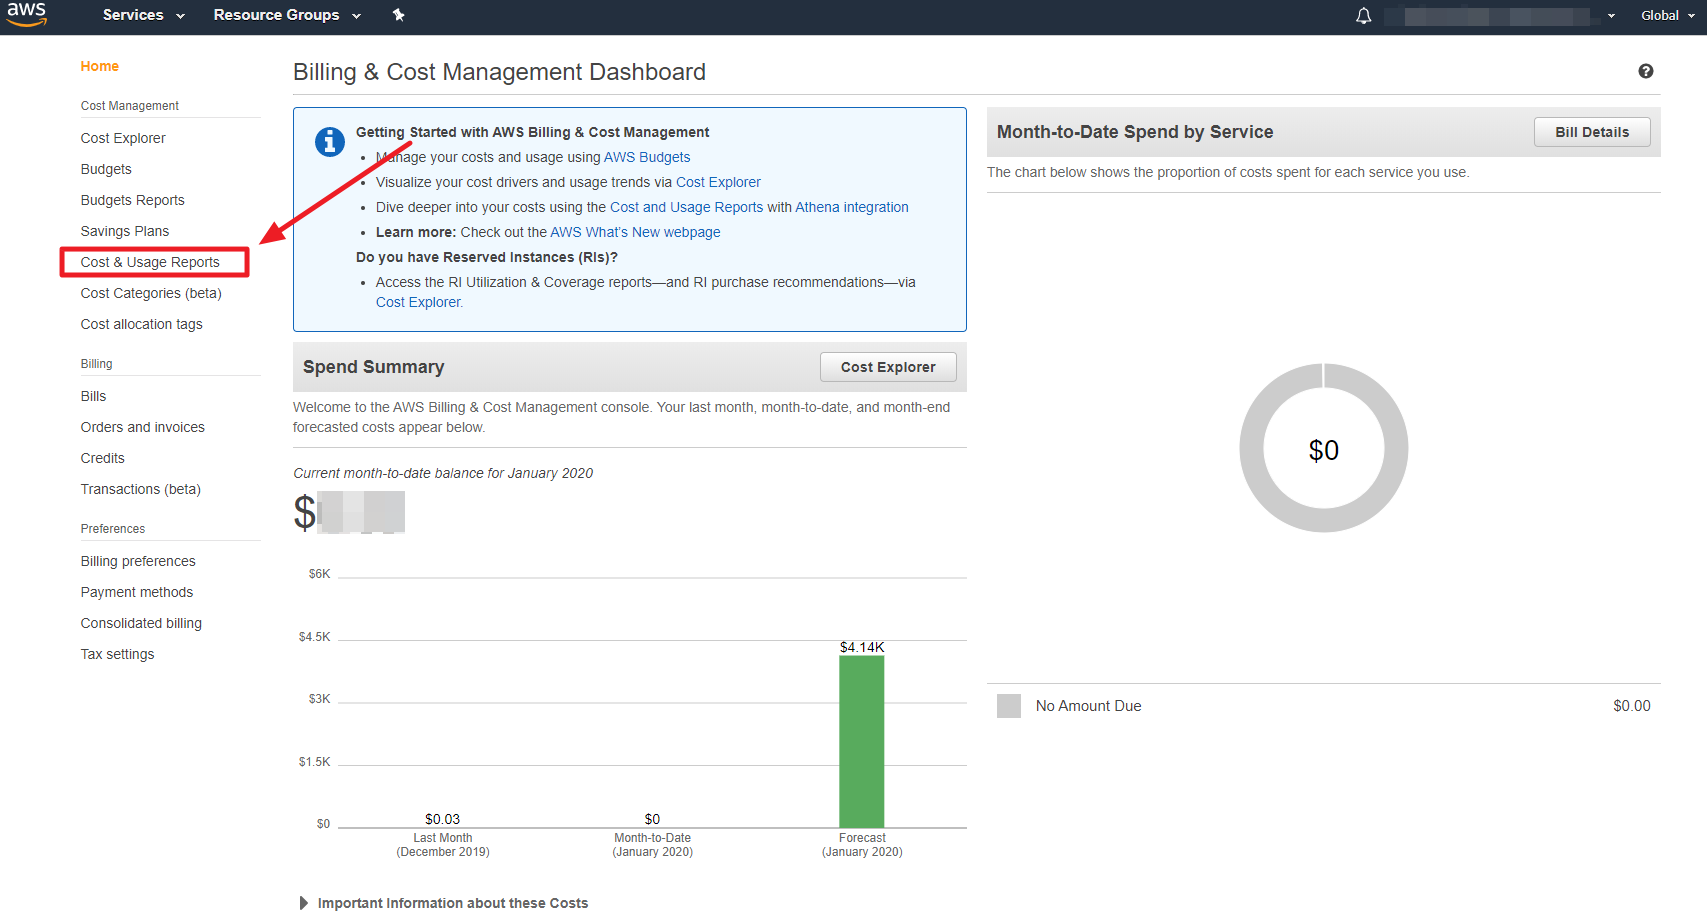
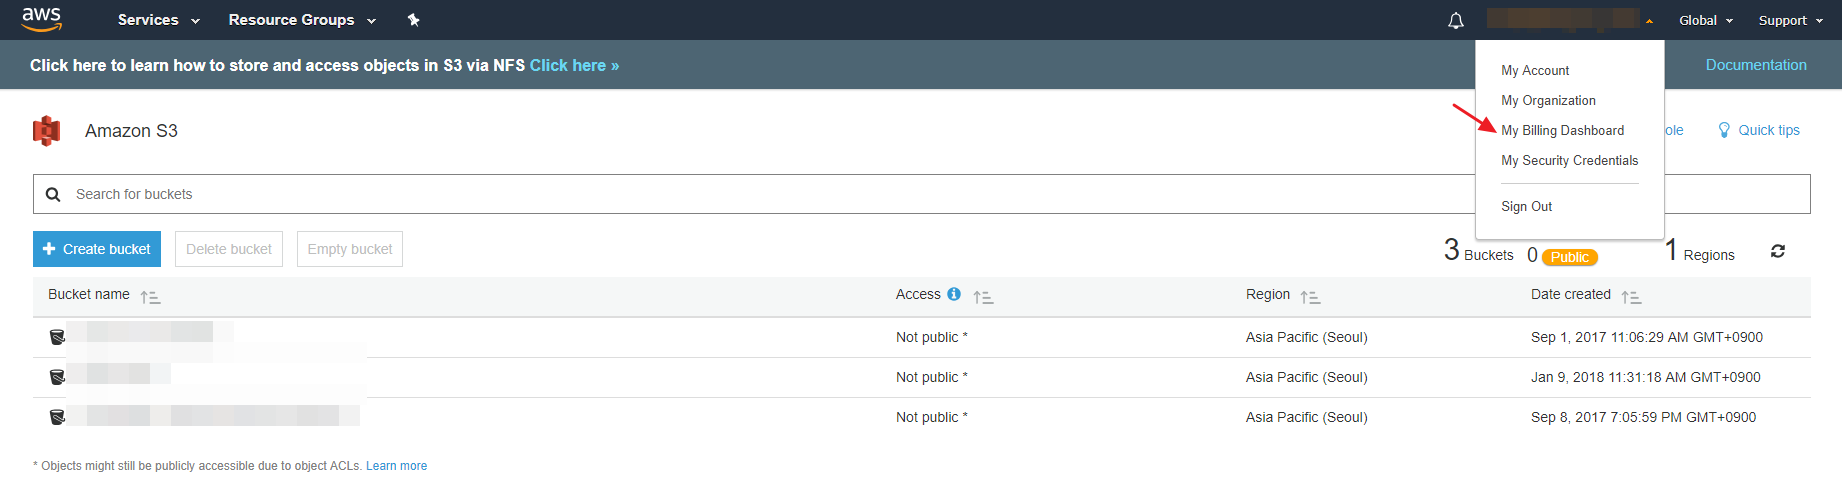
① After creating the bucket, click your profile on the top right corner of the screen and select [Billing Dashboard].

② On the left navigation pane, choose [Cost & Usage Reports].
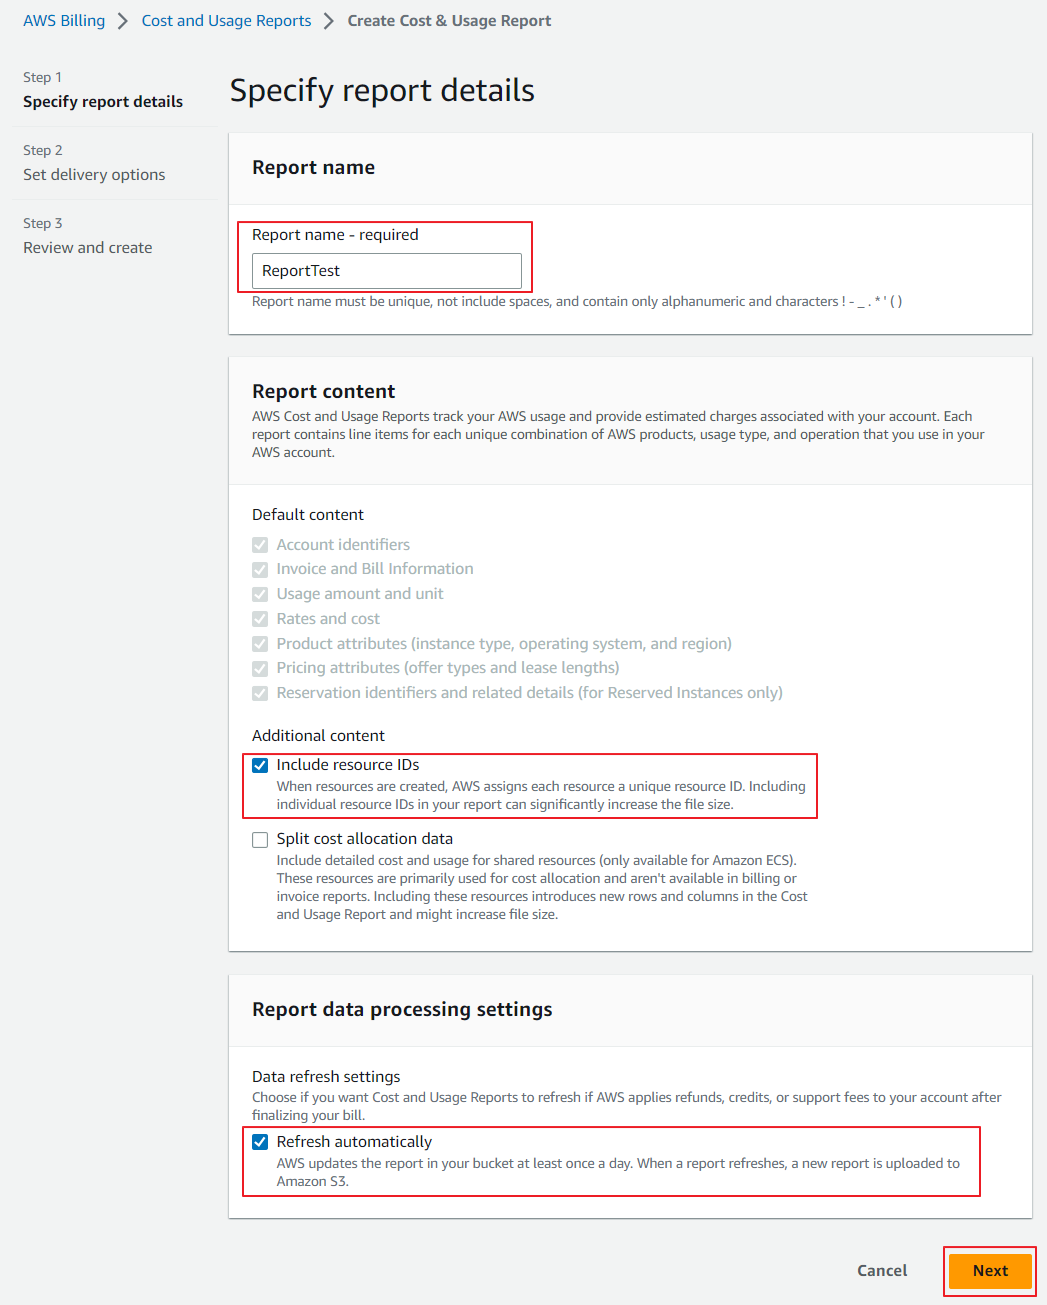
③ Click [Create report] button to create a new report.

④ For Report name, enter a name for your report, and select Include resource IDs checkbox. Then, click the [Next] button. Note that the report name must be unique and only contains alphanumerics and characters ! - _ . * ’ ( ).
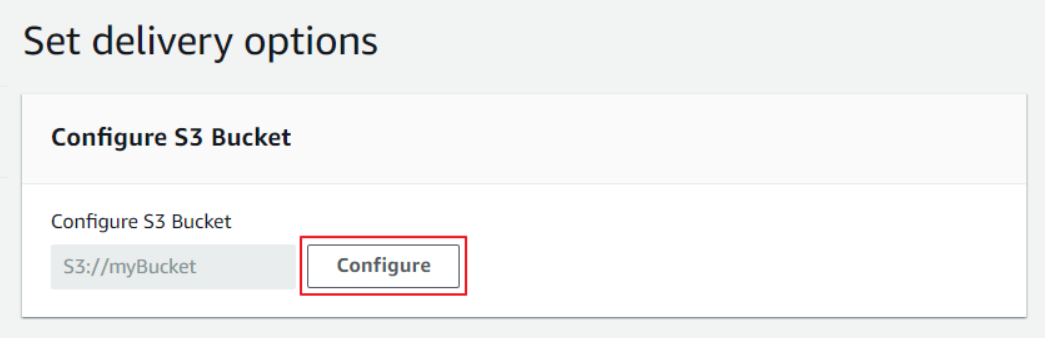
⑤ On the Delivery Options page, click the [Configure] button.
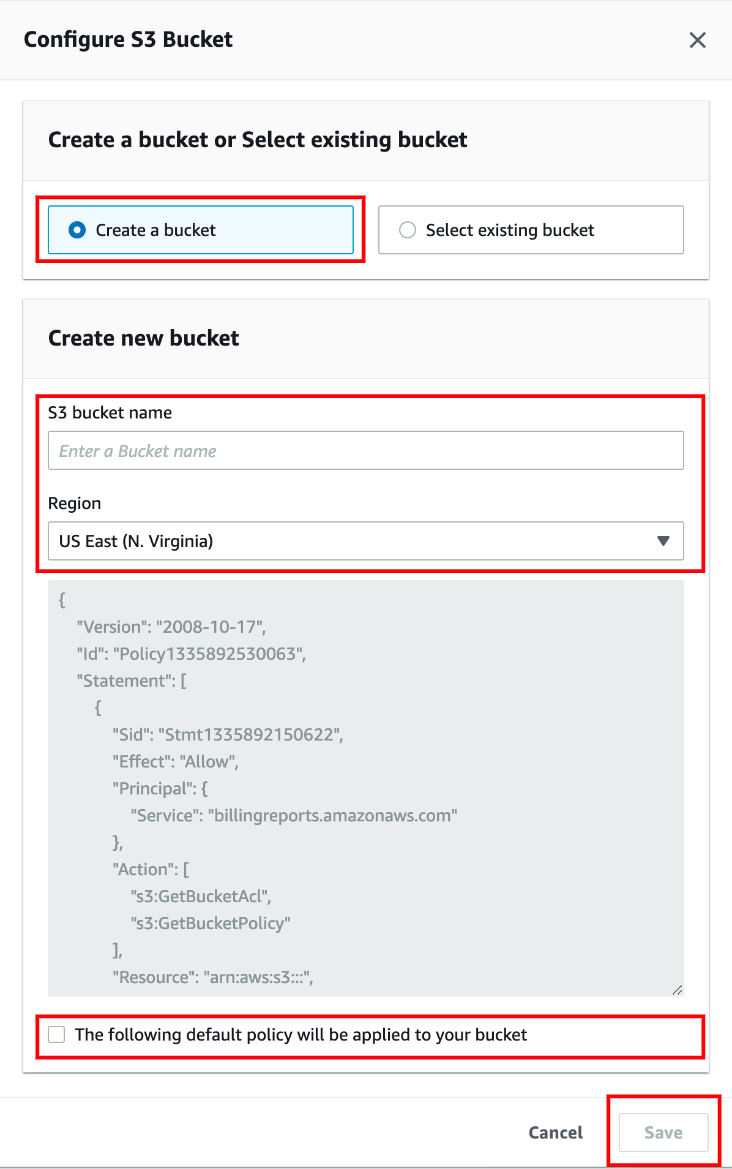
⑥ Select [Create new bucket]. Enter an S3 bucket name and maintain the default value for the region - US East (N. Virginia). Select the [The following default policy will be applied to your bucket] option and click [Save].
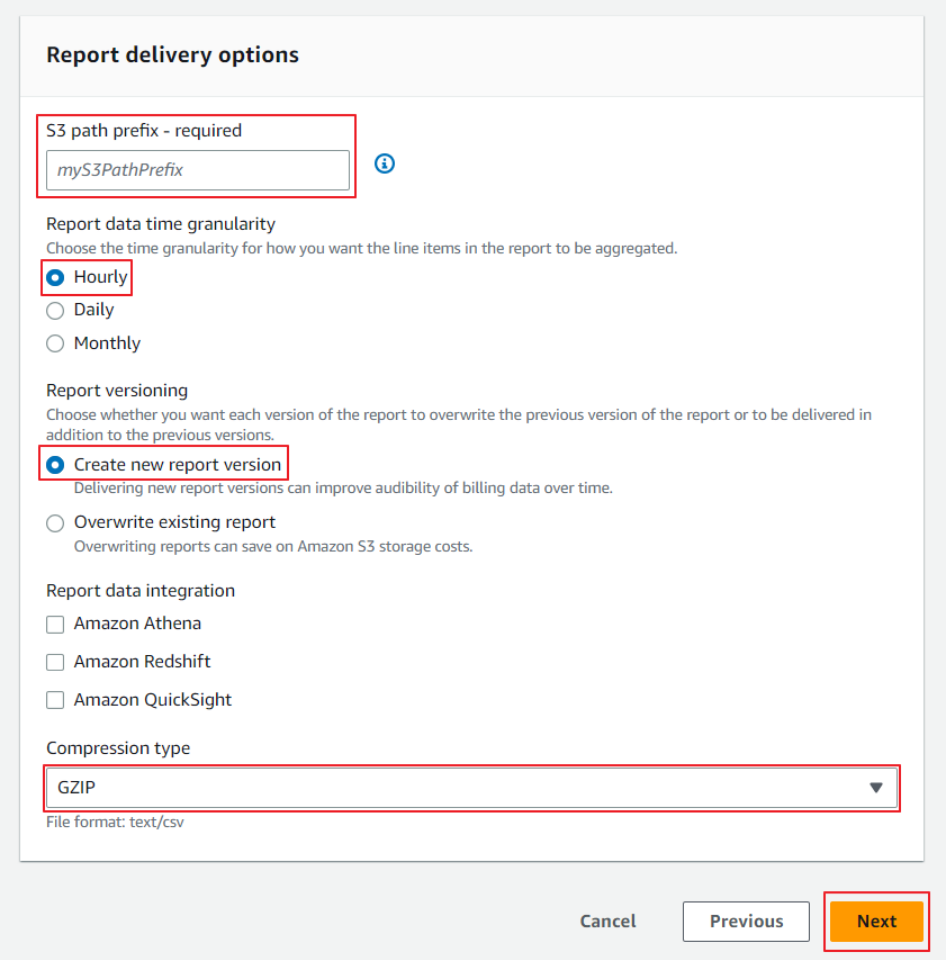
⑦ Enter an S3 path prefix and select the options as below.
- Report data time granularity: Hourly
- Report versioning: Create new report version
- Report data integration: None
- Compression type: GZIP
Afterward, click [Next].
⑧ On the Review and create page, review your report details and click the [Create report] button.
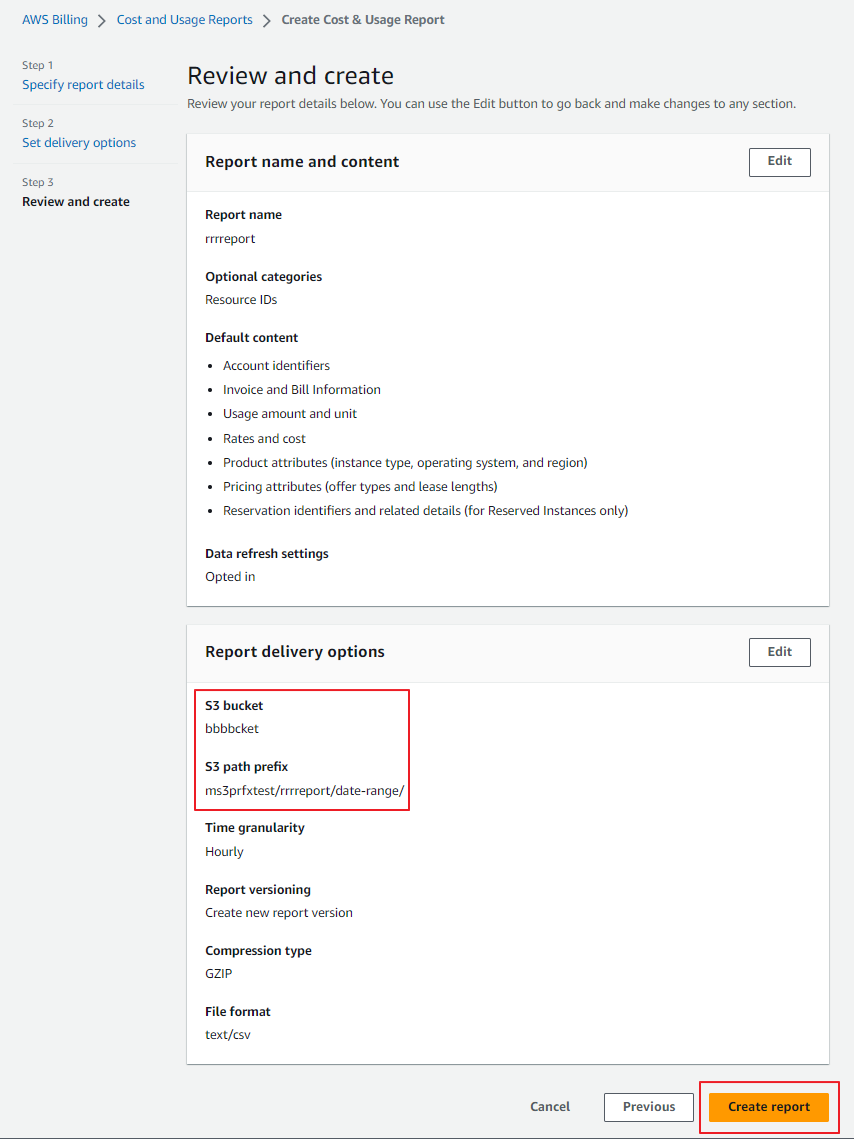
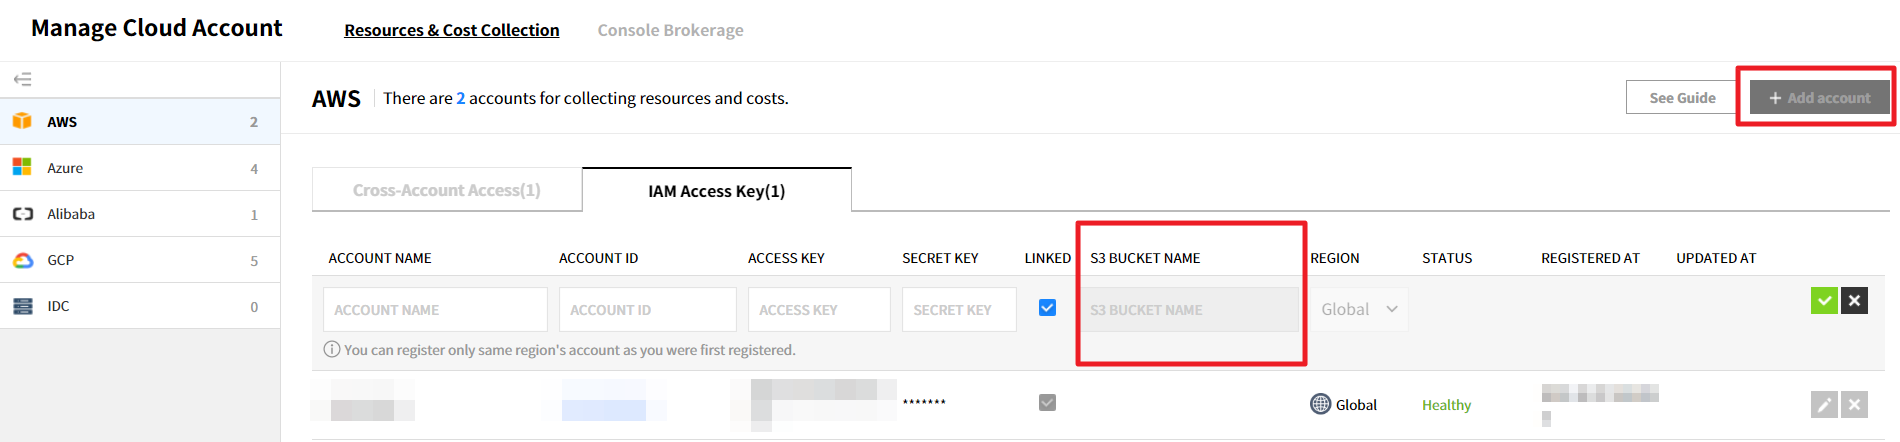
🔔 Please note: If you are registering a payer account, not a linked account, copy the values of the S3 bucket and S3 path prefix—as highlighted in the blue box below—and enter them in the format of S3 bucket name/report path prefix in the [S3 Bucket Name] box on the [Manage Cloud Account > AWS account] page. (Make sure to deselect the LINKED check box if you are not registering a linked AWS account.)
For example, if your S3 bucket name is “bespin-report” and the report path prefix is “/Newreport/date-range/”, enter [bespin-report/Newreport/date-range] in the [S3 Bucket Name] input field when registering.
⑩ You can verify that the report has been created.

🔎 AWS S3 Retrieval Costs Explained:
Please be advised that you are charged for retrieving data from S3 due to AWS pricing policy. AWS charges you for requests made against your S3 buckets and objects using API/SDK. The costs are based on the request type and are charged on the quantity of requests. Please see AWS S3 pricing for more details. If you still have any questions on this matter, please contact our support team.
To see how to load billing reports into Amazon S3 bucket, click the [Amazon S3 Billing Reports] below.
Loading Detailed Billing Data for Amazon S3
① After creating a bucket, click [My Billing Dashboard] at the top right of the S3 service screen.
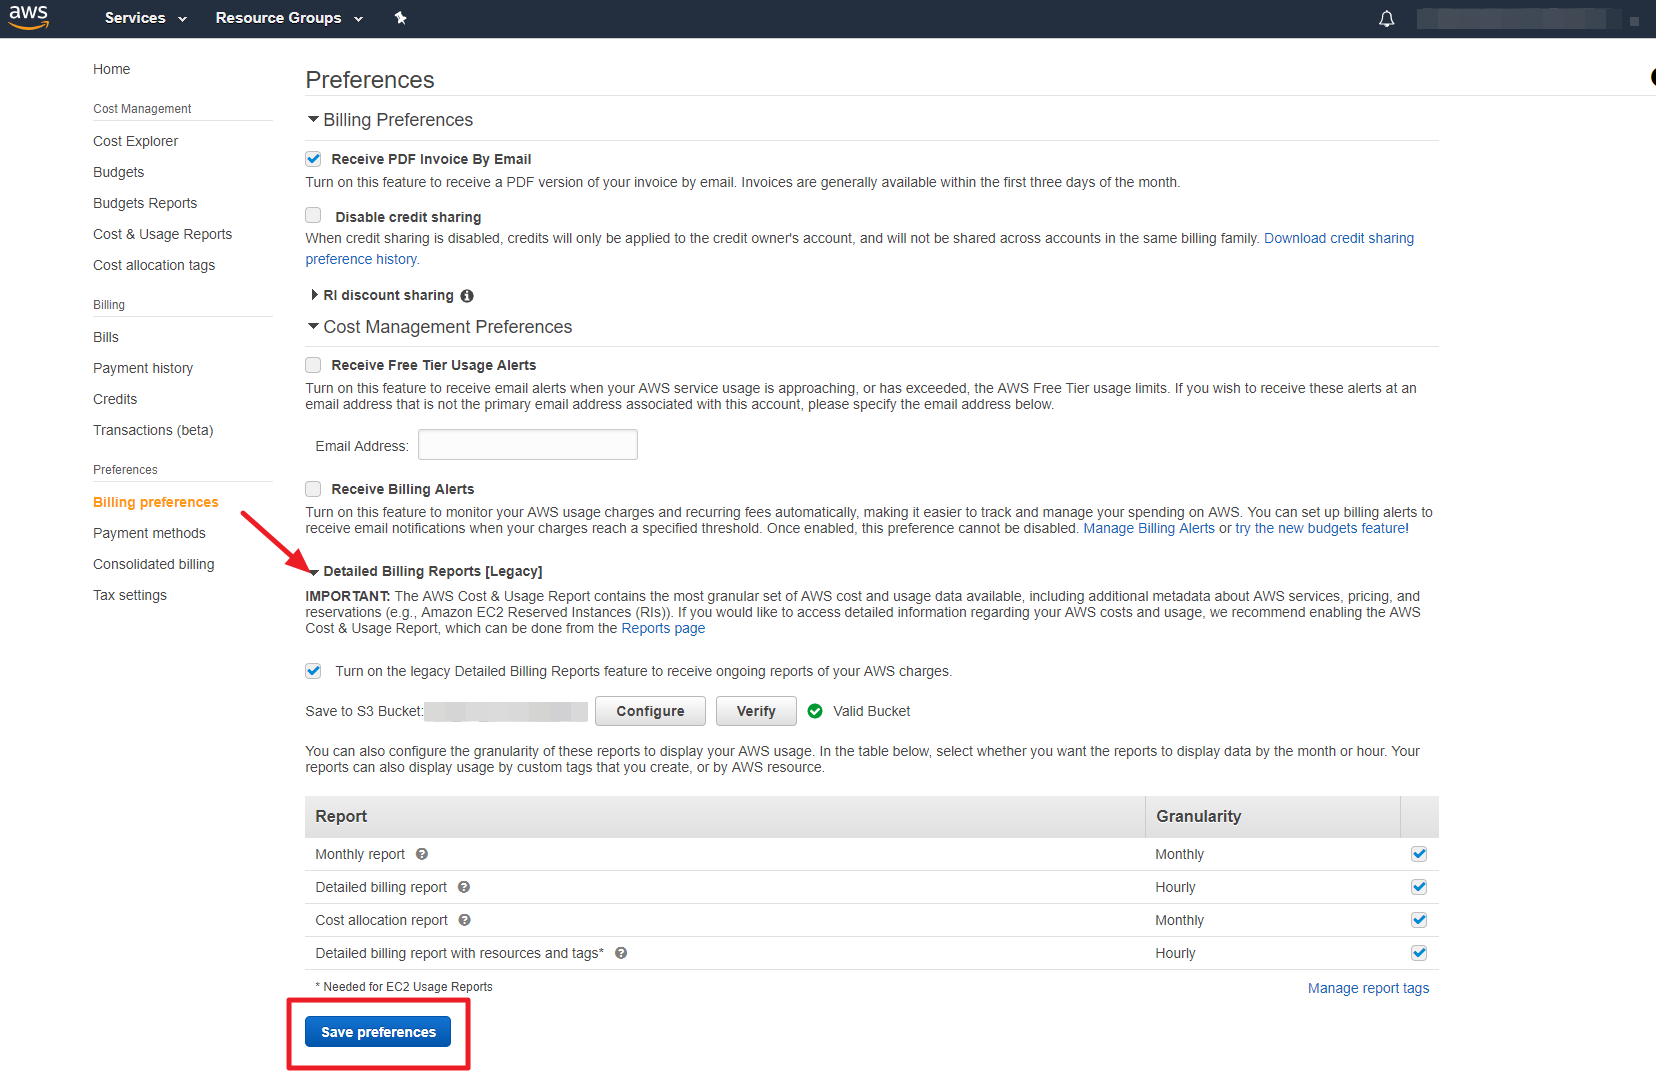
② Click [Billing Preferences] from the Preferences menu.

③ Click Detailed Billing Reports [Legacy] and enter the created S3 Bucket name and click the [Verify] button.
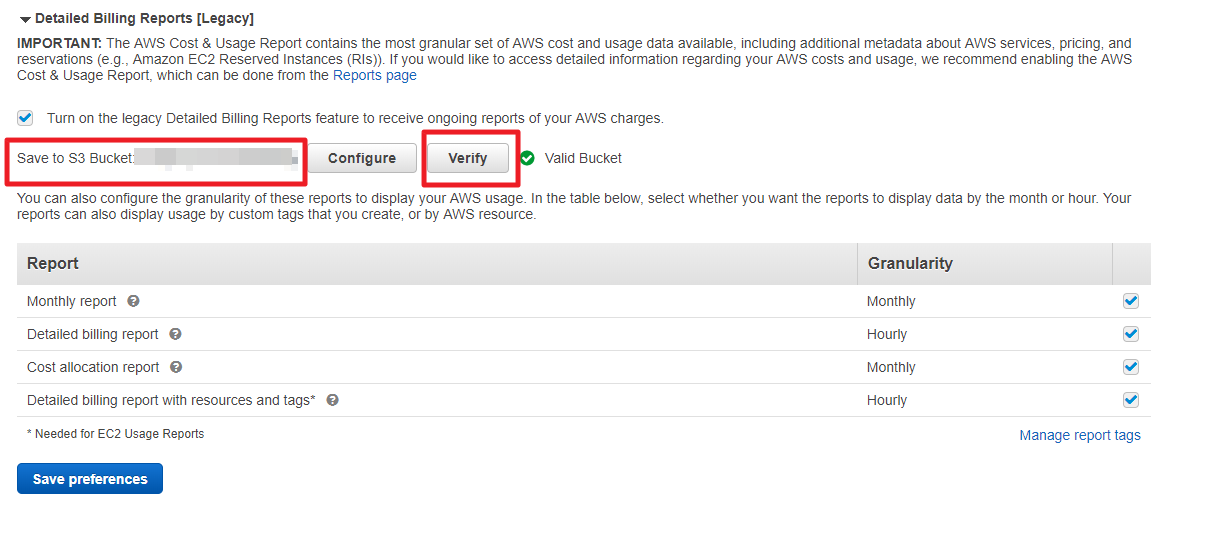
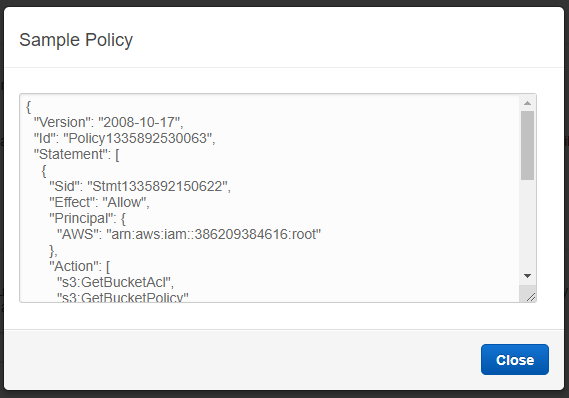
④ If X Invalid bucket message is displayed next to the [Verify] button, click the Sample policy link.
⑤ Copy the sample policy.
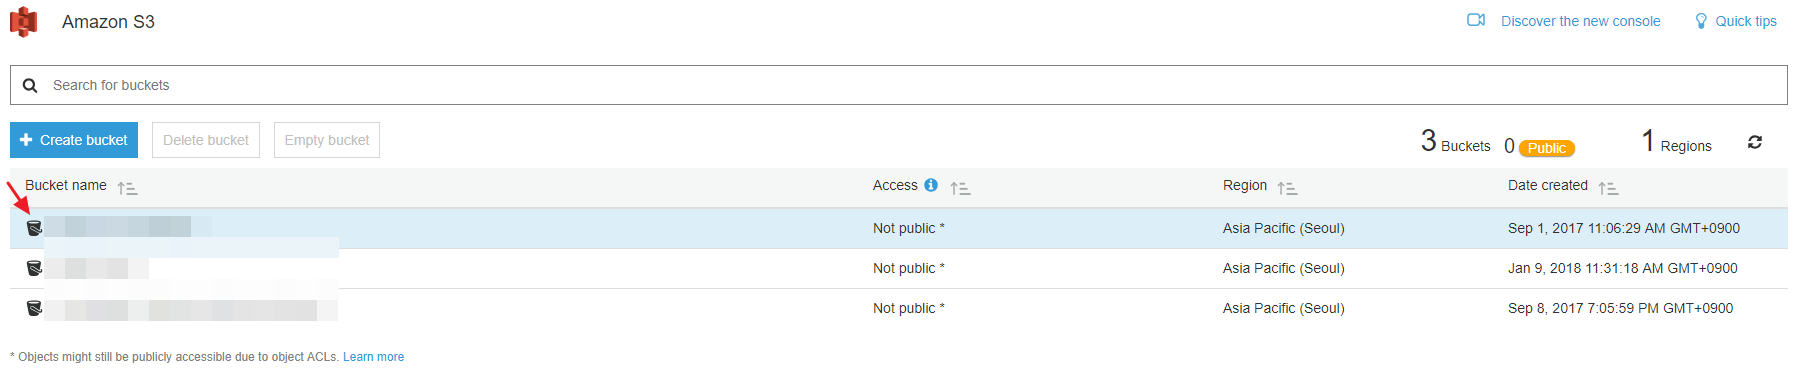
⑥ Go back to AWS Console and click Storage > S3.
⑦ Click the created bucket.
⑧ In Permissions > Bucket Policy tab, paste the copied sample policy.
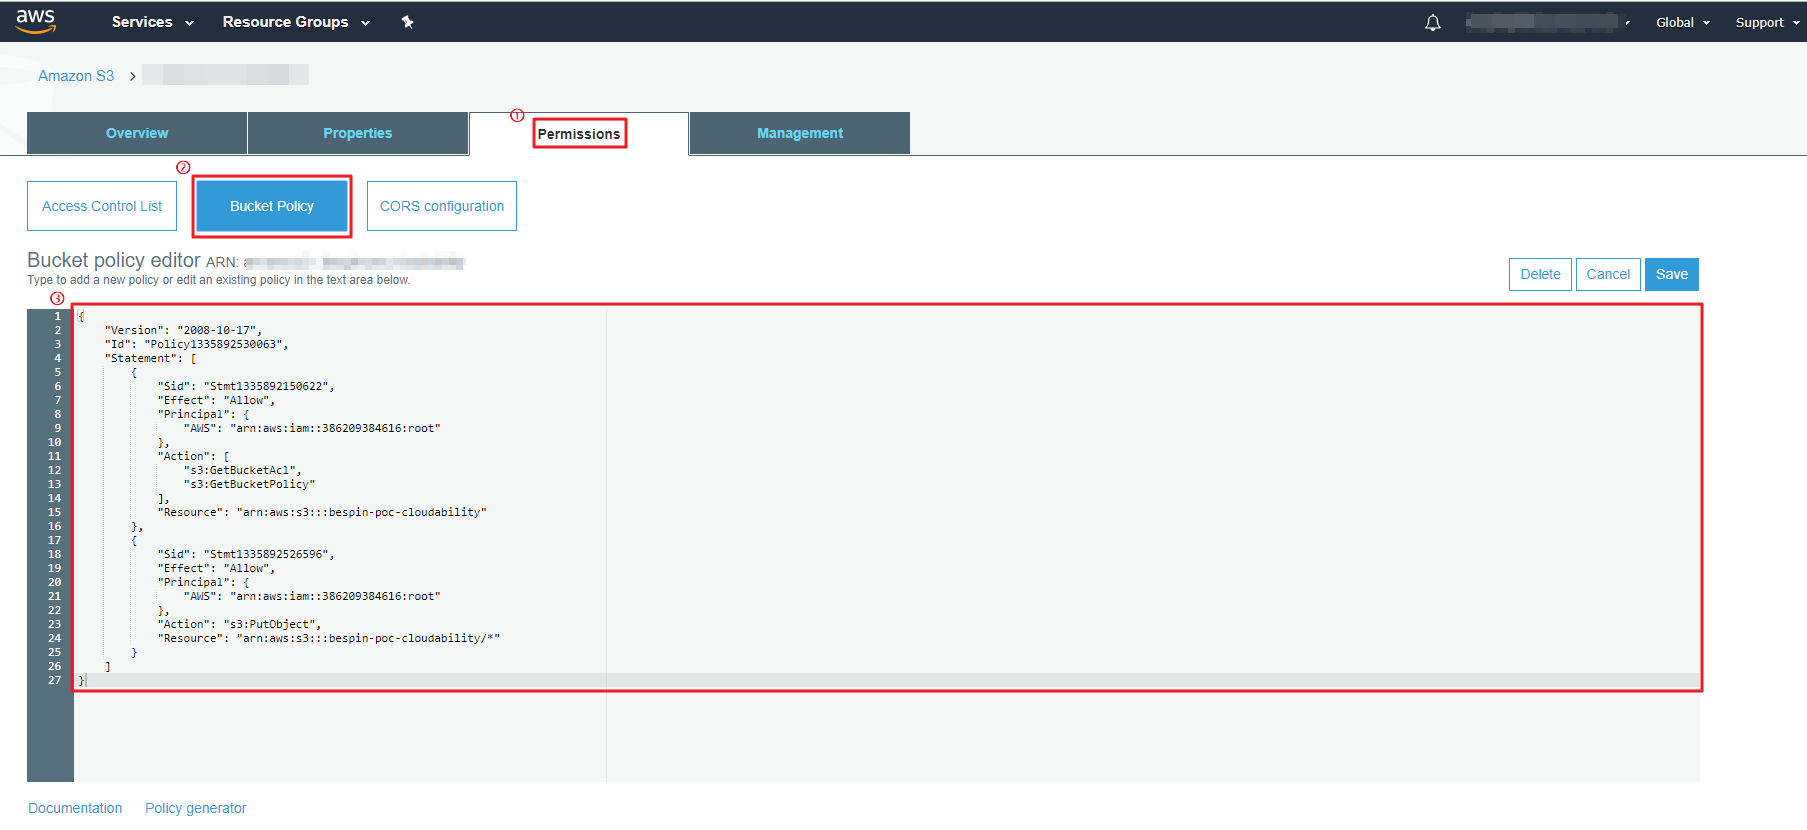
⑨ After clicking [Save] button, go to My Billing Dashboard > Preferences > Billing Preference > Detailed Billing Report [Legacy], and click the [Verify] button again to make sure it is displayed as a valid bucket. Then, click the [Save preferences] button.
⑩ In Service Portal > Cloud Account > Resource & Cost Collection, enter the created bucket name in S3 BUCKET NAME field, and click the check button at the right to add an AWS Cloud account.
📜 Note
It can take up to 24 hours for AWS to start delivering reports to your Amazon S3 bucket.
Register Azure Subscriptions
This section explains how to add Azure subscriptions on the Service Portal. In order to register your Azure subscriptions on the Service Portal, you first need to get Client-Credential information from the Azure Portal. You can obtain Client-Credentials information when you register an application on Azure Portal.
Azure App Registrations on Azure Portal
The following explains how to get a subscription by granting permission to Azure Application using the Client-Credentials information such as Tenant ID, Application ID, and Client secret from Azure Portal.
① In Azure Portal, go to Azure Active Directory service.
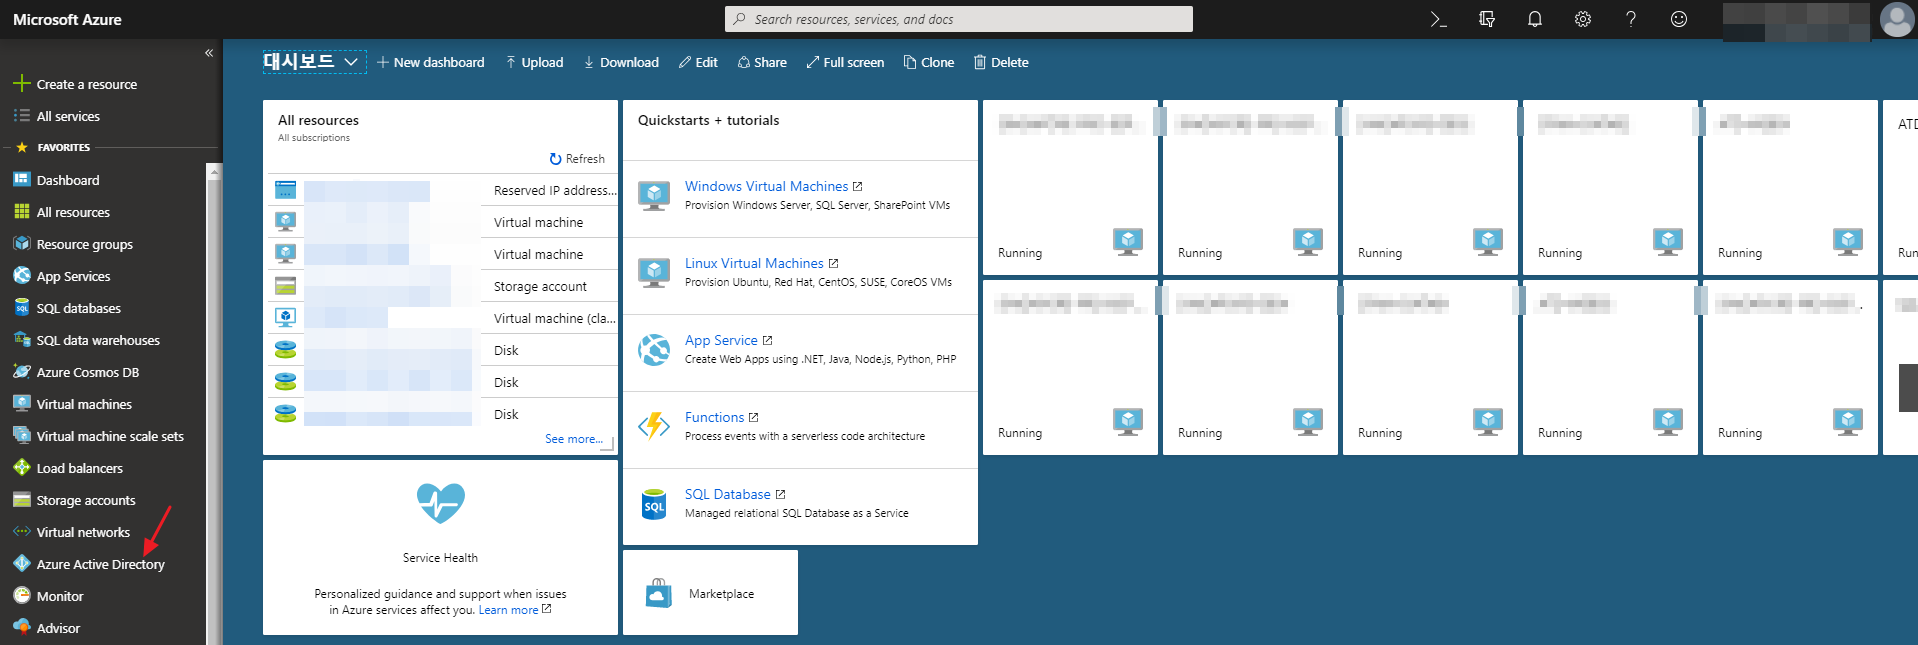
⚠️ Attention: For China Portal, some pages may look different from the global version.
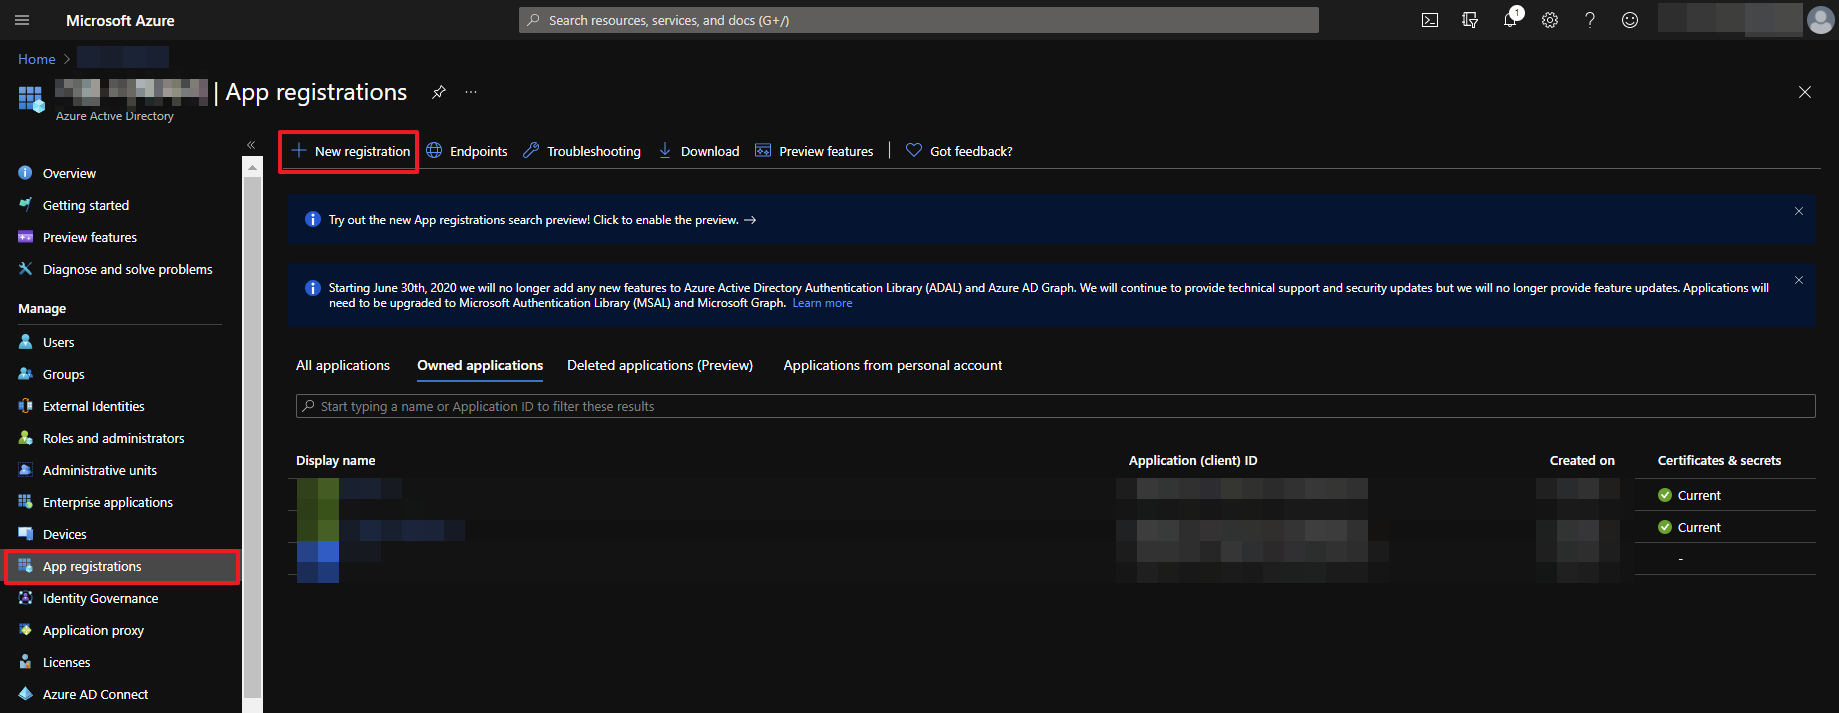
② Under Manage, go to App registrations and click the [+ New registration].
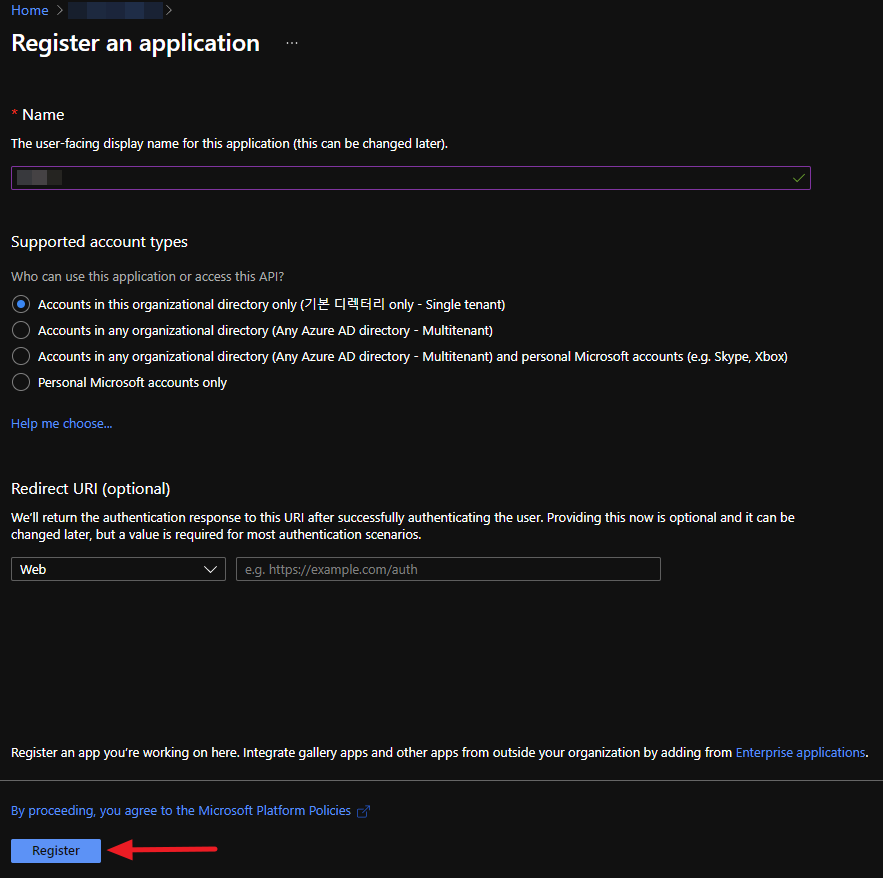
③ Enter the required information including the application name. Select Supported account types and click the Register button.
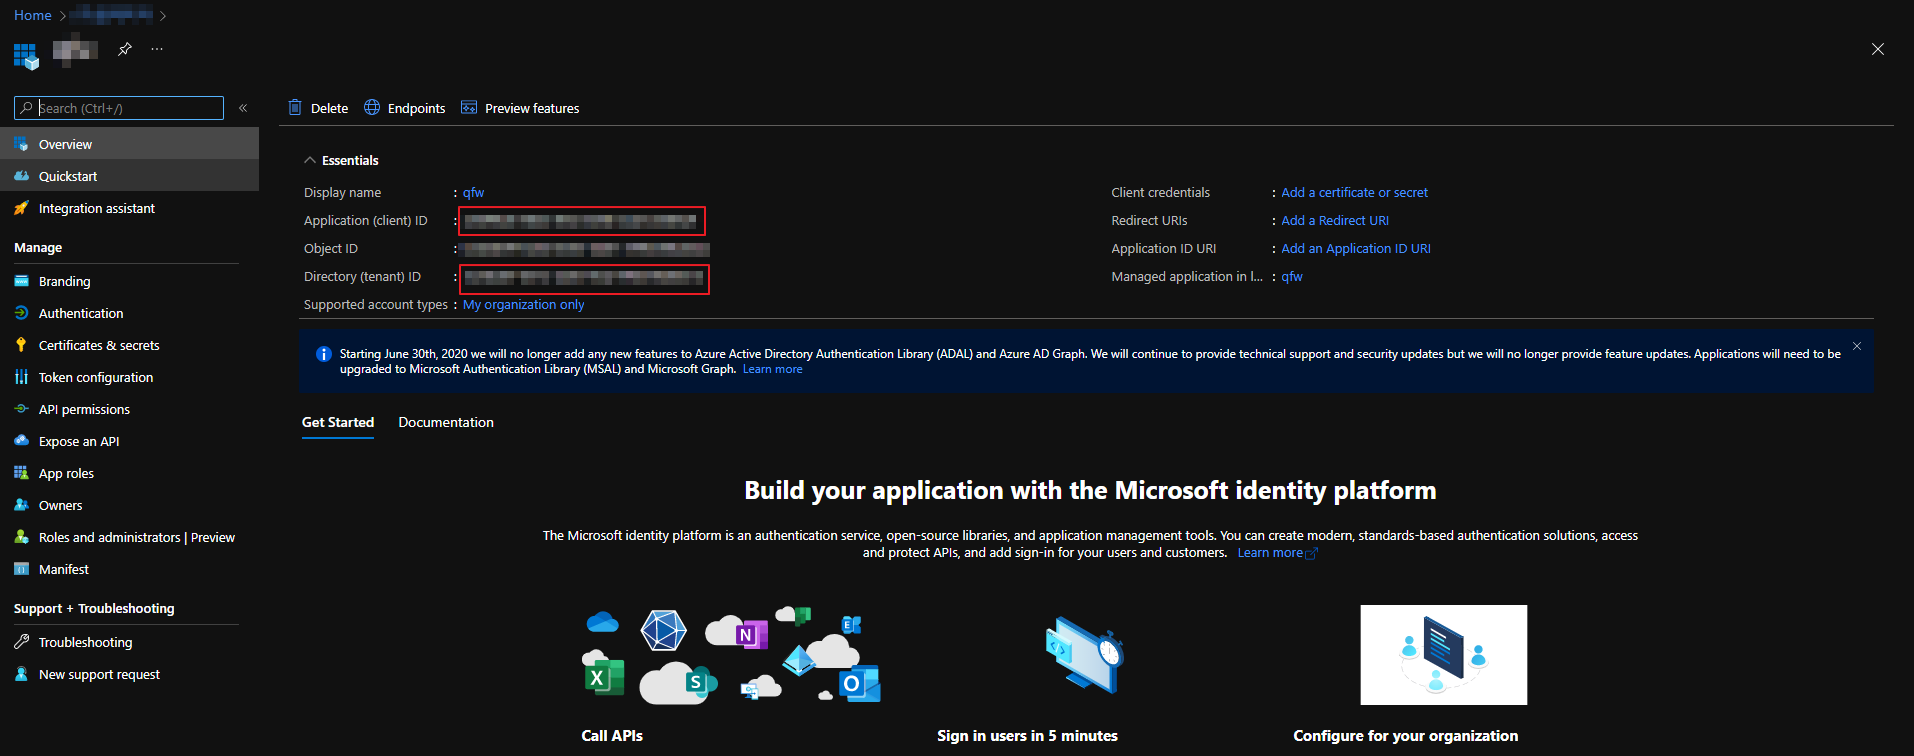
④ When the new application is registered, copy and record the values of the Application (client) ID and Directory (tenant) ID. You will need these ID values when you register your Azure subscriptions on Service Portal.
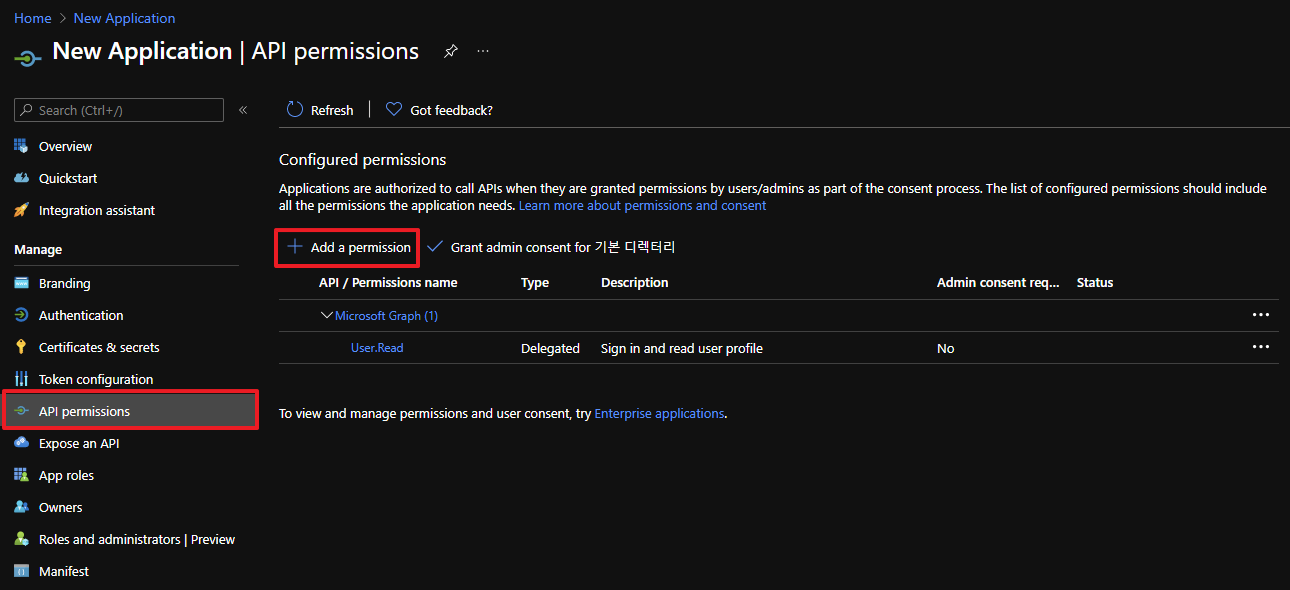
⑤ Under Manage, go to API permissions and click the [+ Add a permission].
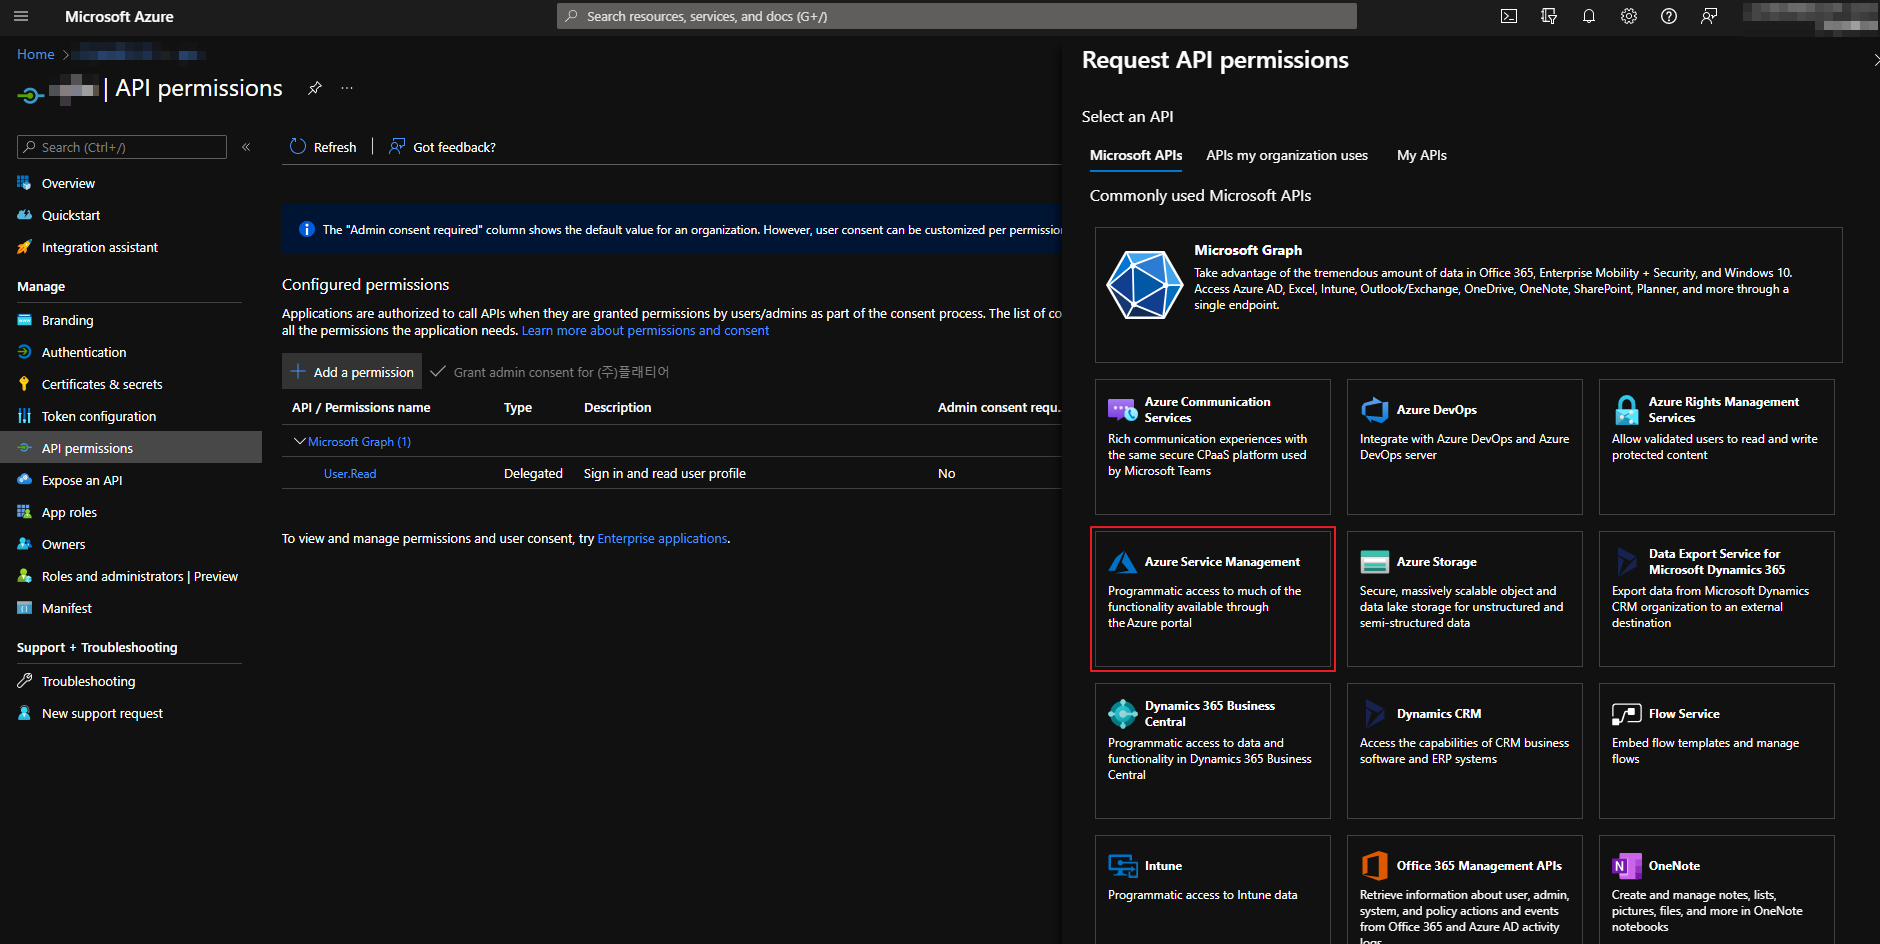
⑥ Select Azure Service Management on the Request API permissions page.
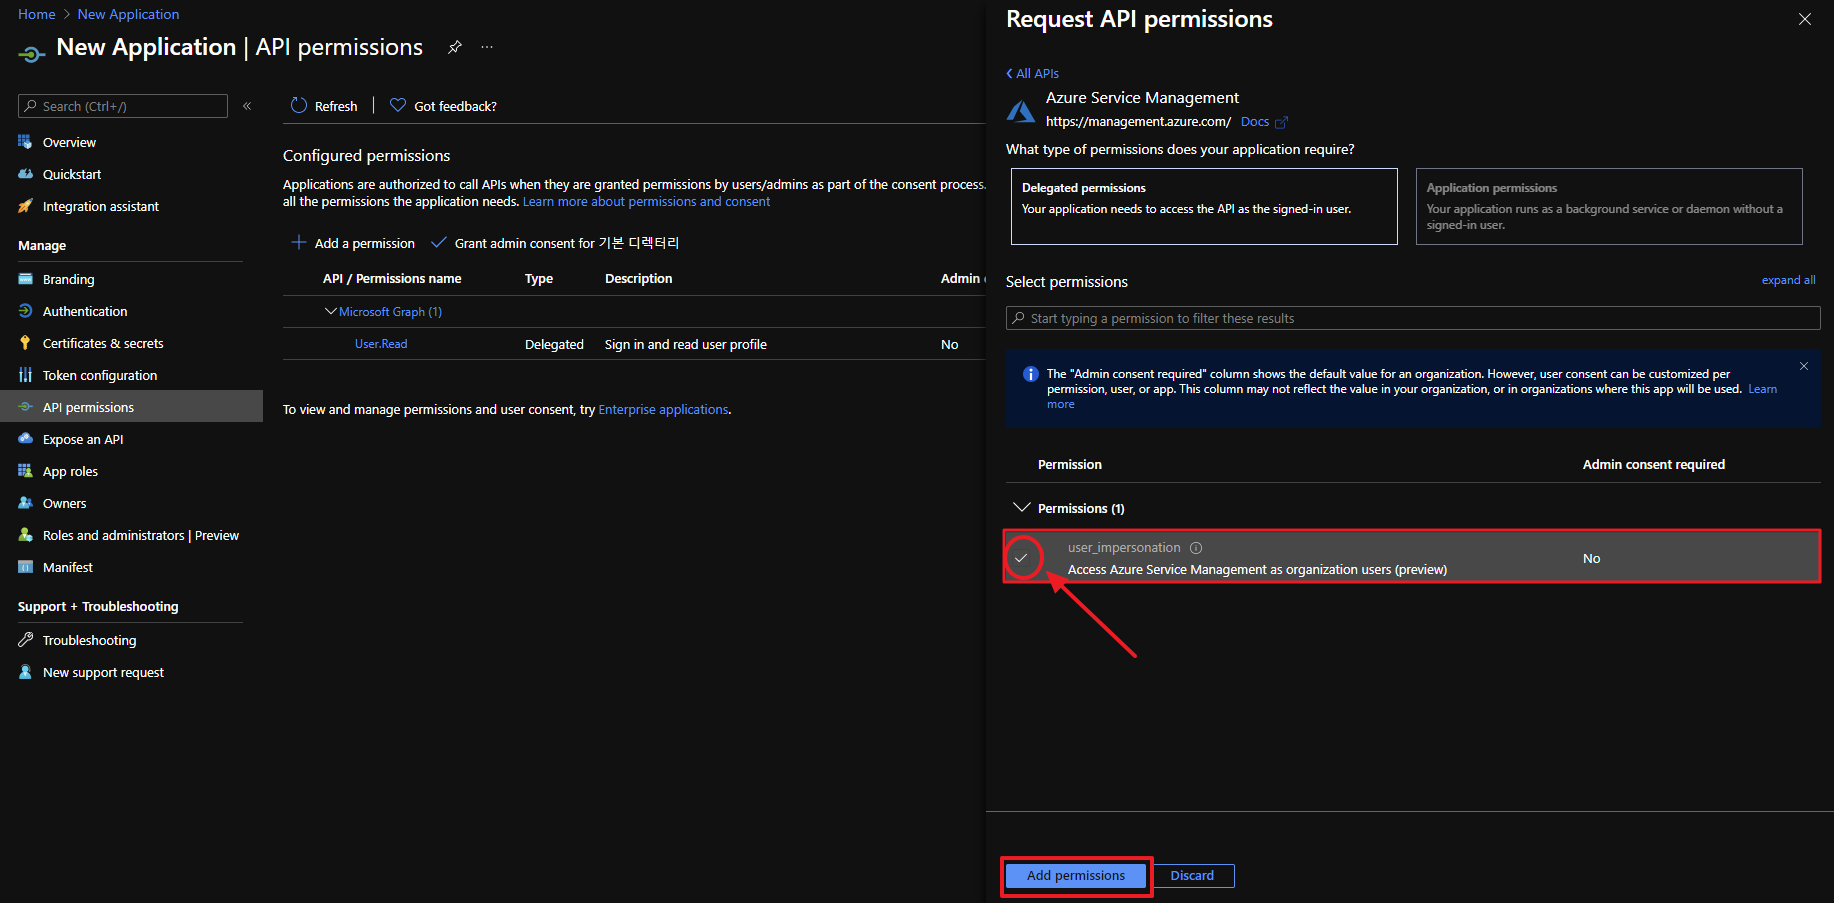
⑦ Check user_impersonation and click the [Add permissions] button on the bottom.
⑧ Under Manage, go to Certificates & secrets and click the [+ New client secret].
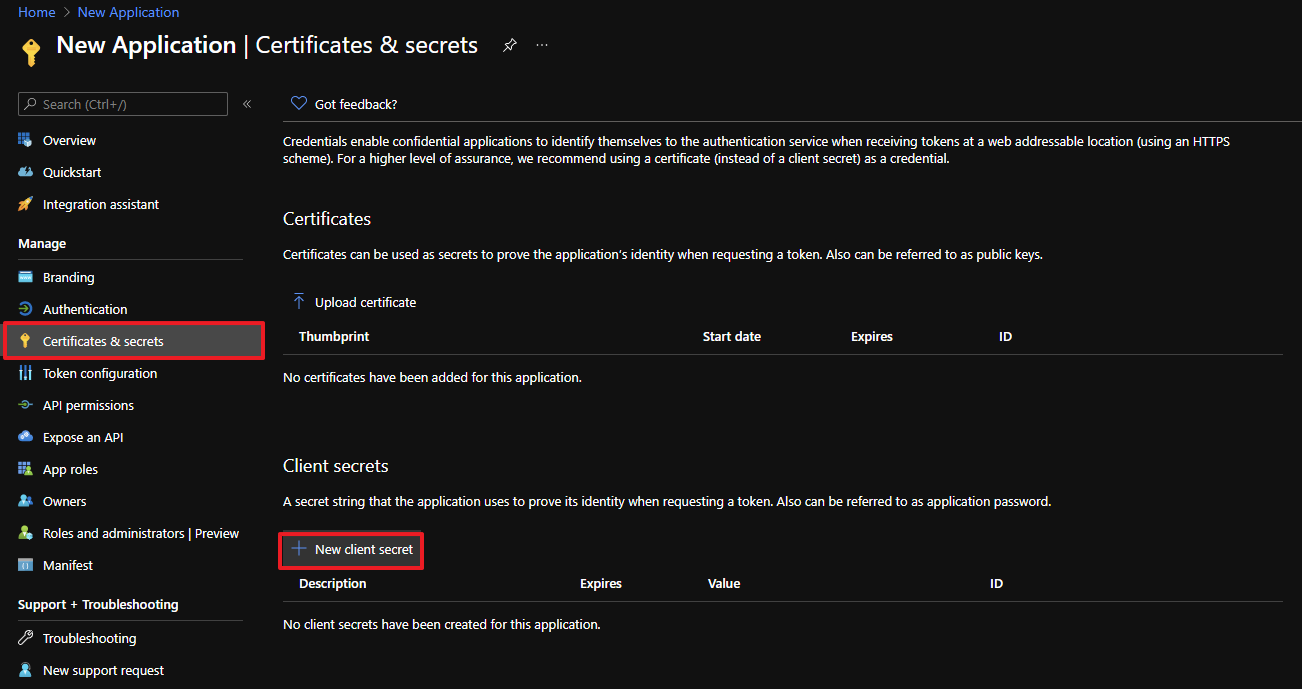
⑨ Enter the description for a client secret and select expiration period. Click the [Add] button to save.
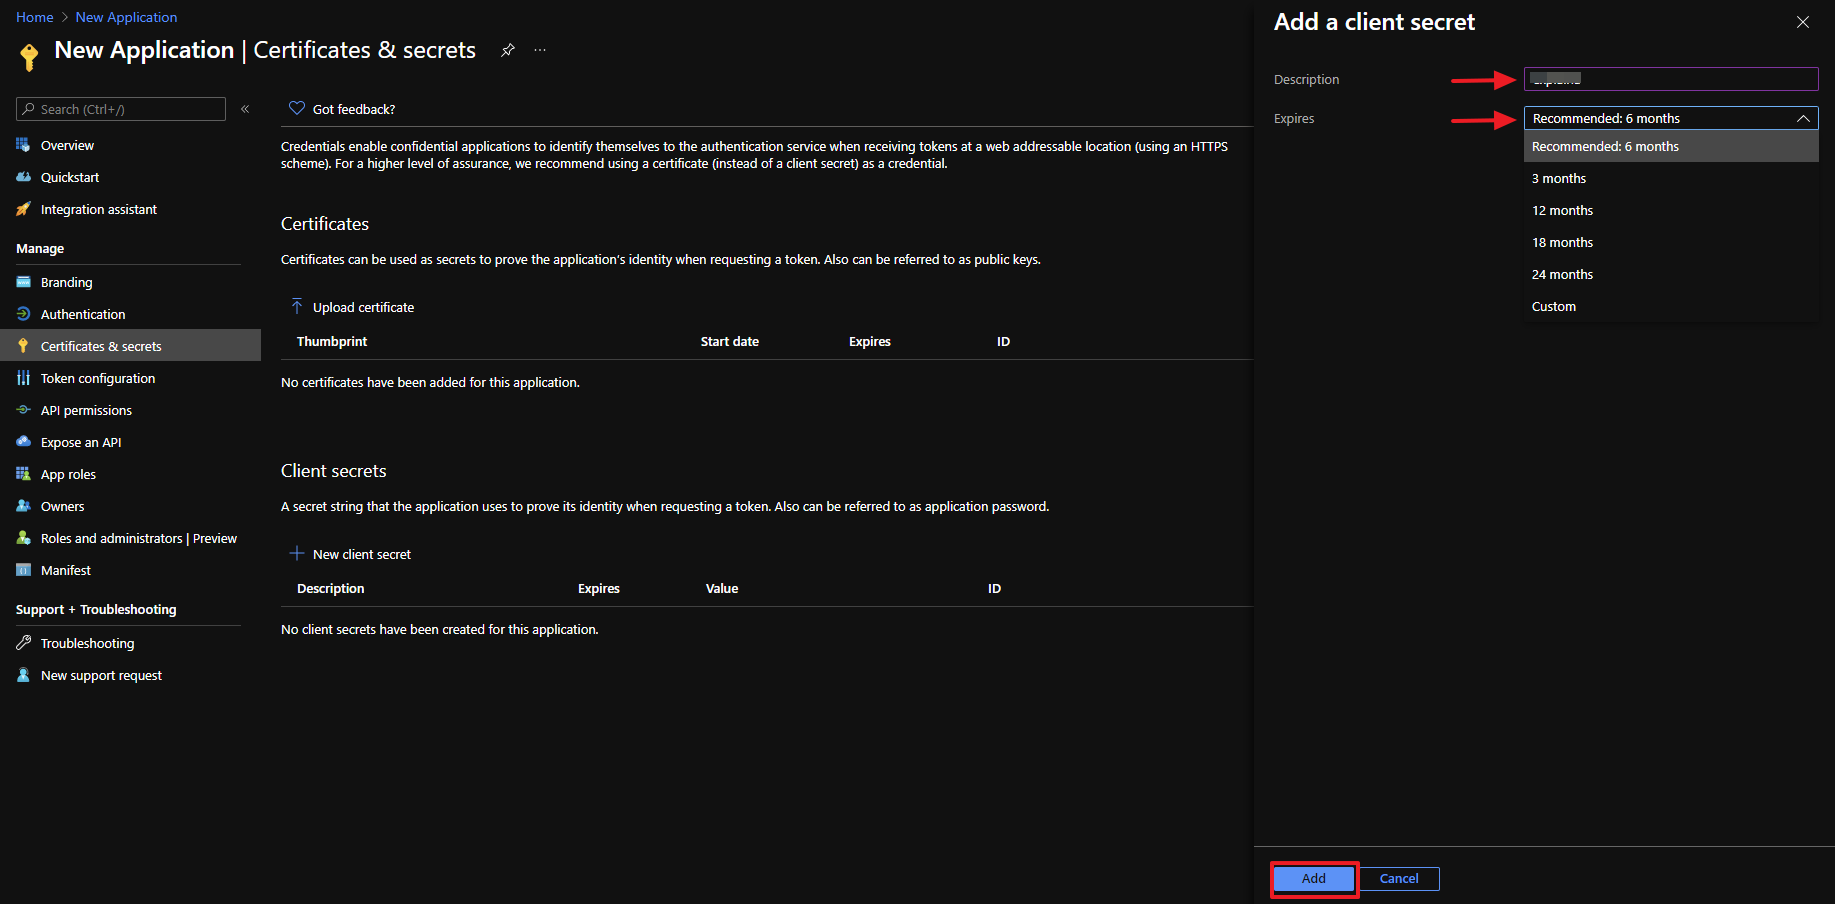
📜 Note
Azure recommends 6 months for client secret expiration period but it can be up to 24 months. Every time the client secret expires, you must re-create the client secret and modify the service account information on the Service Portal.
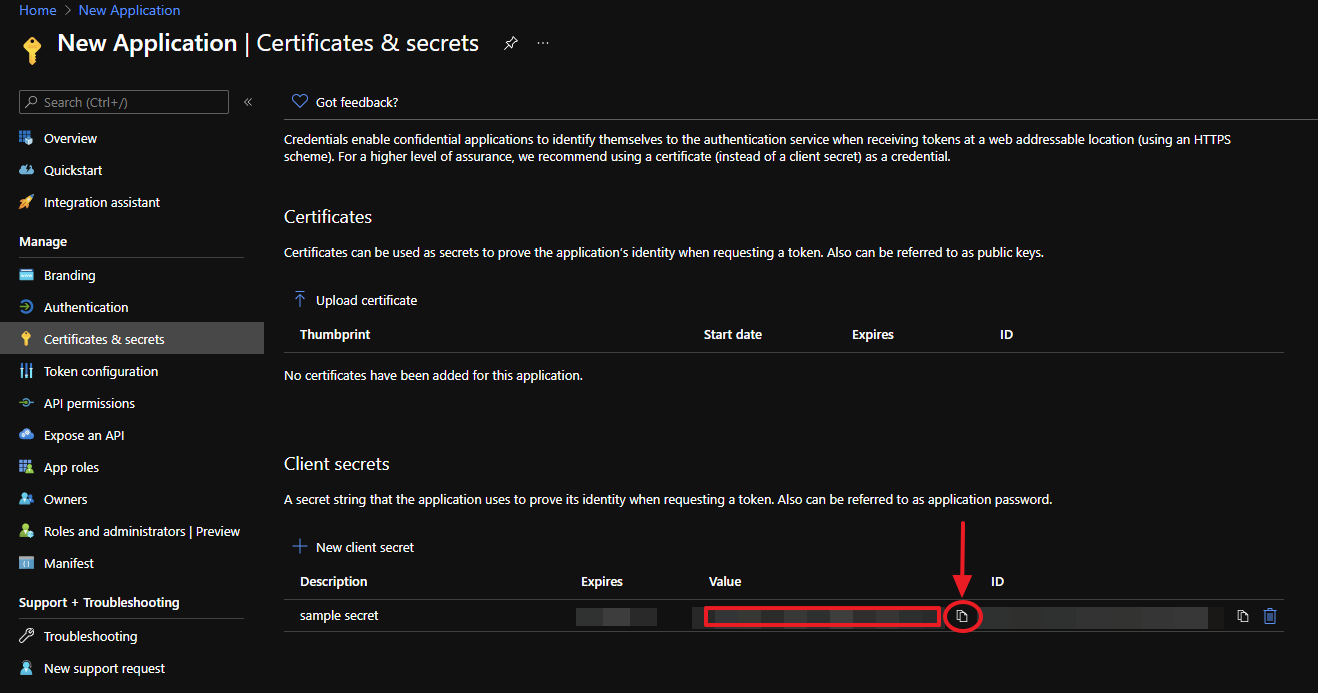
⑩ When the client secret is created, copy and record the secret value. This secret value can only be copied after the initial creation. You can only view the secret creation status but not the actual value later on. If you did not record the secret value at this step, you need to create a new client secret.
Set Permissions on Azure Portal
After creating an application on the Azure Portal, now you need to set appropriate permissions to that application or users.
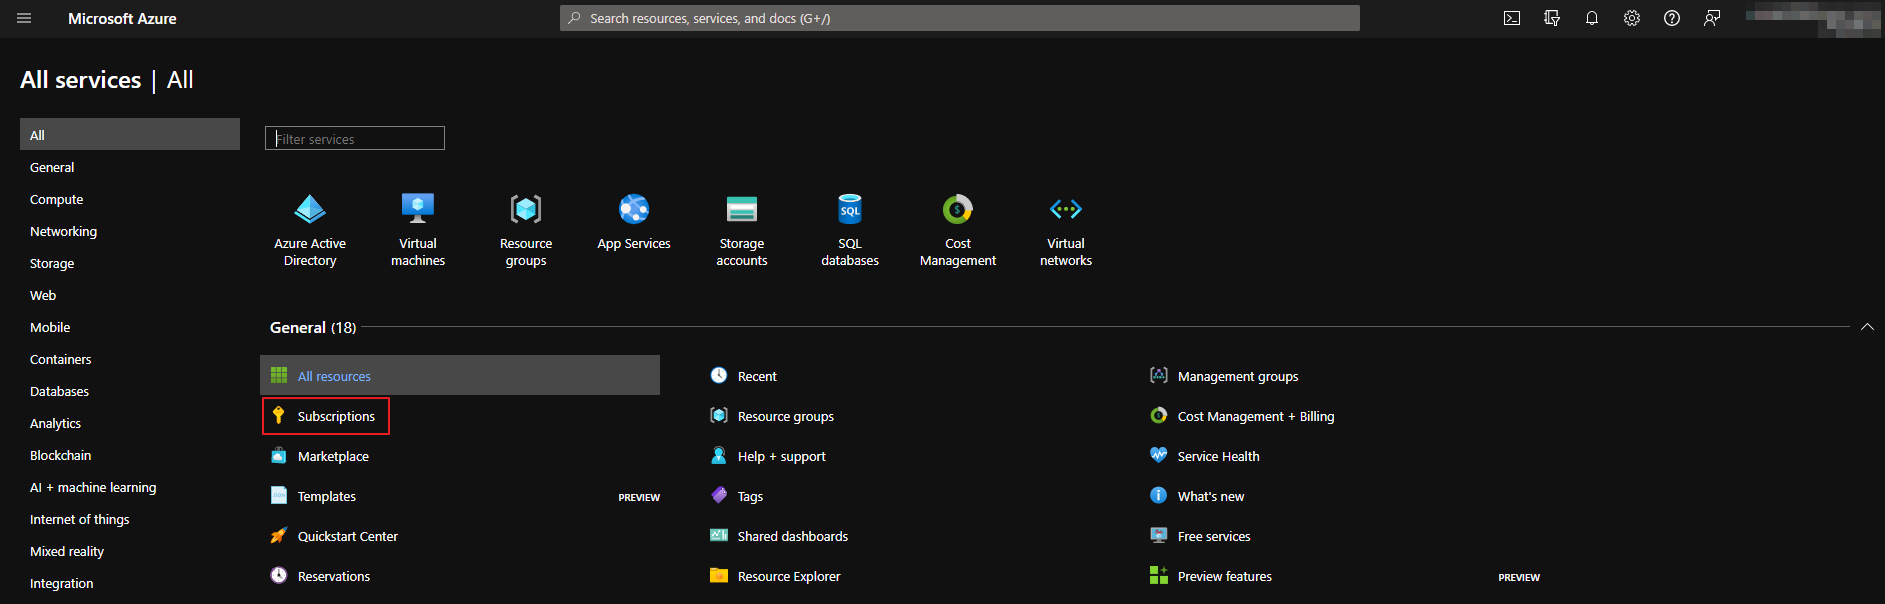
① In Azure Portal, go to Subscriptions service.
② Select a subscription that you want to grant permissions.
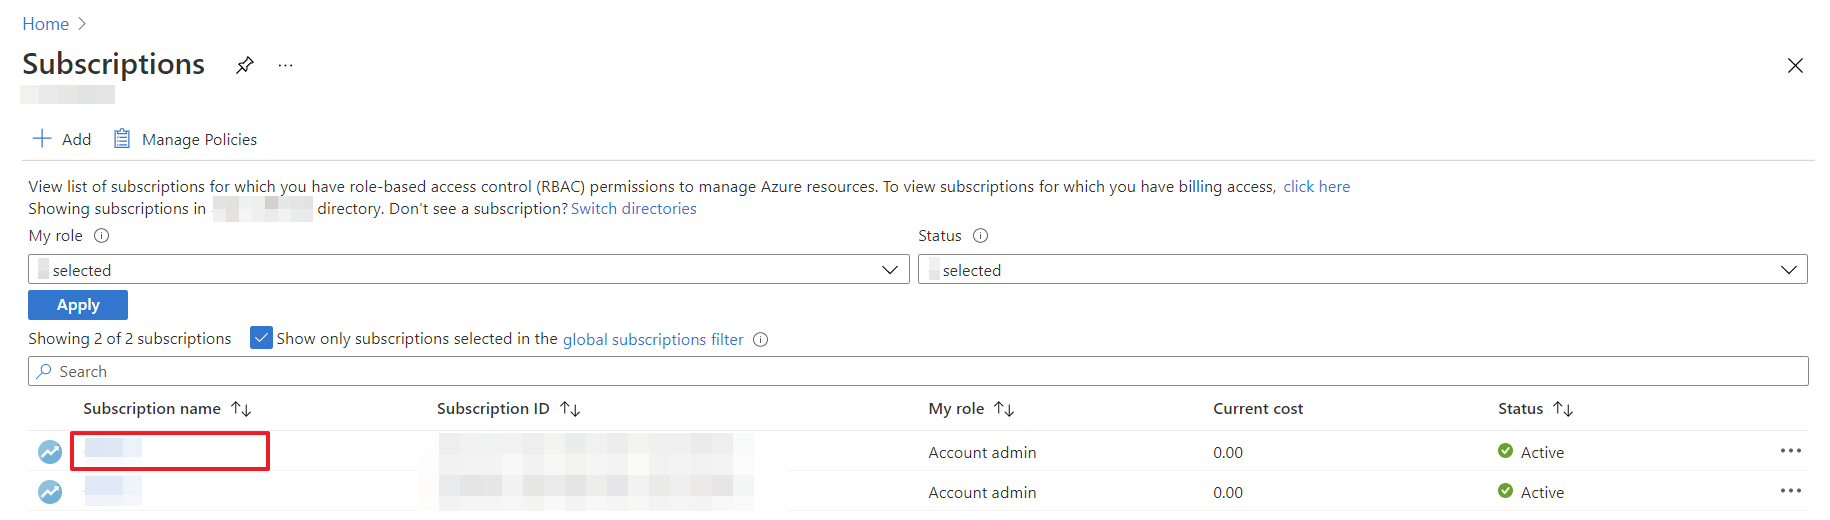
③ In Access Control (IAM), click [+ Add] and select Add role assignment. Select Reader in the Role field.
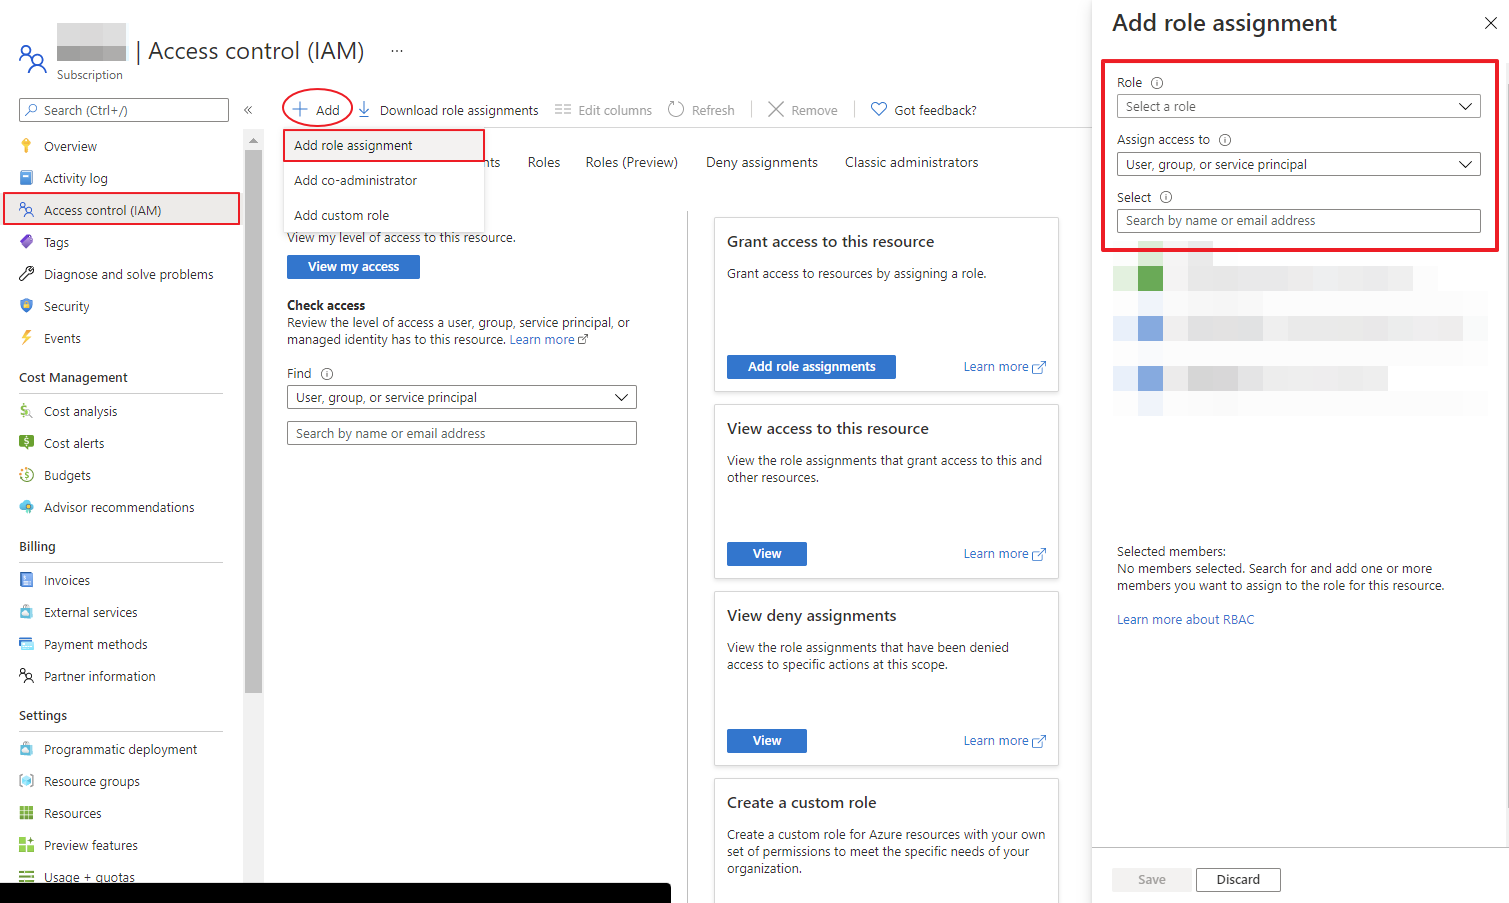
④ For setting permissions, items and descriptions are as follows:
| Item | Description |
|---|---|
| Role | Selecting at least a Reader role is recommended. Azure provides descriptions for each role with tooltips. Reader can view all resources, but is not allowed to make any changes. |
| Assign access to | Select the type of security principal to assign the role to. |
| Select | Search or enter the name of the application you just created. |
⑤ Click Save button to add permissions.
Register with Azure Client-Credentials Information
The following explains how to get subscriptions using Client-Credentials information.
Register with Azure Plan
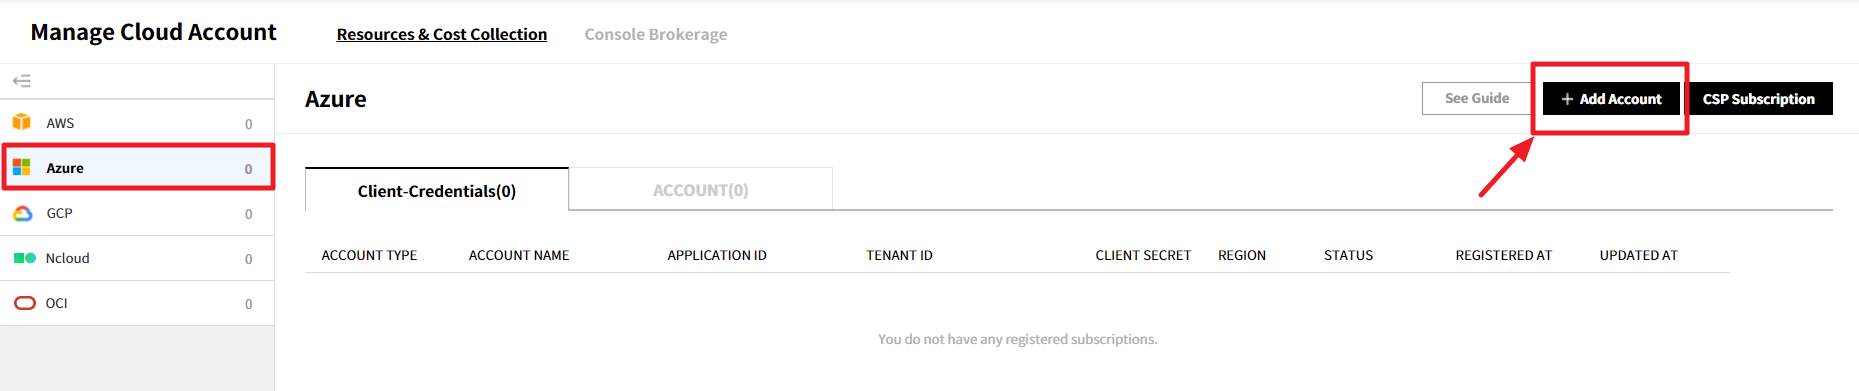
① In the Manage Cloud Account > Resources & Cost Collection menu, select Azure and Client-Credentials Tab and click the [+Add account] button.
② Select Azure Plan as the account type and enter the following information to register your account.
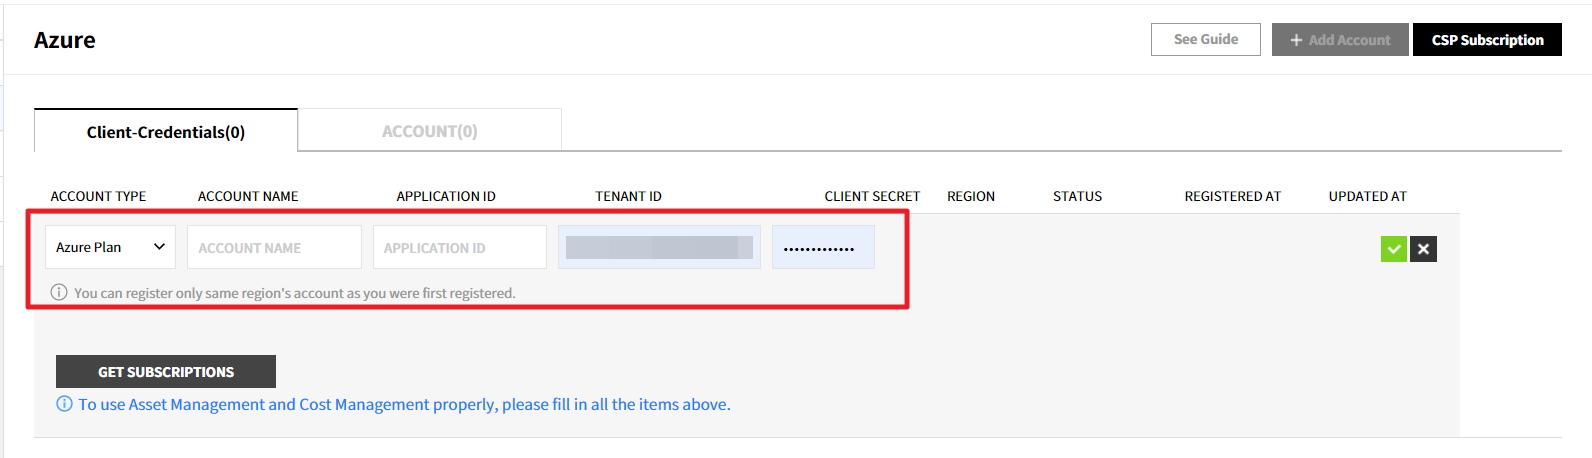
③ Click [Get Subscription] to get Azure subscription information. Click the save icon on the right to save.
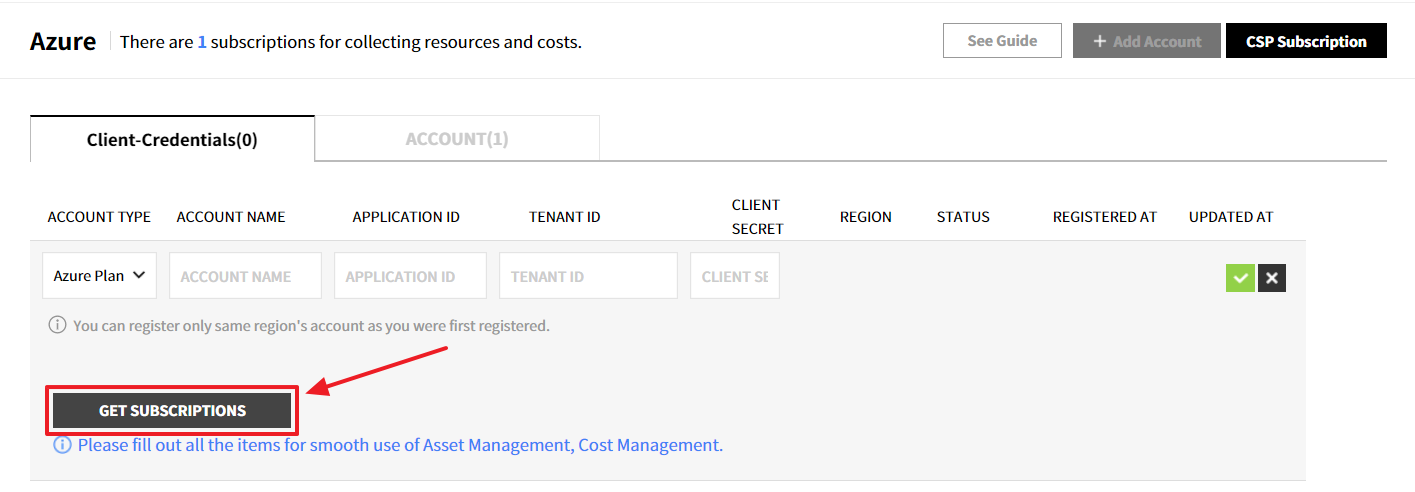
⚠️ Attention: You cannot register duplicate Azure subscriptions if it is already registered in our service.
④ Now you have completed registering Azure subscriptions using the Azure Client-Credentials information.
📜 Note
CSP and Web Direct can be registered the same way as Azure Plan registration.
Register with EA
① In the Manage Cloud Account > Resources & Cost Collection menu, select Azure and Client-Credentials Tab and click the [+Add account] button.
② Select Azure Plan as the account type and enter the following information to register your account including Enrollment and Token.
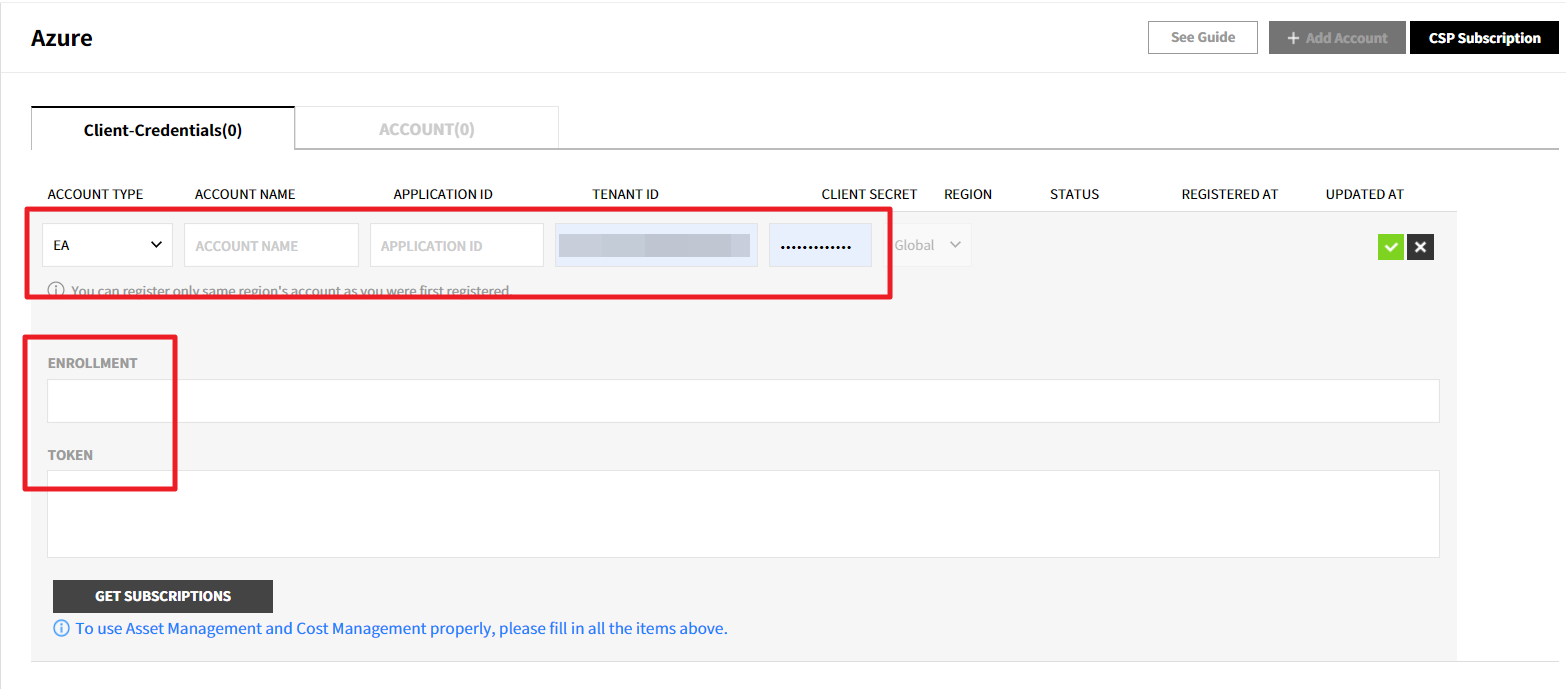
③ Click the GET SUBSCRIPTIONS button to retrieve Azure subscription information, and press the green check icon on the right to save.
Check enrollment (Billing Account ID) value
① Navigate to Cost Management + Billing >Billing scopes and select the account you want to add.
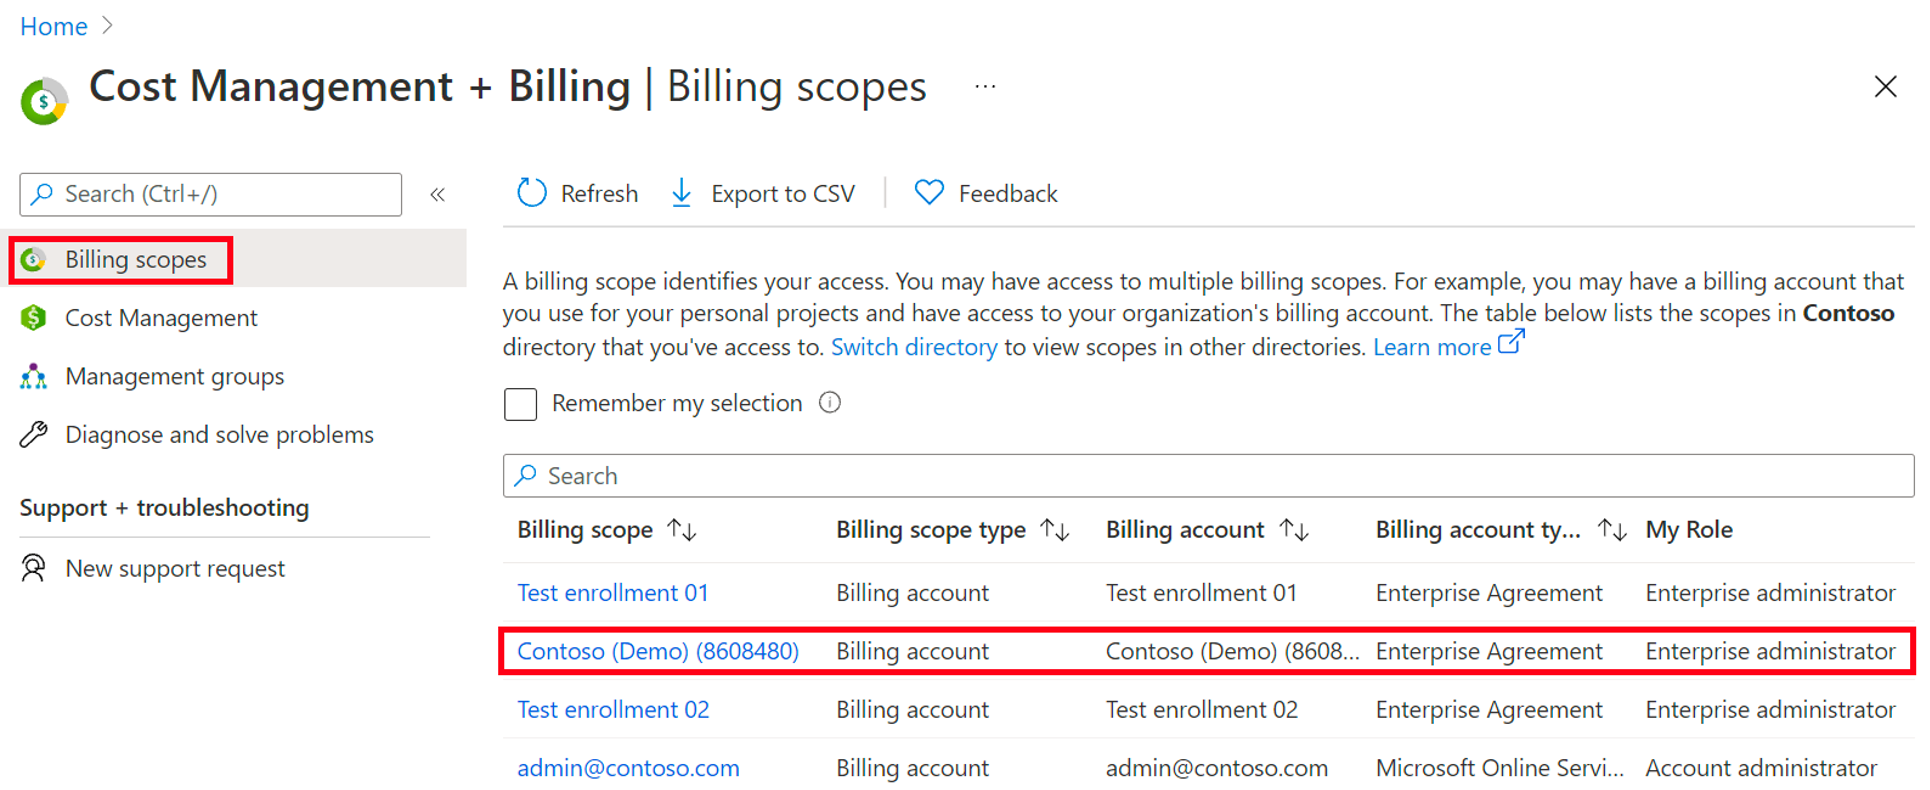
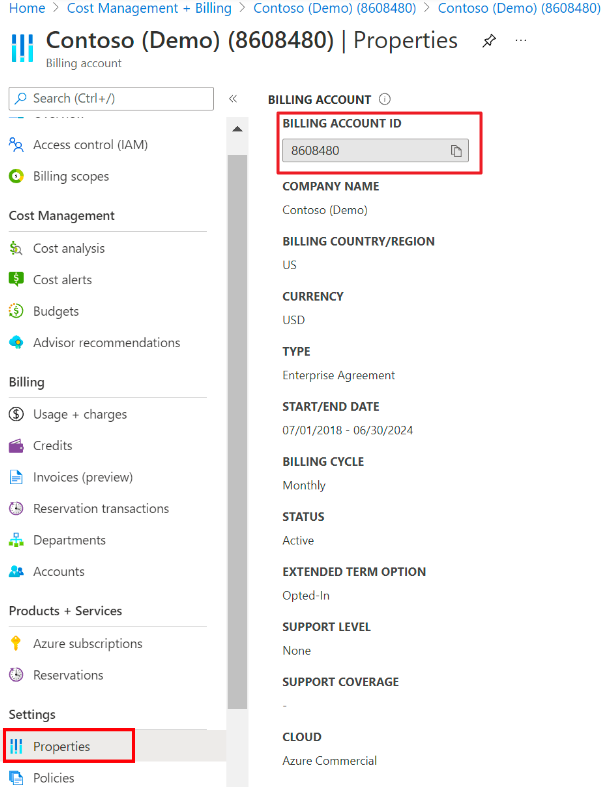
② On the left menu, choose Properties under Settings, then copy the BILLING ACCOUNT ID and paste it into the Enrollment field in the Client-Credentials tab.
Check primary key
① Navigate to Cost Management + Billing >Billing scopes and select the account you want to add.
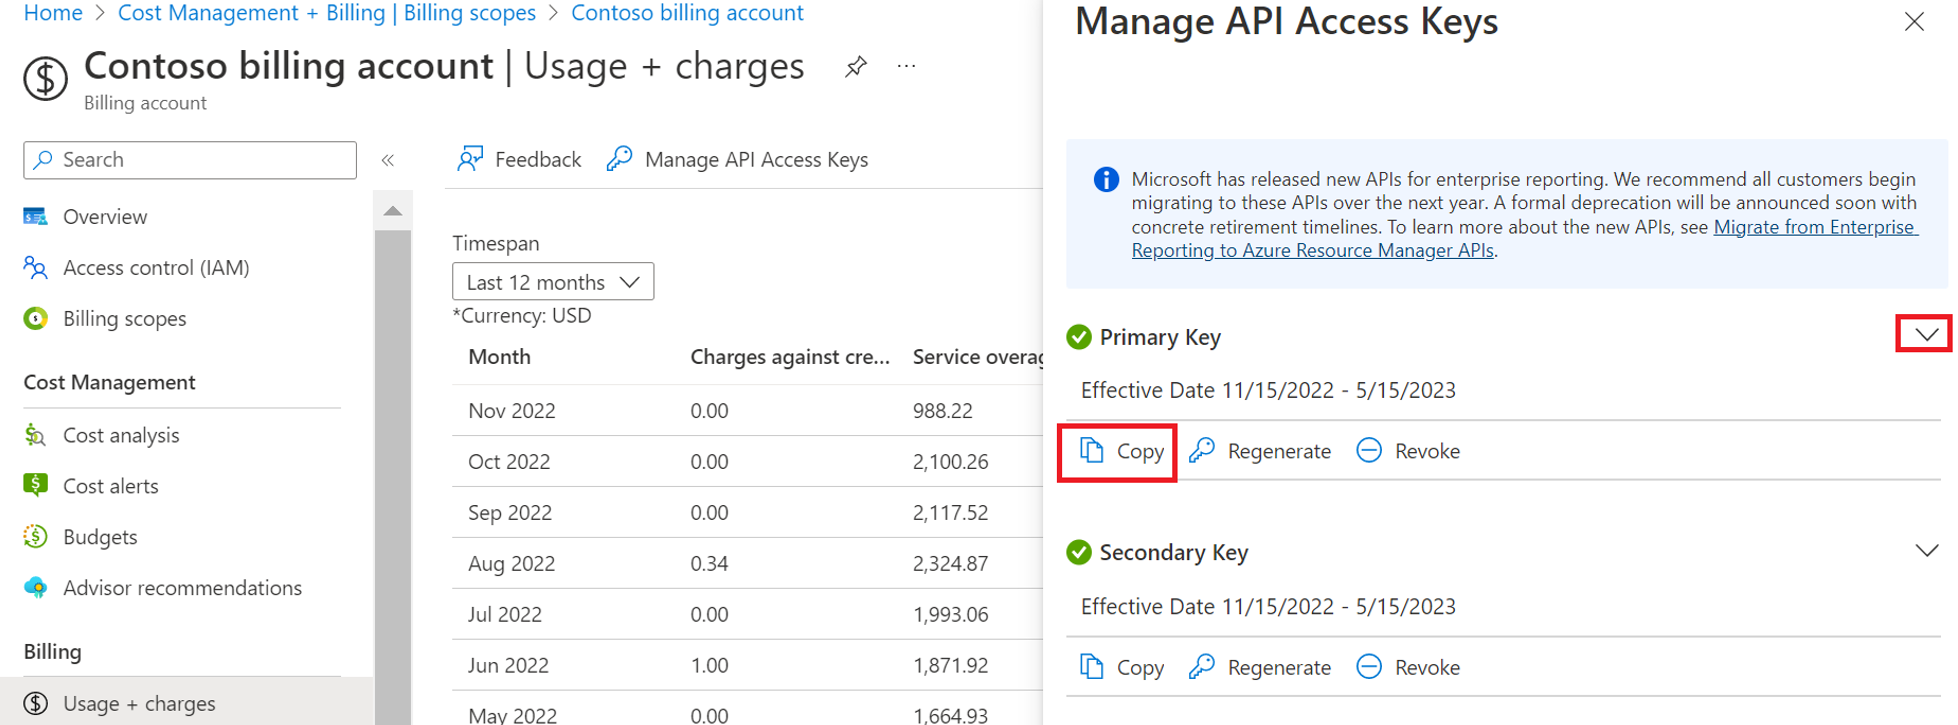
① Choose Usage + charges, and click the Manage API Access Keys button.
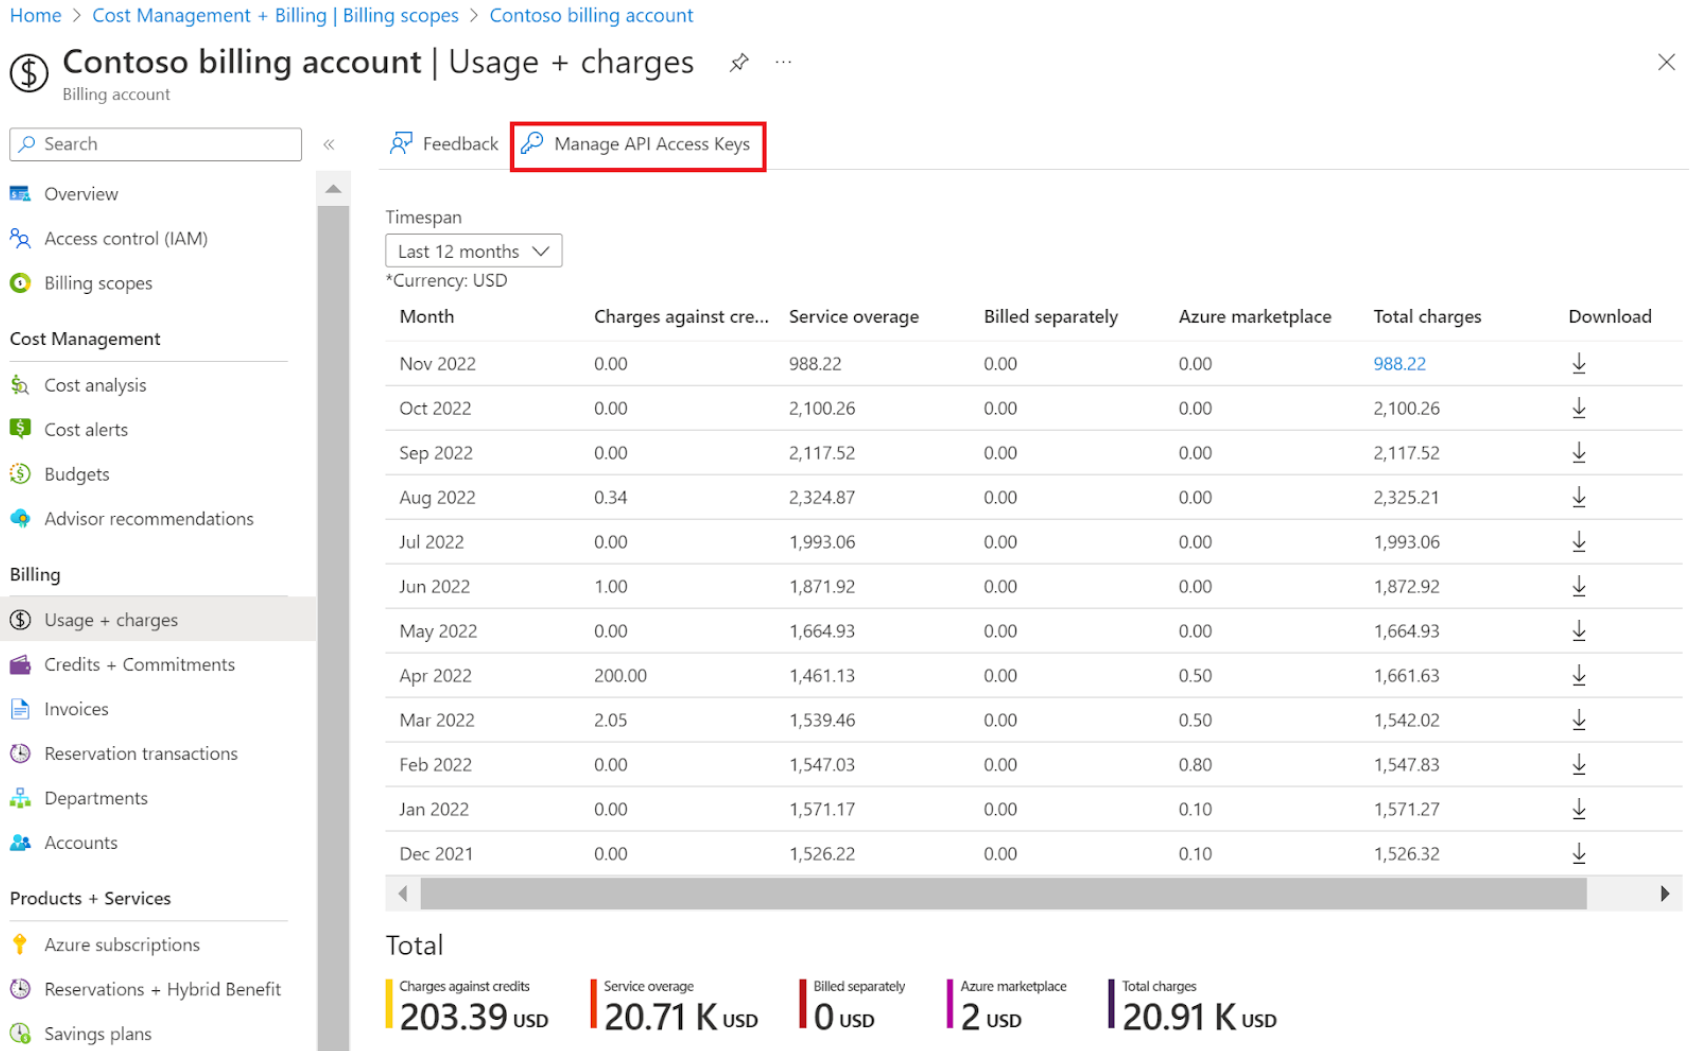
② Click the Copy button below Primary Key and paste it into the Primary Key field under the Client-Credentials tab.
Register with Azure Subscriptions Information
⚠️ Attention
If your Multi-Factor Authentication (MFA) is enabled in the Additional Security Setting of My Account setting, which can be found on your upper-right corner of the screen, this might cause inconveniences when you try to register an Azure subscription using Azure ID & Password information. Therefore, if you want to use MFA, we recommend you to add an Azure application on the Azure Portal and use that Client-Credentials information to register Azure subscriptions.
How to create user and grant permissions
The following explains how to create Azure users and grant permissions.
- Create a User
① In Azure Portal, go to Azure Active Directory service.
⚠️ Attention: For China Portal, some pages may look different from the global version.
② Under Manage, go to Users > All Users, select + New User.

③ While the Create user box is selected, enter the required information, User name and Name fields. Then, Password item will appear below.
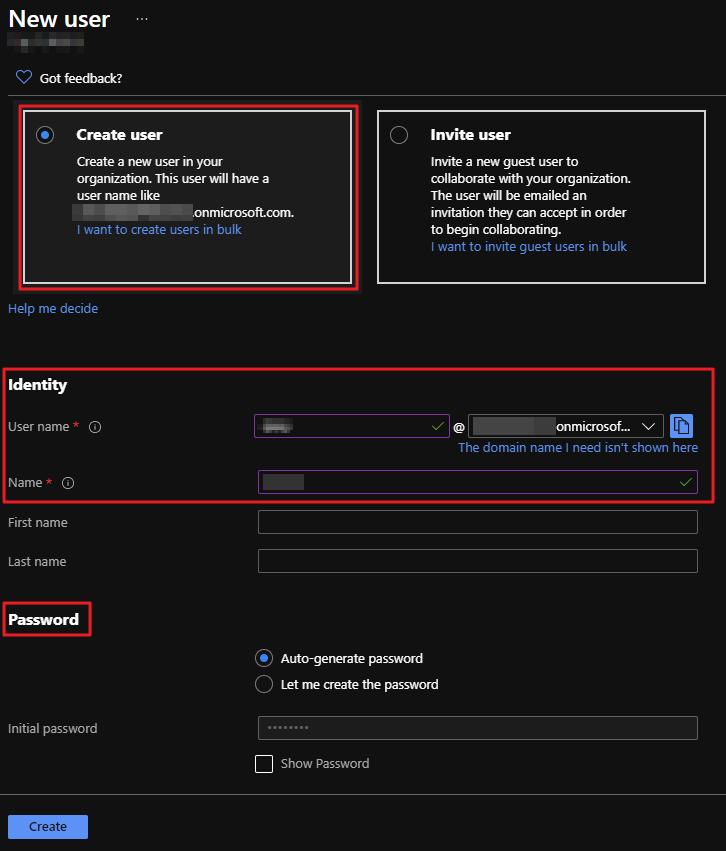
④ You can set your password from Auto-generate password and Let me create the password. If you select the Auto-generate password option, the password is auto-generated. Click Show Password checkbox to see the password and copy it to record the password.
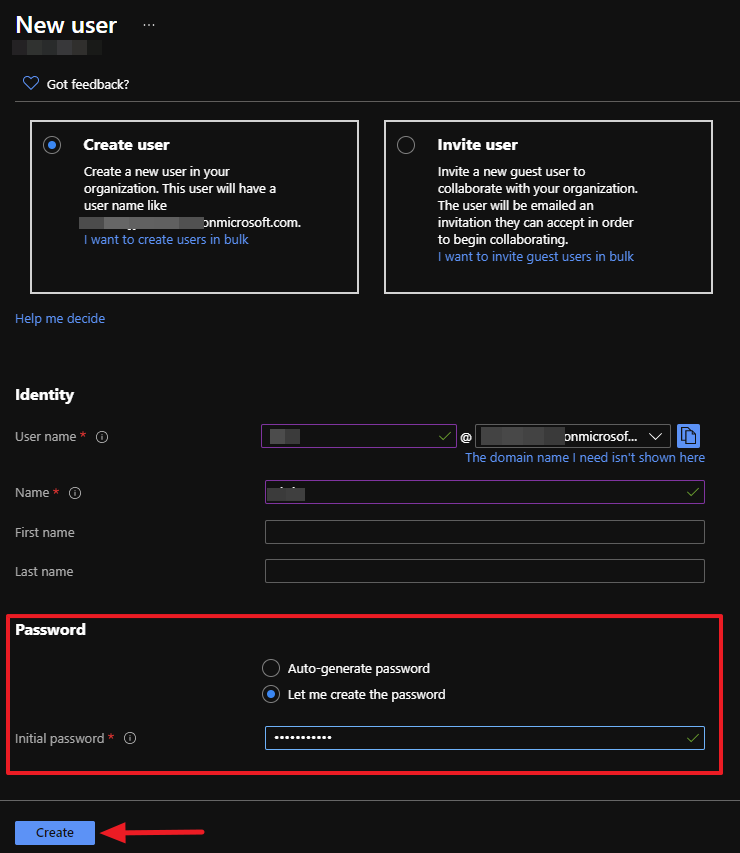
⑤ If you want to create your own password, select Let me create the password and enter the desired password. Review the entered information once again and then click the [Create] button.
⑥ You must change your password after the initial login.
- Set Permissions
① In Azure Portal, go to Subscriptions service.
② Select a subscription that you want to grant permissions.
③ In Access Control (IAM), click the [+ Add] and select Add role assignment. Select Reader in the Role field.
④ For setting permissions, items and descriptions are as follows:
| Item | Description |
|---|---|
| Role | Selecting at least a Reader role is recommended. Azure provides descriptions for each role with tooltips. Reader can view all resources, but is not allowed to make any changes. |
| Assign access to | Select the type of security principal to assign the role to. |
| Select | Search or enter the name of the user you just created. |
⑤ Click Save button to add permissions.
How to get Azure subscription using Azure account information
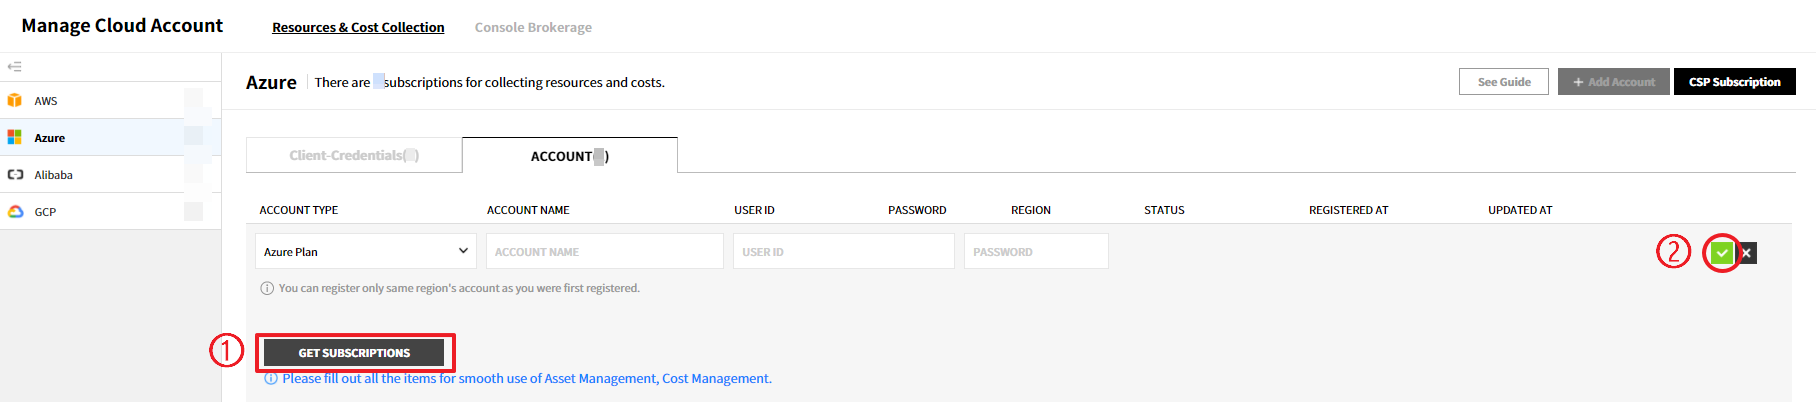
① In Cloud Account > Resources & Cost Collection menu, Select Azure and click the Account tab. Click [+Add Account] button.

② Enter or select the required information such as Account Type, Account Name, User ID, and Password.
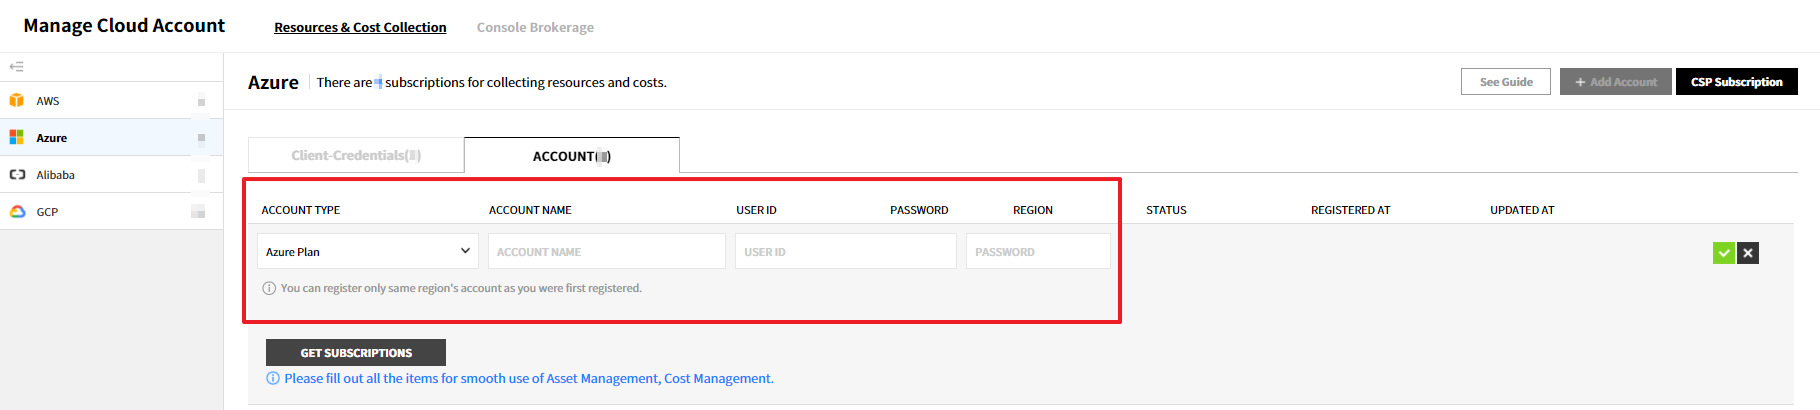
③ Click Get Subscription button to get Azure subscription information and select the subscription to add. Click the green check icon on the right to save information.
⚠️ Attention: You cannot register duplicate Azure subscriptions if it is already registered in our service.
④ Now you have completed registering Azure subscriptions using the Azure ID and Password information.
Video Demo: How to Register Azure Subscriptions
Register GCP Projects
This section explains how to add GCP Projects on the Service Portal. First, you need to create a GCP service account key, which is the private key, in the GCP Console, and then add the GCP Projects on the Service Portal.
Create Private Key on GCP Console
Follow the steps below to create a service account key, which is the private key, on the GCP Console.
📜 Note
If you need to create a private key of the GCP Organization, the key creation procedure may not be the same as the general one. In this case, please ask your GCP account manager for more details.
- Enable Cloud Resource Manager API
- Enable Stackdriver Monitoring API
- Create Service Account and Copy Info
- Grant Permission to Service Account
- Create Service Account Key File
Enable Cloud Resource Manager API
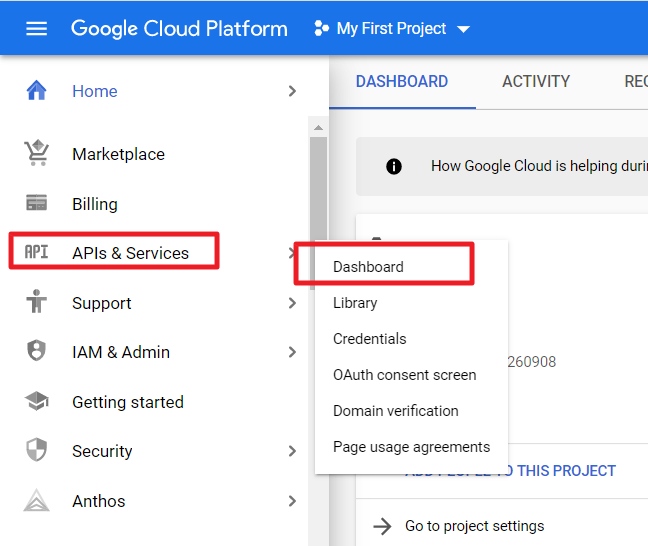
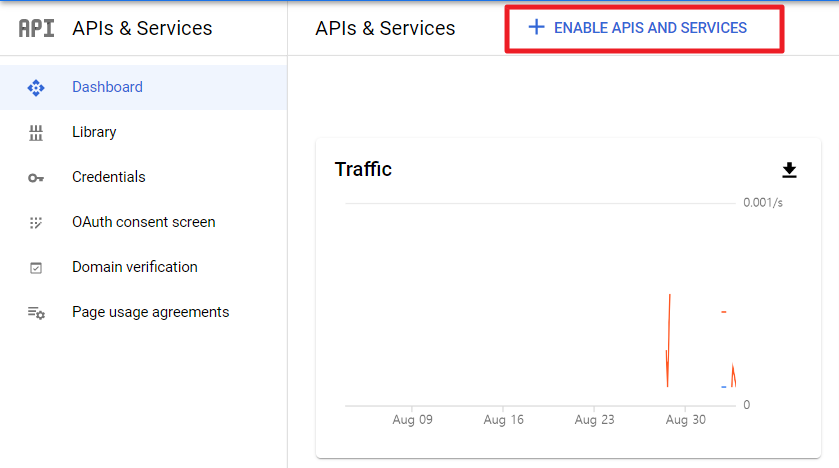
① Go to APIs & Services > Dashboard on GCP Console and click the + ENABLE APIS AND SERVICES.
② Search for Cloud Resource Manager API from the search box at the top of the page. Select the API, and then click the ENABLE button.
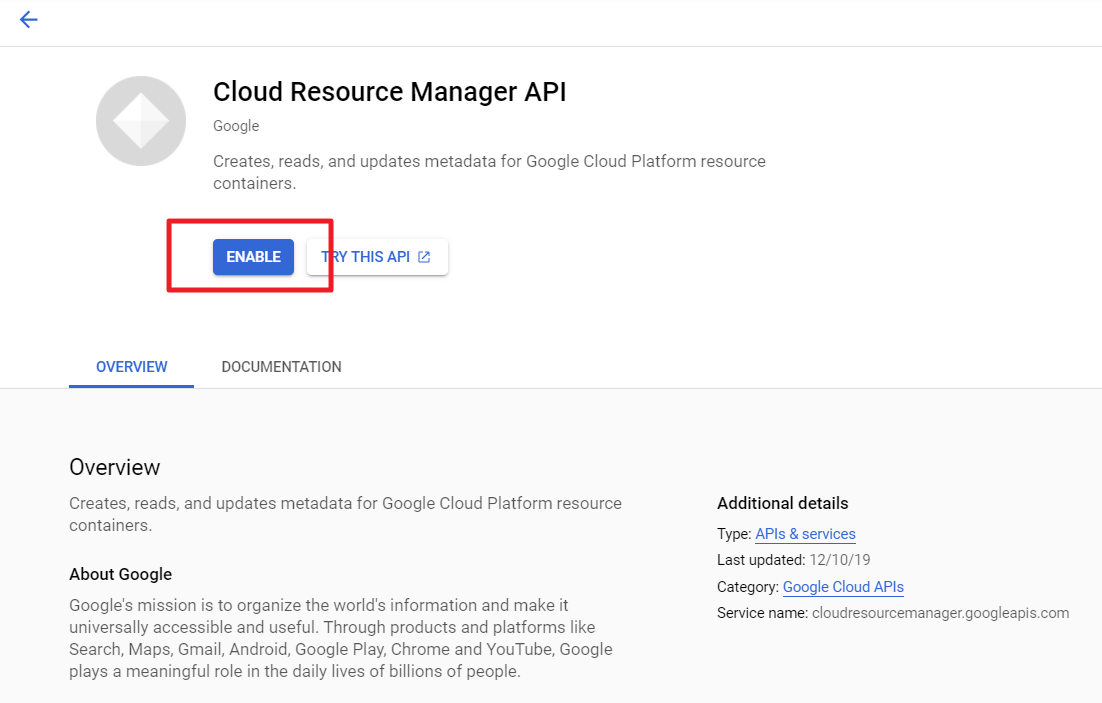
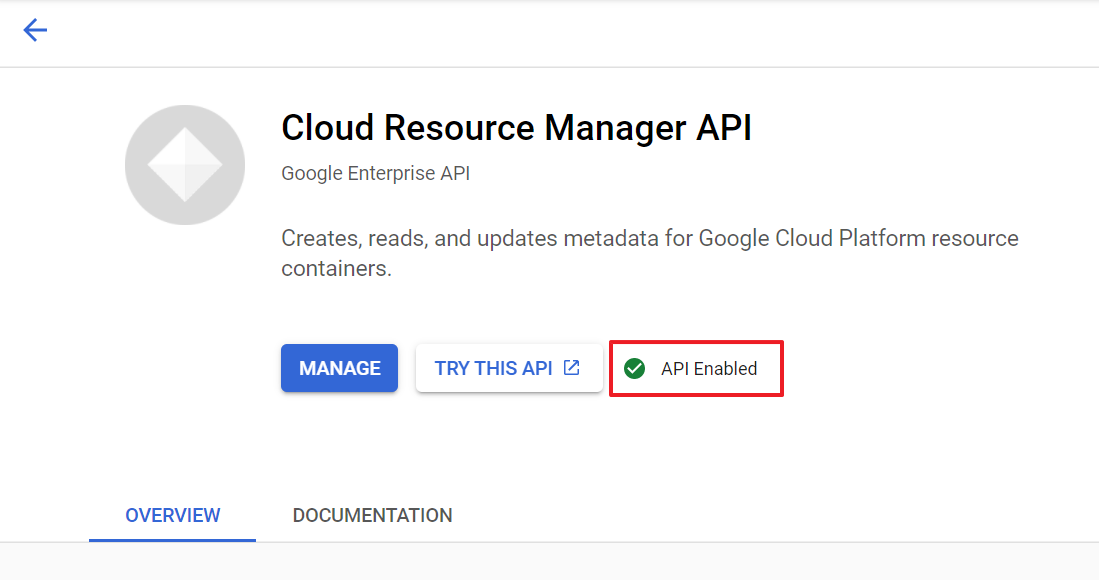
③ See if the Cloud Resource Manager API is enabled.
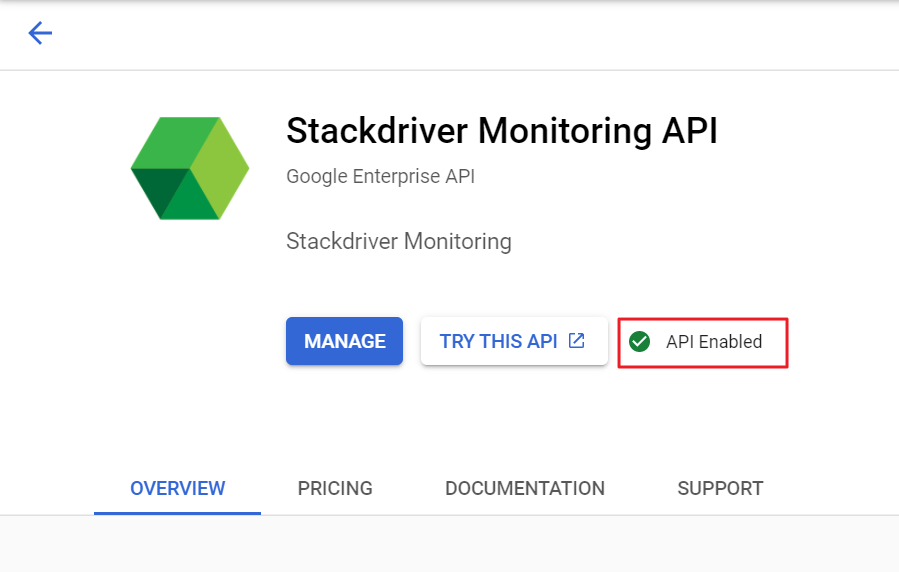
Enable Stackdriver Monitoring API
① Go back to the API Library page and search for Stackdriver Monitoring API.
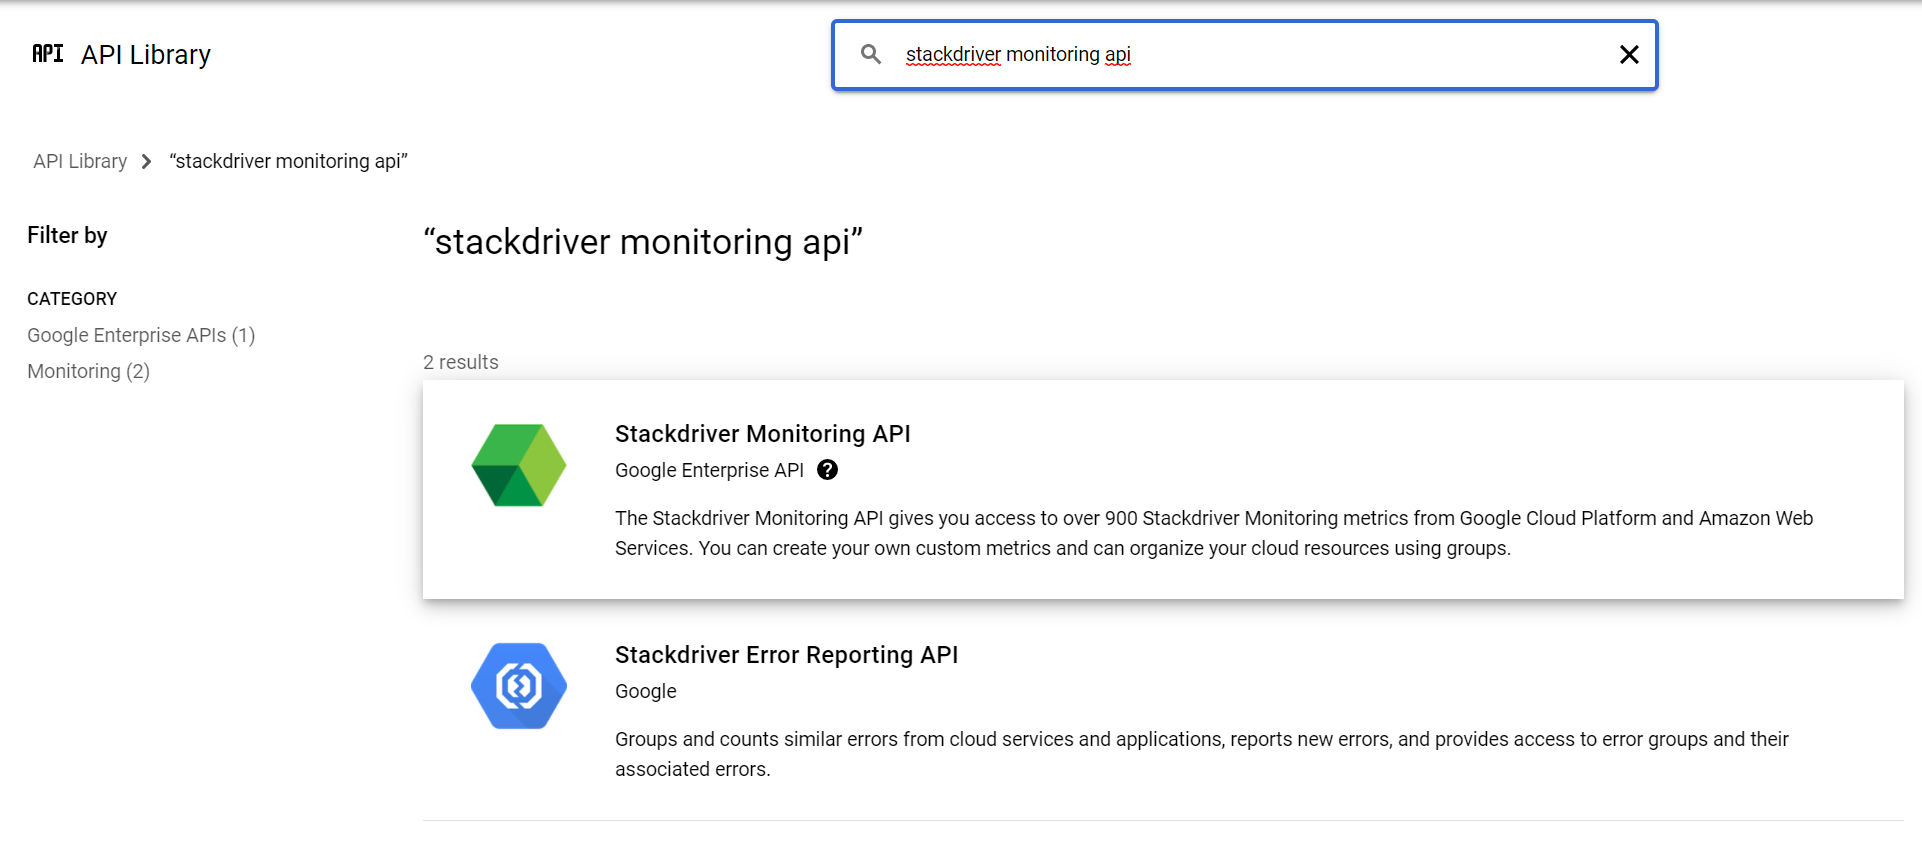
② Select this API and click the ENABLE button.
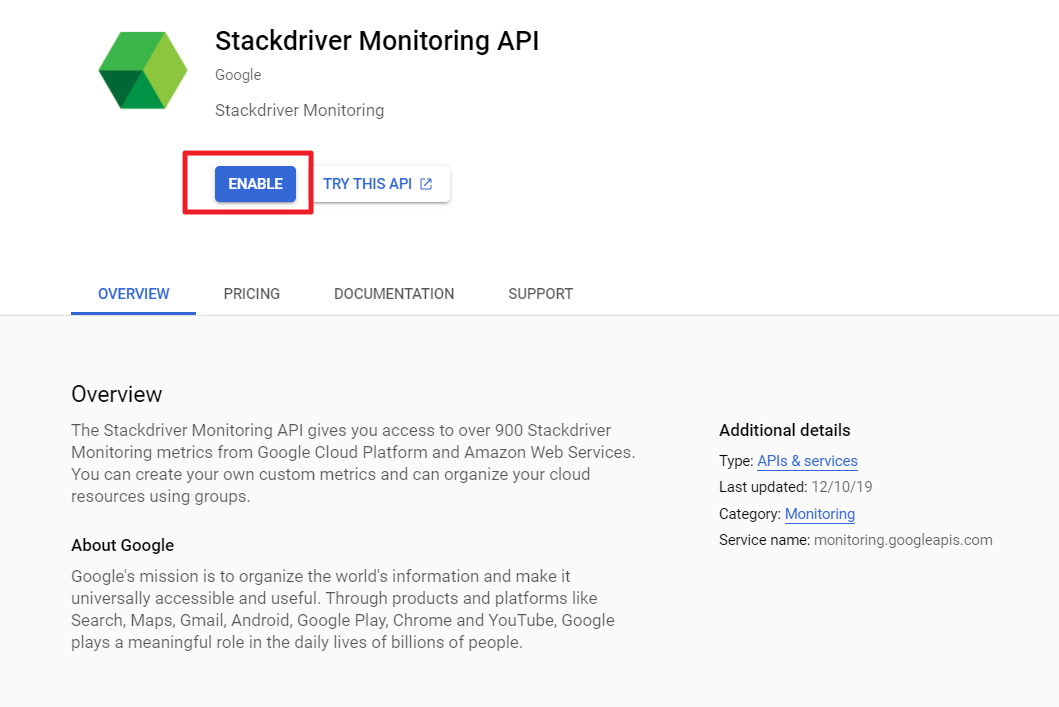
③ See if the Stackdriver Monitoring API is enabled.
Create Service Account and Copy Info
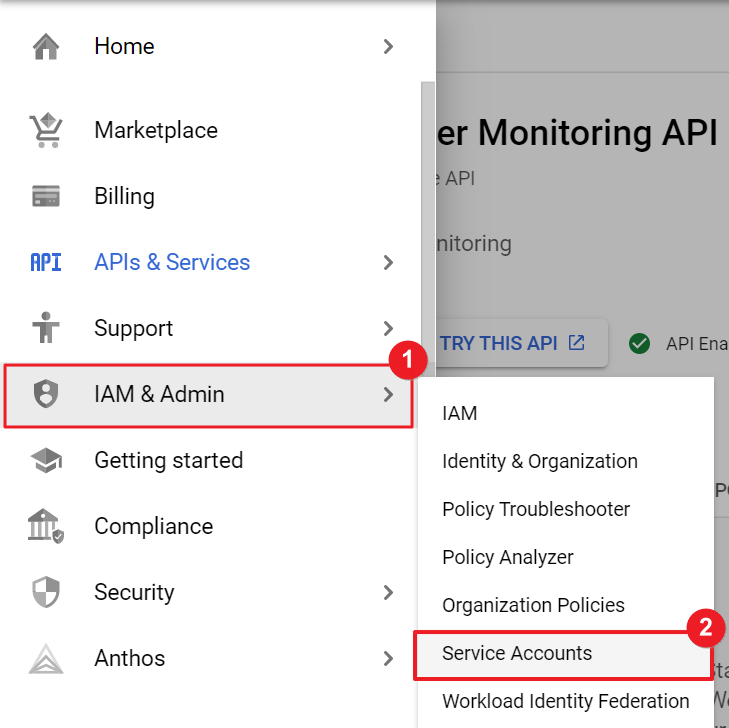
① Go to IAM & Admin > Service Accounts on GCP Console.
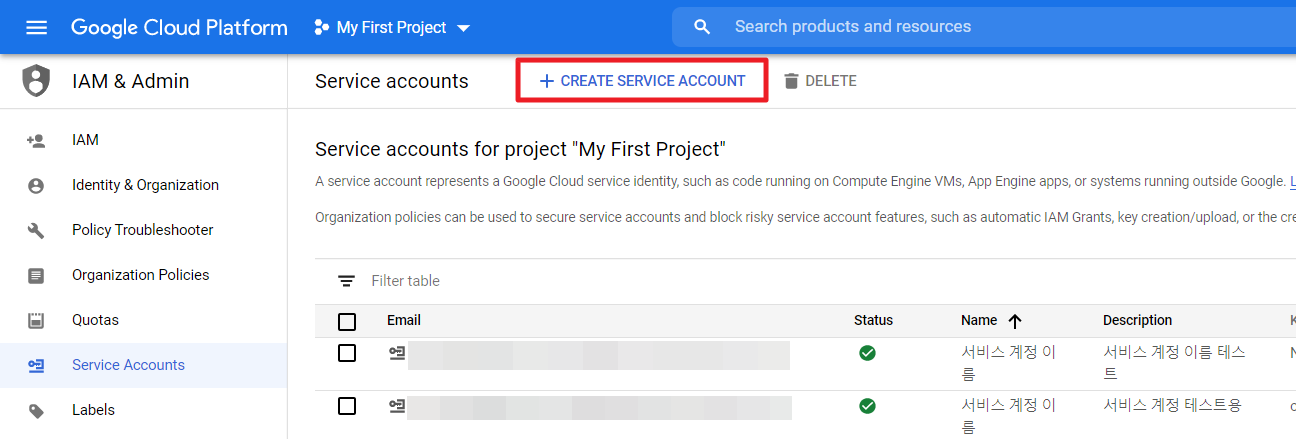
② Click the + CREATE SERVICE ACCOUNT.
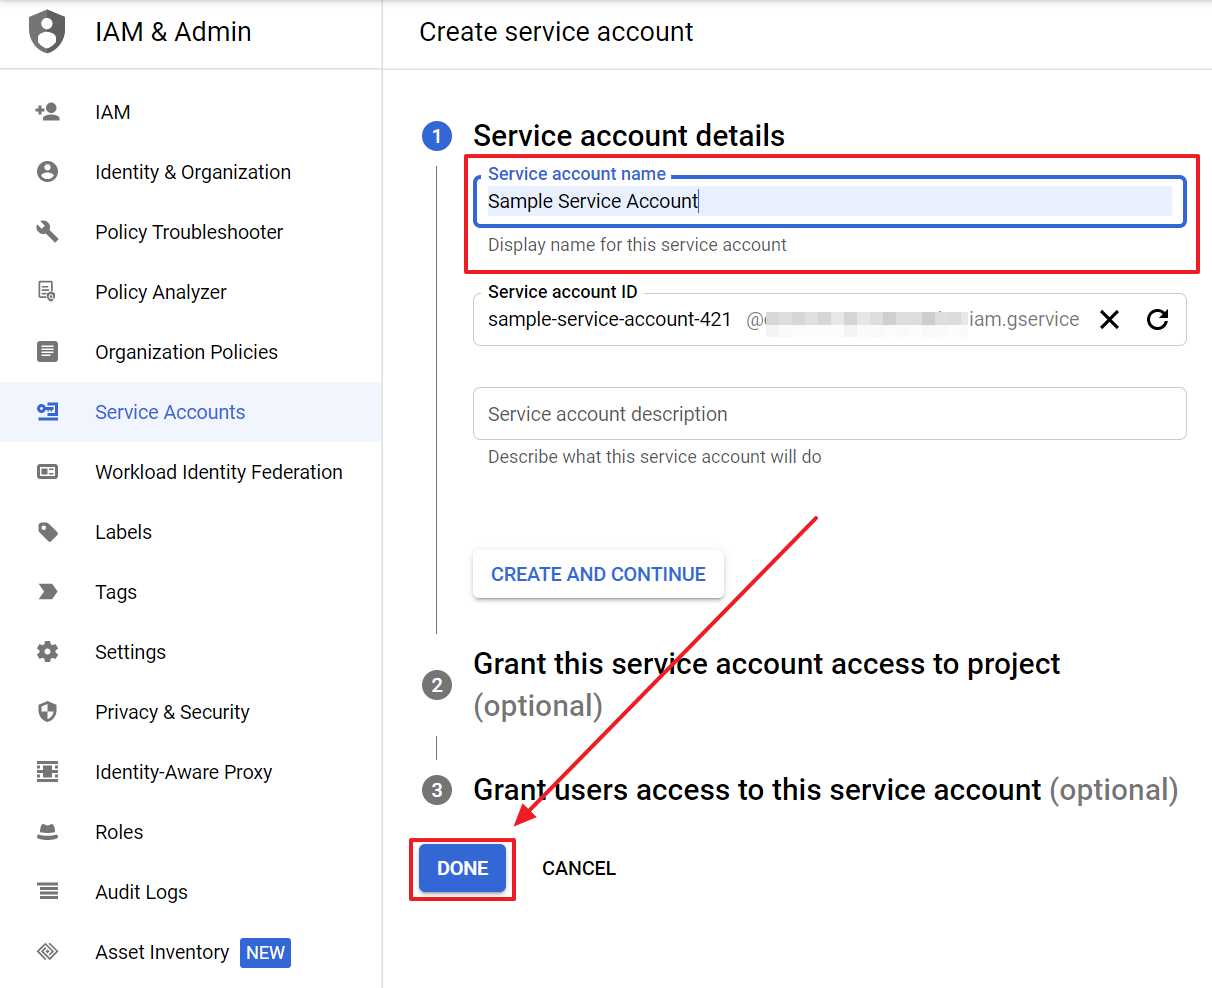
③ Enter a private key name in the Service account name field and click the DONE button.
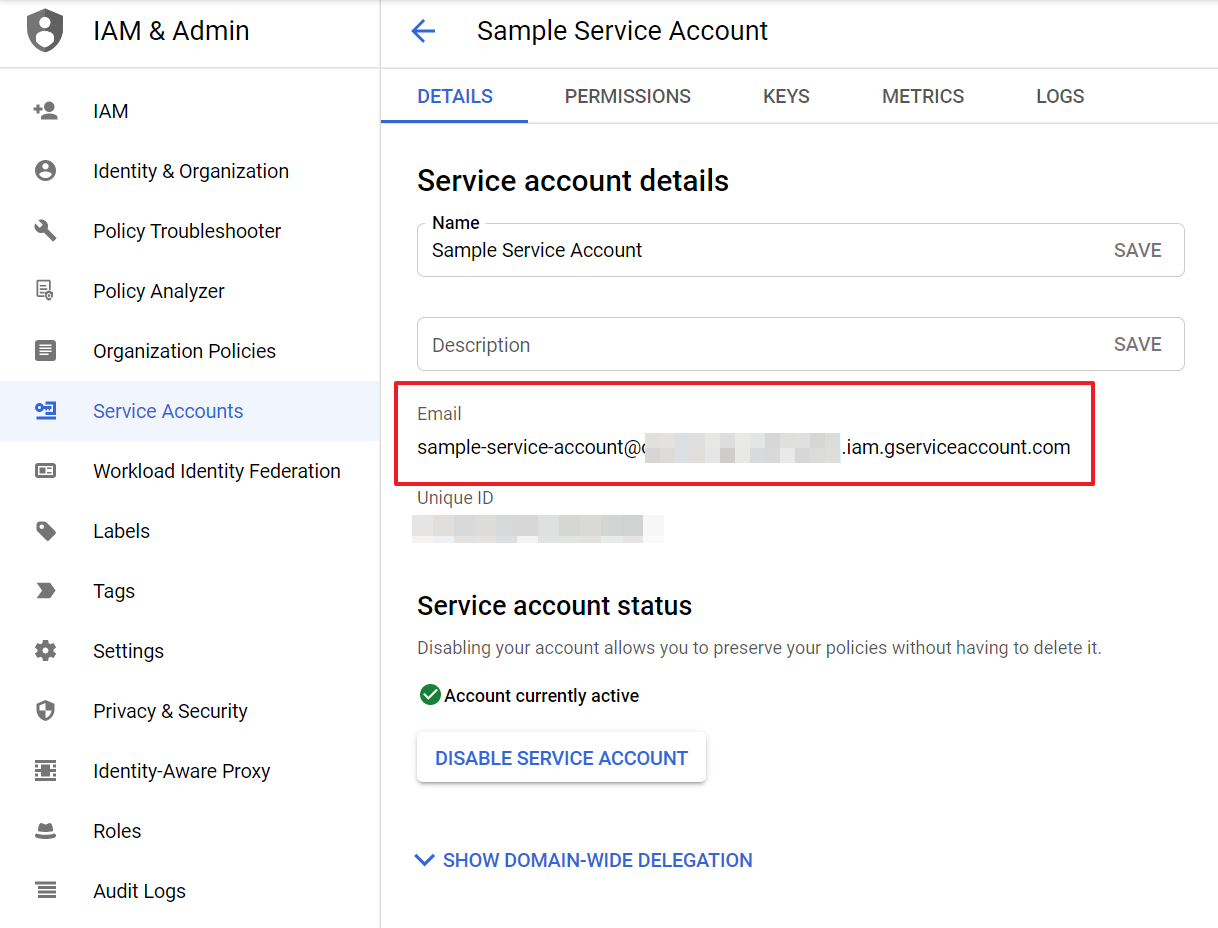
④ Click the newly created service account email.
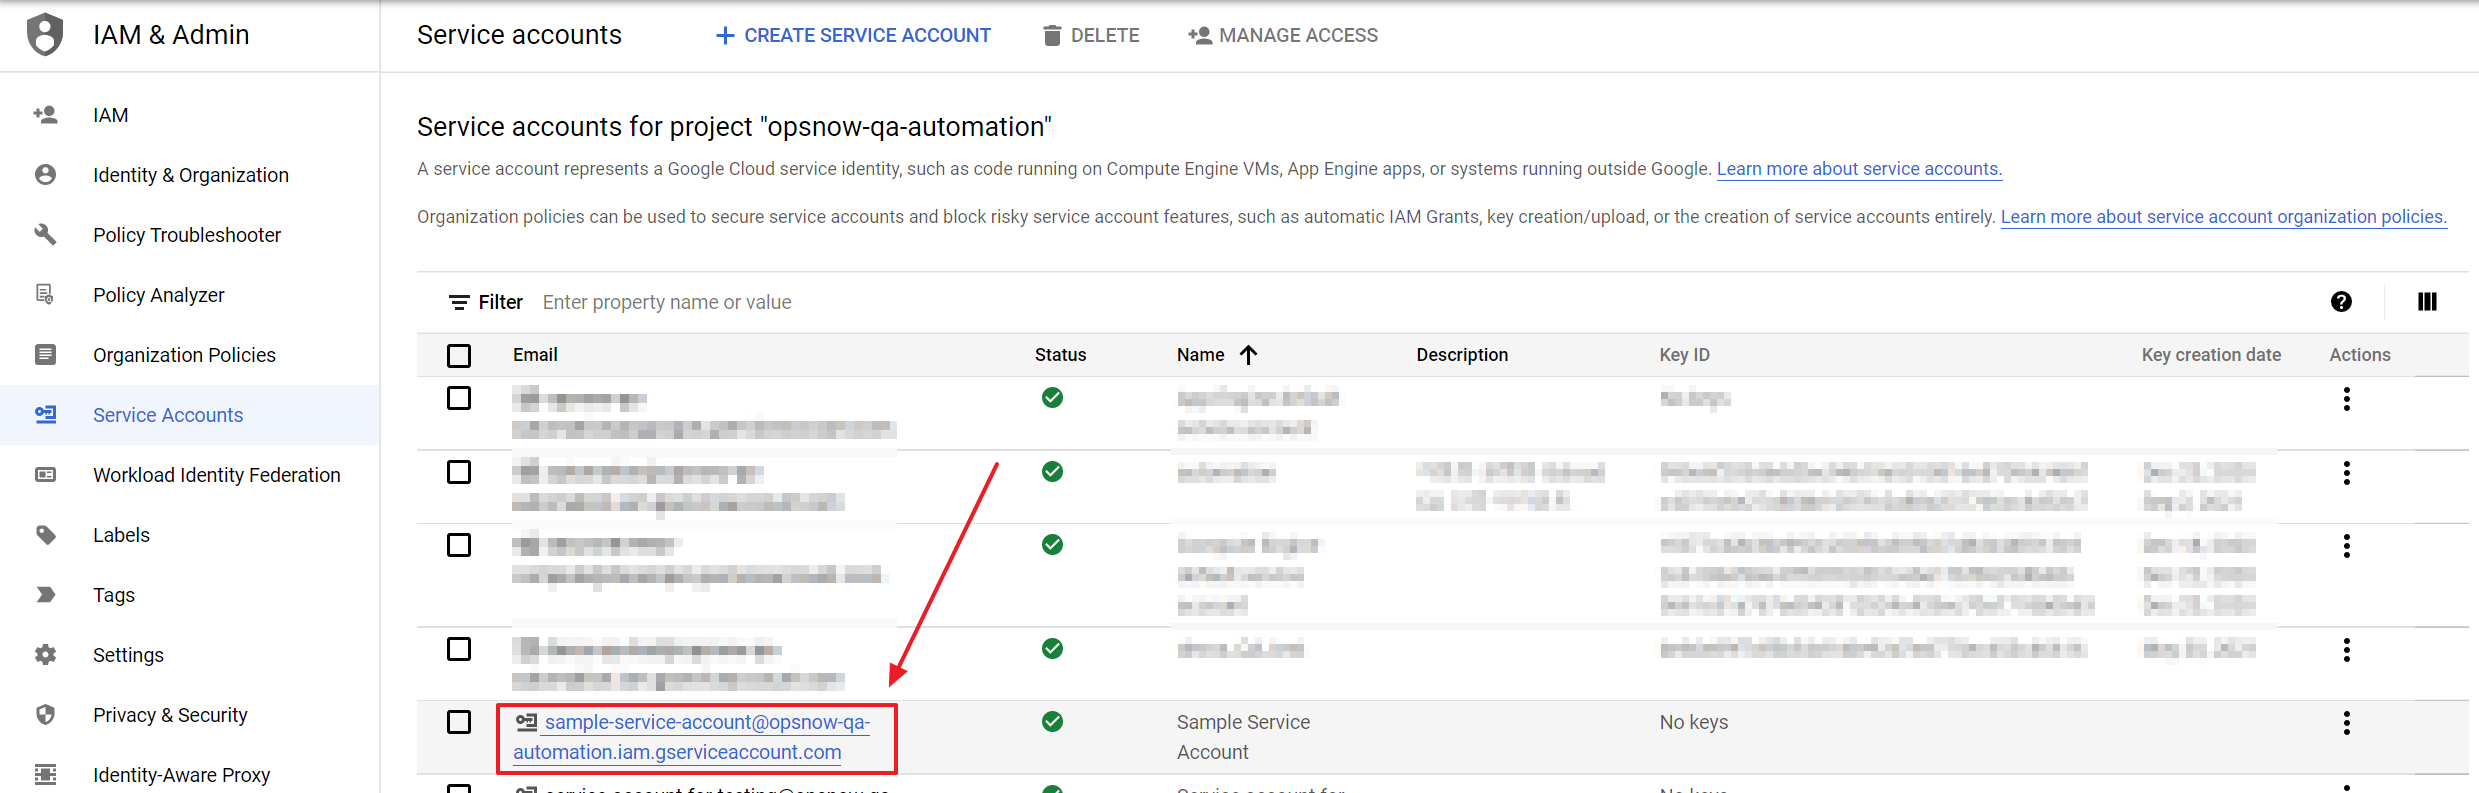
⑤ Check the Email of the service account. You will need this email address when you grant permissions to this service account. Copy and record it for future use.
Grant Permission to Service Account
① Click the Manage Resources, located on the lower left on the IAM & Admin page.
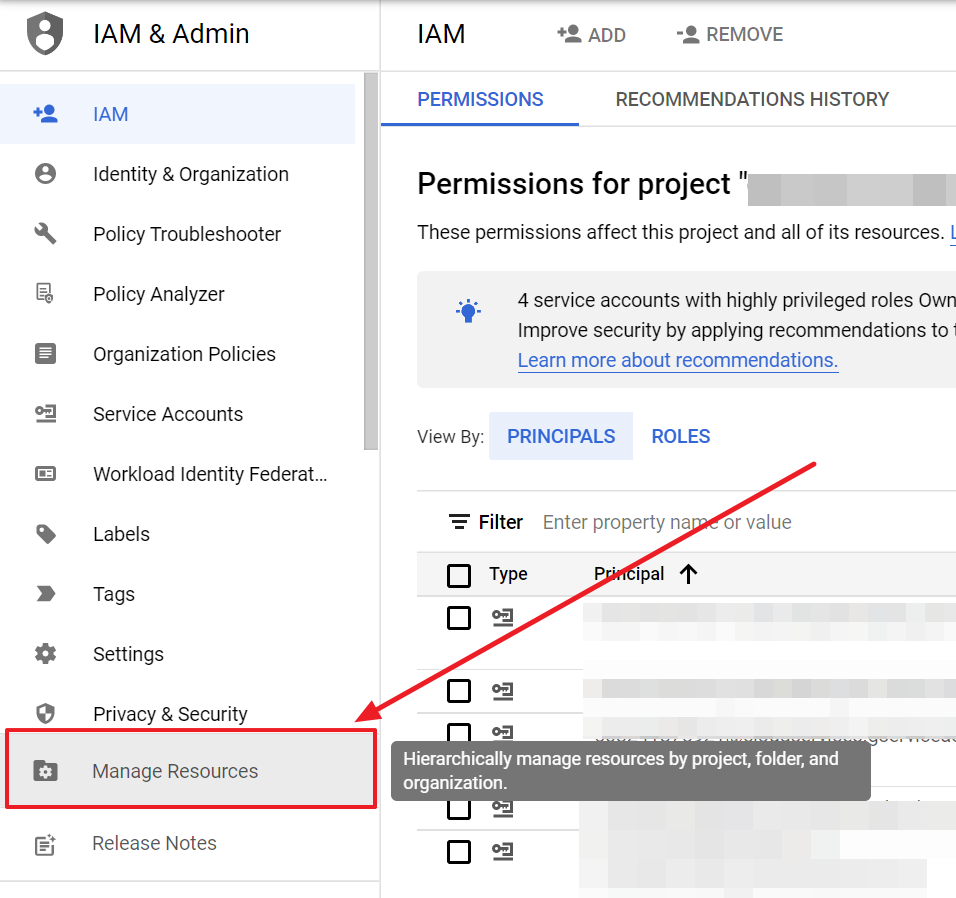
② Select projects that you want to grant permissions.
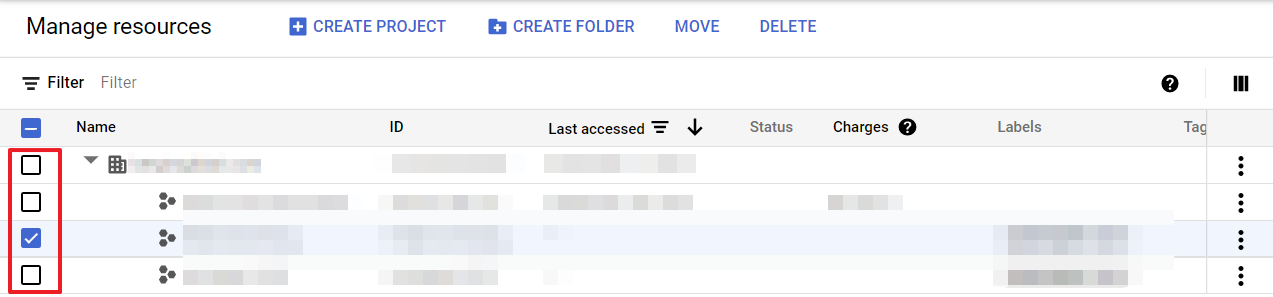
📜 Note: If you have set up GCP Organizations, select the organization or the projects under the organization. If there is no organization, then select projects only.
③ Click the ADD MEMBER button on the right side.
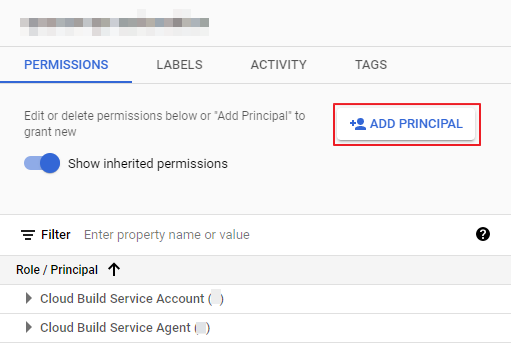
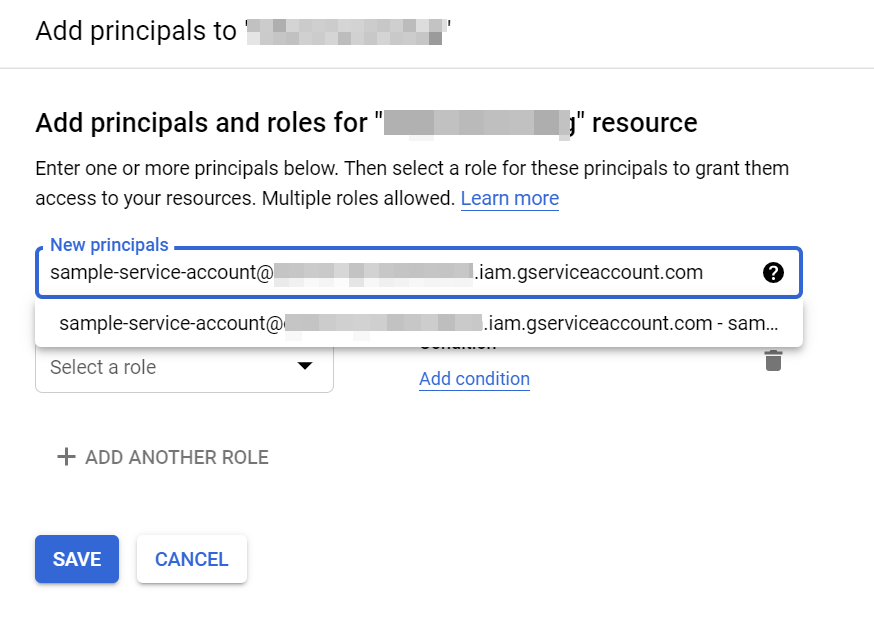
④ Paste the email address that you copied earlier in the Create Service Account step into the New principals field.
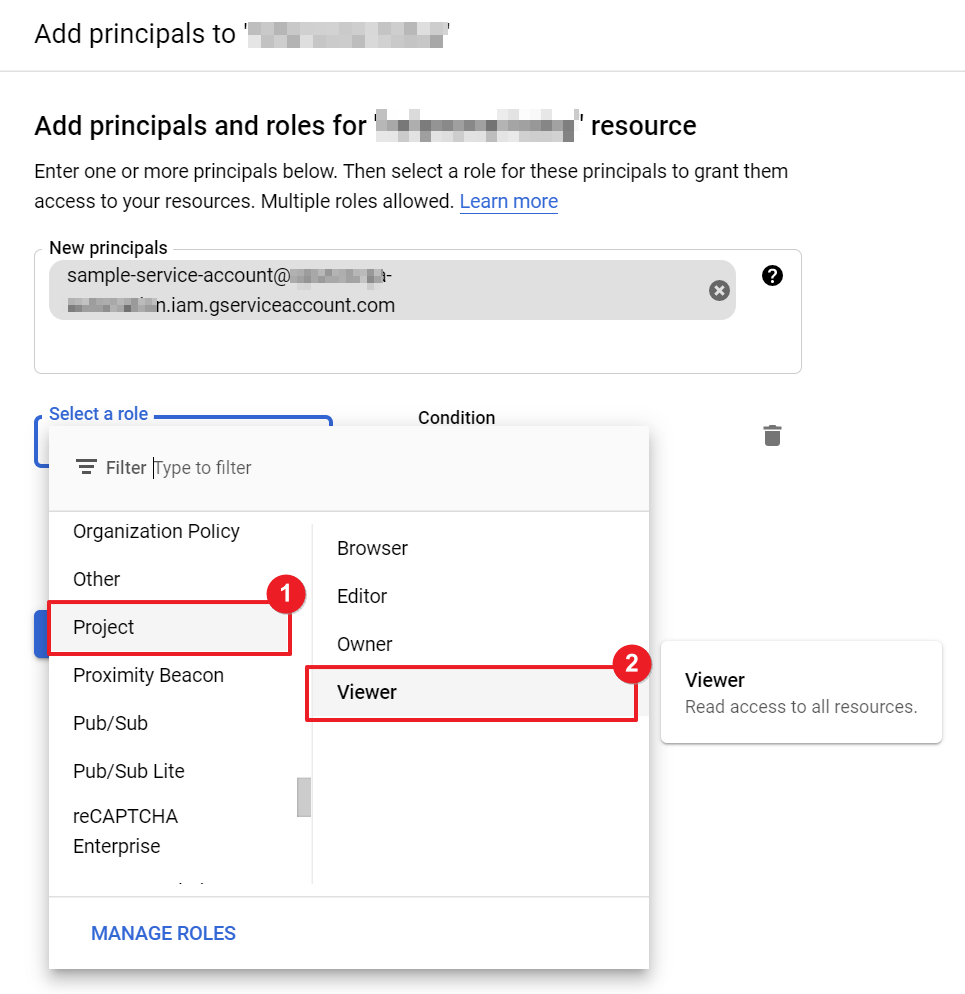
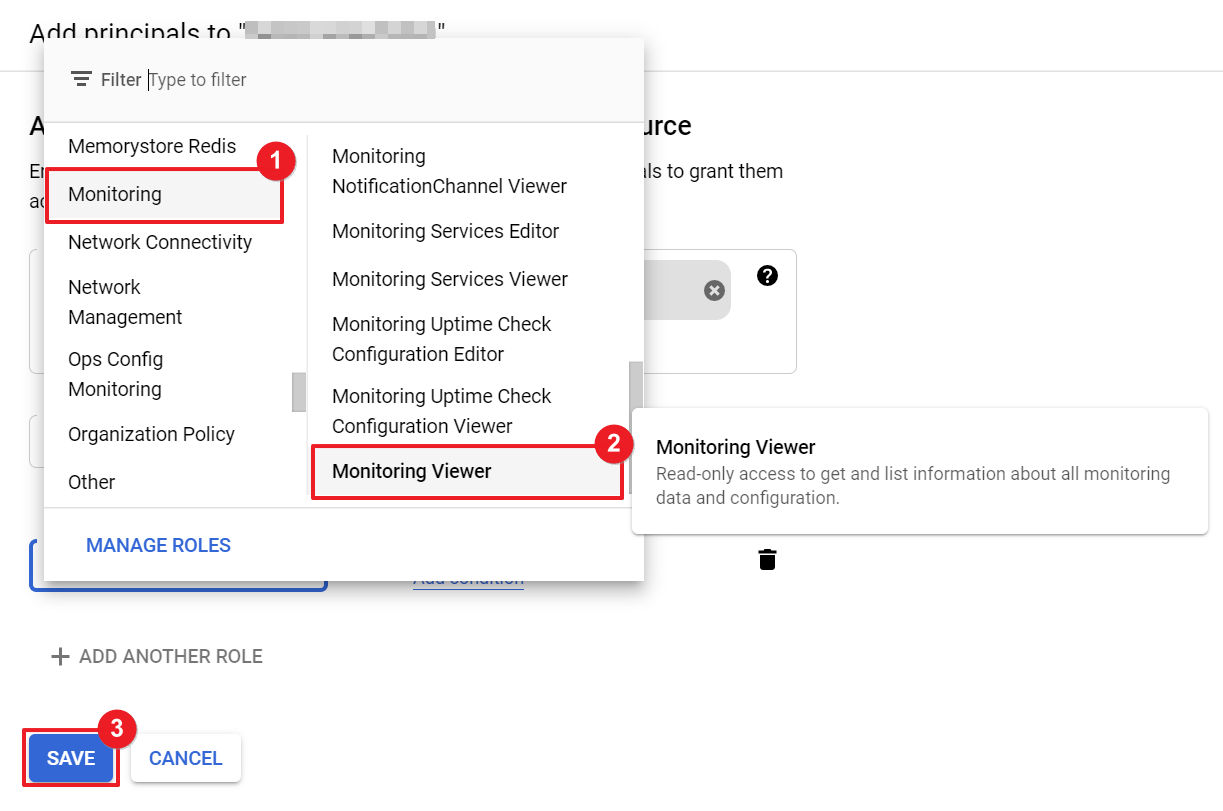
⑤ Click the Select a role drop-down menu, scroll down or search for Project > Viewer and select, and click the + ADD ANOTHER ROLE to select Monitoring > Monitoring Viewer. Click the Save button to grant access to the resources.
Create Service Account Key File
① Click the Service Accounts menu on the IAM & Admin page under GCP Console.

② Select the service account that you want to make a service account key. Click the the three-dotted kebab menu under the Actions column, and click the Manage keys.
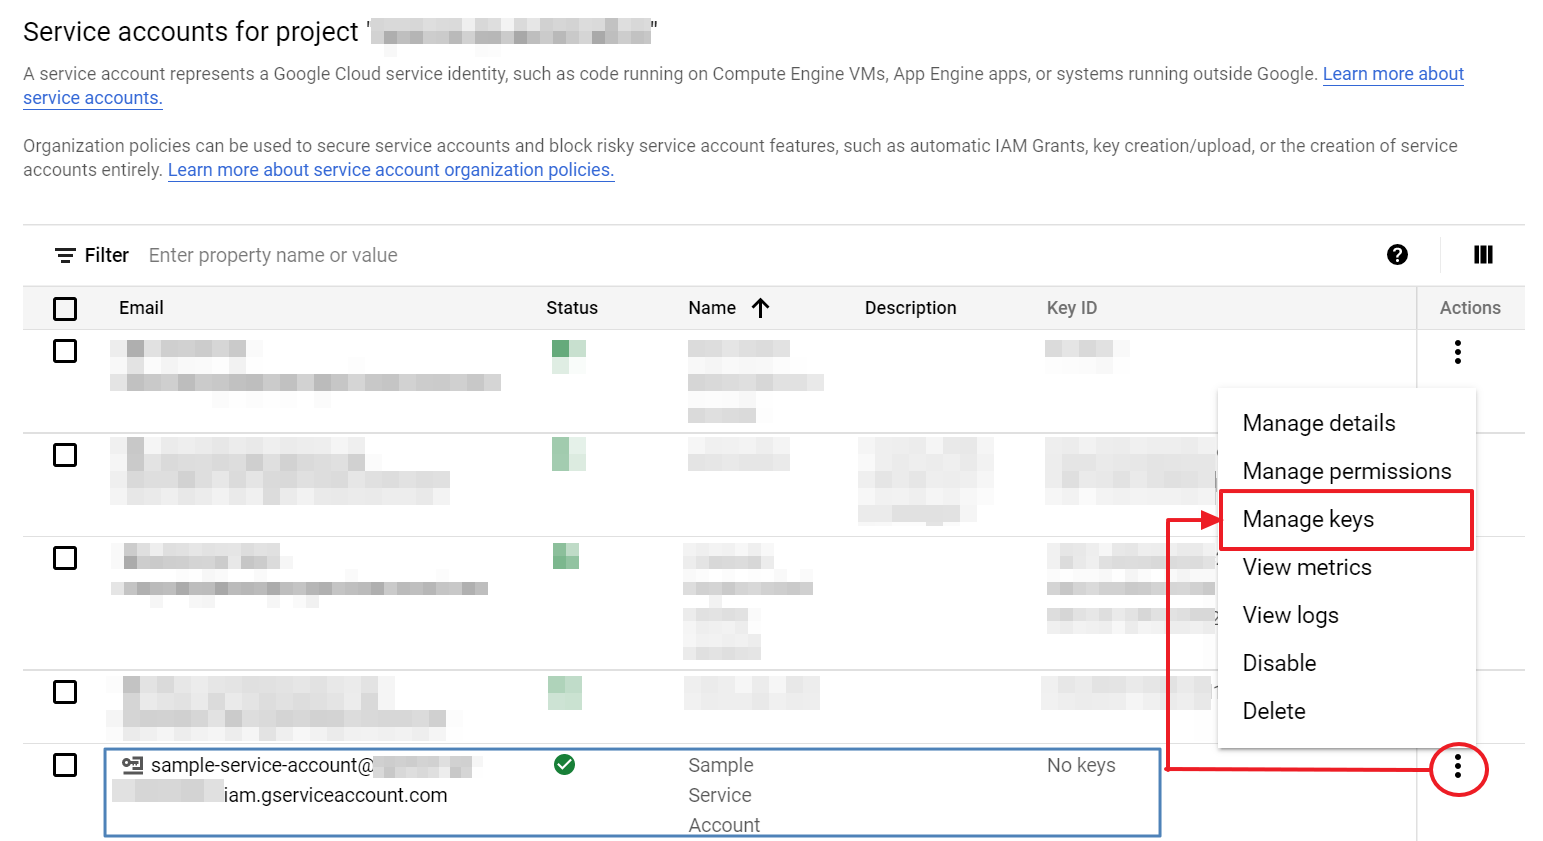
③ Click the ADD KEY button and select Create new key from the drop-down menu.
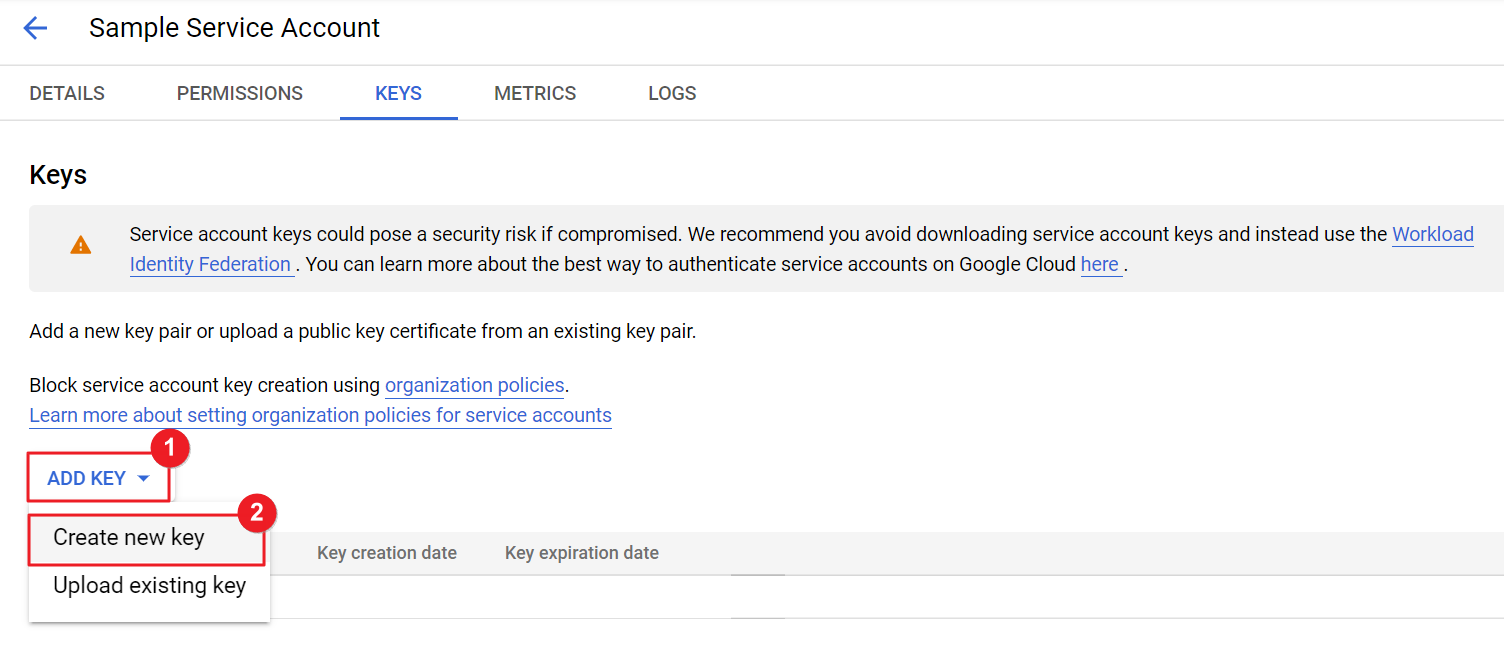
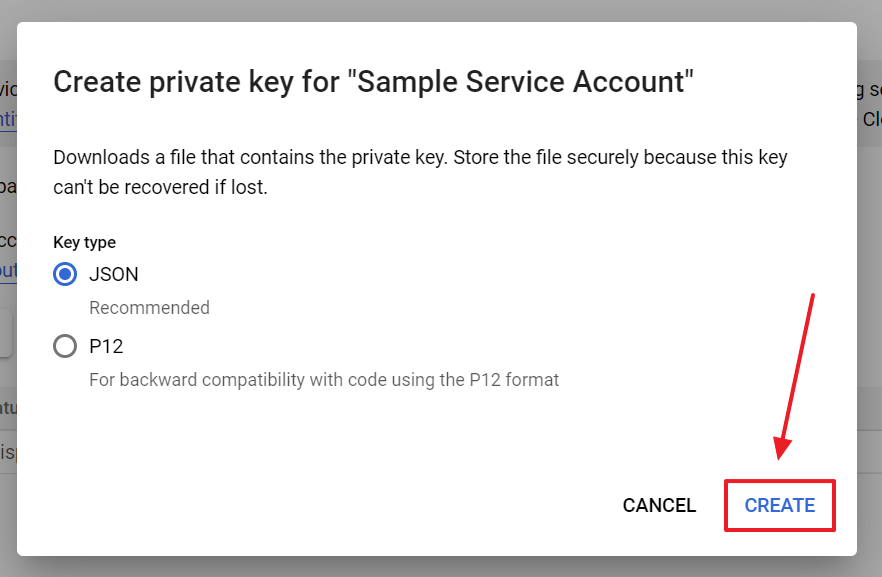
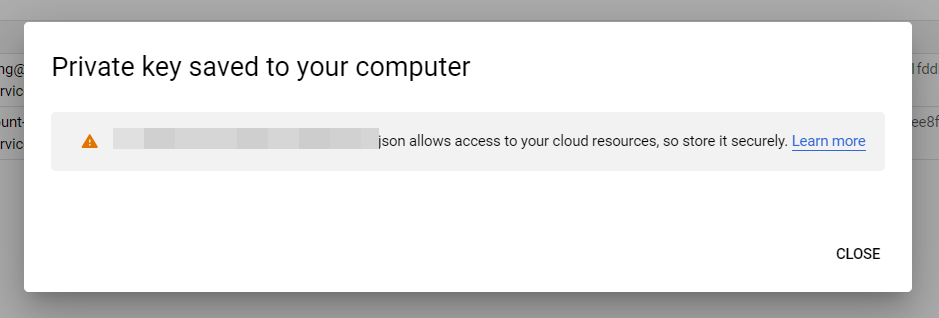
④ Select JSON for the Key type and click the CREATE button. The Private key is saved to your local computer.
Upload Private Key on Service Portal
Now, come back to Service Portal from GCP Console and upload the newly created private key to add GCP projects.
① Go to Service Portal > Cloud Account > Resources & Cost Collection menu and select GCP.
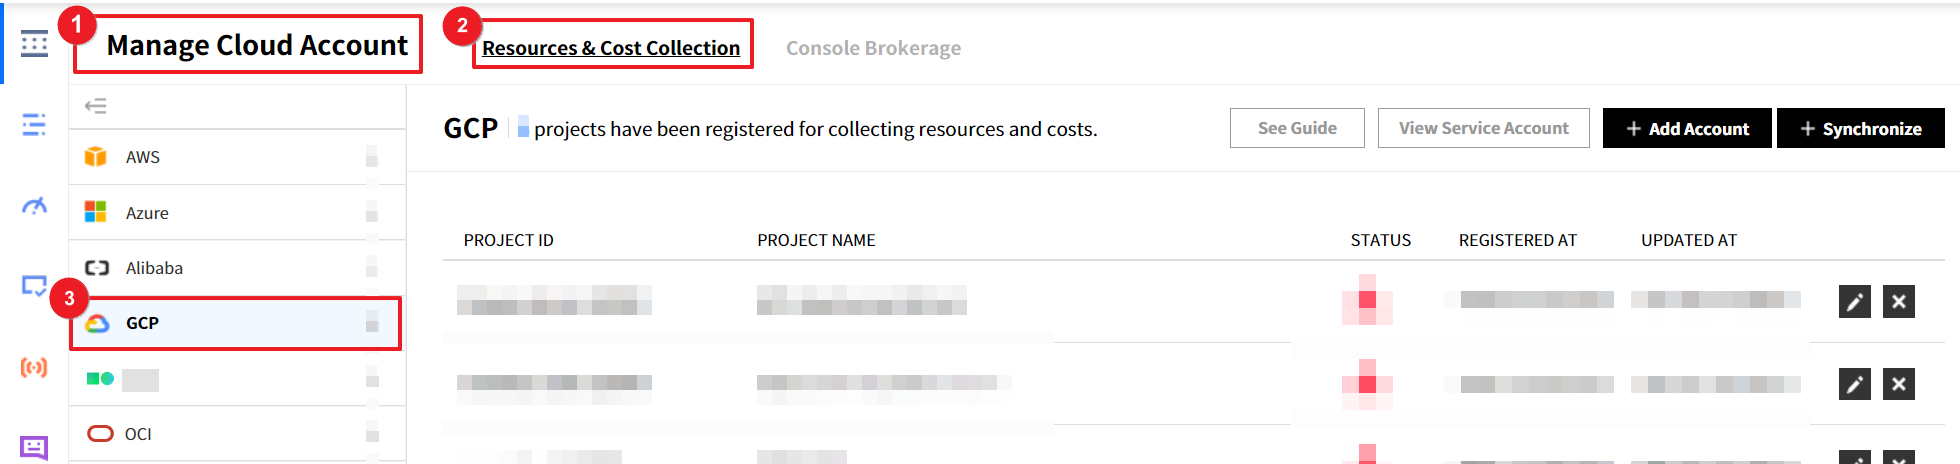
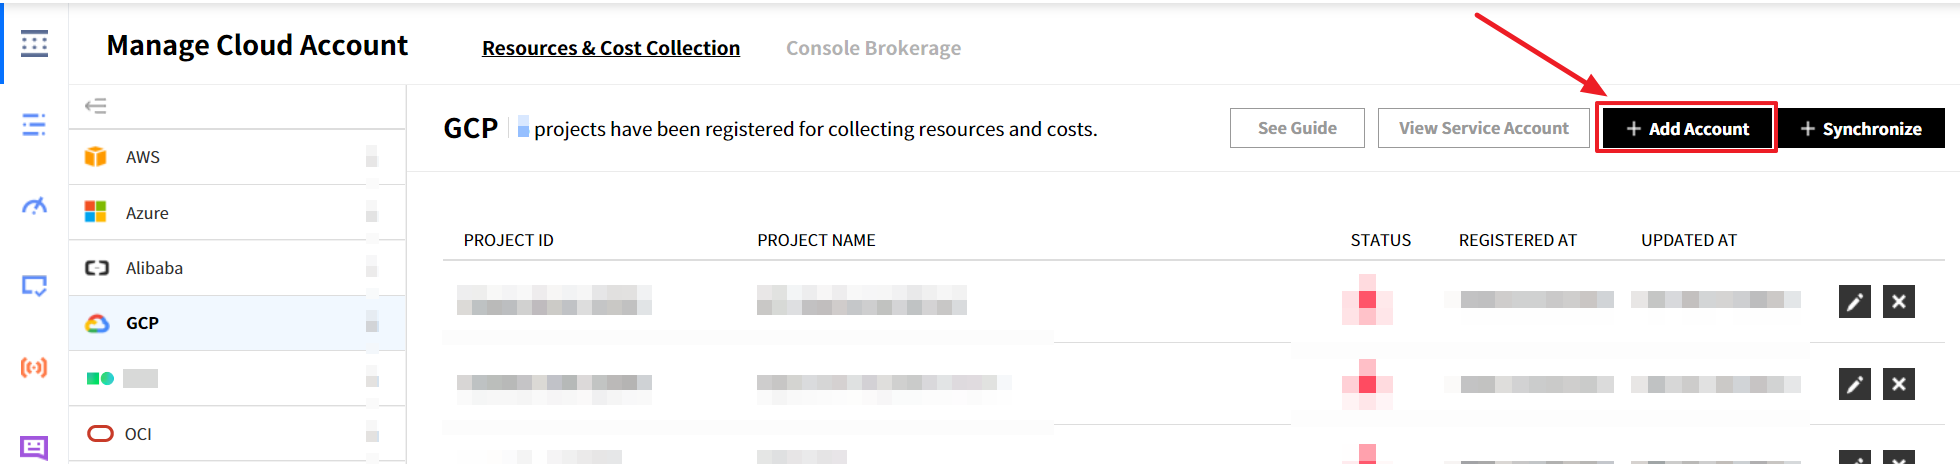
② Click the + Add Account button.
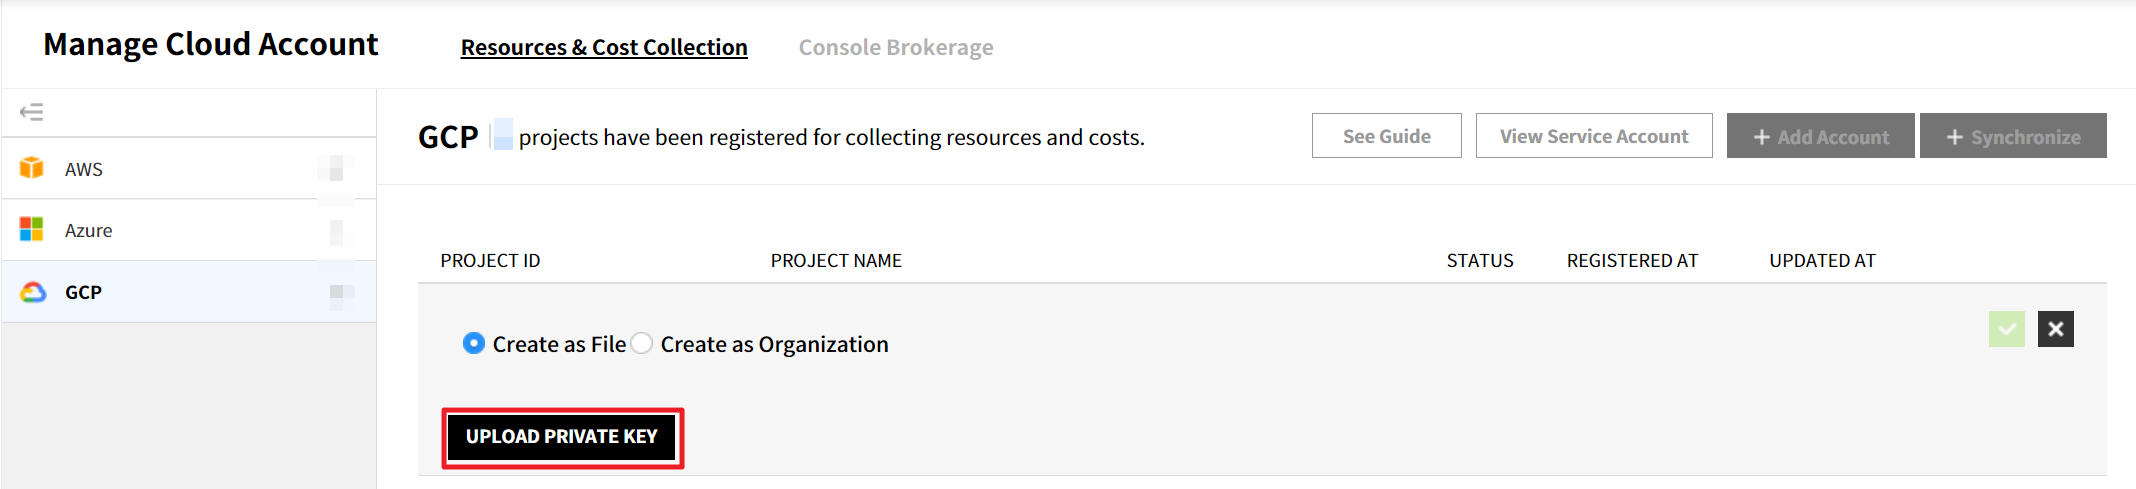
③ To register GCP projects, select Create as File or Create as Organization and click the UPLOAD PRIVATE KEY button.
| Item | Description |
|---|---|
| Create as File | Select Create as File to synchronize the GCP projects information of individual accounts by registering the GCP account with the user’s Private Key File. |
| Create as Organization | Select Create as Organization to synchronize the GCP projects under the organization account by registering the GCP account with the organization’s Private Key File. |
④ Upload the GCP service account key (.json) saved in your local computer.
⑤ When all GCP projects mapped to the account are listed on the page, select the projects that you wish to register by clicking the checkboxes and enter project names. Click the green check button located on the upper-right to save data. When you select multiple projects and click the green check button, all of the selected projects will be added at once. To cancel, click the black X button.
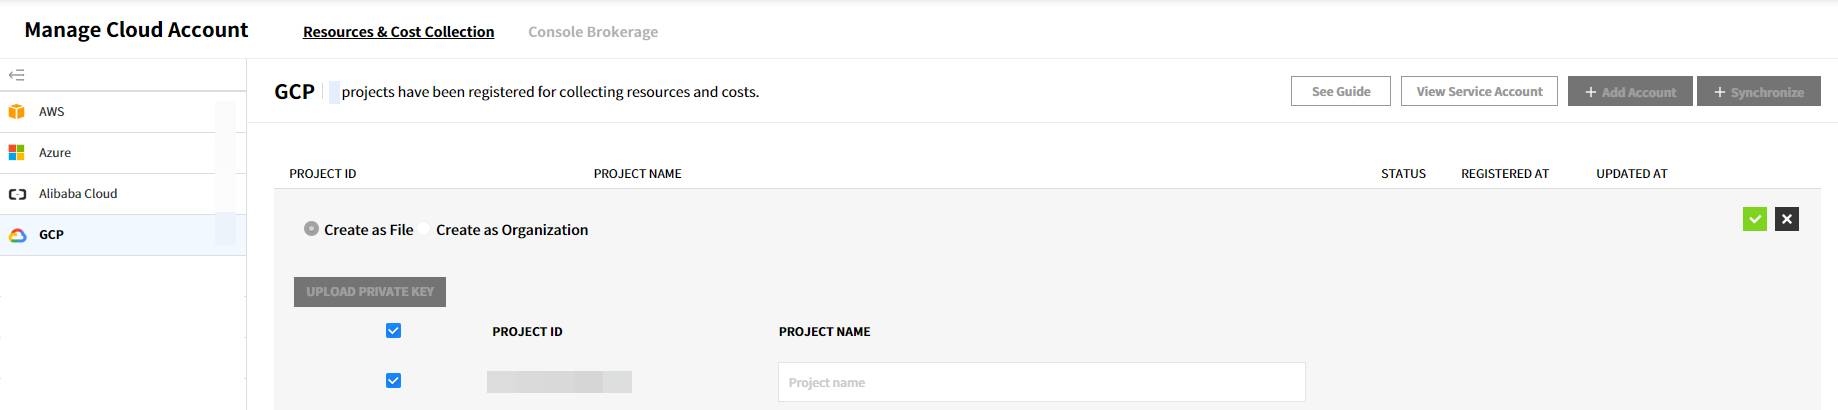
⚠️ Attention: You cannot add a project that has already been used by another company. When you select the projects already added and save them, the previous information will be updated.
To create a Private Key, follow the steps below. User credential information and API settings are required for creating the Private Key.
⑥ Registering GCP Projects is now completed.
Video Demo: How to Register GCP Project
Register Ncloud Accounts
This section explains how to add Naver Cloud Platform (Ncloud) accounts. Before start registering your account, you must have a Ncloud account and partner member account.
Registering an Ncloud account in Service Portal
① Go to Cloud Account > Resource and Cost Collection, and select Ncloud.

② Click [+Add Account] located on the top right.

③ Enter required information including the Account Name and Login ID to register an account.
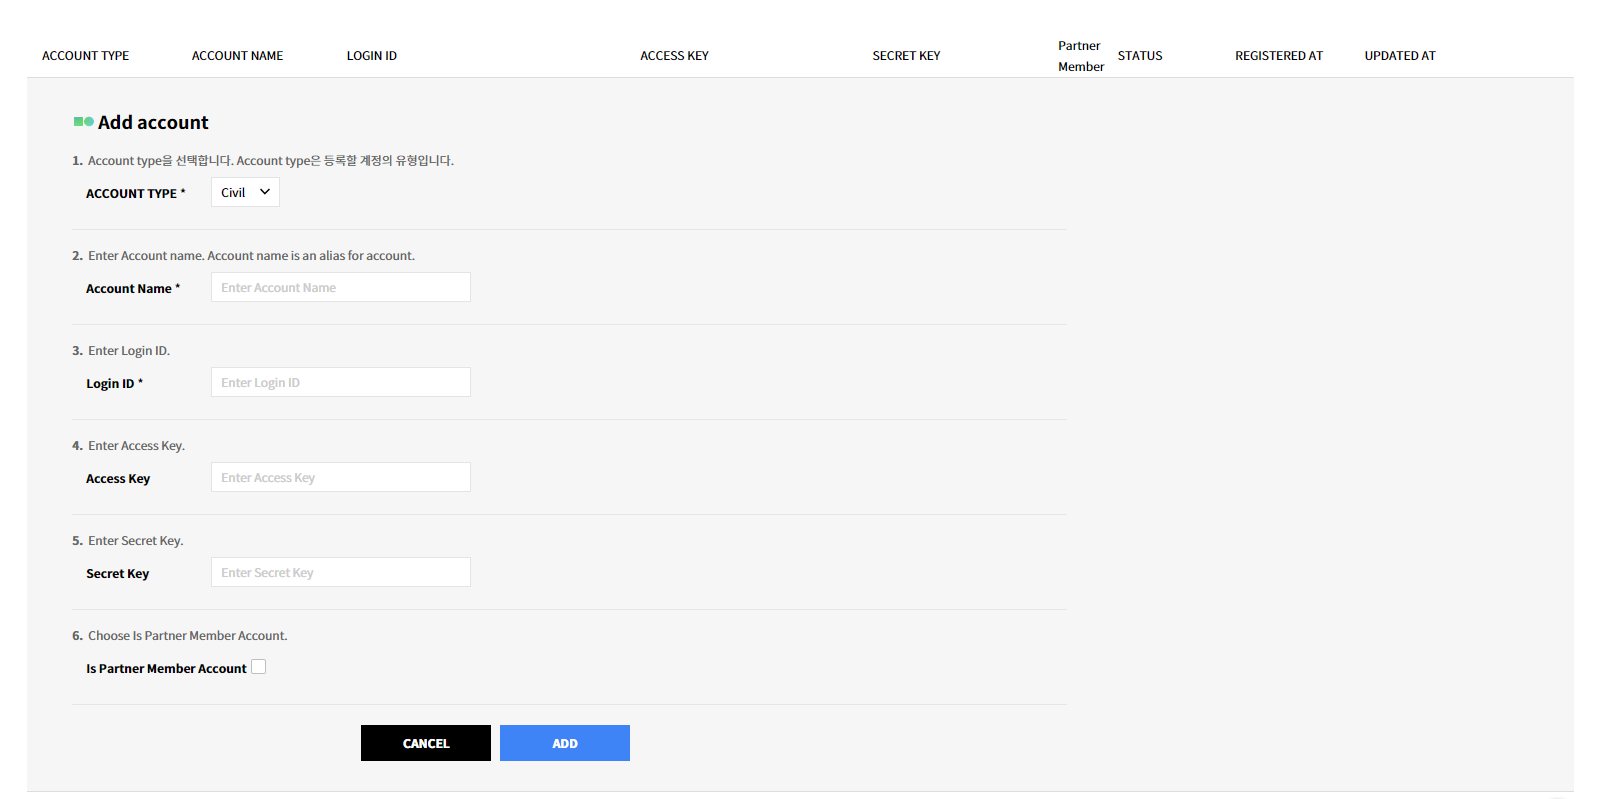
④ Click Add underneath.
- Entries Required for Account Registration
| Item | Required or Optional | Note |
|---|---|---|
| Account Name | Required | |
| Login ID | Required | |
| Access Key | Optional | If you leave Access Key and Secret Key empty, you can only check cost information. |
| Secret Key | Optional | If you wish to view resource information as well as cost information, you should enter an Access Key and a Secret Key. |
| Partner Member Account or Non-partner Member Account | Optional |
How to get Access Key and Secret Key in Ncloud console
① Sign in to Naver Cloud Platform.
② Go to My Page > [Manage Access Keys].
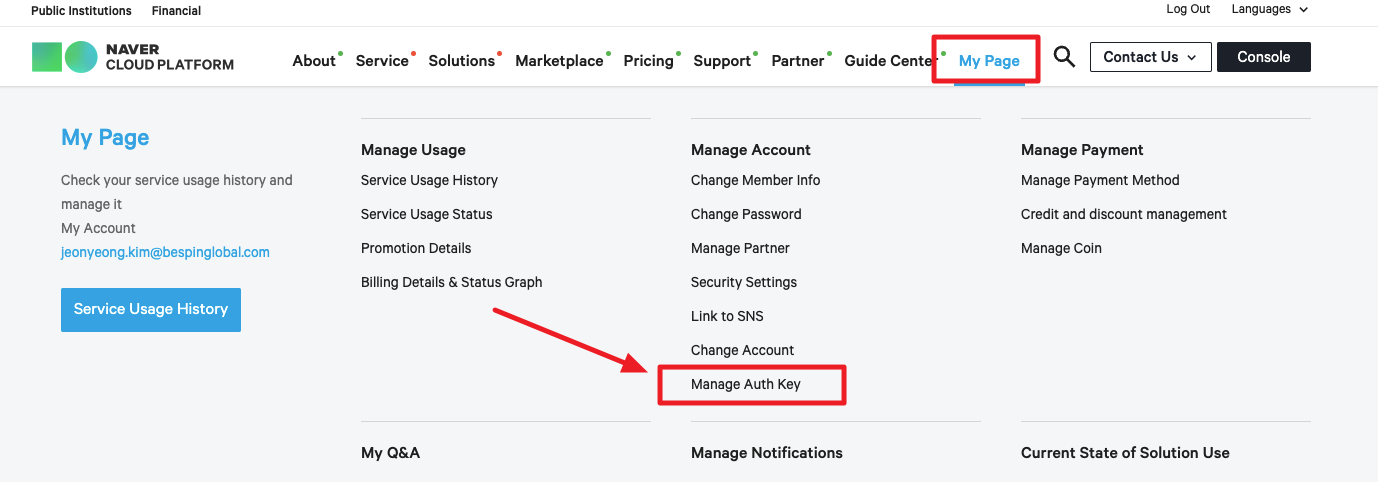
③ To issue an Access Key and a Secret Key, click [Create New API Access Key].
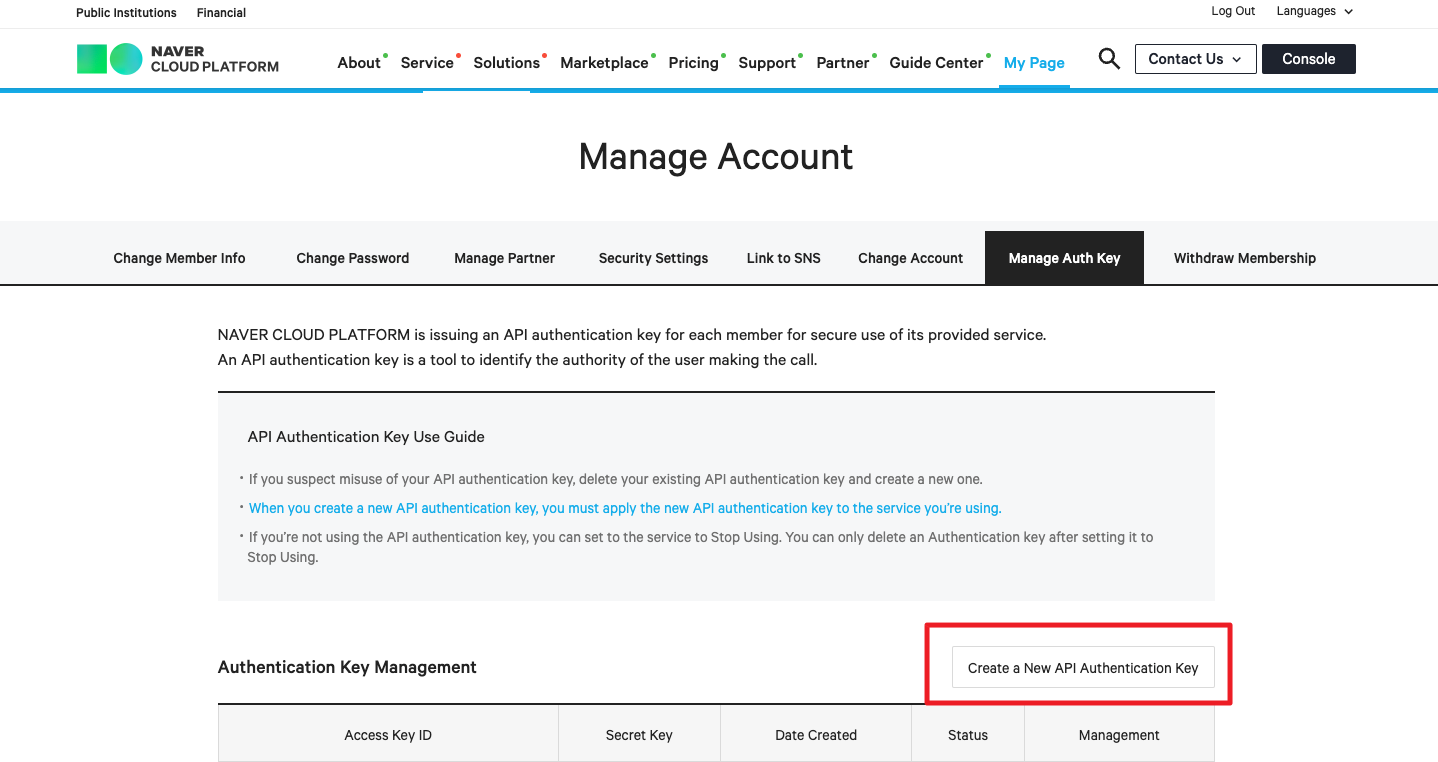
④ A pop-up notifying that an API Access Key is created appears as below.
⑤ Copy the Access Key ID that you just created in Manage API Access Keys and paste it in Service Portal > Cloud Account > Register Ncloud Account or save it elsewhere.
⑥ You can see your Secret Key by clicking [View] in the Secret Key row of Manage API Access Keys. Copy this Secret Key and paste it in Service Portal > Cloud Account > Register Ncloud Account or save it elsewhere.
Register OCI Accounts
This section explains how to add Oracle Cloud Infrastructure (OCI) accounts on the Service Portal.
Registering an OCI account
① Go to Cloud Account > Resource and Cost Collection, and select OCI.

② Click [+Add Account] located on the top right.

③ Enter the required information for registering the account. When you click the Load Compartment button, it loads all compartments you created from the OCI console. You can select all or some of the necessary compartments for this account.
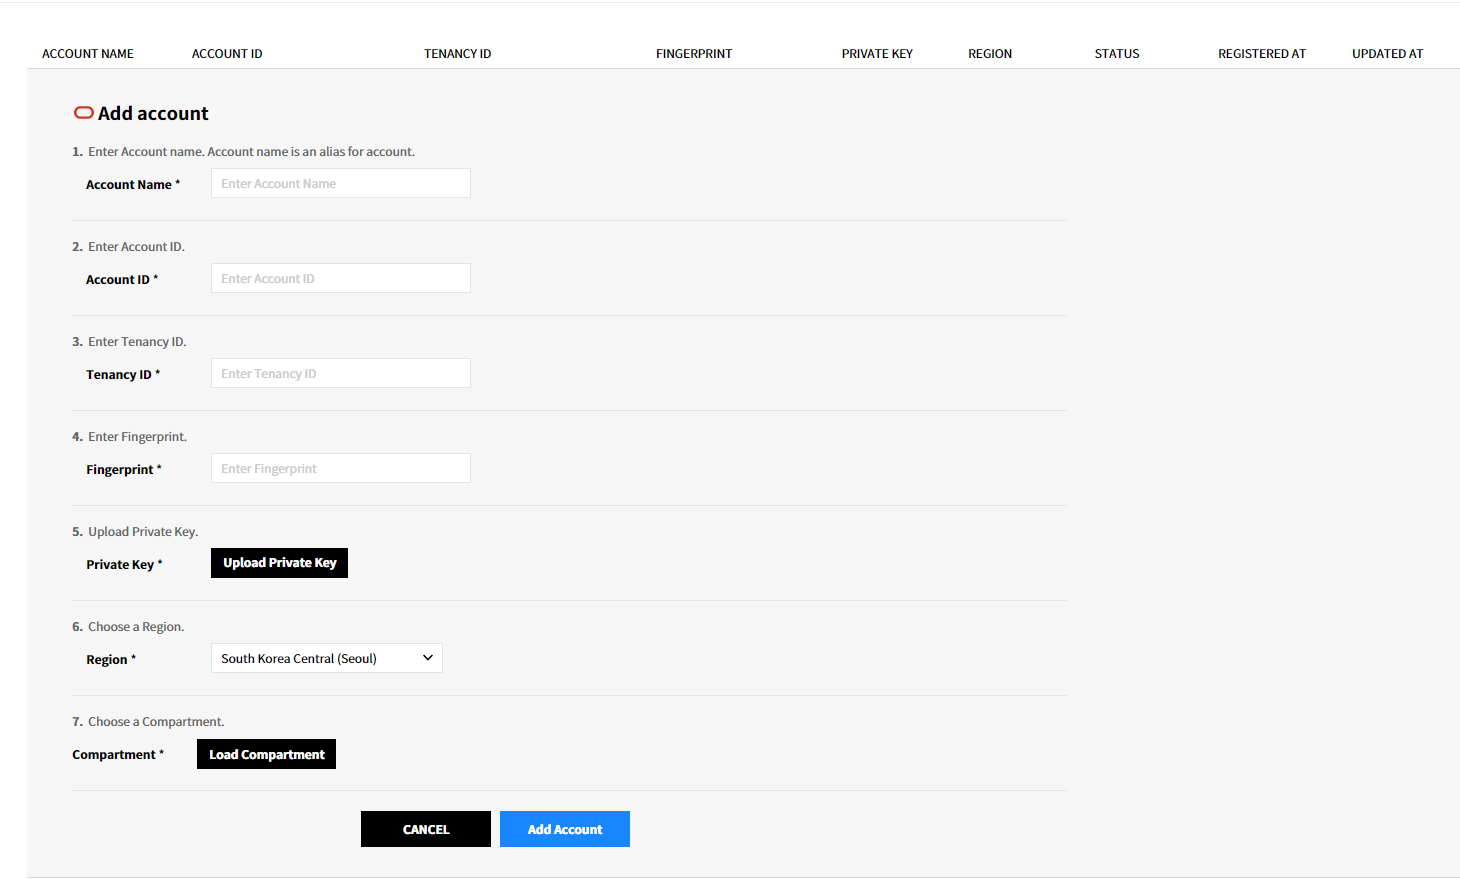
④ Click Add Account button.
- Items Required for Account Registration
| Item | Description |
|---|---|
| Account Name | Users can define the account name. Required information. |
| Account ID | Login user information (User ID in the OCI console). |
| Tenancy ID | The highest unit of OCI account structure. |
| Fingerprint | Fingerprint of the key file, and it is a value that identifies the key file. |
| Private Key | The key for API calls. |
| Region | Region of the tenancy. |
| Compartment | Compartment is a logical entity to group resources, and is a required item for users to set up when creating resources. |
How to create Fingerprint and Tenancy ID in OCI console
① Sign in to Oracle Cloud Infrastructure.
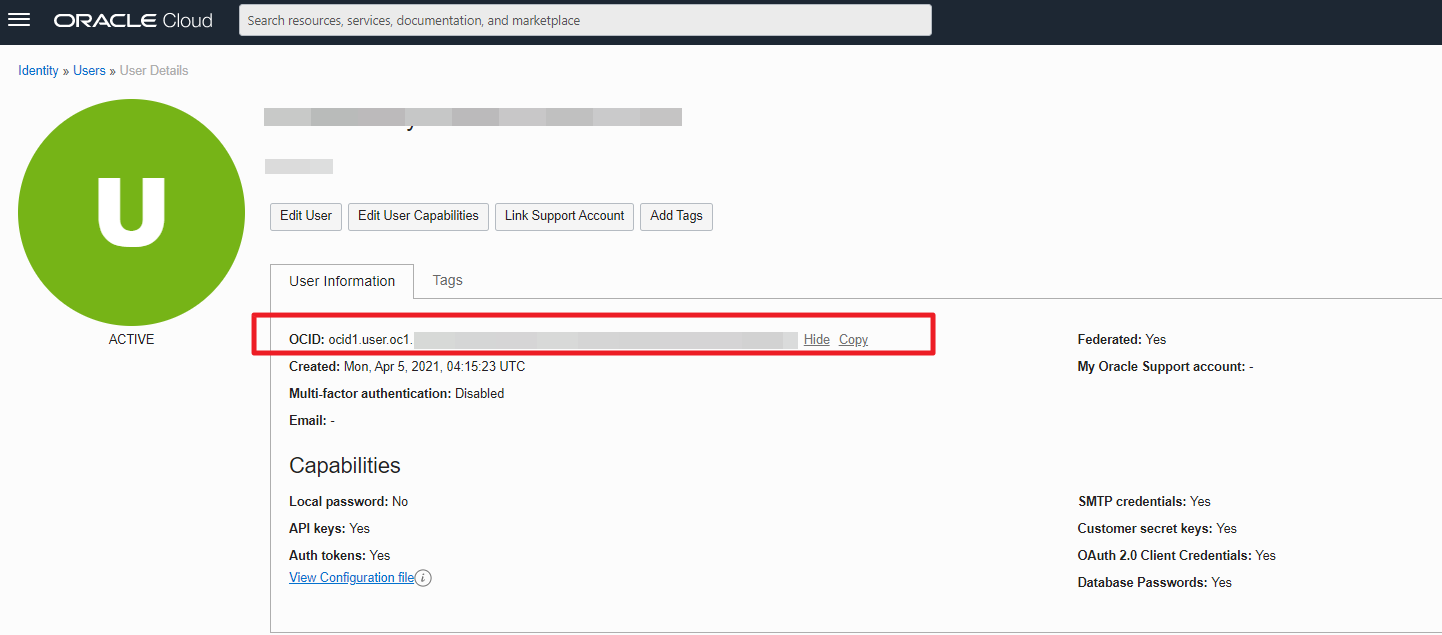
② Select Profile > User settings in the OCI console.
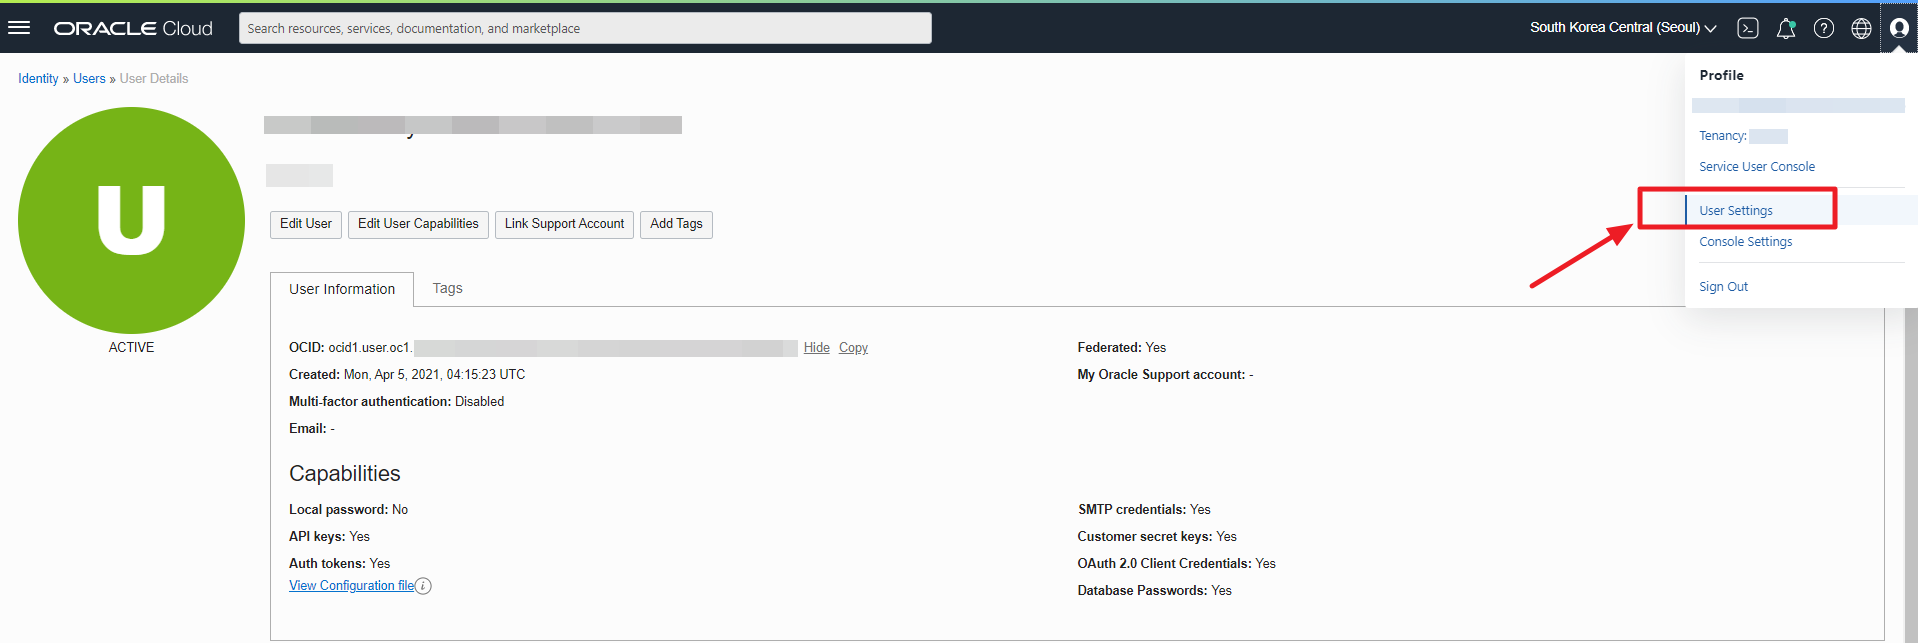
③ Copy User ID from the User information tab, and paste it in the Account ID field.
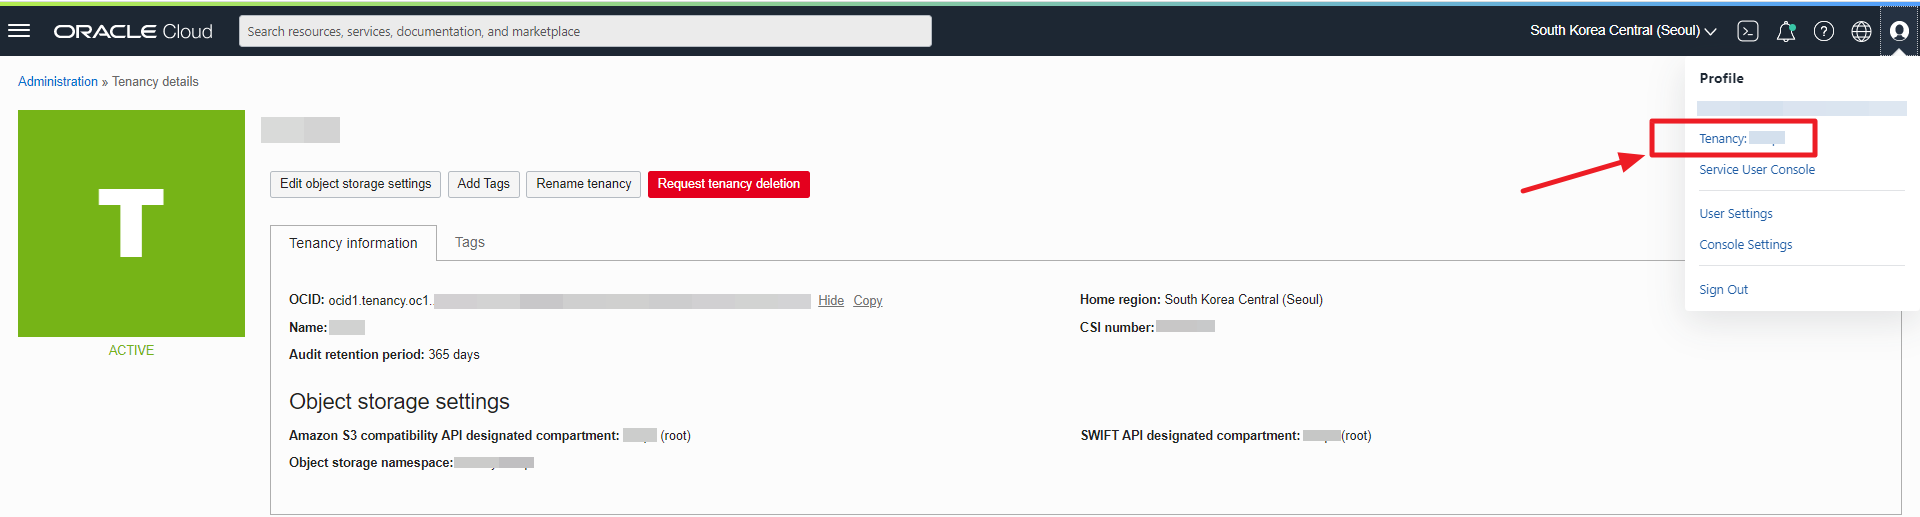
④ Select Profile > Tenancy, and copy Tenancy ID.
⑤ Select Profile > User settings, and then, click the API Key > Add API Key button from the Resource tab located on the navigation bar.

⑥ In the Add API Key window, select Generate API Key Pair > Download Private Key > Add button in the sequential order. Upload the downloaded key by clicking Upload Private Key button in the Service Portal page.
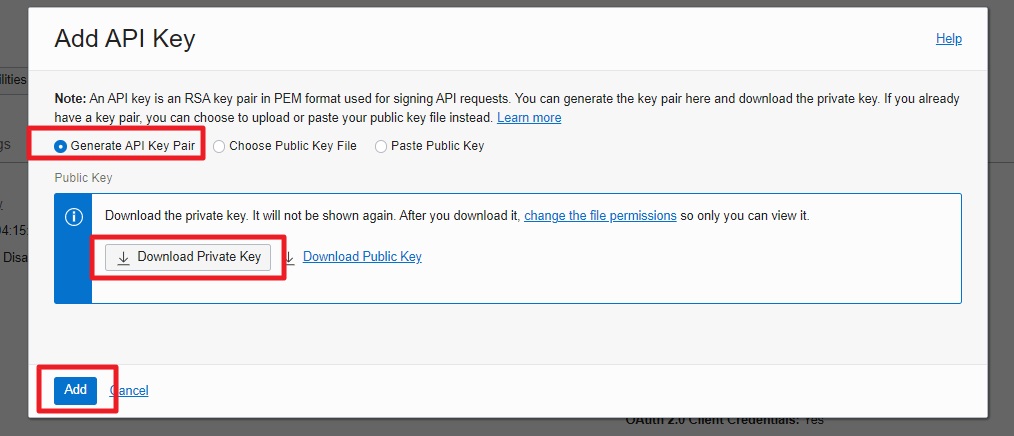
⑦ You can find the created Fingerprint in the API Key section.
Register Alibaba Cloud Accounts
Select Alibaba from the list on the left bar to register your account.
Required Items for Registering Accounts
| Asset Management | Cost Management | |
|---|---|---|
| Account Name | Required | Required |
| Account ID | Required | Required |
| Access Key | Required | Required |
| Secret Key | Required | Required |
| Linked Account or Non-linked Account | Required; Select either Linked Account or Non-linked Account | |
| OSS Bucket Name | Required | Required |
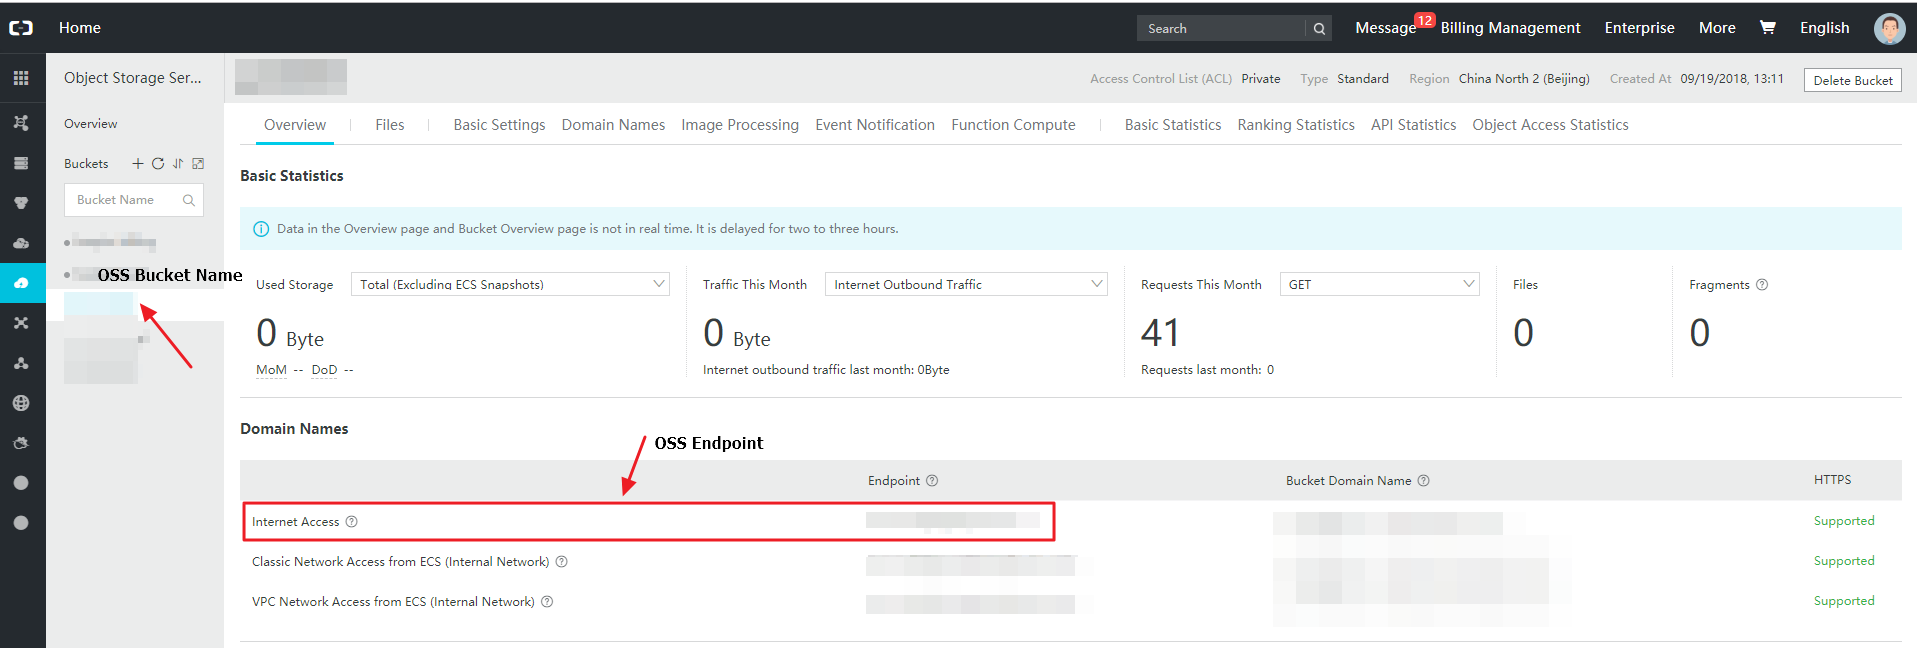
| OSS Endpoint | Required | Required |
① In Cloud Account > Resources & Cost Collection menu, select Alibaba and click the [+Add account] button.

② Enter the required information for account registration.

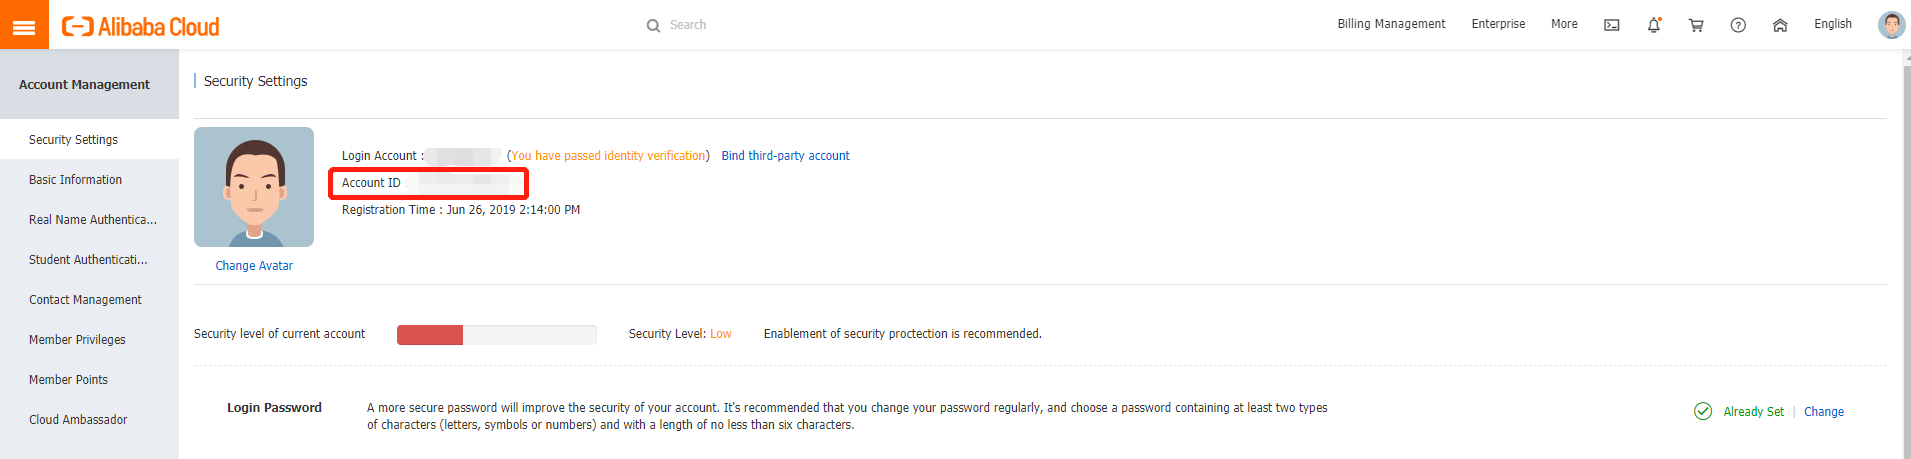
Enter Account Name and Account ID
You can set any name for Account Name. For Account ID, go to Alibaba, click the account icon located on the right side of the page, and copy and paste ‘Account ID’ from the account management page.

Get Access Key & Secret Key
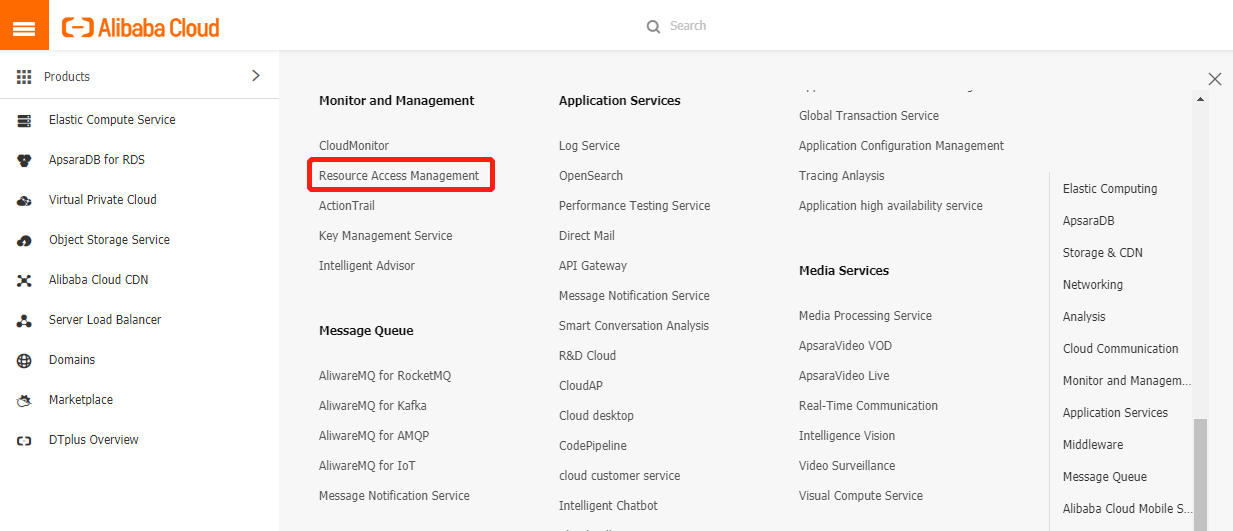
① In Alibaba console, go to Products > Monitor and Management and click the RAM service.
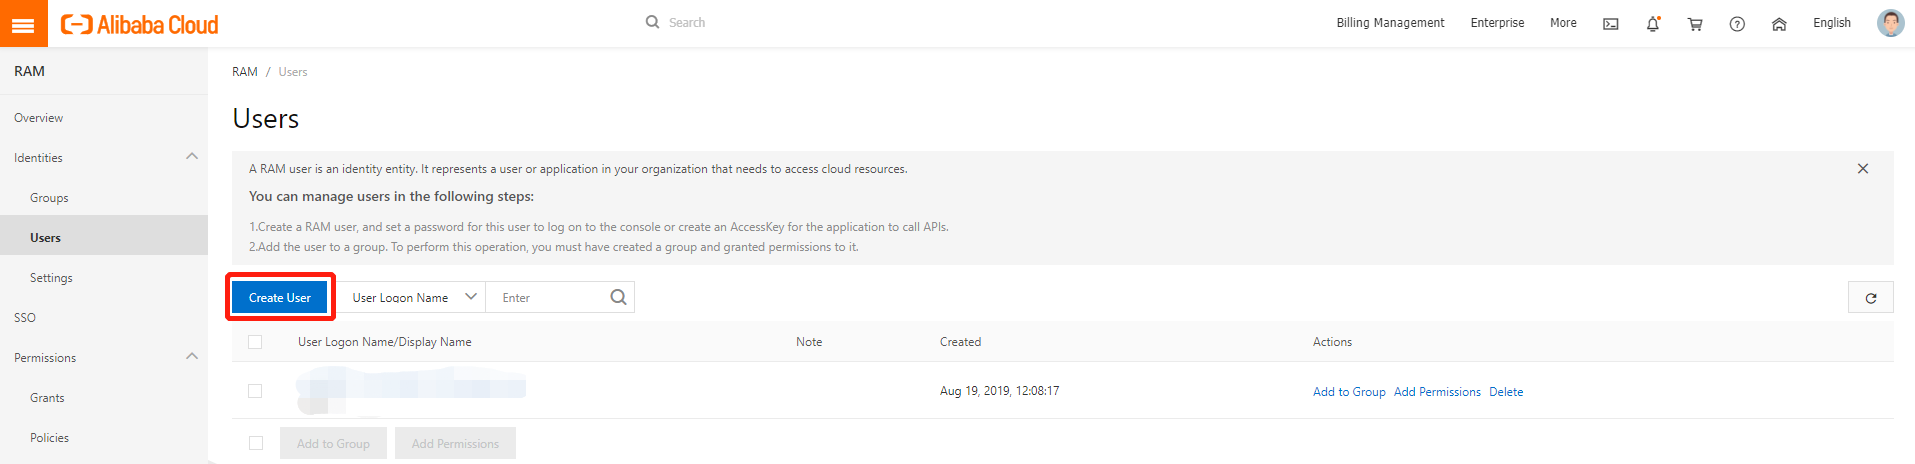
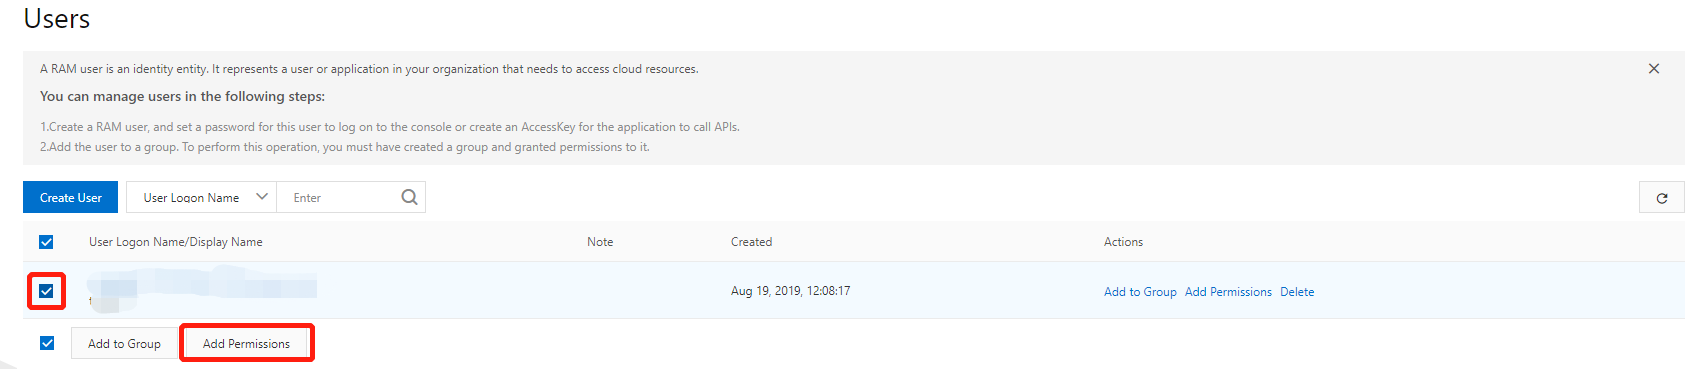
② Click Users menu on the left side of the RAM service page.

③ Click [Create User] button.
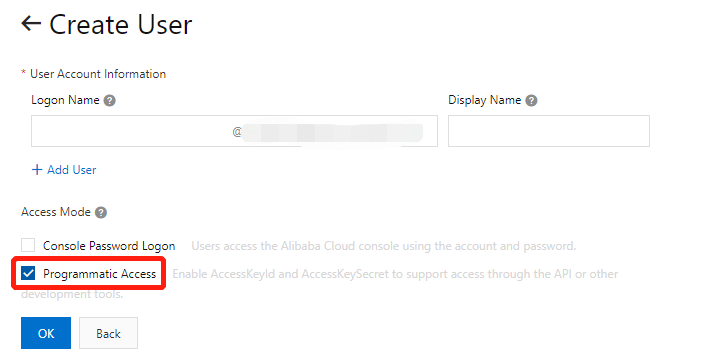
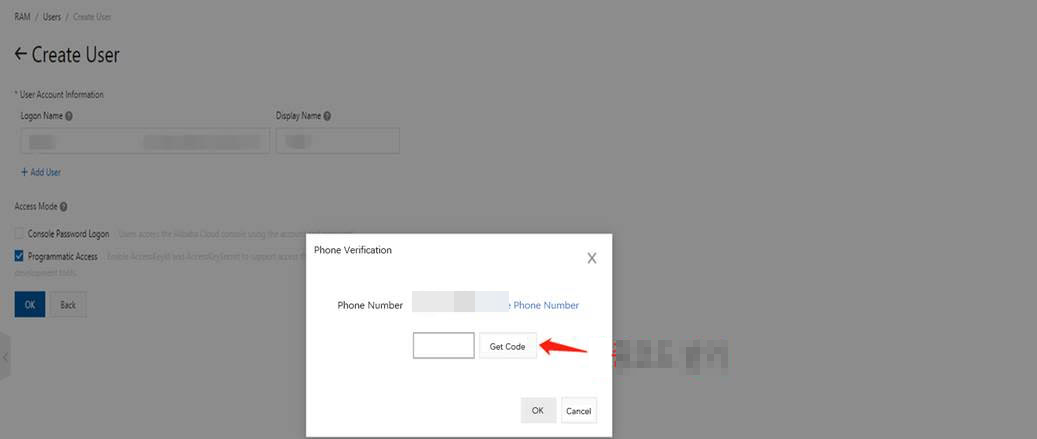
④ Enter the required information. After that, select the Programmatic Access checkbox and click the [OK] button.
⑤ Click [Receive Authentication Code] from the SMS pop-up window, and click the [OK] button after entering the SMS code. You can download Access Key and Secret Key information in .csv file by clicking [Save Access Key Information] button.
⑥ AccessKeyID (Access Key) and AccessKeySecret (Secret Key) information will be displayed along with a pop-up window of the created Access Key. You can download Access Key and Secret Key information in .csv file by clicking [Download CSV File] button. In addition, you can copy Access Key and Secret Key information.
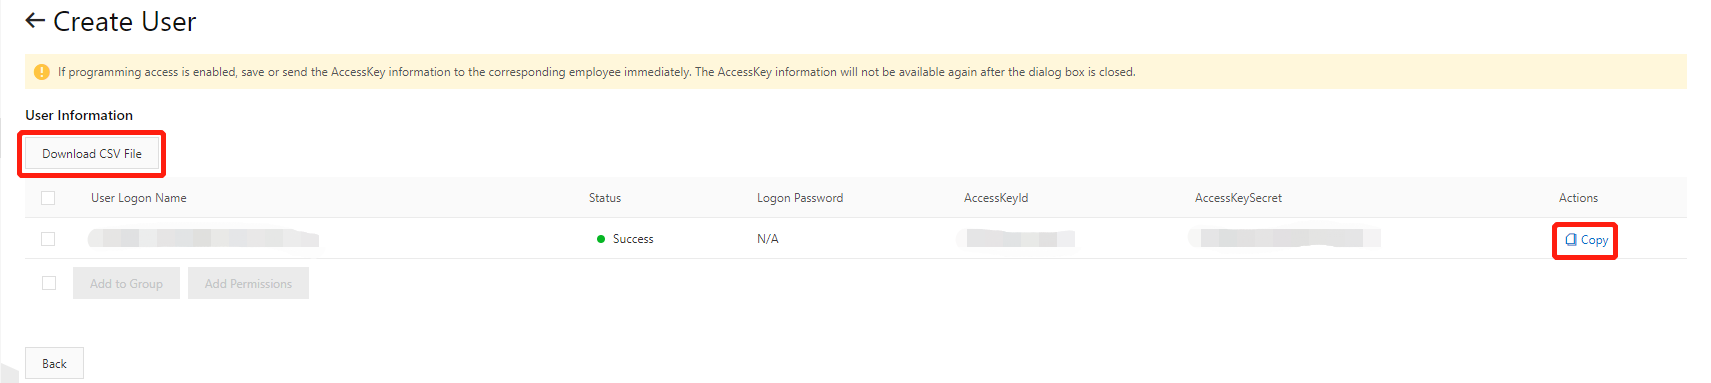
⑦ Select a created user and click the [OK] button.
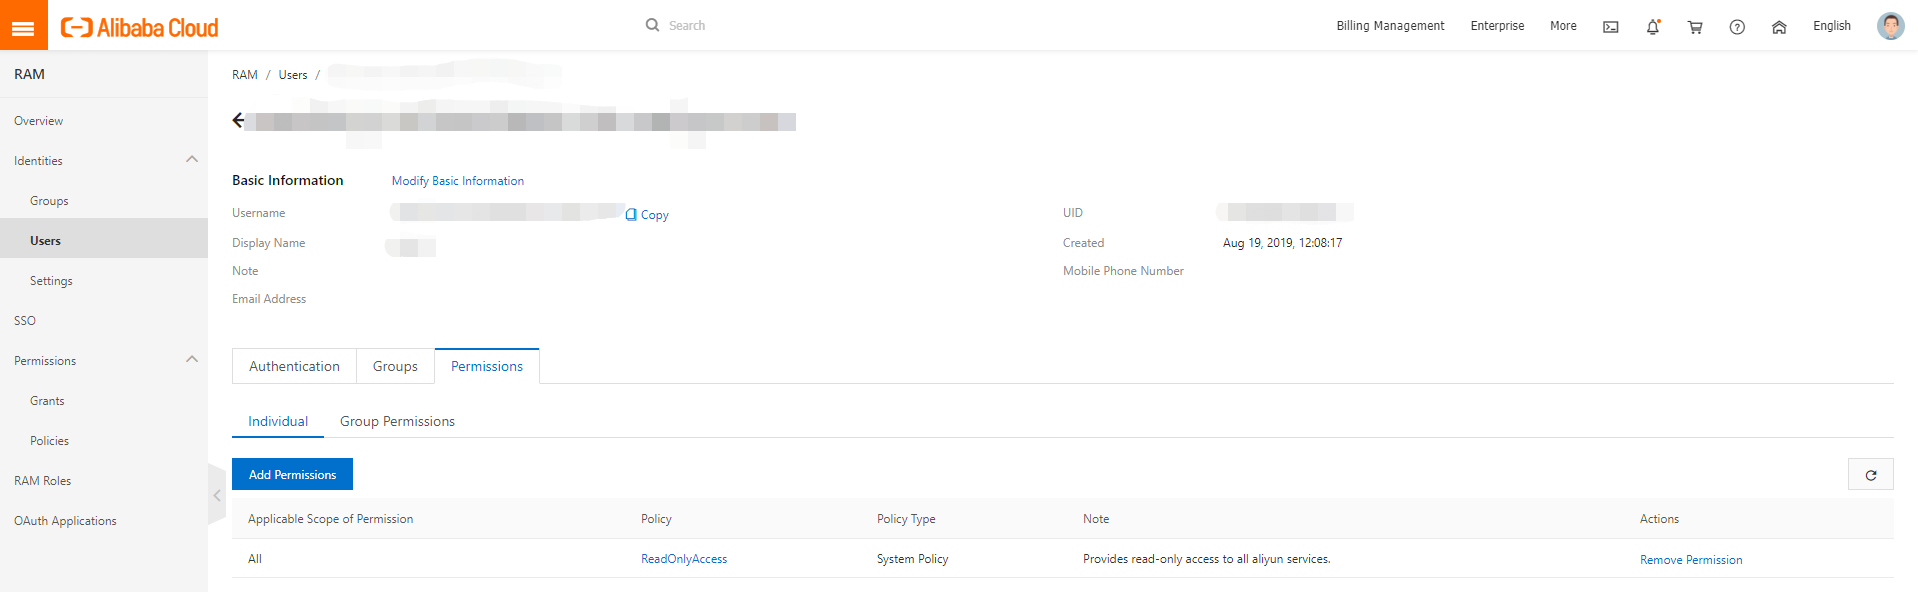
⑧ Select ReadOnlyAccess from Add Permissions page and click the [OK] button.
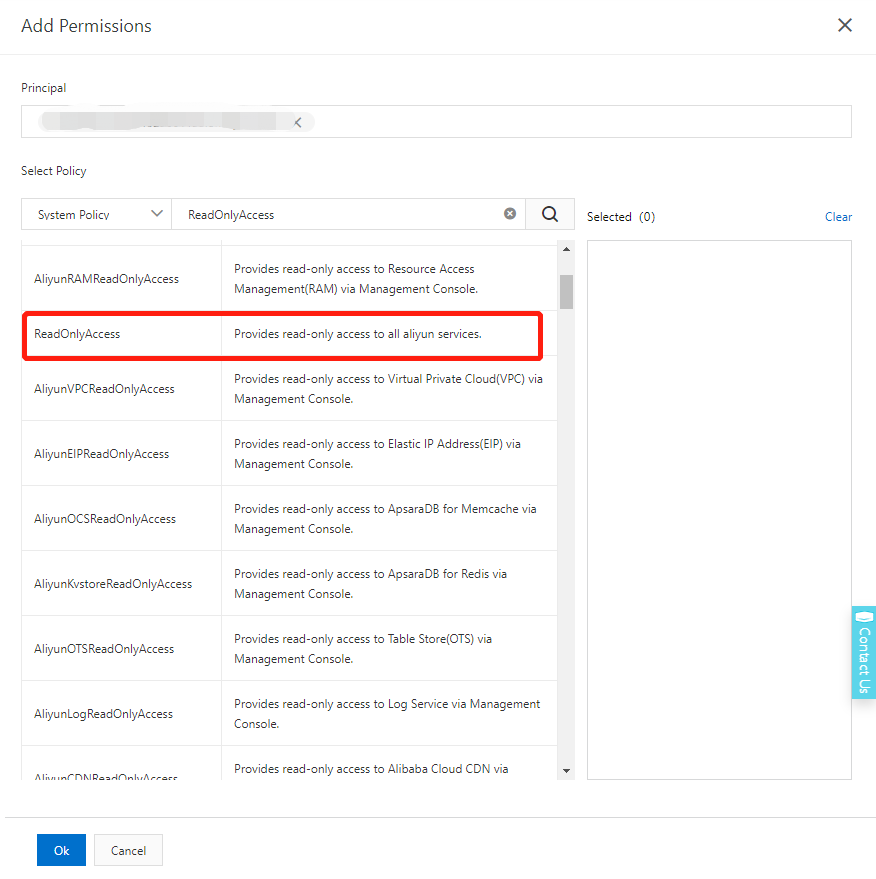
⑨ Select RAM > Users > Permissions > Individual to check the selected permission.
Create OSS Bucket for Billing Data
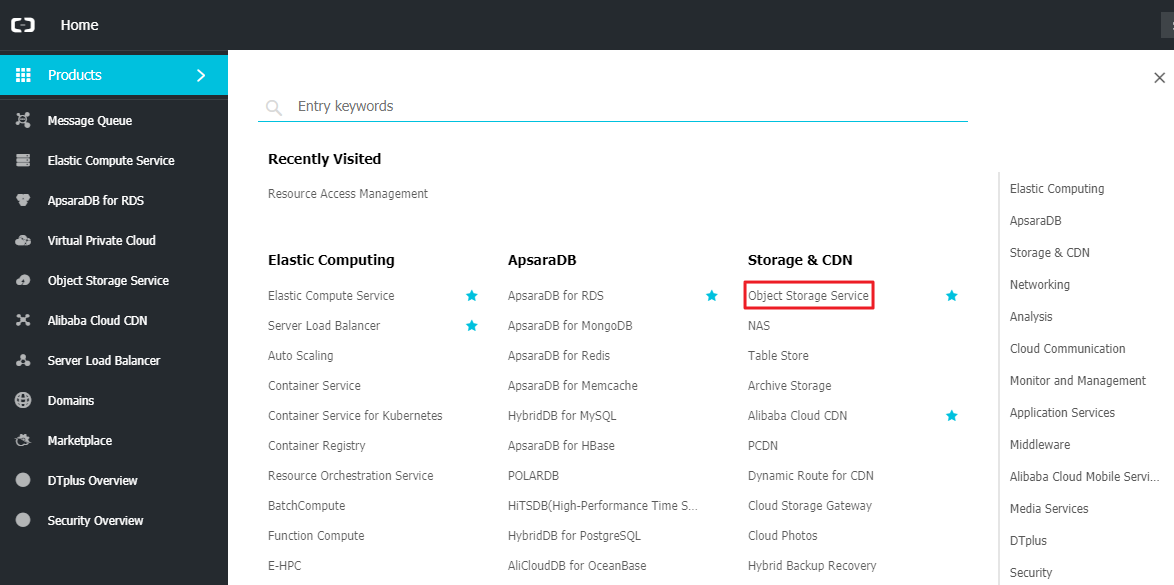
① In Alibaba, go to Products > Storage & CDN and click OSS service.
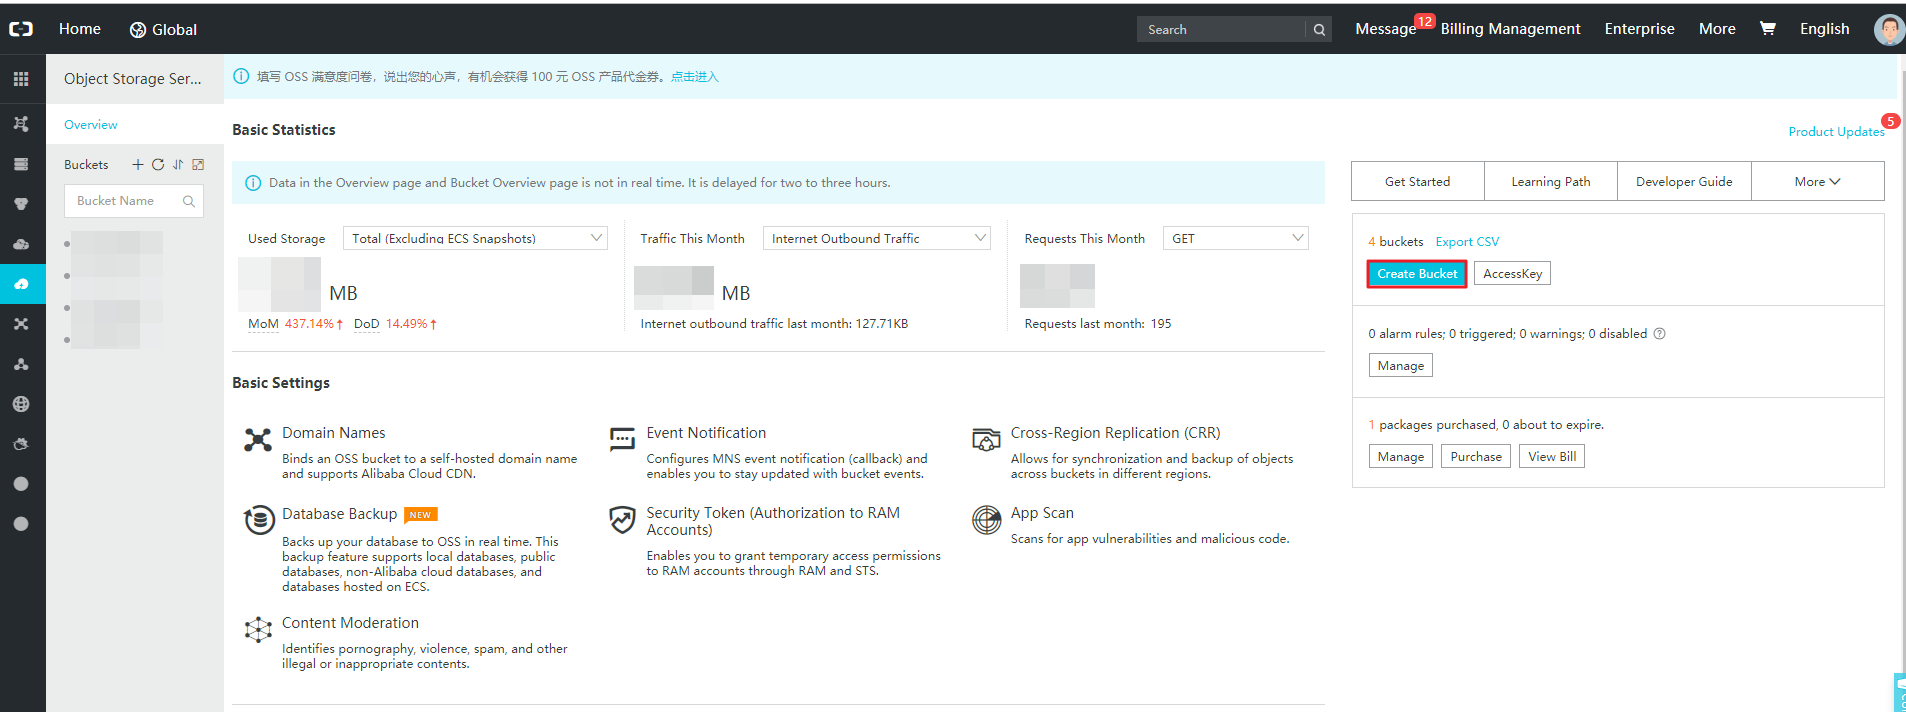
② Click [Create Bucket] button in OSS service.
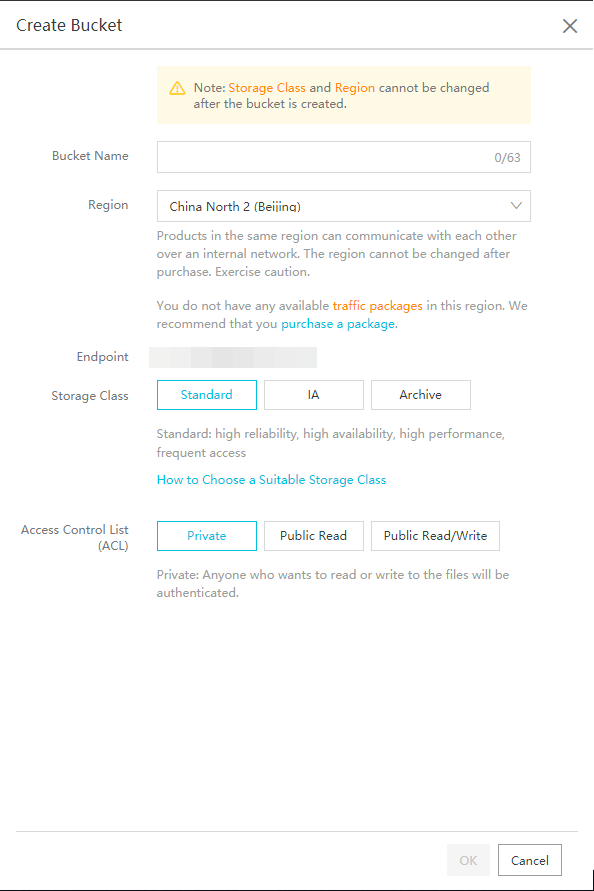
③ Enter the Bucket name, set the Region, Storage Class, Access Control List and click the [OK] button.
④ Created bucket information will be displayed as below.
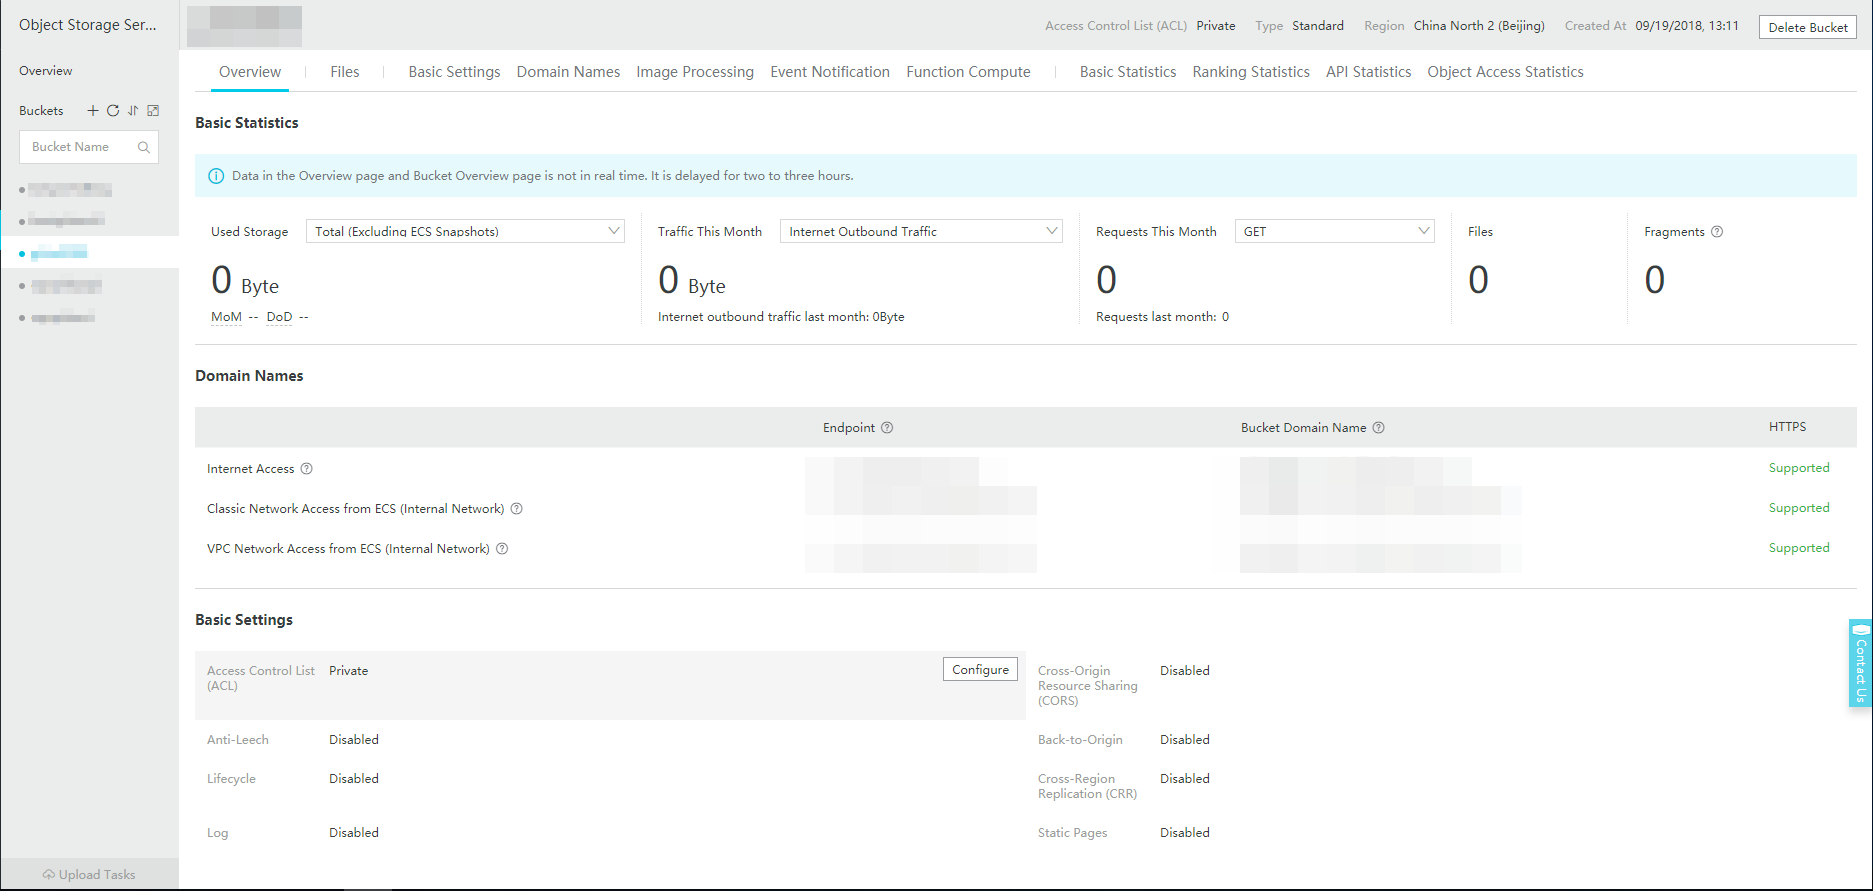
⑤ Select the created Bucket and click the Basic Settings menu.
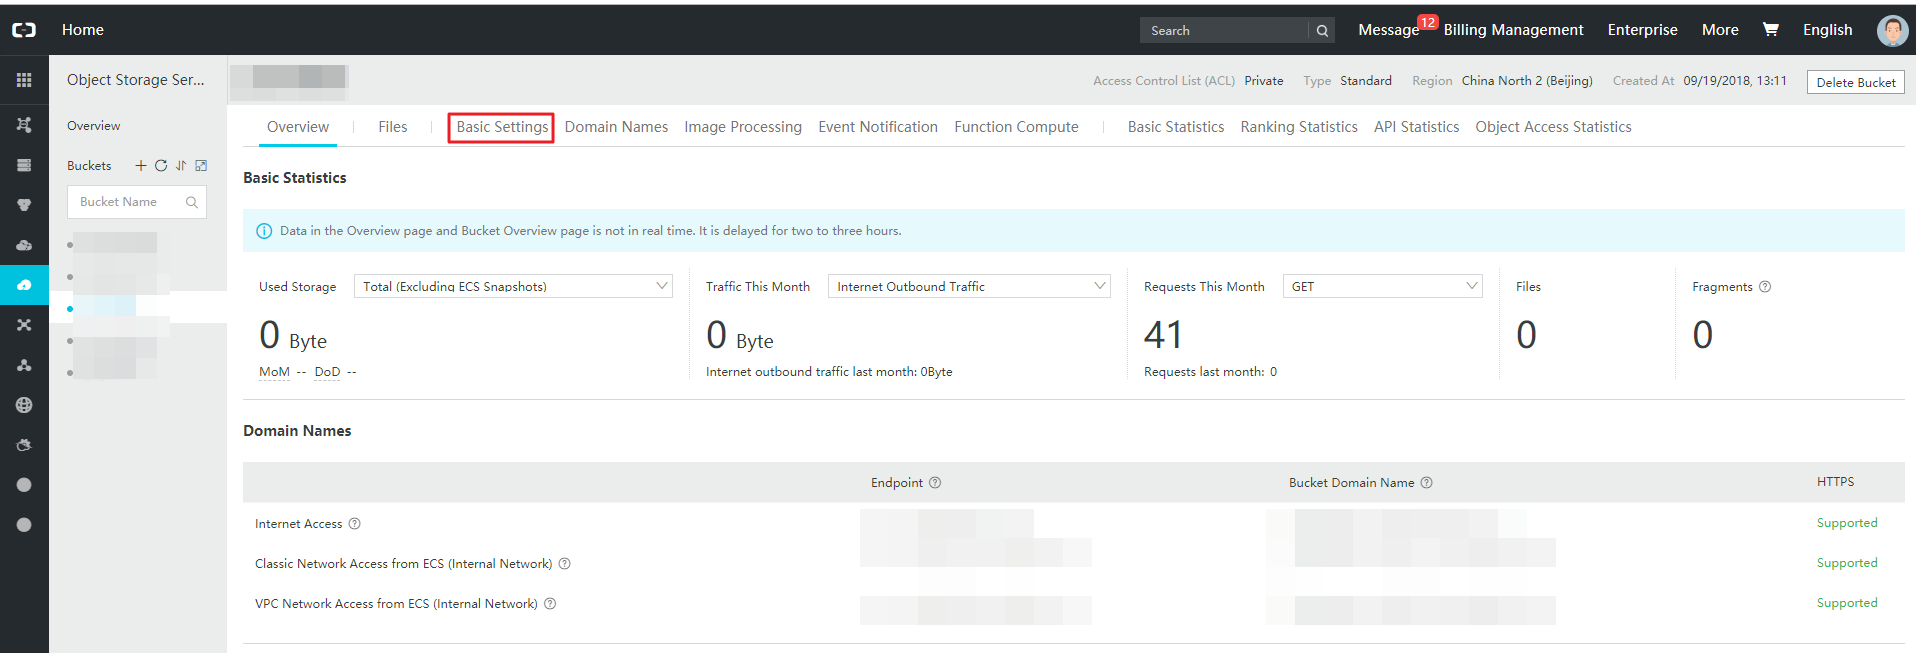
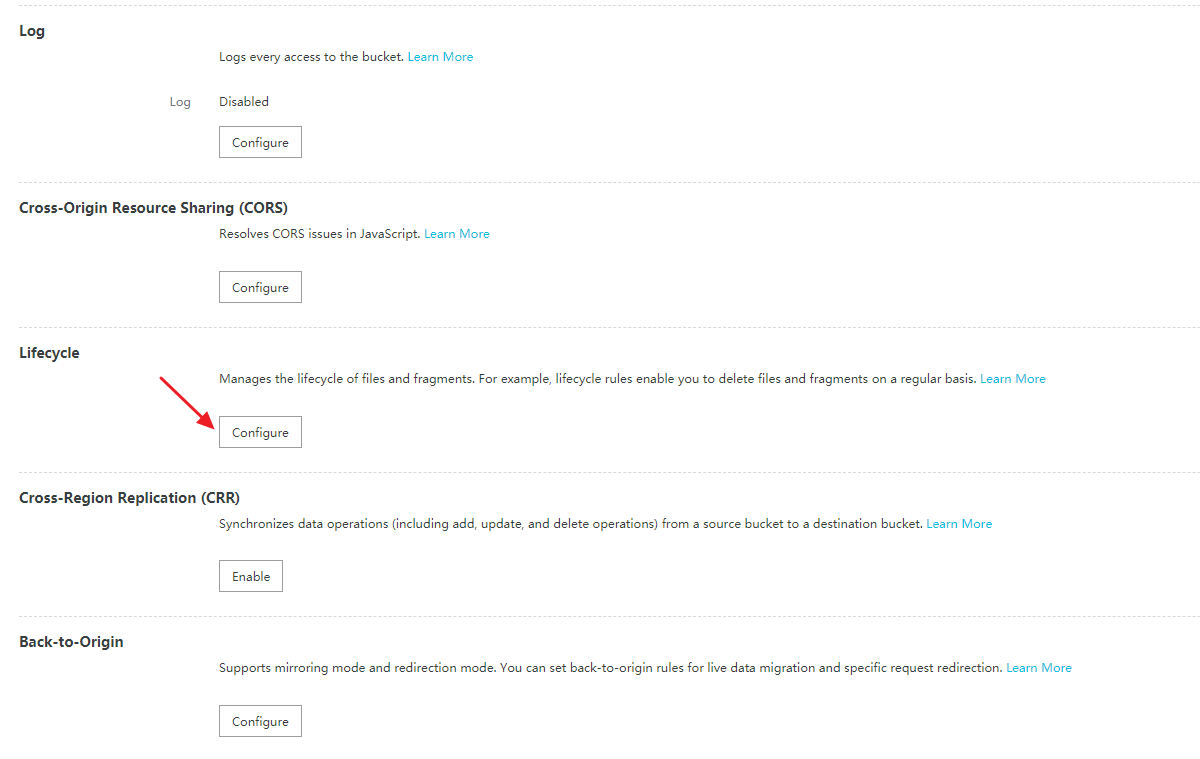
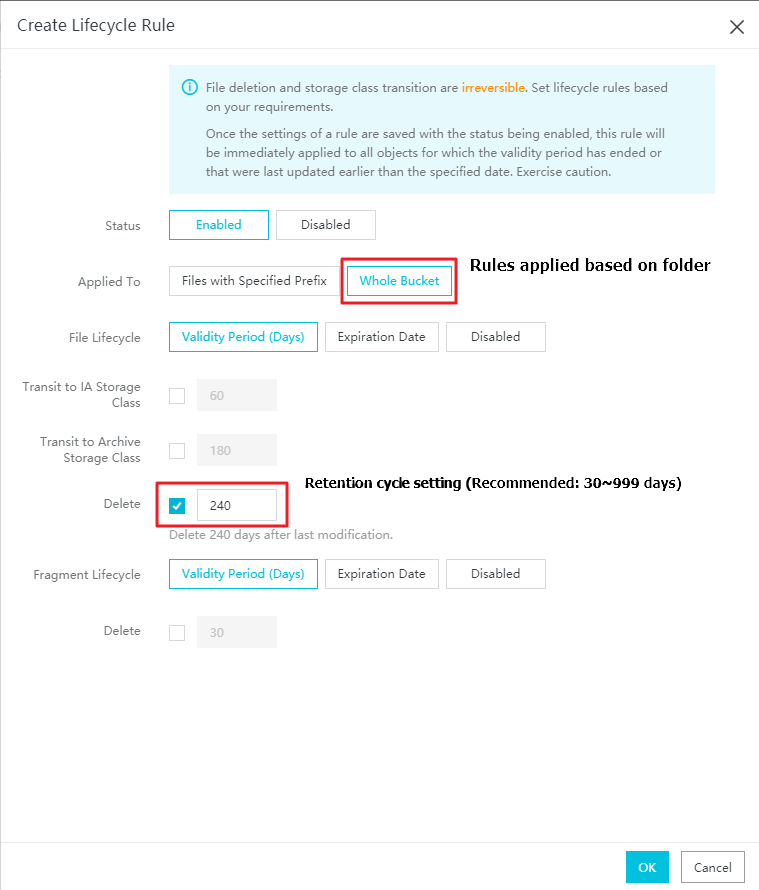
⑥ In Basic Settings > Lifecycle, click the [Configure] button.
⑦ In Lifecycle settings screen, click the[Create Rule] button.
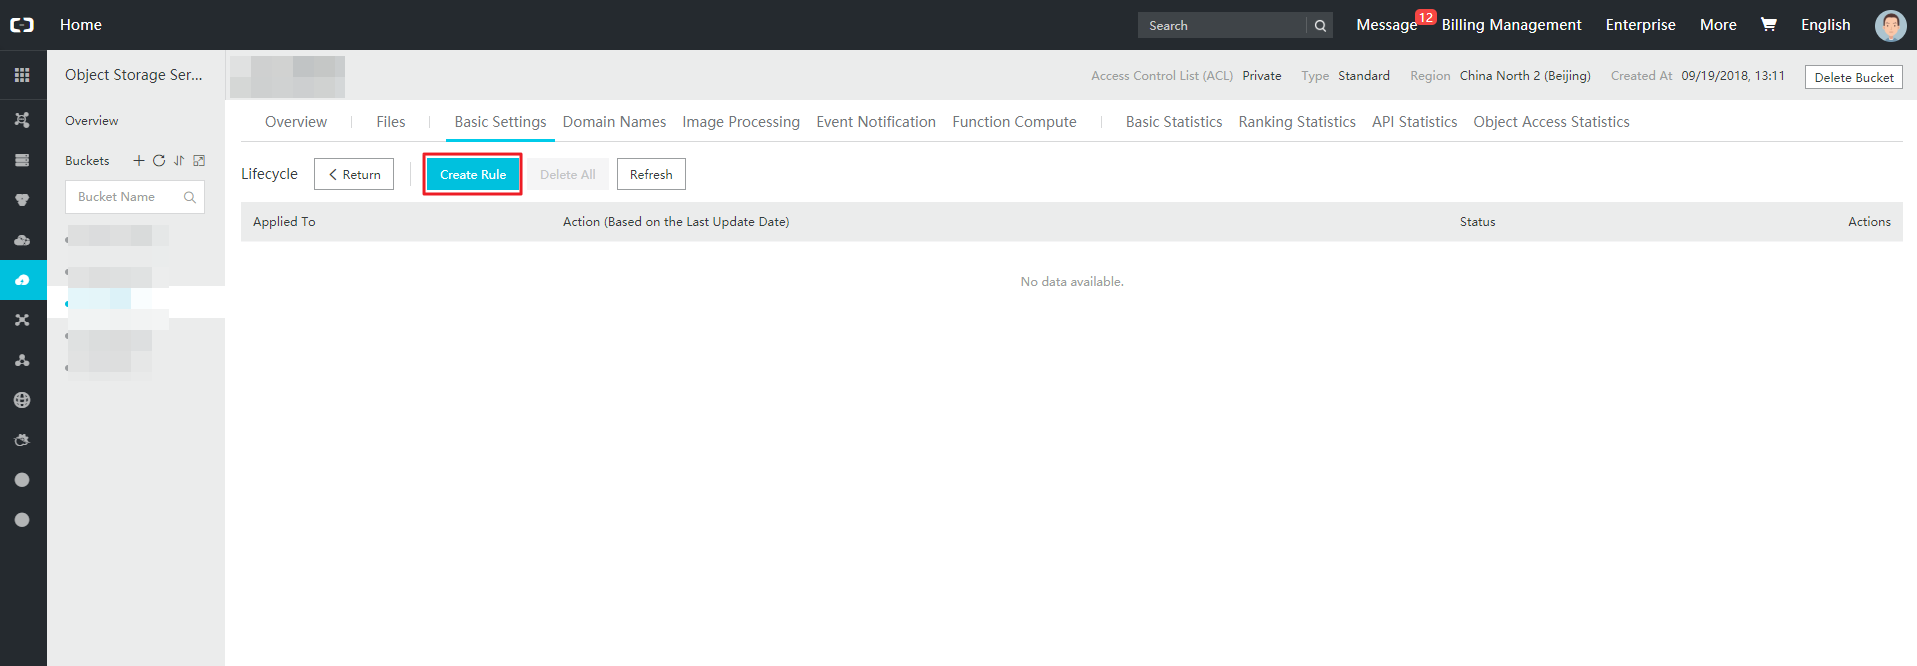
⑧ In Lifecycle Rule setting screen, enter the value from 30 to 999 in Delete option and click the [OK] button.
Load Billing Data
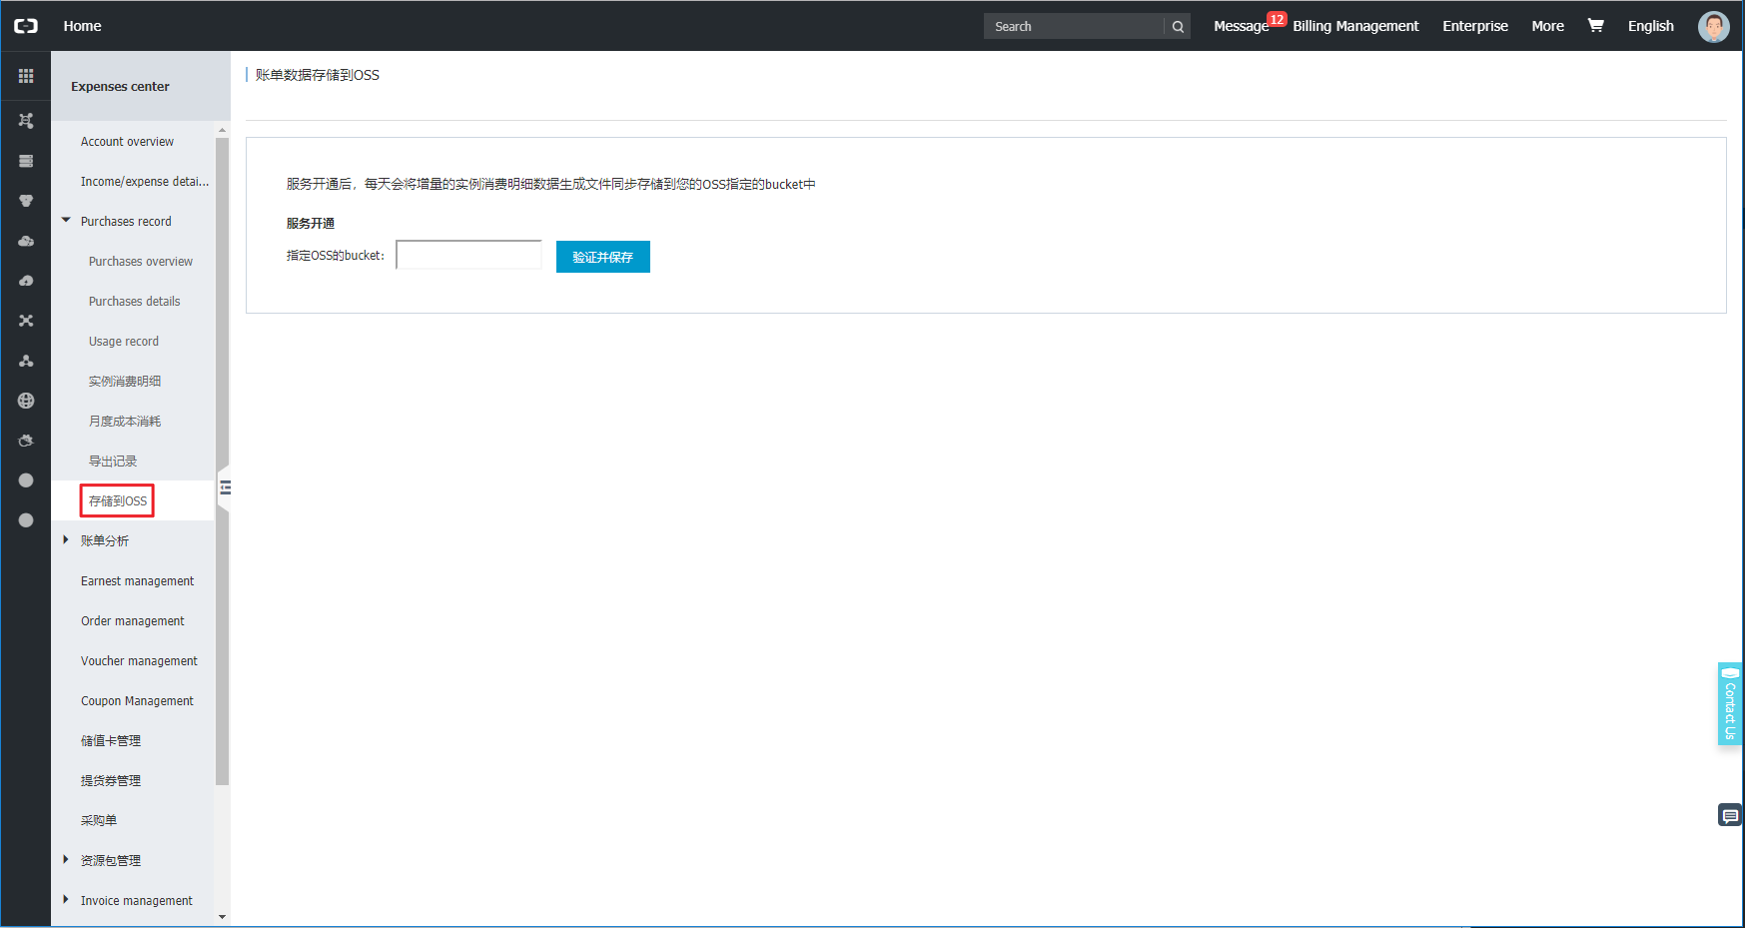
① Click Billing Management menu at the top of the home screen.

② Select Purchases record > Save OSS.
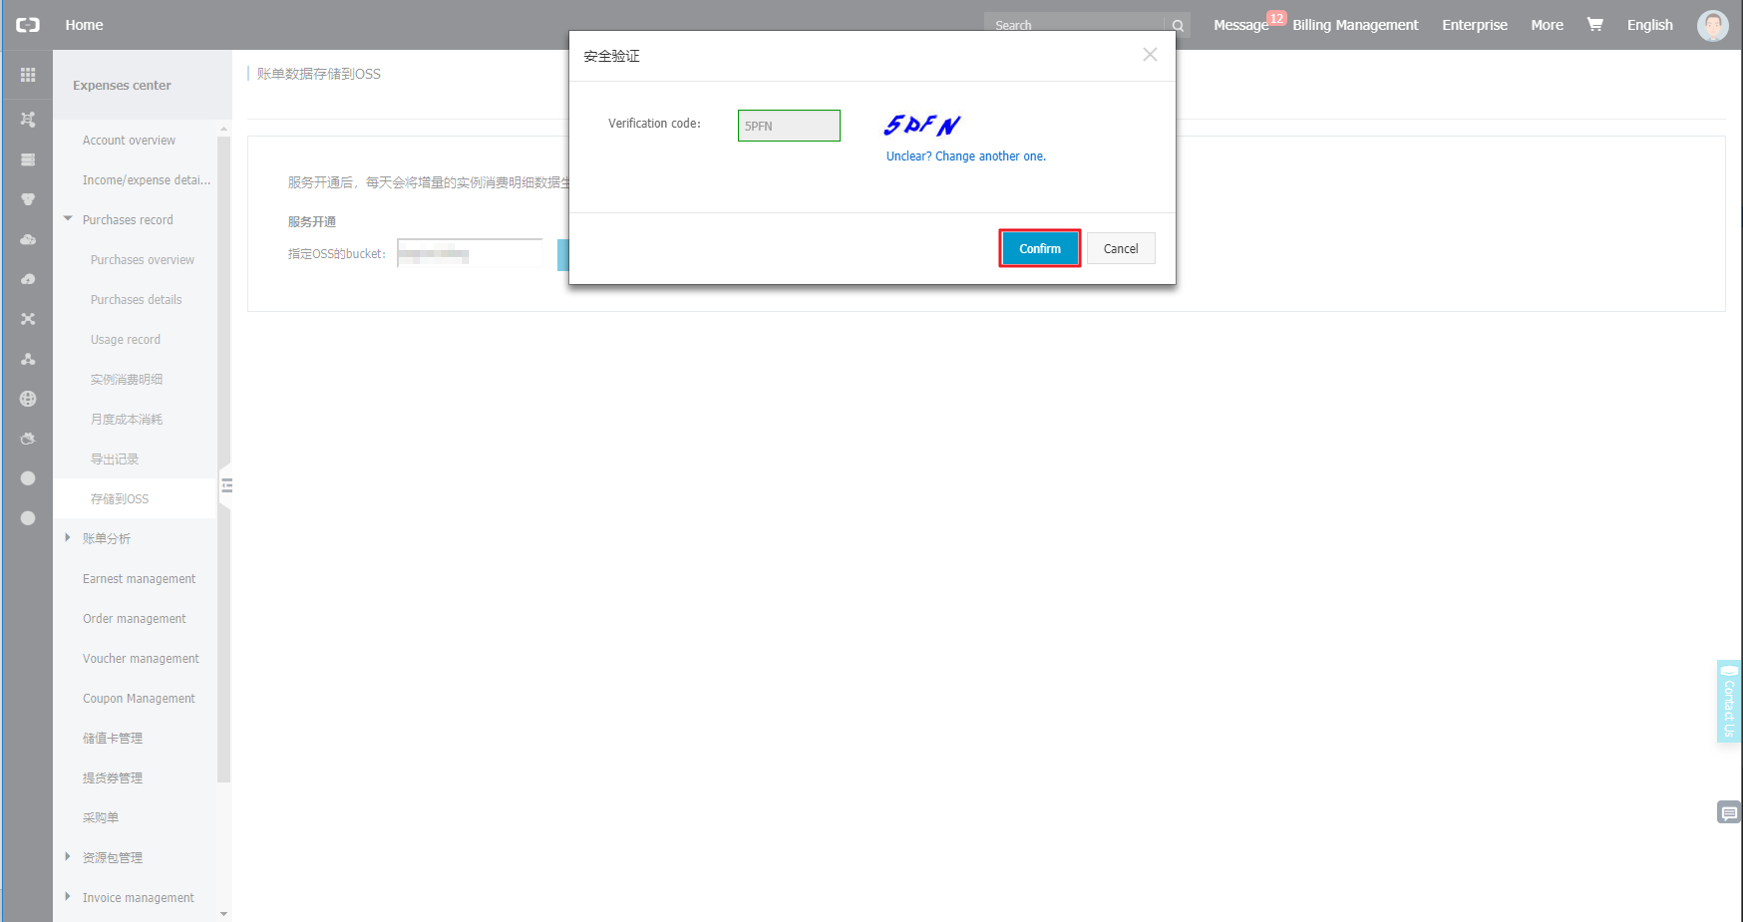
③ Enter the created Bucket name and click the [OK and Save] button next to the input field.

④ After entering verification code and clicking [Confirm] button, billing data will be loaded in your created OSS Bucket.
⑤ In Portal > Cloud Account > Resources & Cost Collection menu, enter OSS Bucket Name and OSS Endpoint to add an Alibaba account. OSS Endpoint refers to the endpoint in Internet Access of your created bucket information.

Register AWS Accounts For AutoRI
Before using the AutoRI of the AutoSavings services, you need to register your AWS accounts first in order to collect and process AWS Reservations data.
⑴ Go to Portal > Cloud Accounts > AutoRI menu.
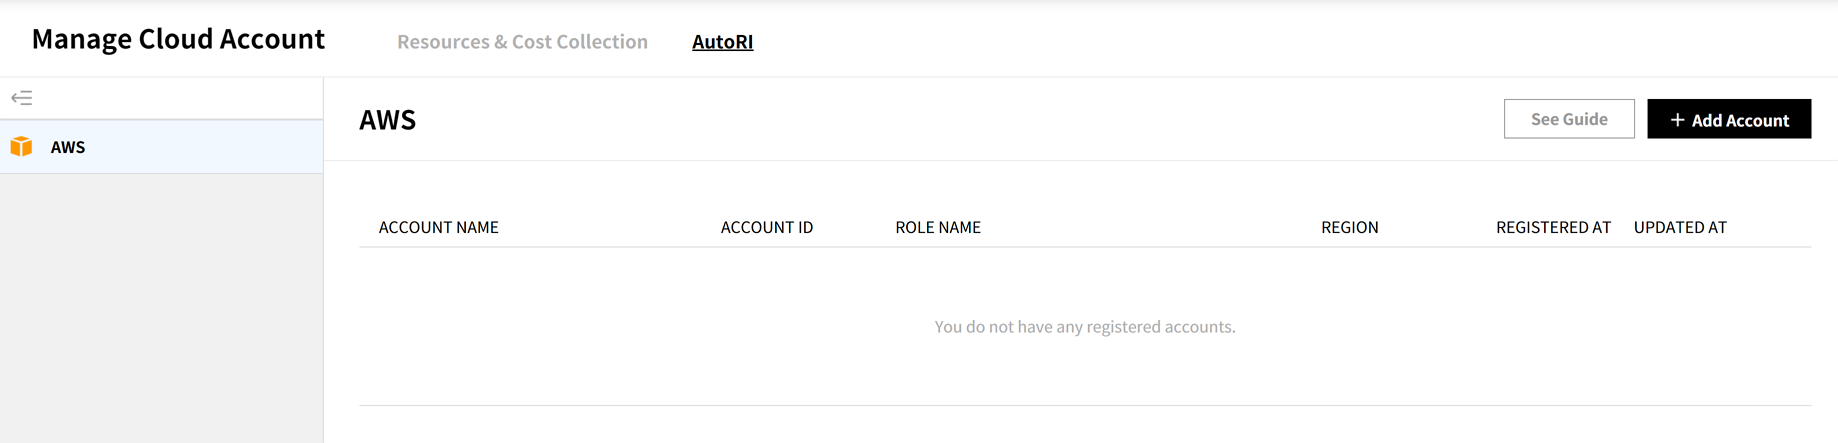
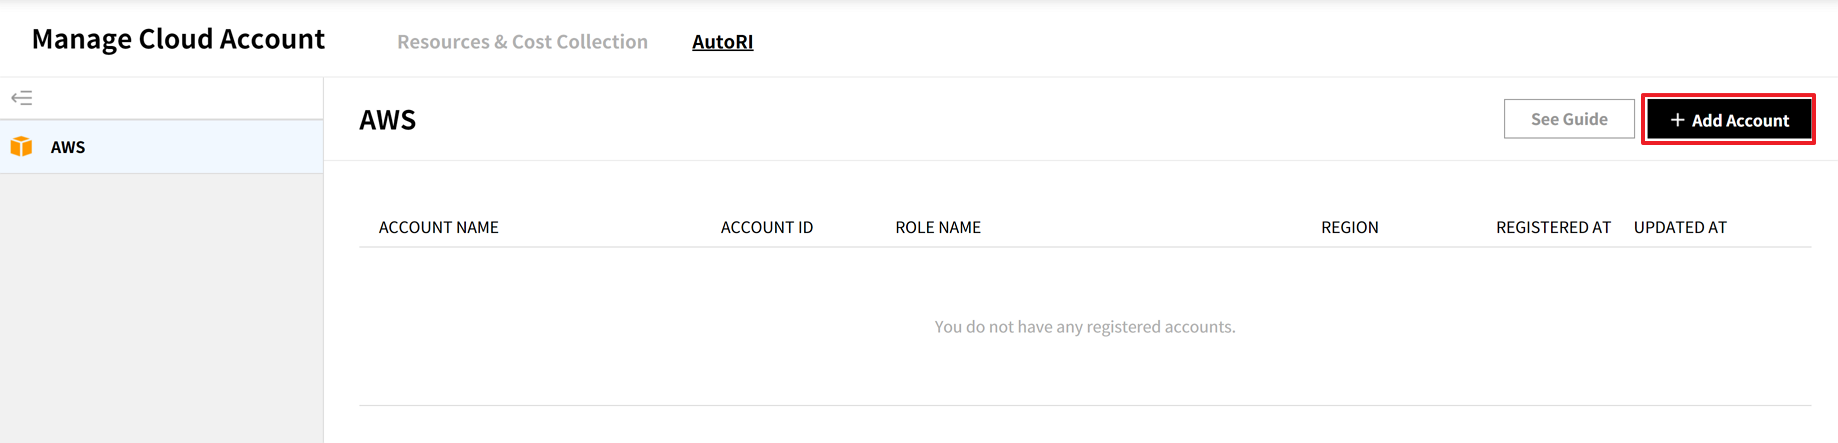
⑵ Click [+ Add Account].
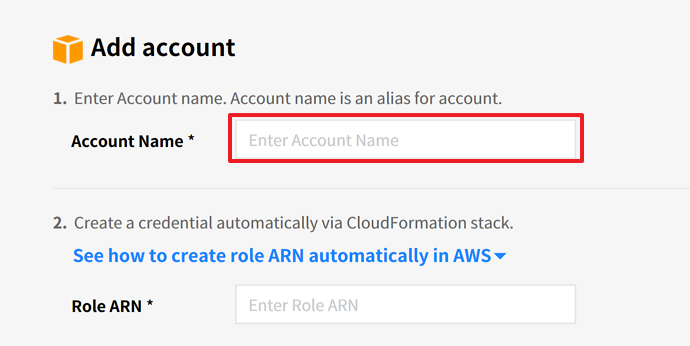
⑶ Enter the AWS account name. This name is an alias for the account so you can easily distinguish this account from other accounts.
⑷ Enter the Role ARN. This Role ARN can be automatically created using the AWS CloudFormation stacks. See below detailed guide to create and view your AWS Role ARN.
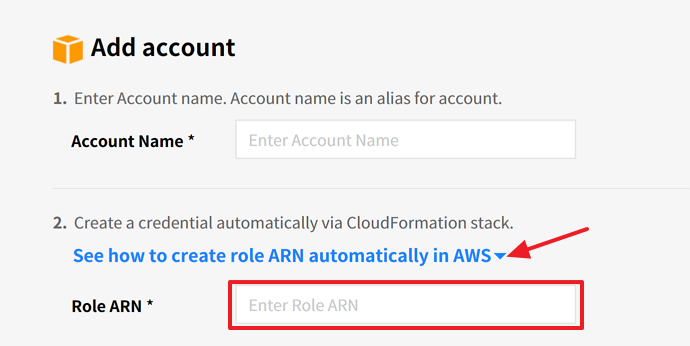
See How to Create Role ARN Automatically in AWS
① Sign in to the AWS Management console, and search and select [CloudFormation].
② Create a new stack by using one of the following options.
Click [Create Stack] in the CloudFormation console if you have no running stacks.
![]()
Click [Create Stack] on the Stacks page and then choose [With new resources (standard)] if you do have a currently running stack.
![]()
③ Next, enter the URL in the Amazon S3 URL field. We provide the URL in the Template URL from See how to create role ARN automatically in AWS of Service Portal. Copy and paste this link and click [Next] in the Specify Template page.
④ Enter the required information and click the [Next] button. Stack name can include letters (A-Z and a-z), numbers (0-9), and dashes (-). ExternalAccount will be automatically inserted, and for ExternalId, copy External ID from See how to create role ARN automatically in AWS of Service Portal.
⑤ In Options page, click the [Next] button without entering anything.
⑥ Check the input fields in the Review page, select [I acknowledge that AWS CloudFormation might create IAM resources.] checkbox. And click [Create stack] to create a stack.
⑦ Choose the stack created from the stack list, and click [Physical ID] in Resources tab.
⑧ When you click an item from [Physical ID] list, the summary page appears. Click the [Copy to clipboard] icon next to Role ARN to copy the value. Then, paste the copied value in the Role ARN field of Service Portal.
⑸ Click [ADD] to complete registering your AWS account for AutoRI.
Modify & Delete Accounts
📌 Important: Only the users who have “edit” permission for the Cloud Account menu can modify the registered cloud account information. To see your assigned permissions, go to Service Portal > Permission > Service Platform. Please contact your account manager for further information about the permissions.
Modify Accounts
① To modify the registered cloud account information, first select the Cloud Service Provider (CSP) on the Service Portal > Cloud Account > Resource & Cost Collection page, and then click the pencil icon.

② Make necessary modifications and click the green [V] button to save. You cannot modify the registered account ID.

Delete Accounts
You cannot directly delete the registered cloud account on the Service Portal > Cloud Account menu. Please contact your sales representative or send an email inquiry to our Technical Support team.
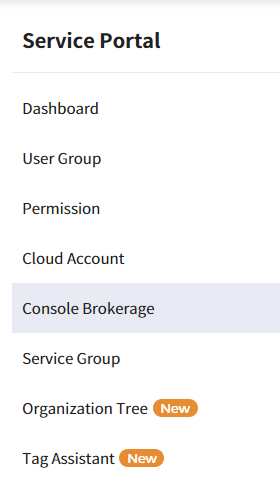
Console Brokerage
Service Portal > Manage Cloud Account > Console Brokerage
The Console Brokerage provides features to use AWS Management Console without having to log in by granting rights to access to AWS Management Console with a service account. The user can check the resource usage status and provision resources in AWS Management Console with the same account. Also, if you manage multiple AWS accounts, you only need a single service account to log into multiple AWS accounts.
Depending on your country or region, this feature may not be available.
Register Accounts
In order to use Console Brokerage features, you must first register an account to log into AWS Management Console.
Add Account
① Click [+ Add account] button in Service Portal > Cloud Account > Console Brokerage.
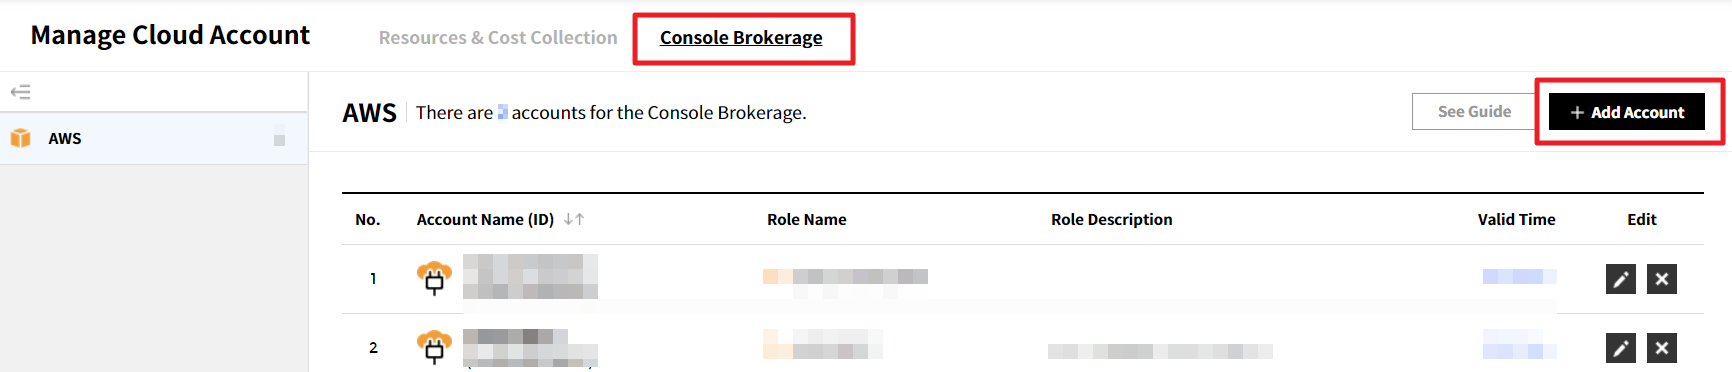
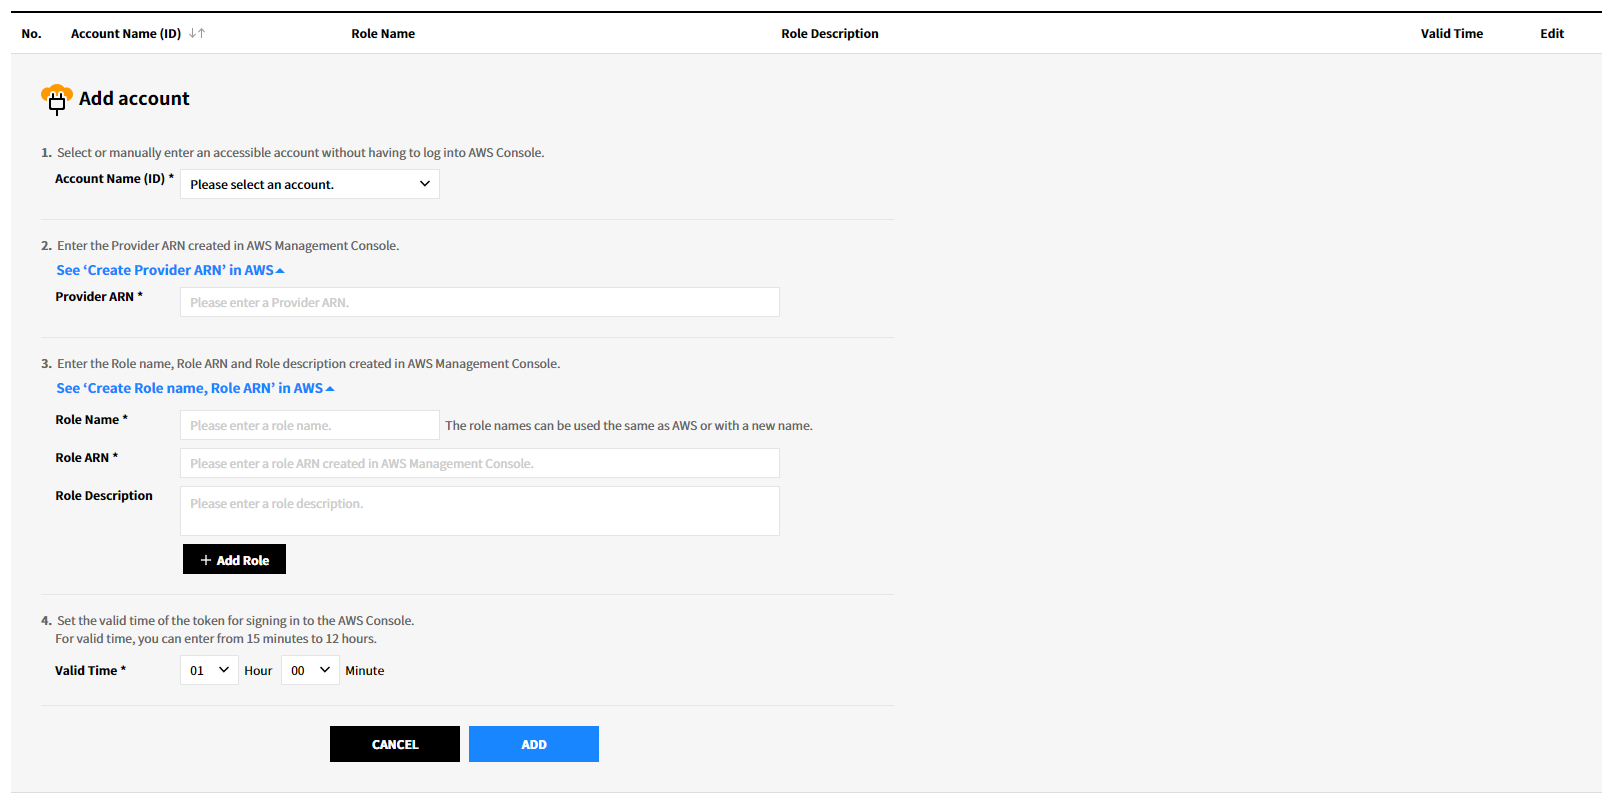
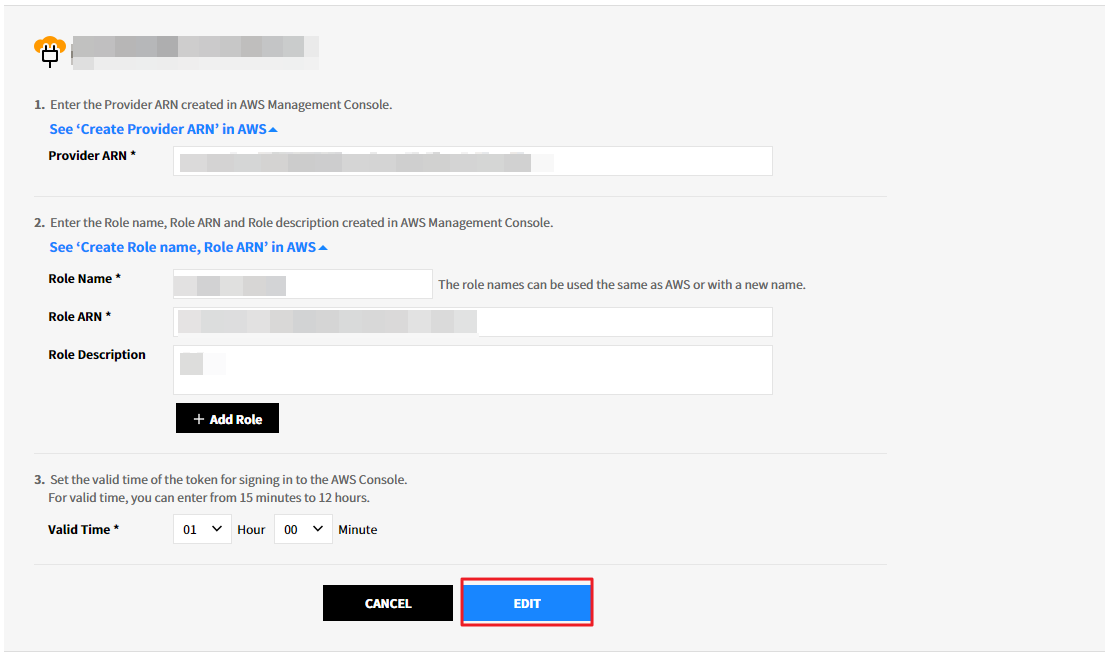
② In Add account screen, enter the information and click the [Add] button.
| Item | Description |
|---|---|
| Account Name (ID) |
Select manually or an existing ID. If you already registered an AWS account for collecting resources and cost, you can select that account. |
| Provider ARN |
Enter the Provider ARN as below. arn:aws:iam::(enter AWS ID):saml-provider/(enter role name) |
| Role Name | You can use alphanumeric and ‘+=,.@-_’ symbols. You can also use the same name as AWS or the new name. |
| Role ARN |
Enter the Role ARN as below. arn:aws:iam::( enter AWS ID):role/( enter role name) |
| Role Description | Enter the description about a role. (Maximum of 64 characters in alphanumeric and ‘+=,.@-_’ symbols) |
| Valid Time |
Set the valid time of the token for accessing to the AWS Management Console. (15 minutes ~ 12 hours) |
③ The added account will be displayed in AWS accounts list.

Delete Account
① Click ![]() icon in Edit in the list of added accounts.
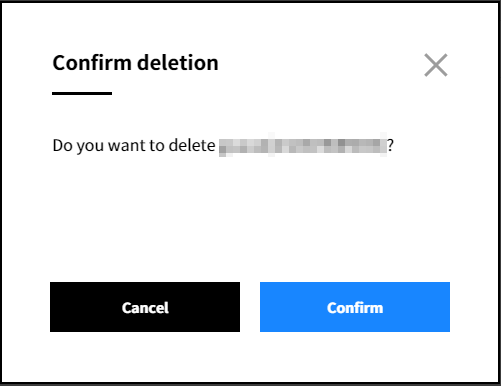
icon in Edit in the list of added accounts.
② In Confirm deletion pop-up, click the [Confirm] button.
③ In Delete completed pop-up, click the [Confirm] button to delete an account.

Edit Account
① Click ![]() icon in Edit in the list of added accounts.
icon in Edit in the list of added accounts.
② After making changes, click the [Edit] button.
③ In Confirm edition pop-up, click the [Confirm] button.
④ In Edition completed pop-up, click the [Confirm] button to edit an account.
User
Service Portal > Console Brokerage > User
Console Brokerage under Service Portal provides convenience for users to connect registered AWS accounts and service accounts in Cloud Account without additional AWS Console log-in. Users can also connect accessible AWS accounts and roles.
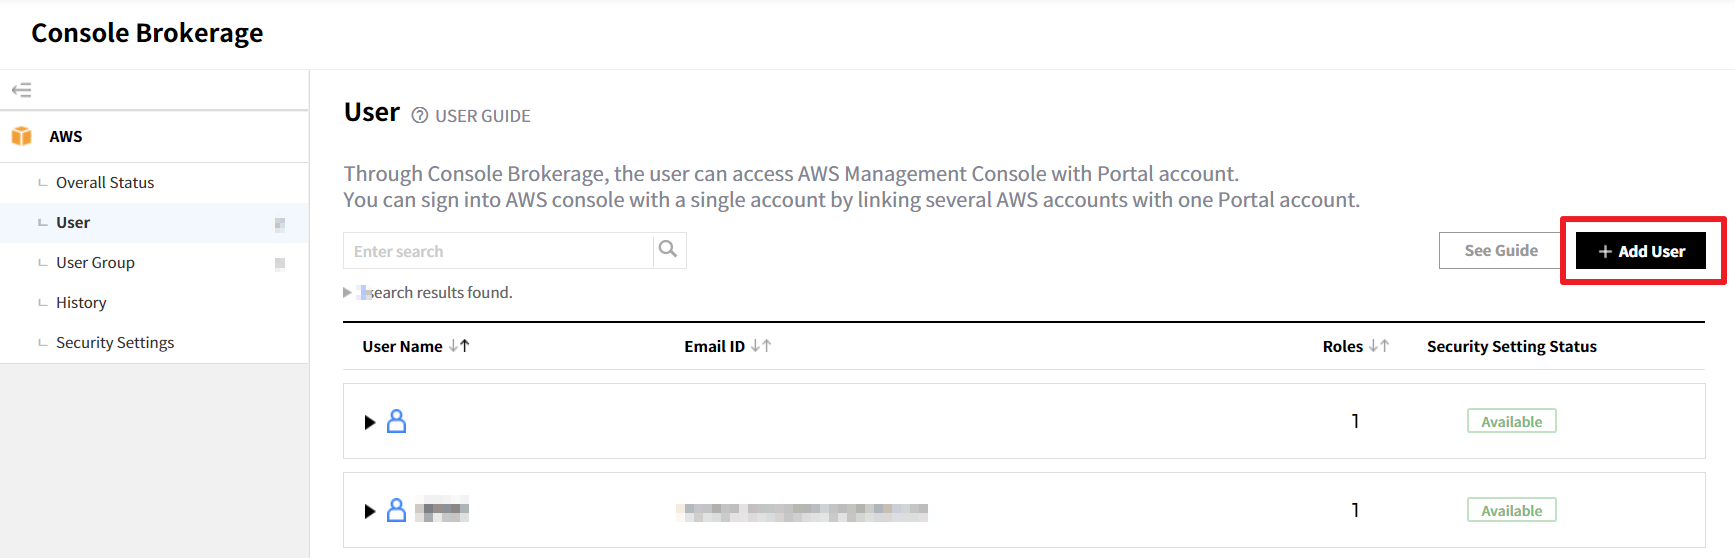
Add User
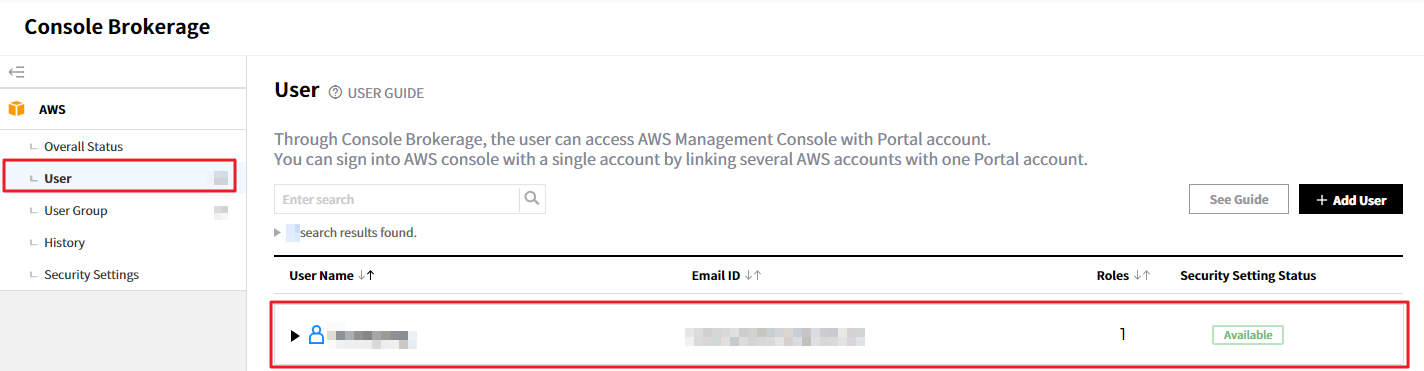
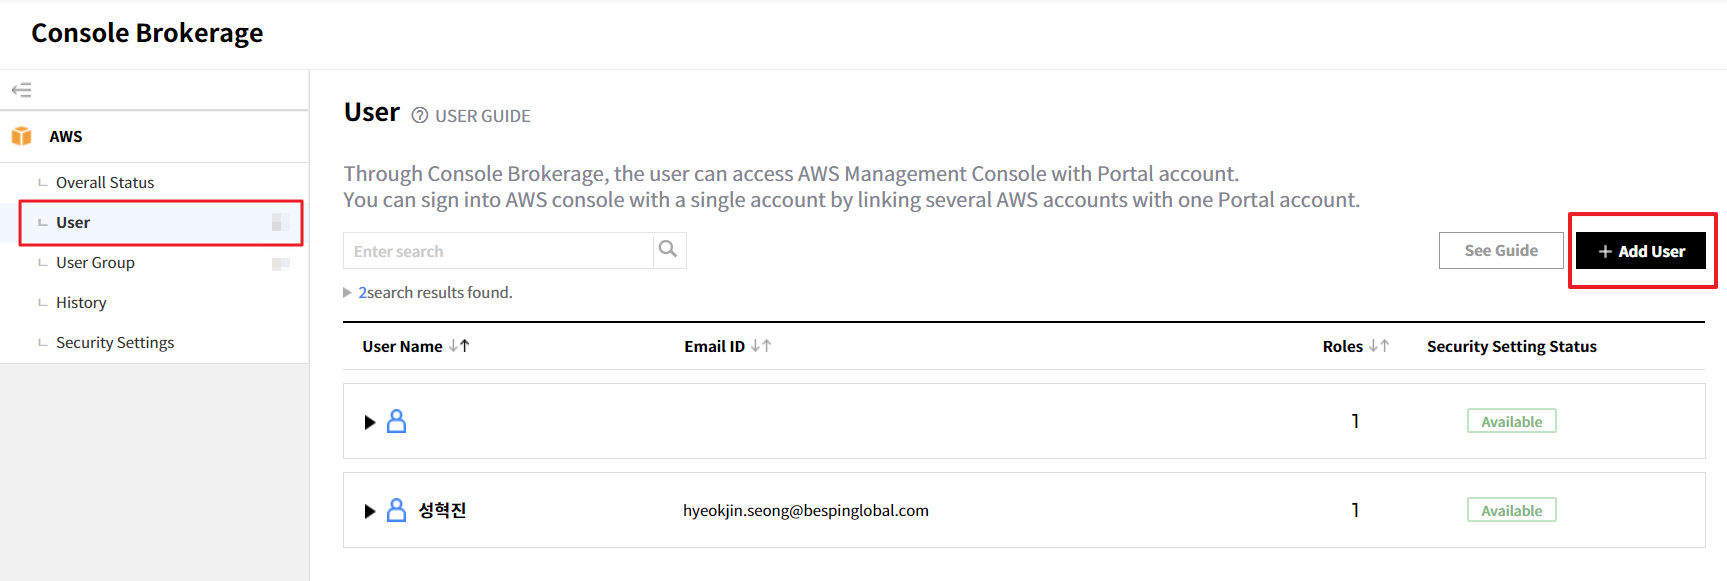
① Click User at the left of the screen. In User screen, click the [+ Add User] button.
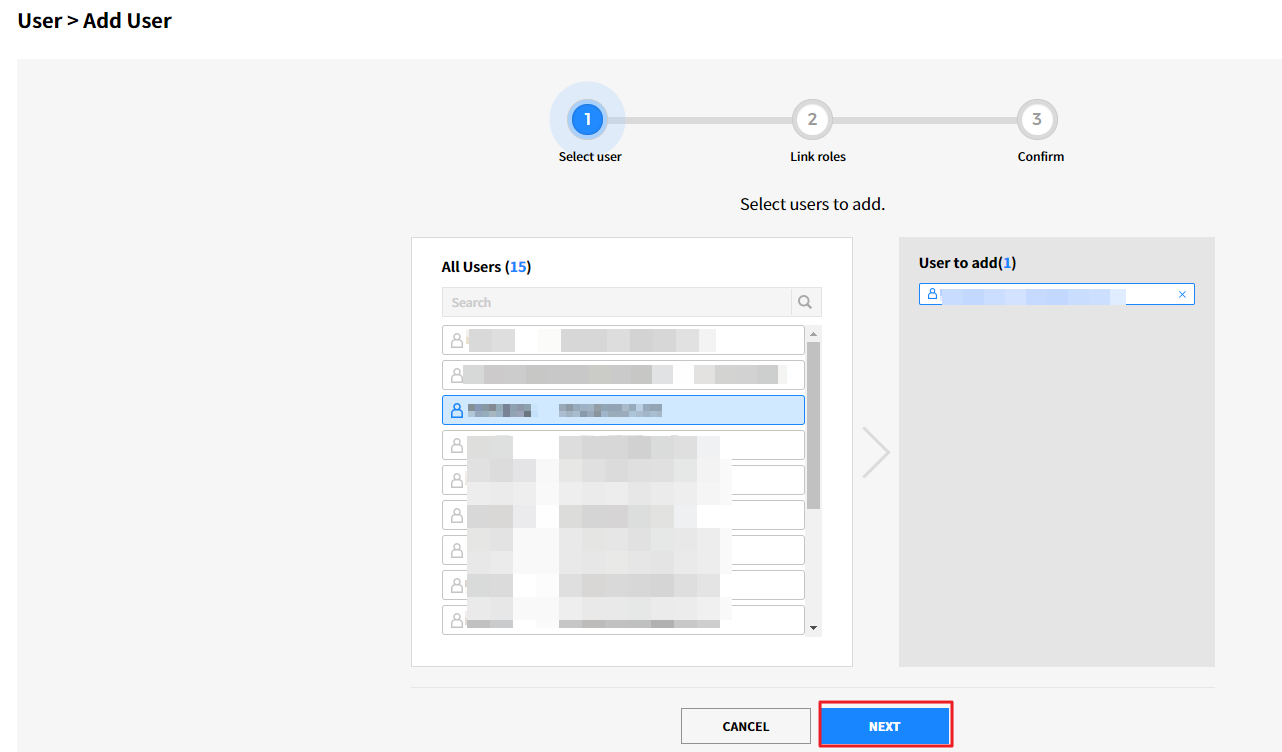
② Select user: Enter a user in the search field and click the user you entered. Then, the user will be displayed in the User to add list. After adding a user, click the [Next] button.
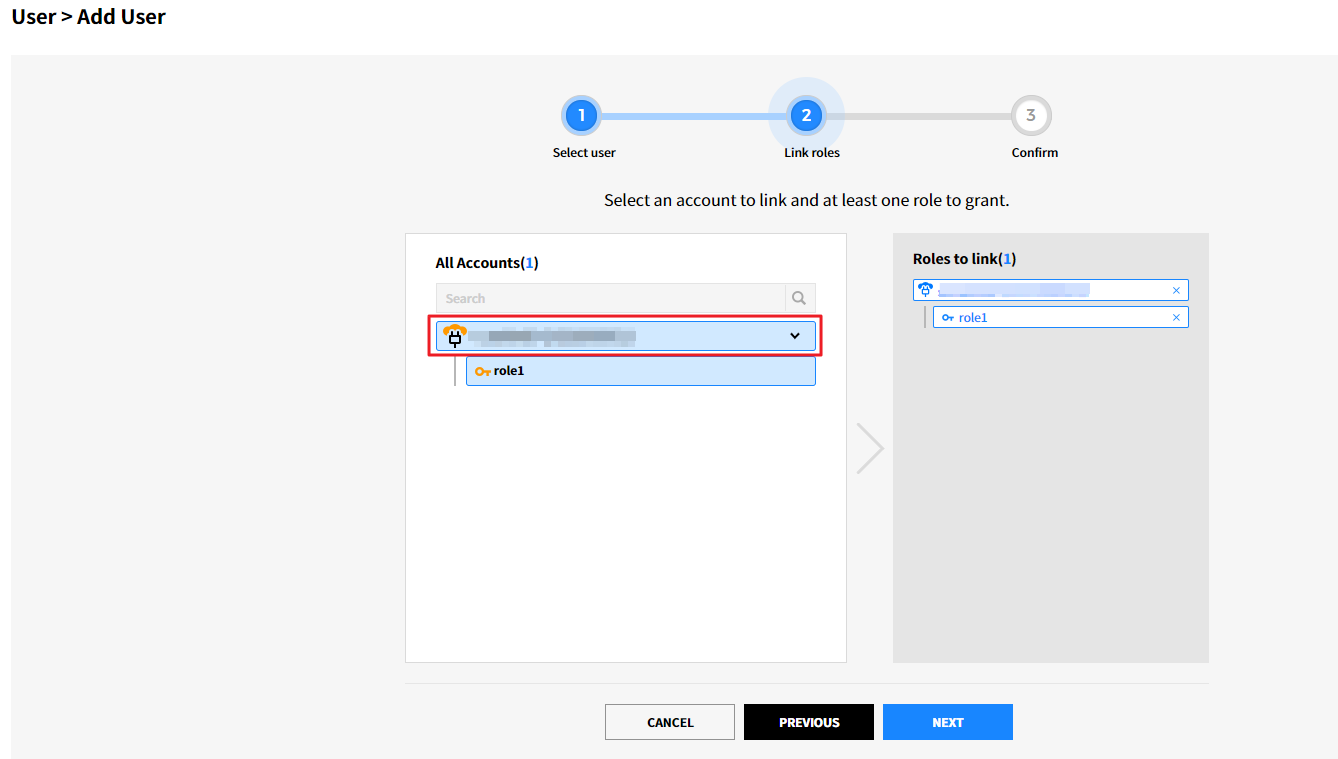
③ Link roles: Select an account to link and a role to add to an account. Then, click the [Next] button.
④ Confirm: After checking the users to add and roles to link, click the [Add] button.
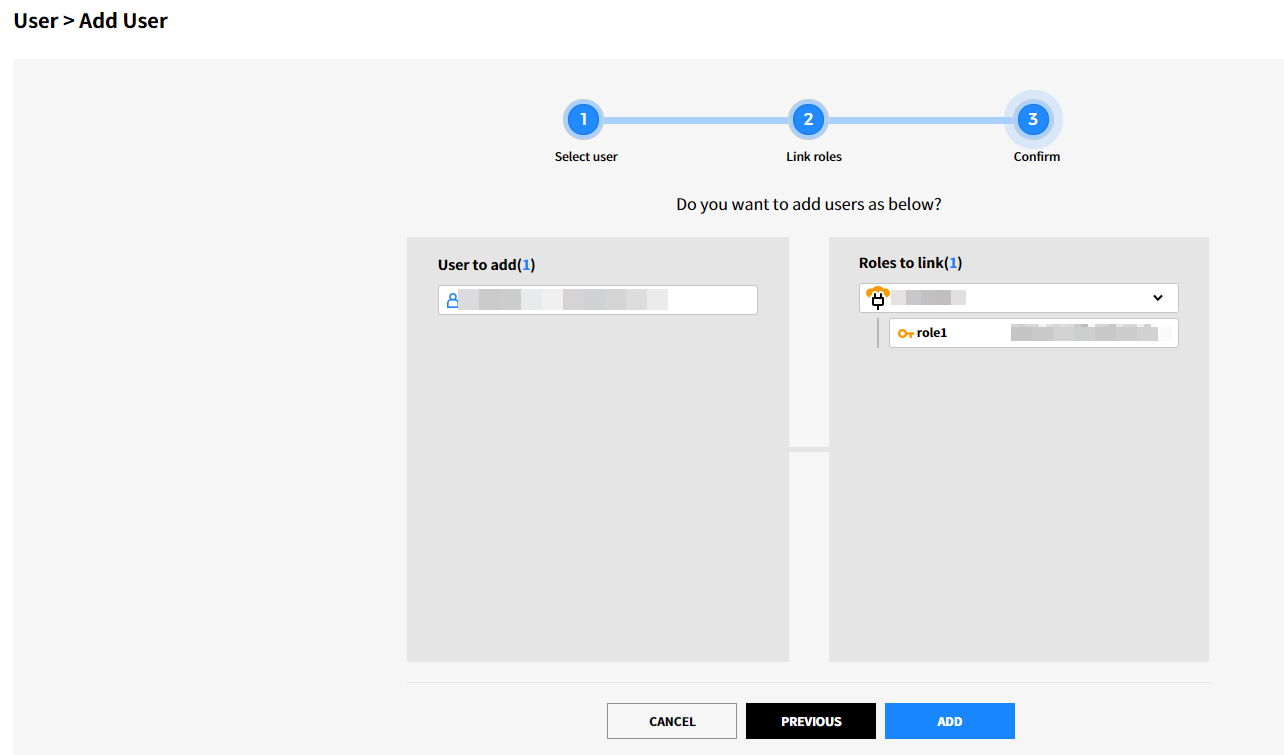
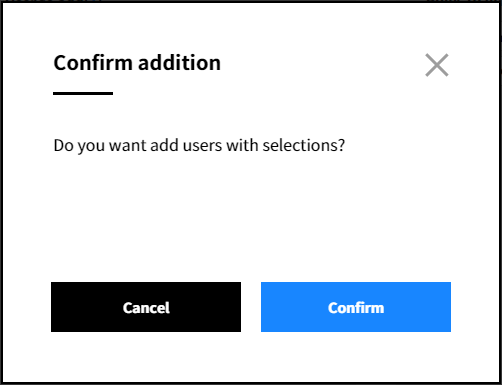
⑤ In Confirm addition pop-up, click the [Confirm] button to add users.
⑥ You can add more users by clicking [+Add User] button.
User Security Settings
To make your account more secure, we strongly recommend setting up the following user security options: Multi-Factor Authentication (MFA) and IP Address Restriction.
① Select and click the user to set up user security.
② View the current security settings under the User security settings.
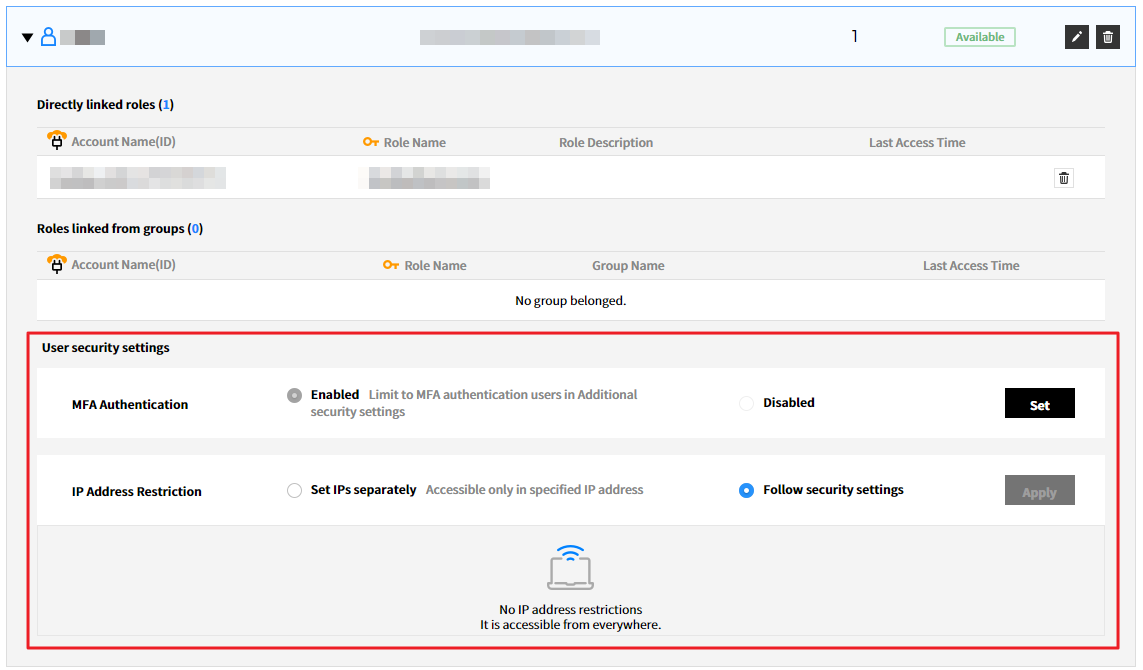
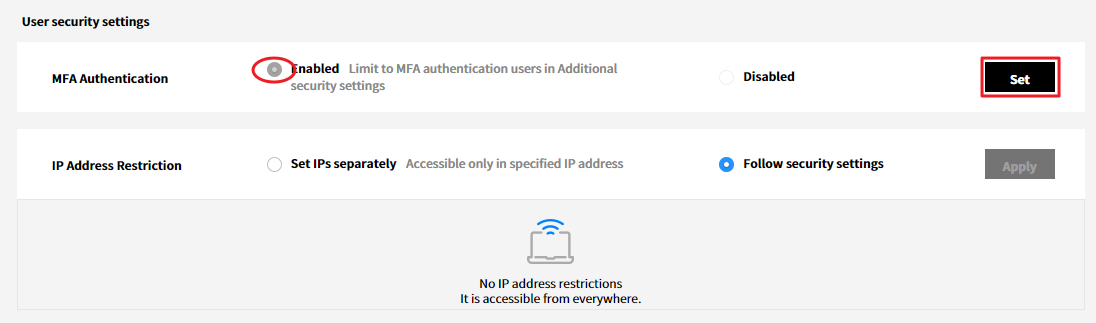
③ If the user had already enabled MFA Authentication on the My Account > Additional Security Setting > Multi-Factor Authentication page, then the Enabled option is already selected. If the Disabled option is selected by default, then click the Set button to set up additional security settings to make the account more secure. By setting up the 2-step additional security, users will be required to enter the one-time password (OTP) when logging in to the Service. One example of OTP is Google Authenticator mobile app.
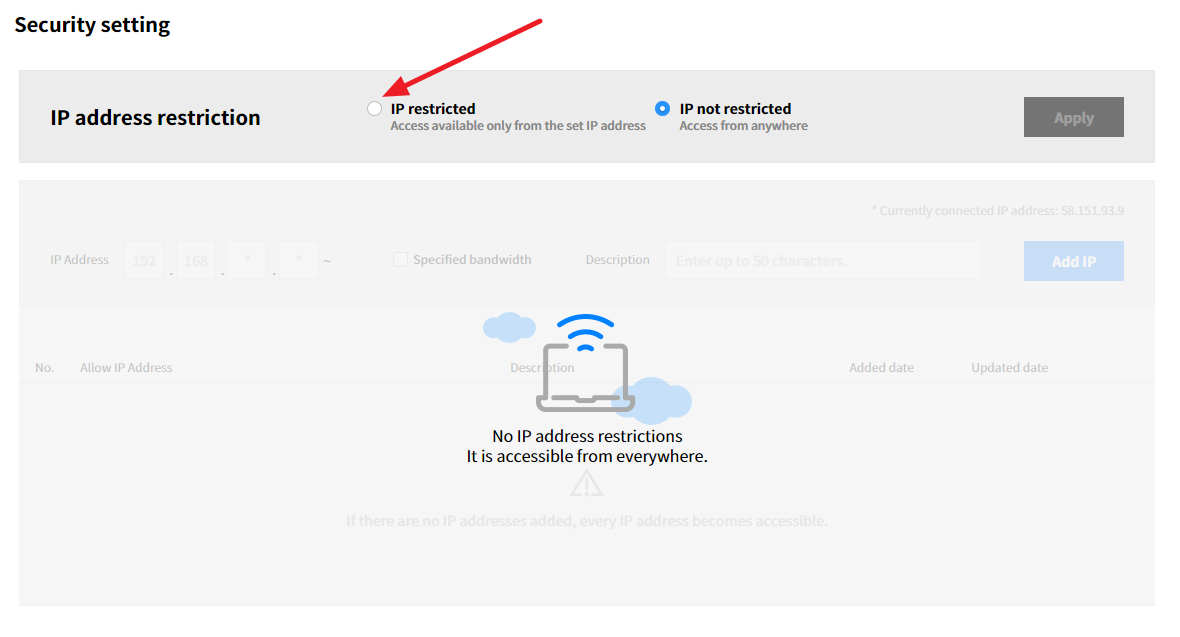
④ IP Address Restriction option restricts access from unknown IP addresses other than the one already registered on this page. By restricting IP address or the specified bandwidth, only the users who are logging in from the specified IP address can be successfully logged in to the Service. Select Set IPs separately to enter the specified IP address. If you want to set bandwidth, then click the Specified bandwidth check box. The IP bandwidth cannot go over the limit already configured on the Service Portal.

⑤ If the IP Address Restriction option is selected as Follow security settings, the user’s security setting is the same as the whole company’s security settings on the Console Brokerage > Security Settings page.
⚠️ Attention: Depends on the user permission, the Security Settings page may not be shown. Please ask your account manager for more details.
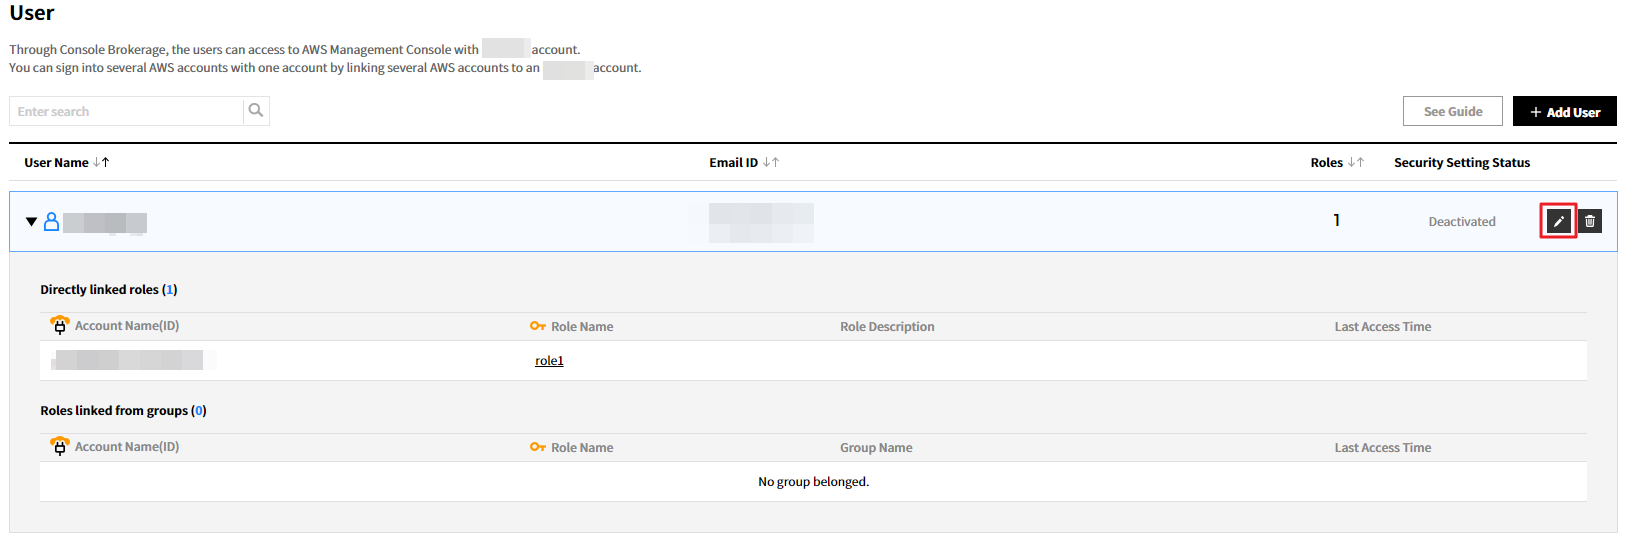
Edit User Role
① Click the black arrow at the left of the User list.

② The details about a user will be displayed below. Click the [Edit] icon.
③ You can add or remove roles to link to users. After adding or removing, click the [Edit] button.
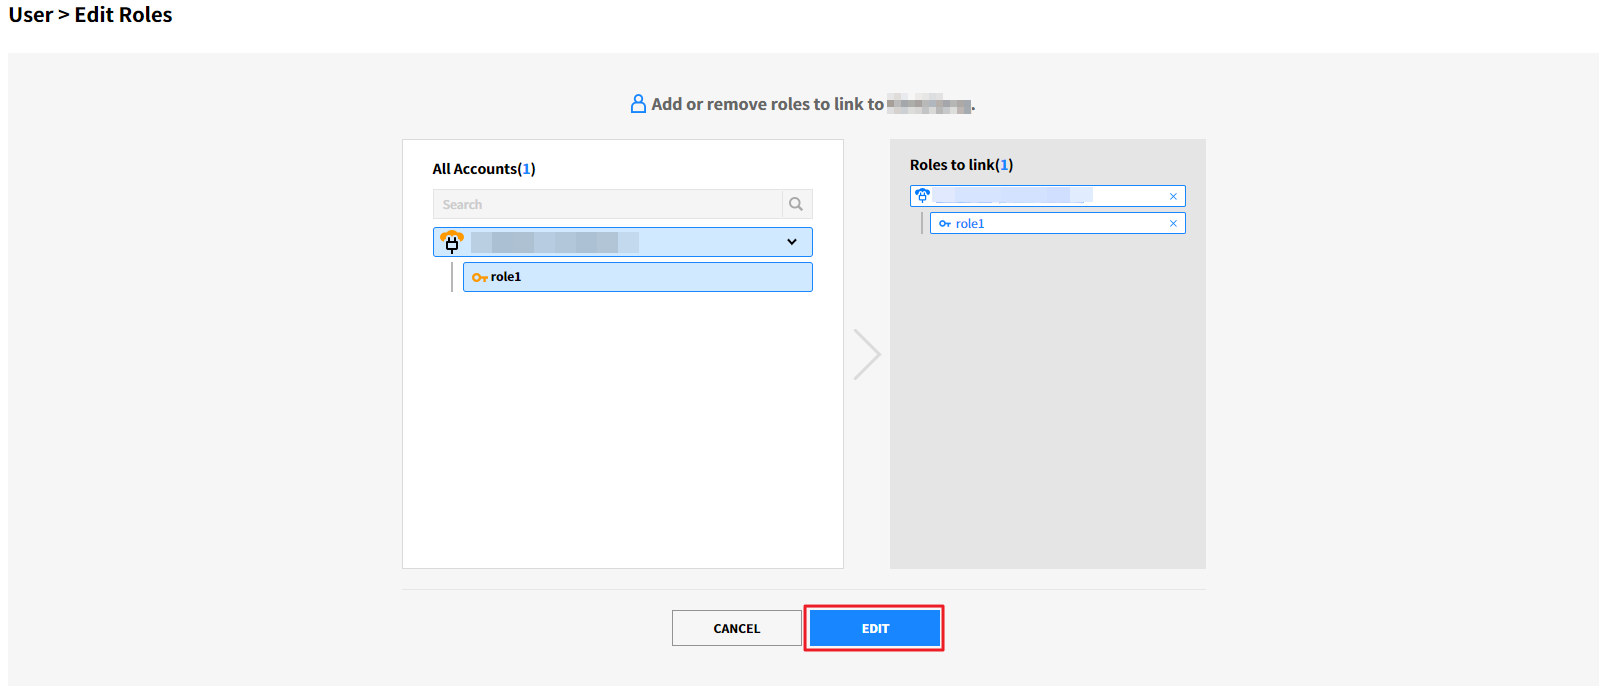
④ In Confirm edition pop-up, click the [Confirm] button to edit the user role.
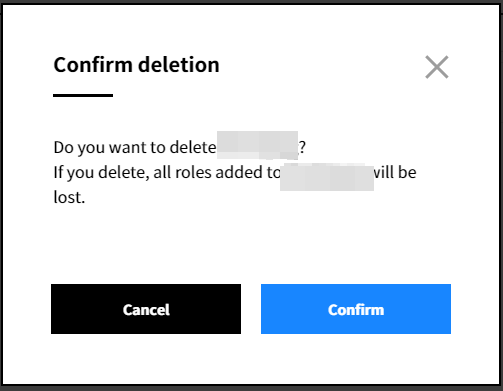
Delete User
① If you mouse over the user, the delete icon will be displayed at the right. Click [Delete] icon.

② In Confirm deletion pop-up, click the [Confirm] button to delete the user role.
User Group
By creating user groups, multiple users can connect to an AWS account without going through several steps.
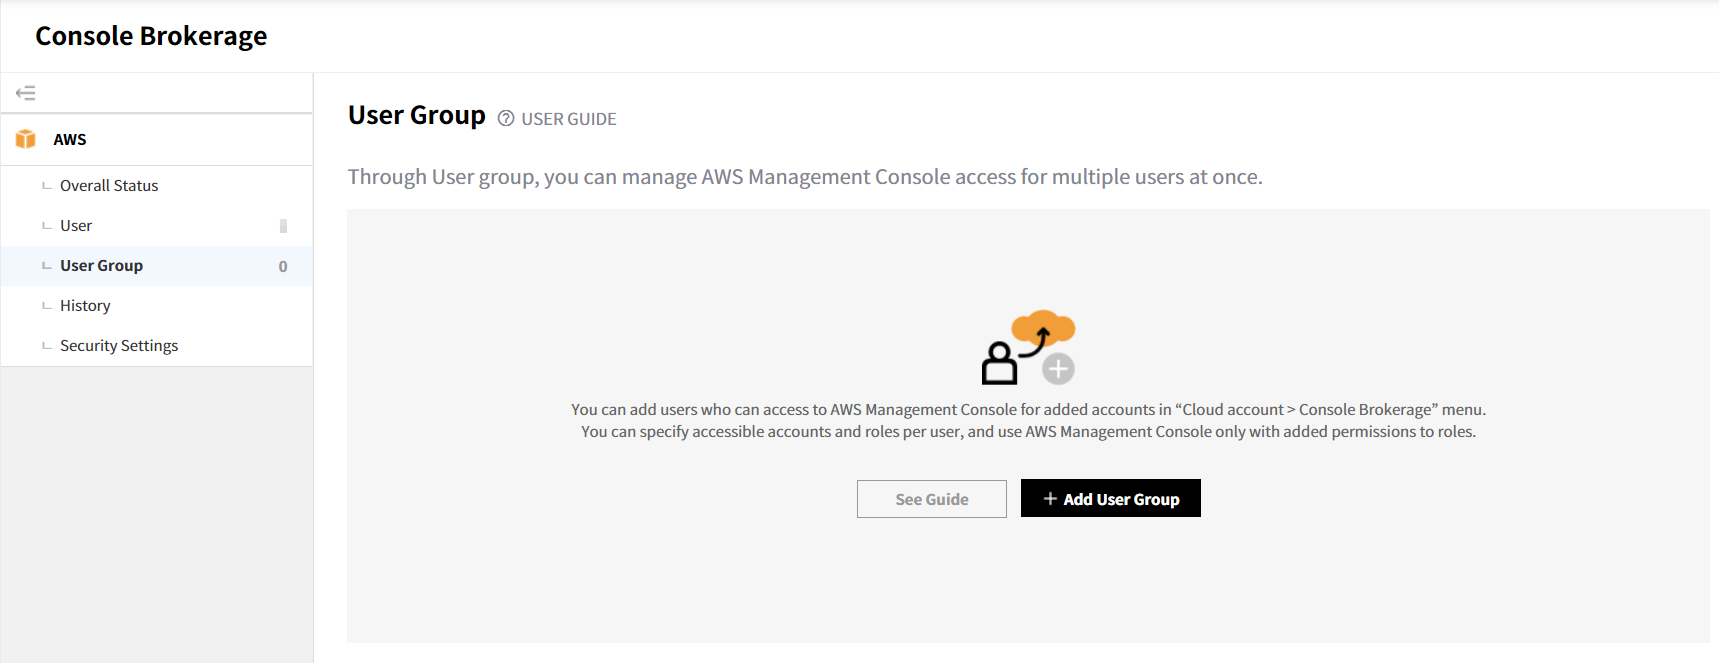
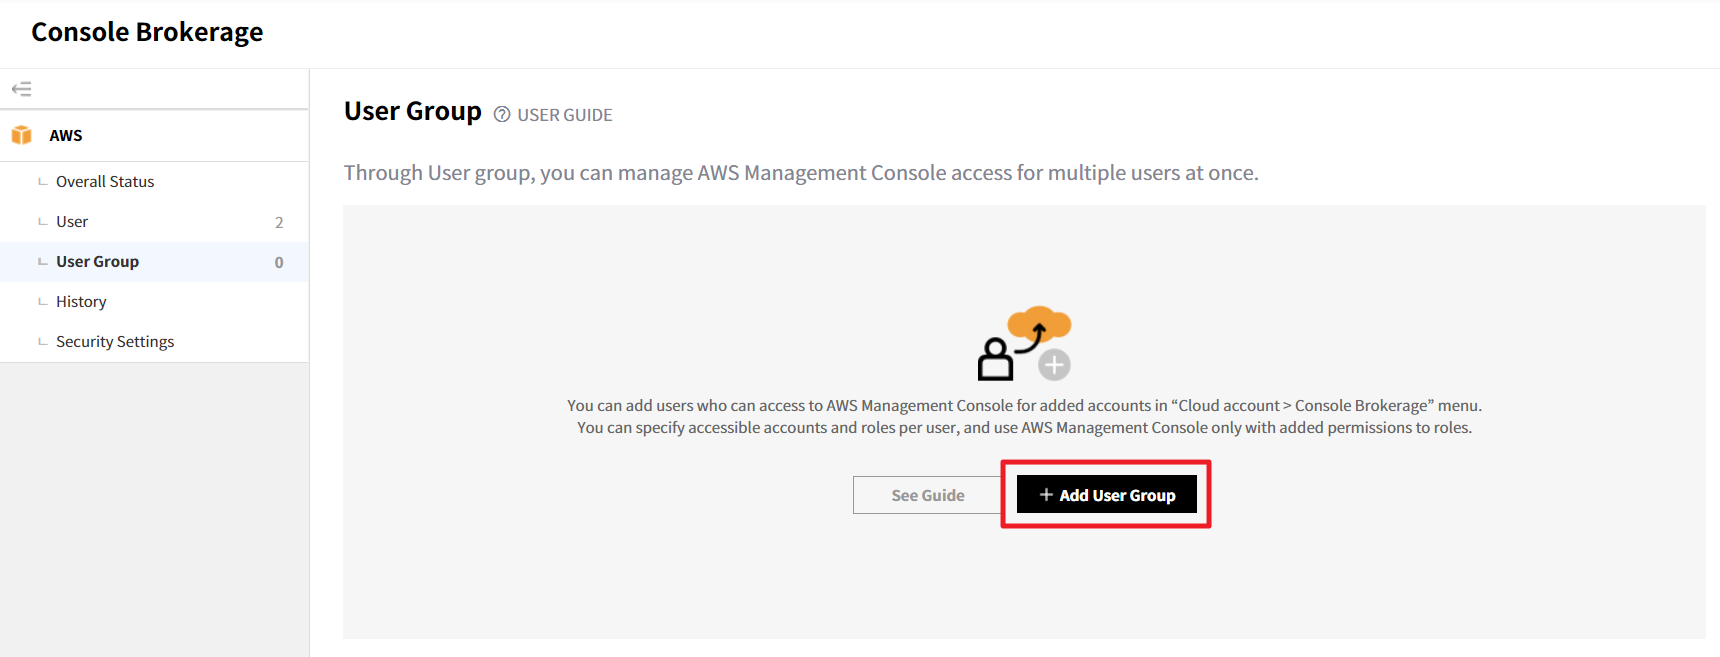
Add User Group
① Click ‘User Group’ at the left of the screen. In User Group screen, click the [+ Add User Group] button.
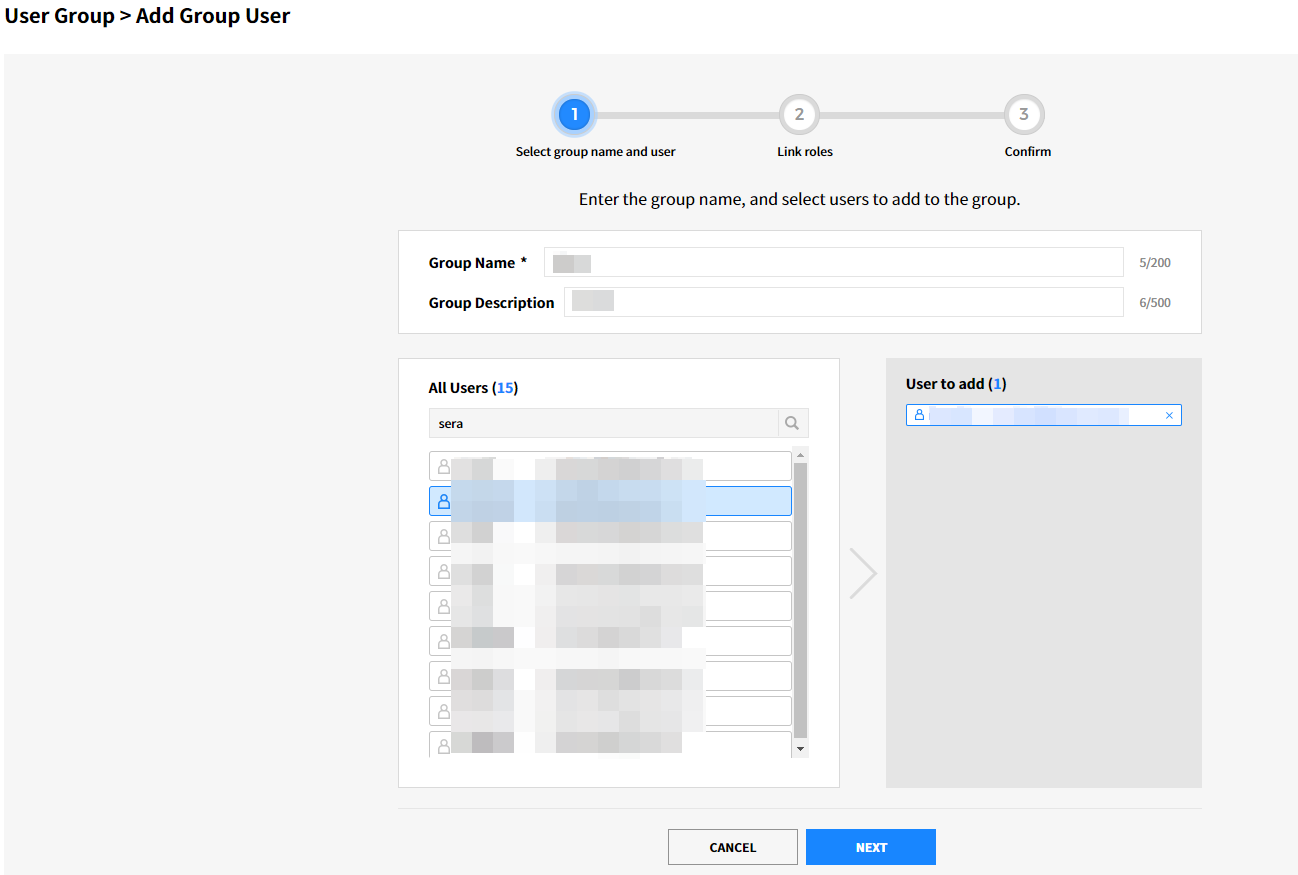
② Select group name and user: Enter a user in the search field and click the user you entered. Then, the user will be displayed on the list located on the right. After adding the user, click the [Next] button.
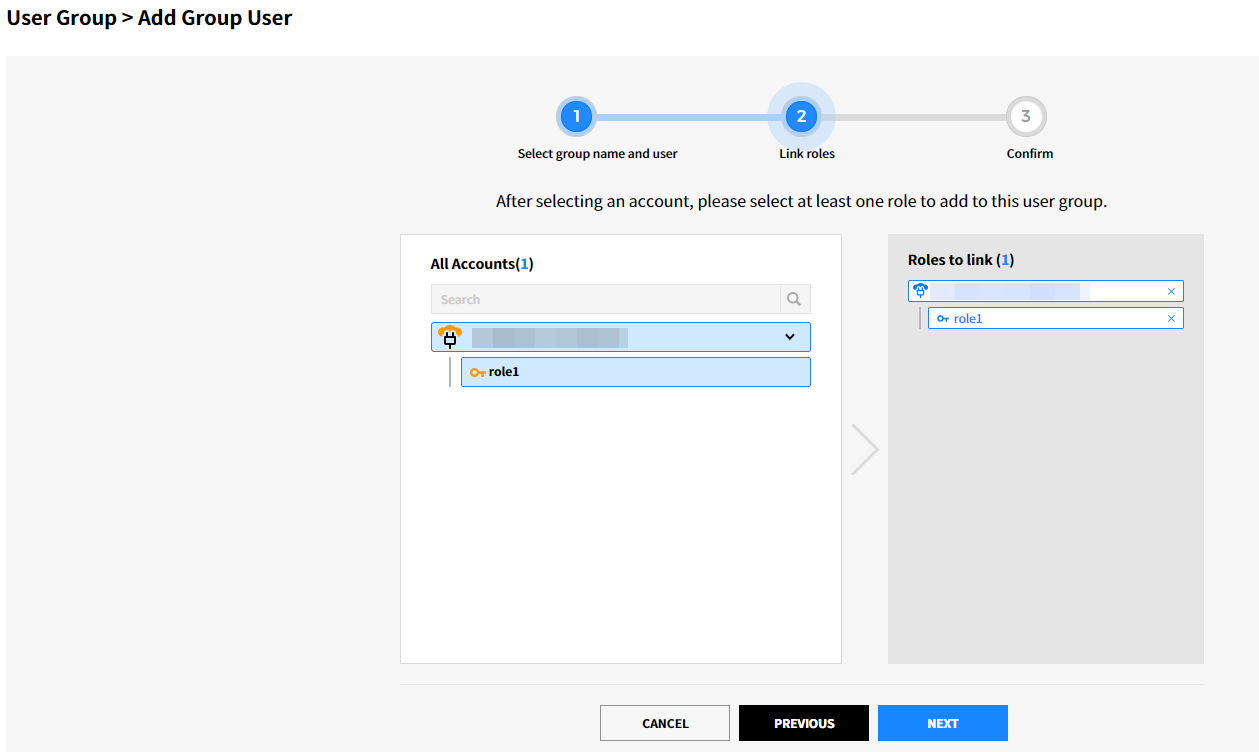
③ Link roles: Select an account to link and a role to add to an account. Then, click the [Next] button.
④ Confirm: After checking the users to add and roles to link, click the [Add] button.
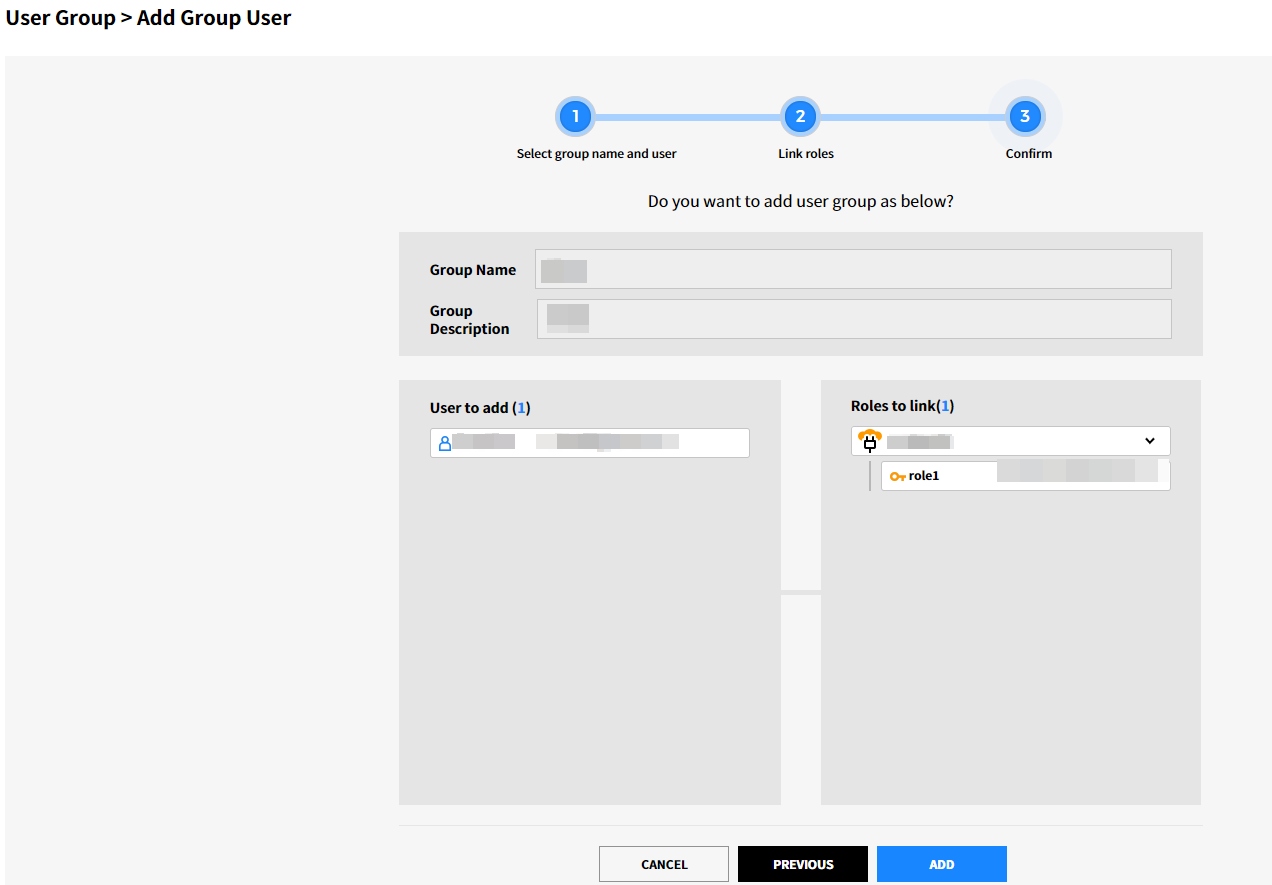
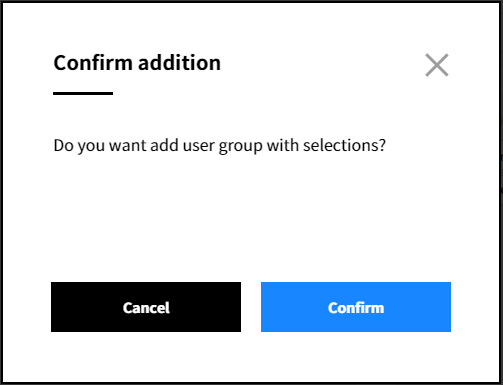
⑤ In Confirm addition pop-up, click the [Confirm] button to add user group.
⑥ You can add more user groups by clicking [+Add User Group] button.
Edit User Group
① If you mouse over the user, the edit icon will be displayed at the right. Click [Edit] icon.

② When clicking, it will move to the Add user group screen again. Make changes of user group information in Select group name and user, Link roles, and Confirm steps, and click the [Confirm] button. Then, user group information will be changed.
Delete User Group
① If you mouse over the user, the delete icon will be displayed at the right. Click [Delete] icon.

② In Confirm deletion pop-up, click the [Confirm] button to delete the user role.

History
In each tab (All, User, User Group), the history for adding, deleting, adding/canceling role, adding/deleting/renaming group, and logging into Console will be displayed as below.
| Item | Display | ||
|---|---|---|---|
| All | Add account |

|
YYYY-MM-DD. HH:MM The account has been added by {user}. Added account: Account name 1 |
| Delete account |

|
YYYY-MM-DD. HH:MM The account has been deleted by {user}. Deleted account: |
|
| Change role name |

|
YYYY-MM-DD. HH:MM The role name has been changed by {user}. Role name: Role name 1 → Role name 2 |
|
| Delete role |

|
YYYY-MM-DD. HH:MM The role has been deleted by {user}. Deleted Role: |
|
| User | Add user |
|
YYYY-MM-DD. HH:MM The user has been added by {user}. Added User: Hong GilDong (xxxx@xxxxx.com) |
| Delete user |

|
YYYY-MM-DD. HH:MM The user has been deleted by {user}. Deleted User: |
|
| Add role |

|
YYYY-MM-DD. HH:MM The role has been added by {user}. User: Hong Gildong (xxxx@xxxxx.com) Added Role: Account 1 > role name 1 |
|
| Cancel role |

|
YYYY-MM-DD. HH:MM The role has been canceled by {user}. User: Hong Gildong (xxxx@xxxxx.com) Canceled Role: |
|
| Log into Console |

|
YYYY-MM-DD. HH:MM Logged in to the console. User: Hong Gildong (xxxx@xxxxx.com) Connected Account: Account 1 > role name 1 |
|
| User Group | Add user group |

|
YYYY-MM-DD. HH:MM The user group has been added by {user}. Group Name: User group name 1 |
| Delete user group |

|
YYYY-MM-DD. HH:MM The user group has been deleted by {user}. Group Name: |
|
| Change user group name |

|
YYYY-MM-DD. HH:MM The user group name has been changed by {user}. Group Name: User group name 1 → User group name 2 |
|
| Add user |
|
YYYY-MM-DD. HH:MM {user} added a user to {user group name}. Added User: Hong Gildong (xxxx@xxxxx.com) |
|
| Delete user |
|
YYYY-MM-DD. HH:MM {user} deleted a user from {user group name}. Deleted User: |
|
| Add role |
|
YYYY-MM-DD. HH:MM {user} added a role to {user group name} Added Role: Account 1 > role name 1 |
|
| Cancel role |
|
YYYY-MM-DD. HH:MM {user} canceled a role from {user group name}. Canceled Role: |
|
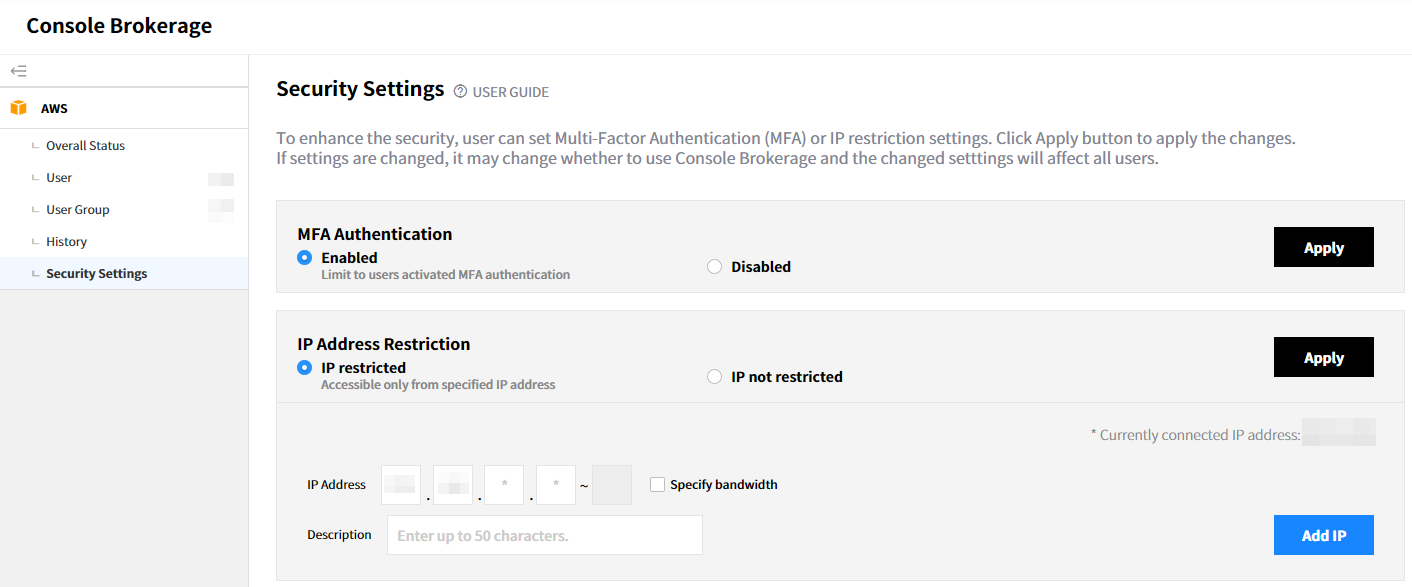
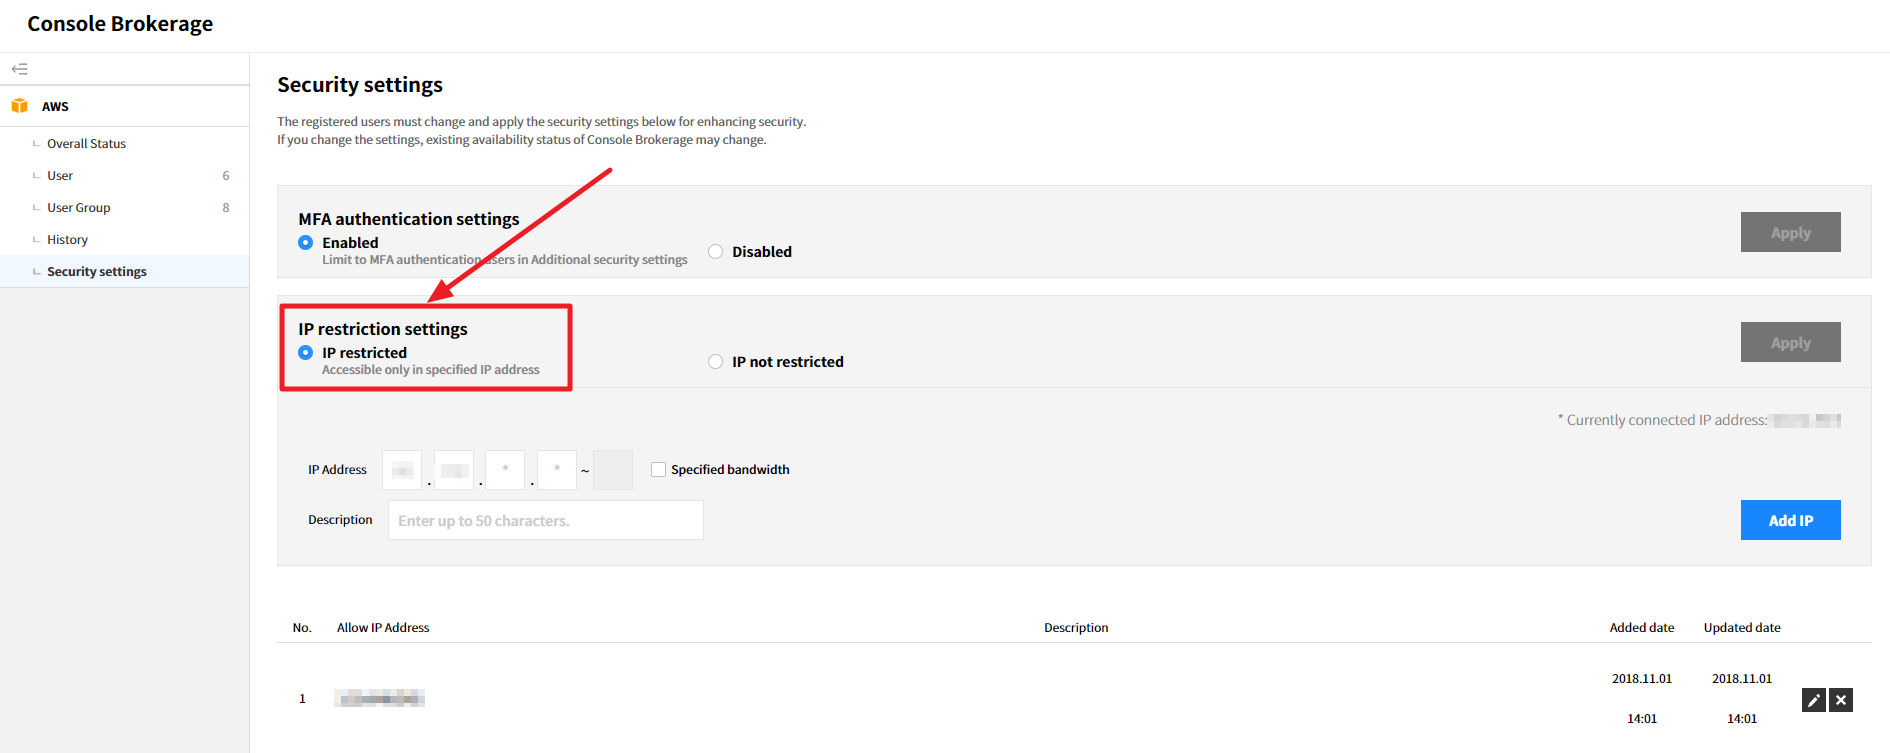
Security Settings
Users can configure additional security settings only for Console Brokerage. There are two options to set your security, MFA Authentication Settings and IP Restriction Settings.
MFA Authentication Settings
Select Security Settings from the Console Brokerage menu. Click the [Enabled] button of MFA Authentication Settings and then select the [Apply] button.
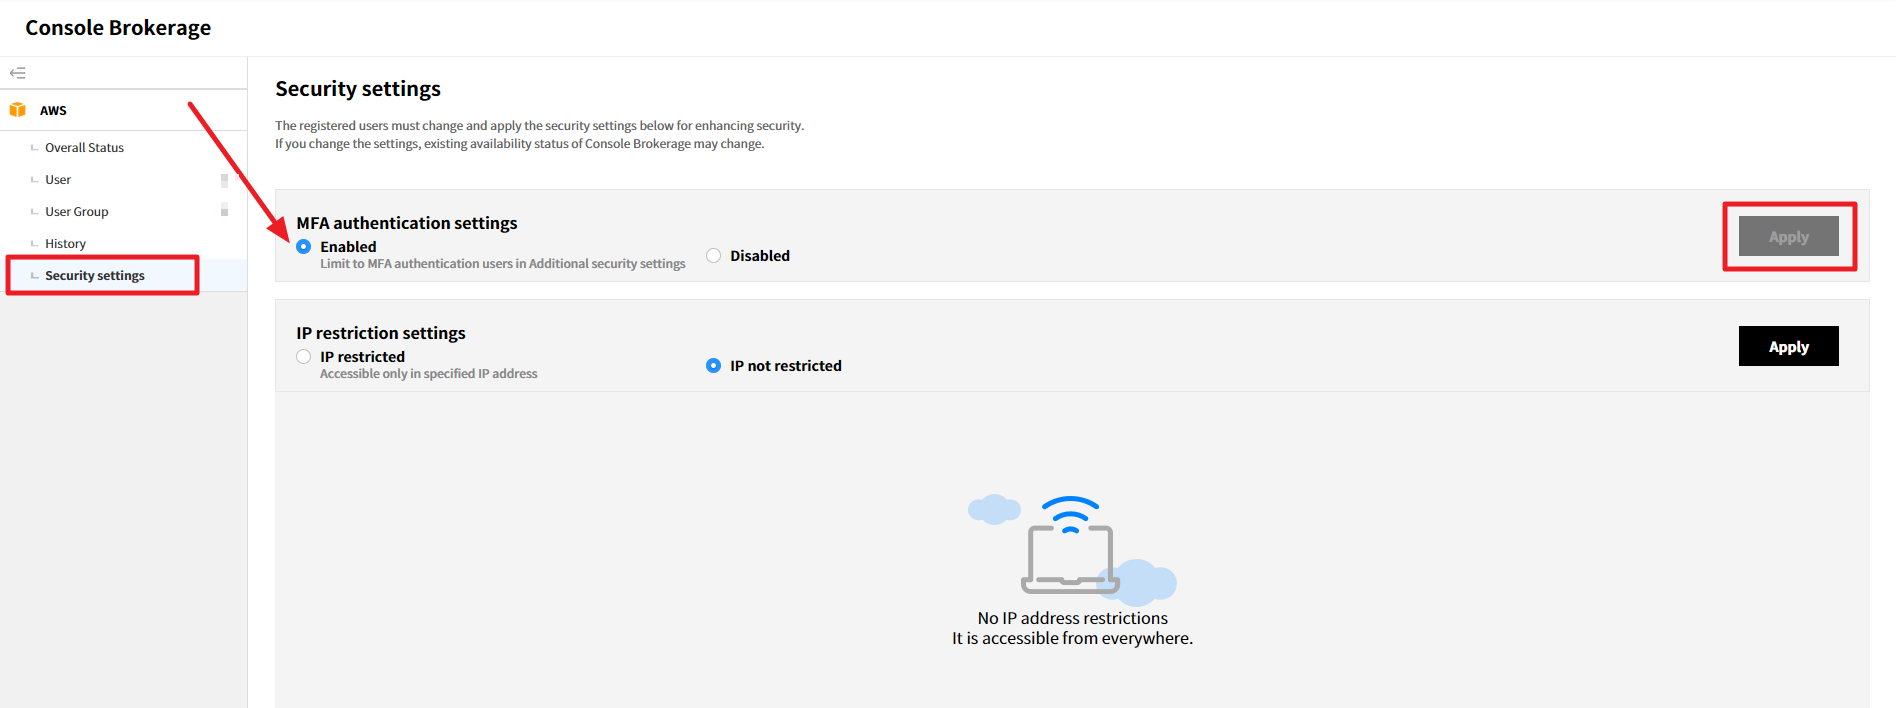
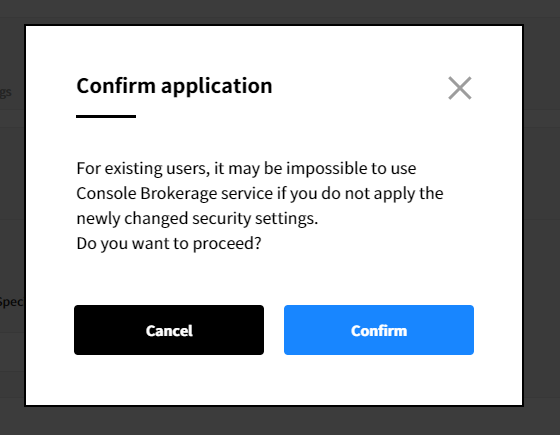
After selecting [Apply] button, a pop-up window will be appeared asking whether to proceed again, then click the [Confirm] button to apply the changes.
IP Restriction Settings
If IP Restriction Settings is enabled, you can allow certain IP addresses or a certain range of IP addresses to access the service.
📜 Note: Please note that an IP address cannot exceed the designated range of IP addresses that were already set by Service Portal.
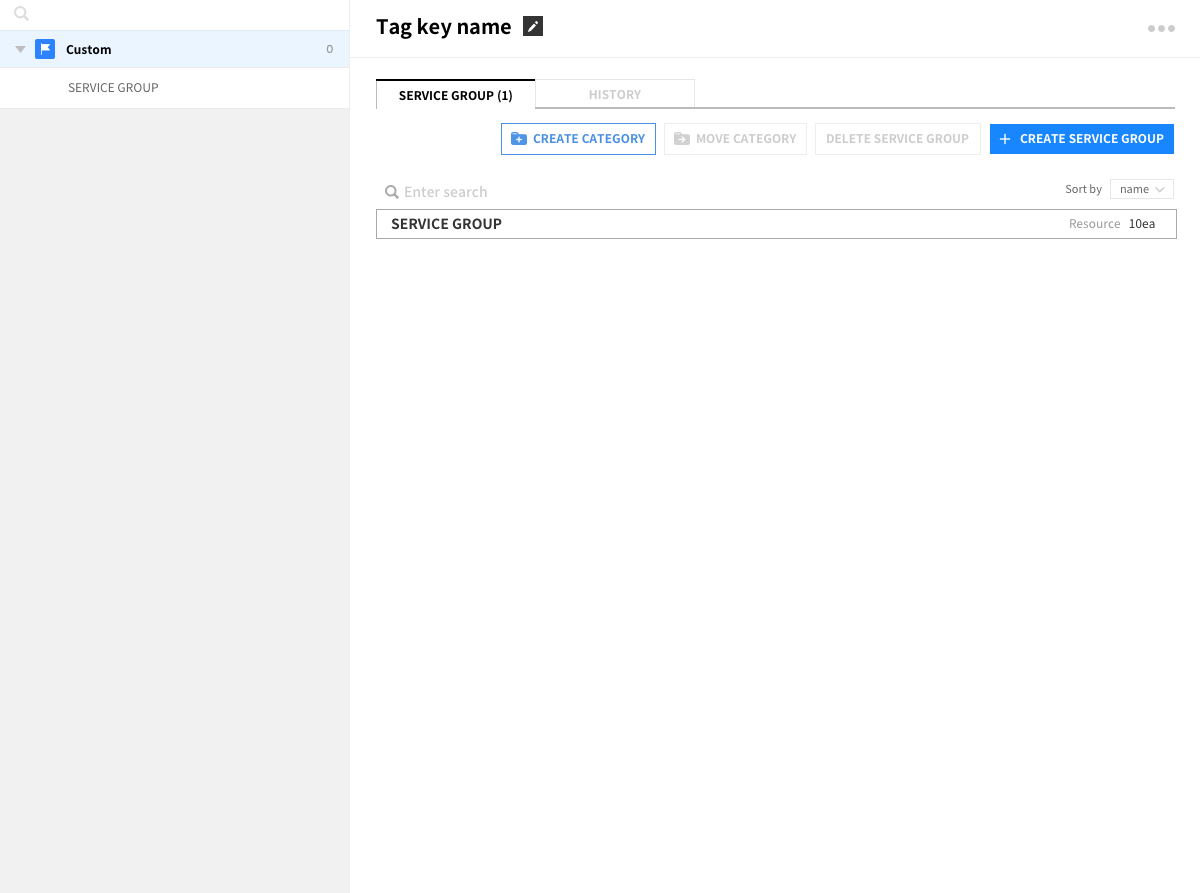
Service Group
Service Portal > Service Group
The Service Group allows you to categorize resources according to your requirement. Create a View according to your requirement and group resources into a Category and Service Group to get a better understanding of your operating service’s essential data such as resource usages, costs, and status.
Getting Started

Automatically Create New View & Service Group
Automatically creating Service Group allows you to create new Views and their sub-service groups based on Account or Tag Key you have selected. Users who have multiple accounts or who are already categorizing resources well with the Tag feature from the Cloud Service Provider’s Console or Portal do not need to make extra efforts again to create a Service Group here. With just a few clicks, you can easily group your resources.
- *Automatically create/manage Views created in the View list by using the Account and Tag key rule conditions
- Automatic layout status can be managed by the user selecting on/off.
- On initial entry: If you have an account, an account View will be provided as default.
(View with automatically created Service Group per user’s account)
![]()
Creating New View & Service Group based on Tags
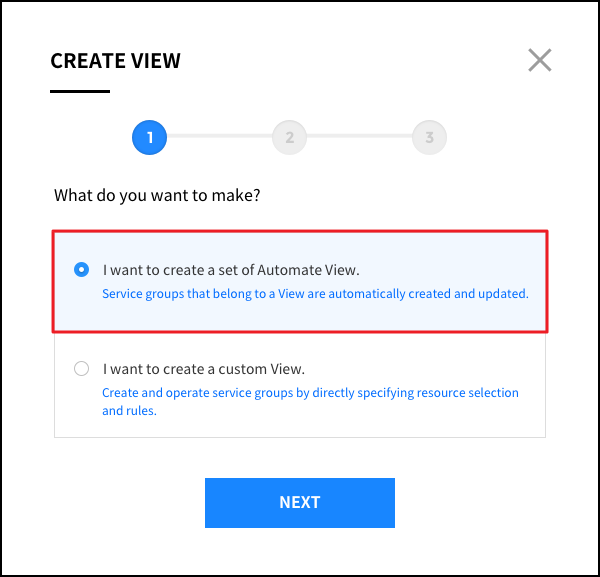
① Click CREATE VIEW

② Select Create Auto View
③ Select Create by Tag key
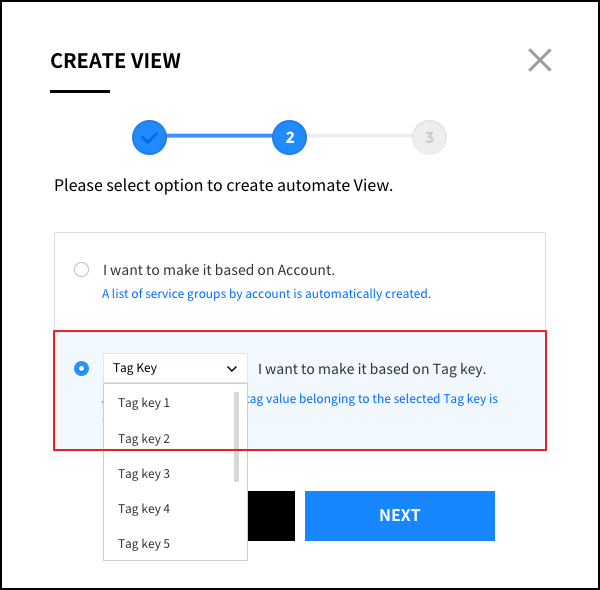
④ Select your Tag key
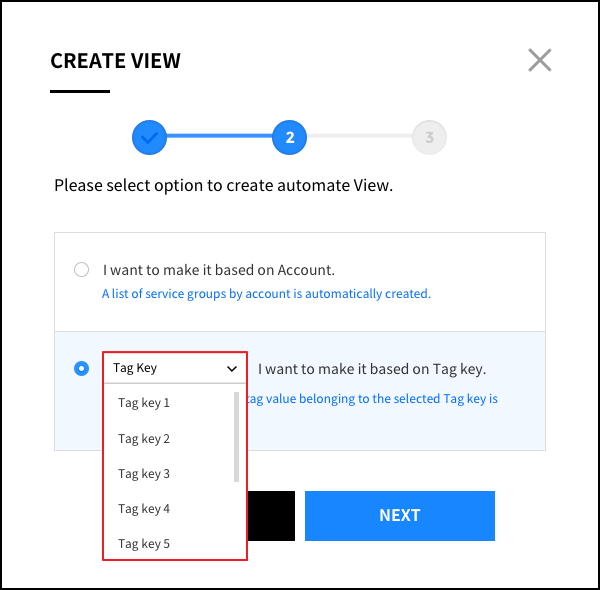
⑤ Service Group is automatically created for each Tag value belonging to the Tag key.
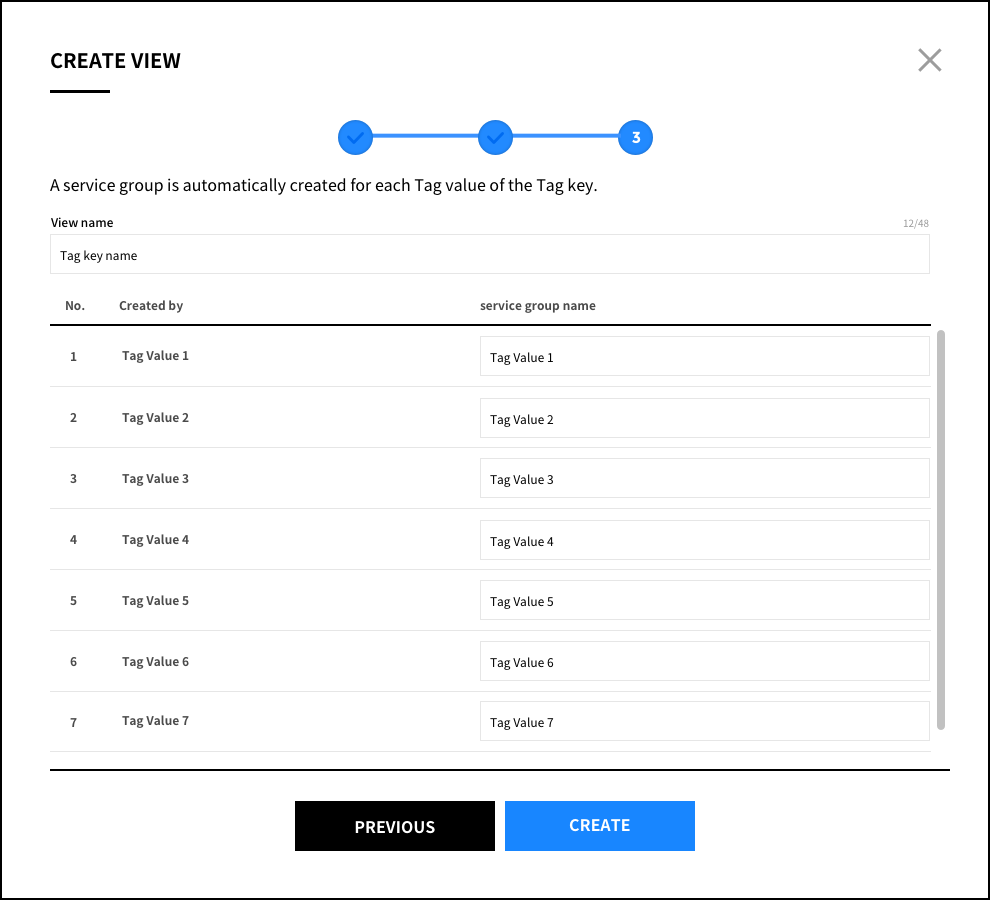
⑥ After it is created, you can check the information of View in the left menu. If you select View, you can check the Service Group list based on the automatically created Tag on the right side and the rule conditions in which the Service Group was created.
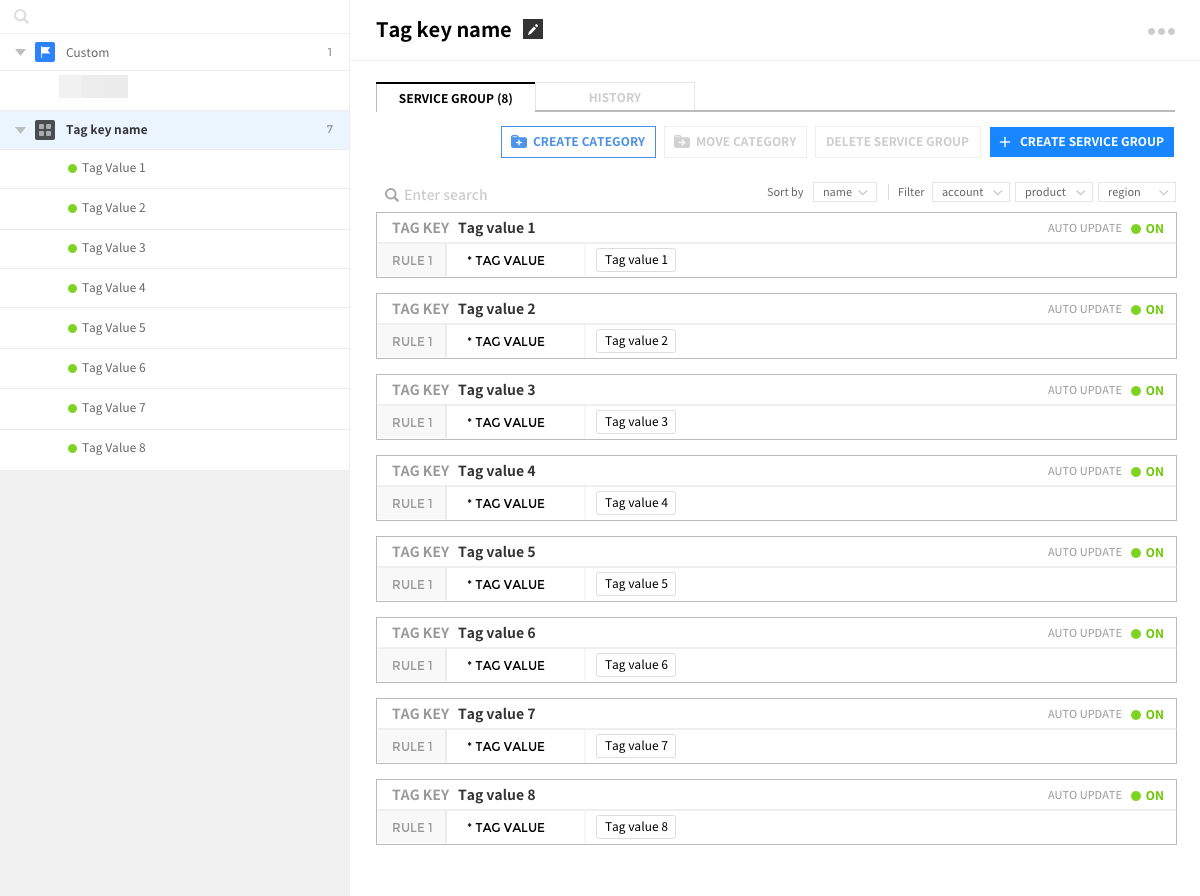
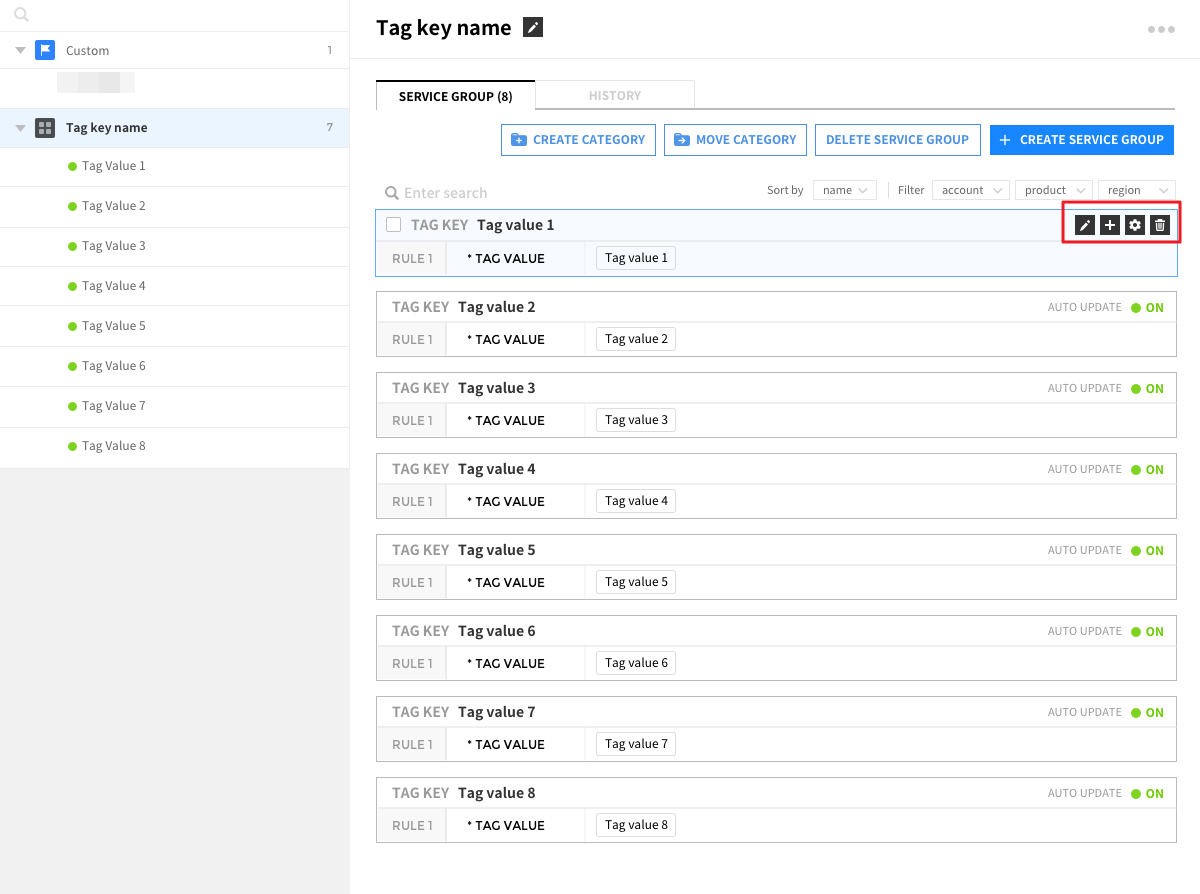
To edit the created Service Group, an icon appears when you hover over it with the mouse. You can edit name, add resource, edit rule or delete with this button.
Creating New View & Service Group based on Account
① Click CREATE VIEW
② Select Create Auto View

③ Select Create by Account
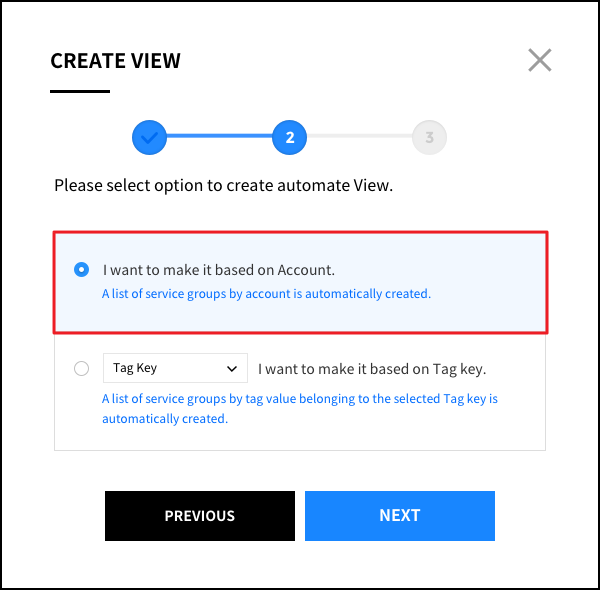
④ Service Group is automatically created for each account.
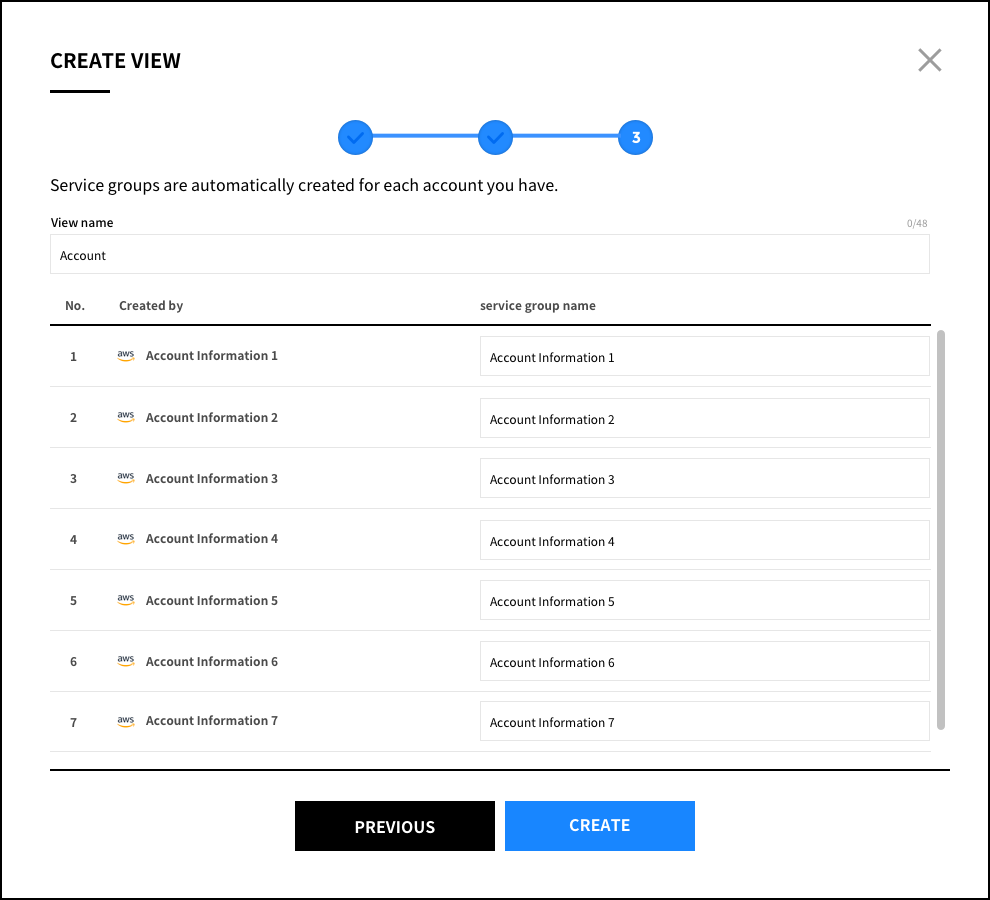
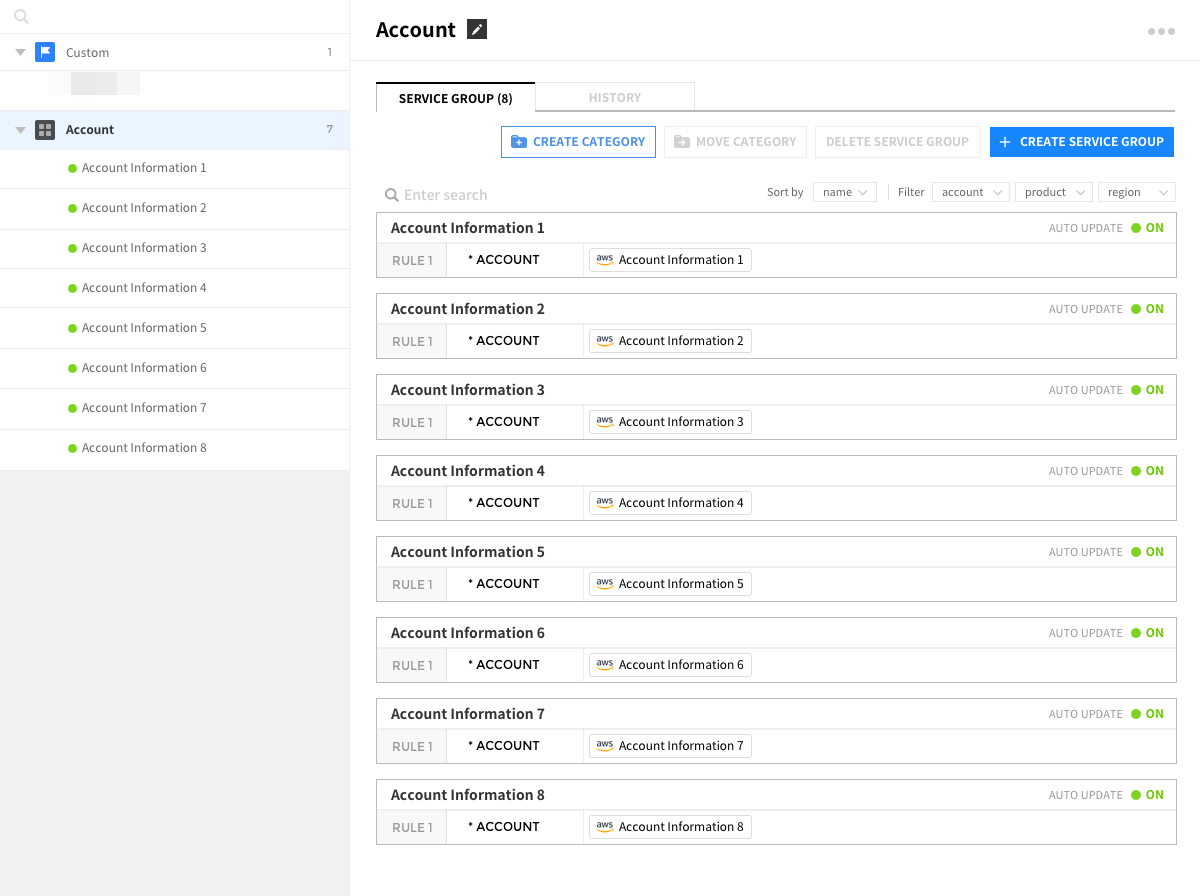
⑤ After it is created, you can check the information of View in the left menu. If you select View, you can check the Service Group list based on the automatically created account on the right side and the rule conditions in which the Service Group was created.
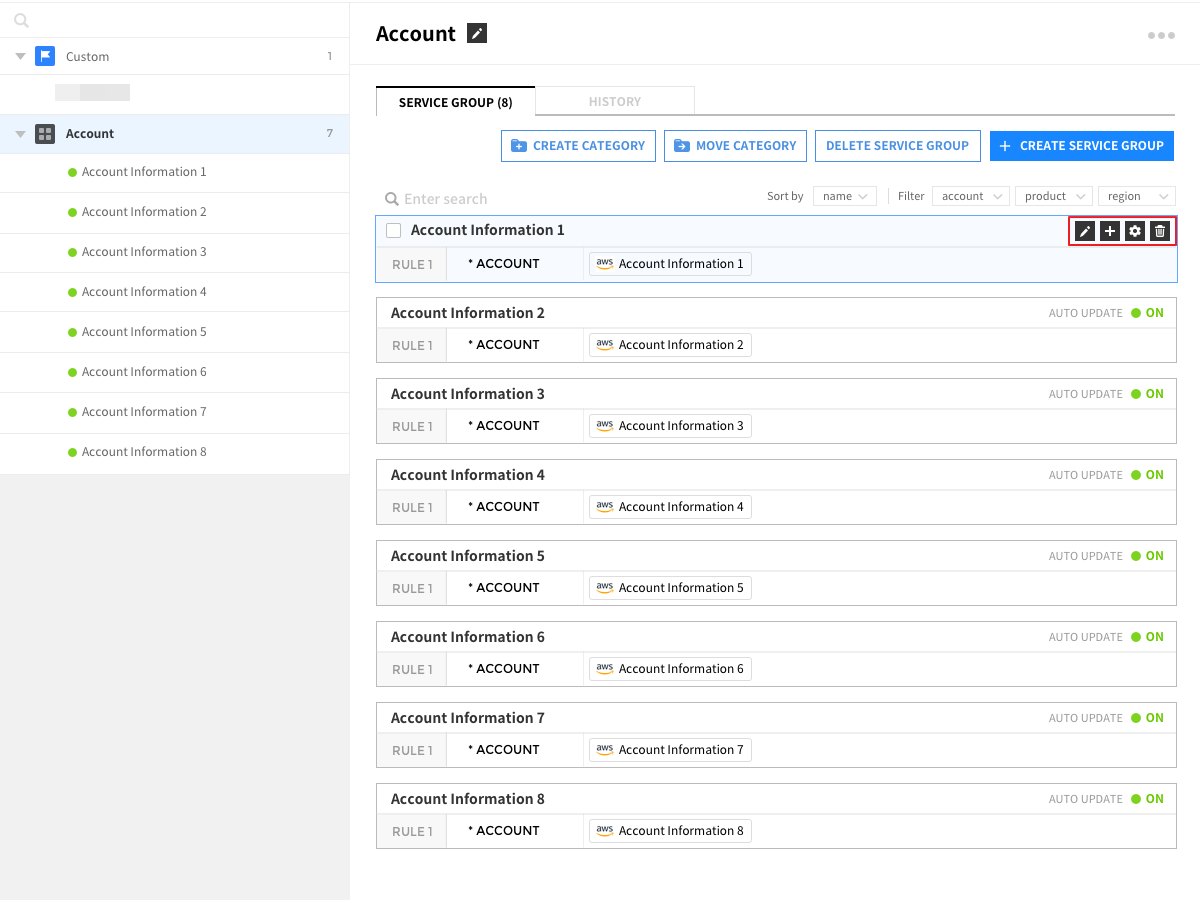
To edit the created Service Group, an icon appears when you hover over it with the mouse. You can edit name, add resource, edit rule or delete with this button
Manually Create New View & Service Group
① Click CREATE VIEW
② Select Create Custom View.
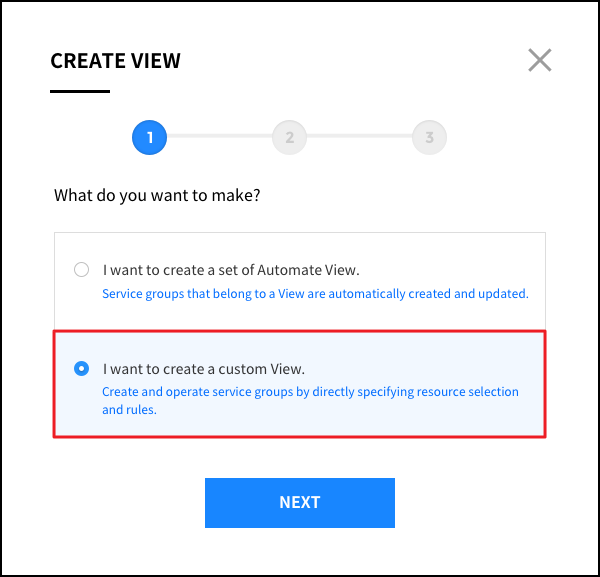
③ Enter a Custom View name. The name can be up to 48 characters. Only English, numbers, and hyphens (-) are allowed
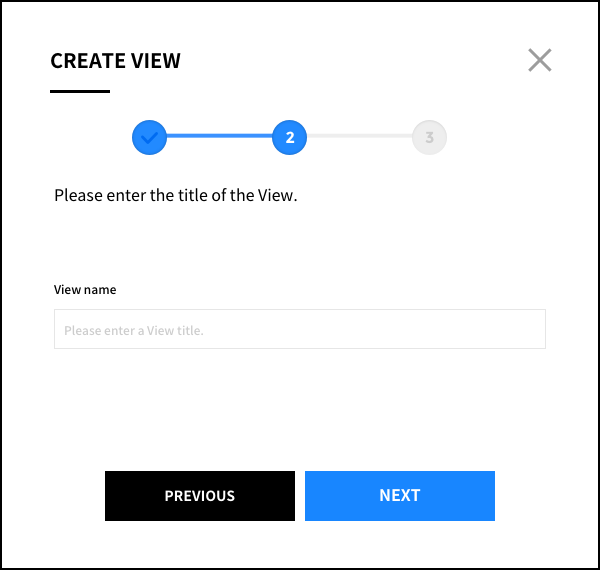
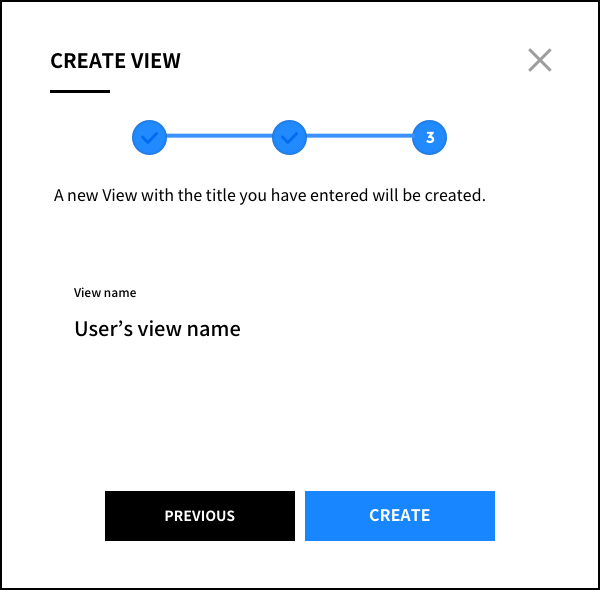
④ Click Next. A message or View created with the specified name will be shown. Select Create to create with the specified settings, or click Previous to specify a different name.
⑤ Check the created View on the left menu. As the View is created manually, it is created without the initially registered Service Group and can be registered via the + Create Service Group button.
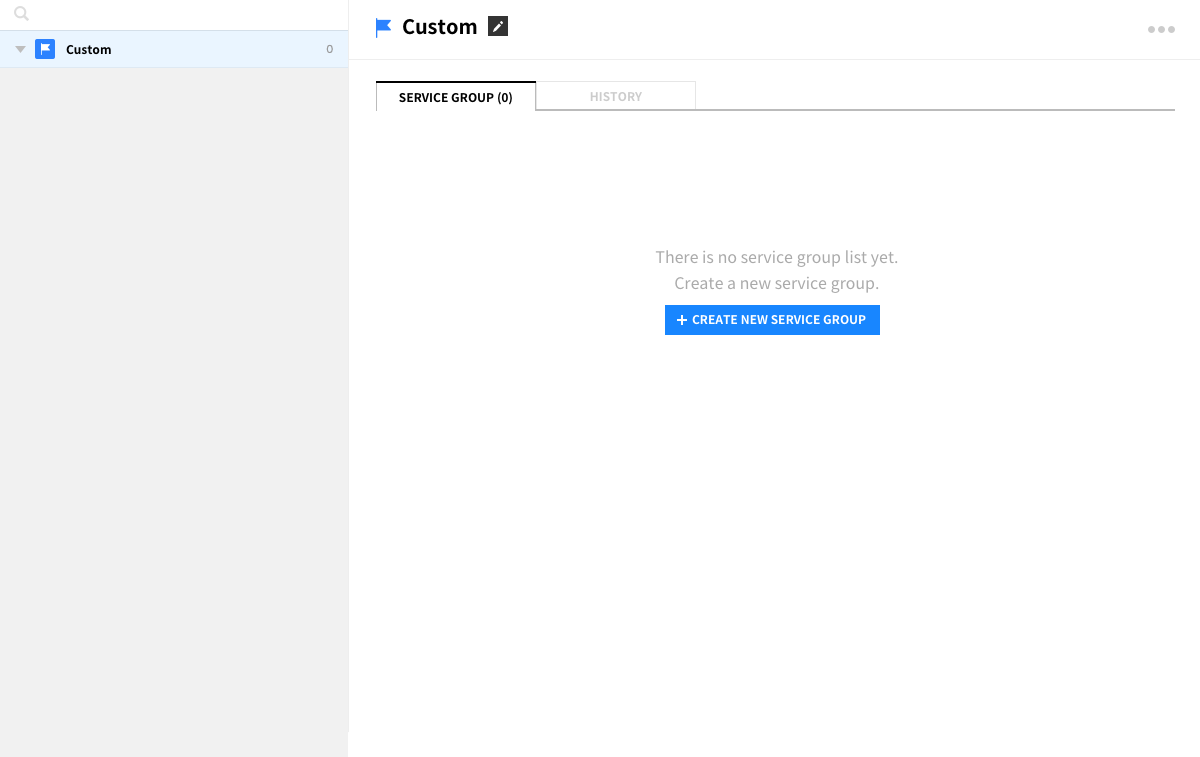
⑥ If you select Create Service Group, a page appears in which you can specify the Service Group name. You can create a Service Group by specifying the desired name and description.

Once a Service Group is created, you can check it on the page as shown below. You can manage it by mapping resources automatically or manually to the corresponding Service Group.
Create Category to categorize Service Groups
You can use the Category feature when you want to manage the created Service Groups in certain hierarchical structures.
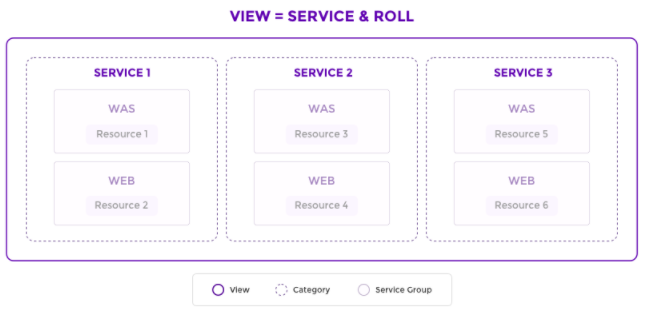
You can categorize Service Groups by services or by roles with many Views but you can also create categories to manage resources in one View.
First, create Service Groups by roles and then group them into categories to manage them hierarchically as shown below.
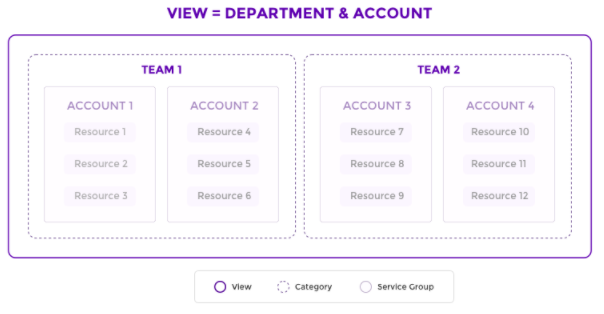
Scenrio A. A Company has two teams operating their own services using 4 accounts. The company can manage their resources systematically with just a one View and two Categories by creating Service Groups as below:
![]()
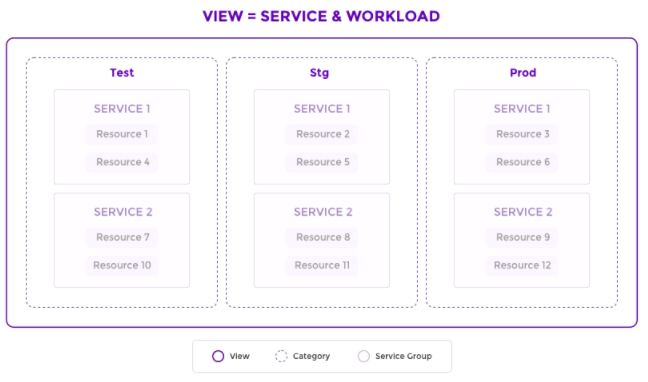
Scenrio B. A development team wants to manage the resources for the testing, staging, and production environment. The team can manage their resources systematically with one View and three Categories by creating Service Groups as below:
![]()
Create Category
① To assign a Category to your service groups, you need to create a Category first. Bring your mouse point over the View Name on the list shown on left. Click + button and “Create category” drop-down option will appear.
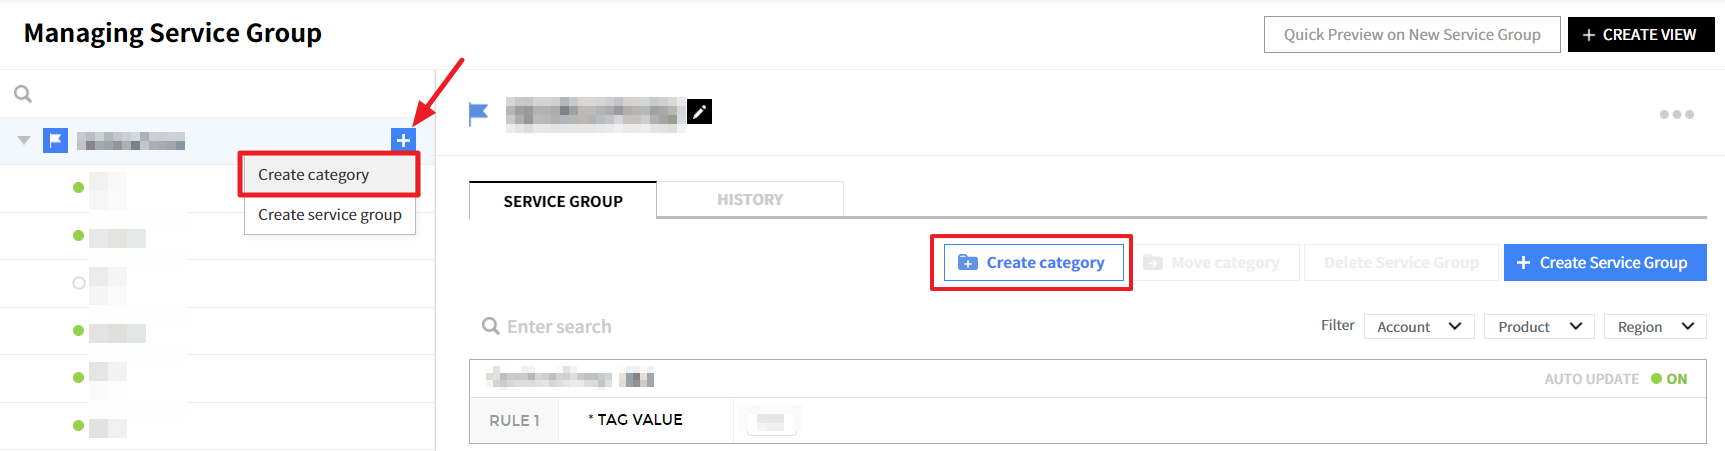
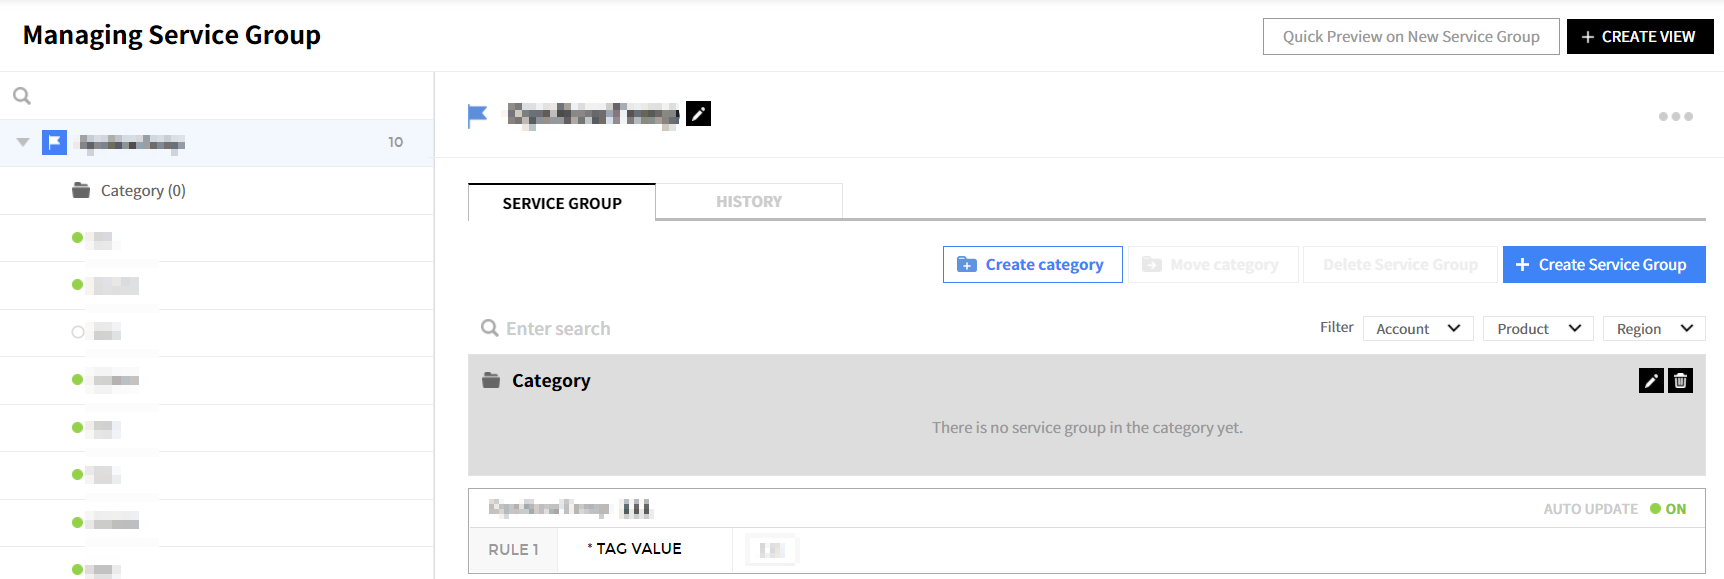
② Click Create category and the Category folder icon will appear on the View List. New Category is created on the Service Group List on the right.
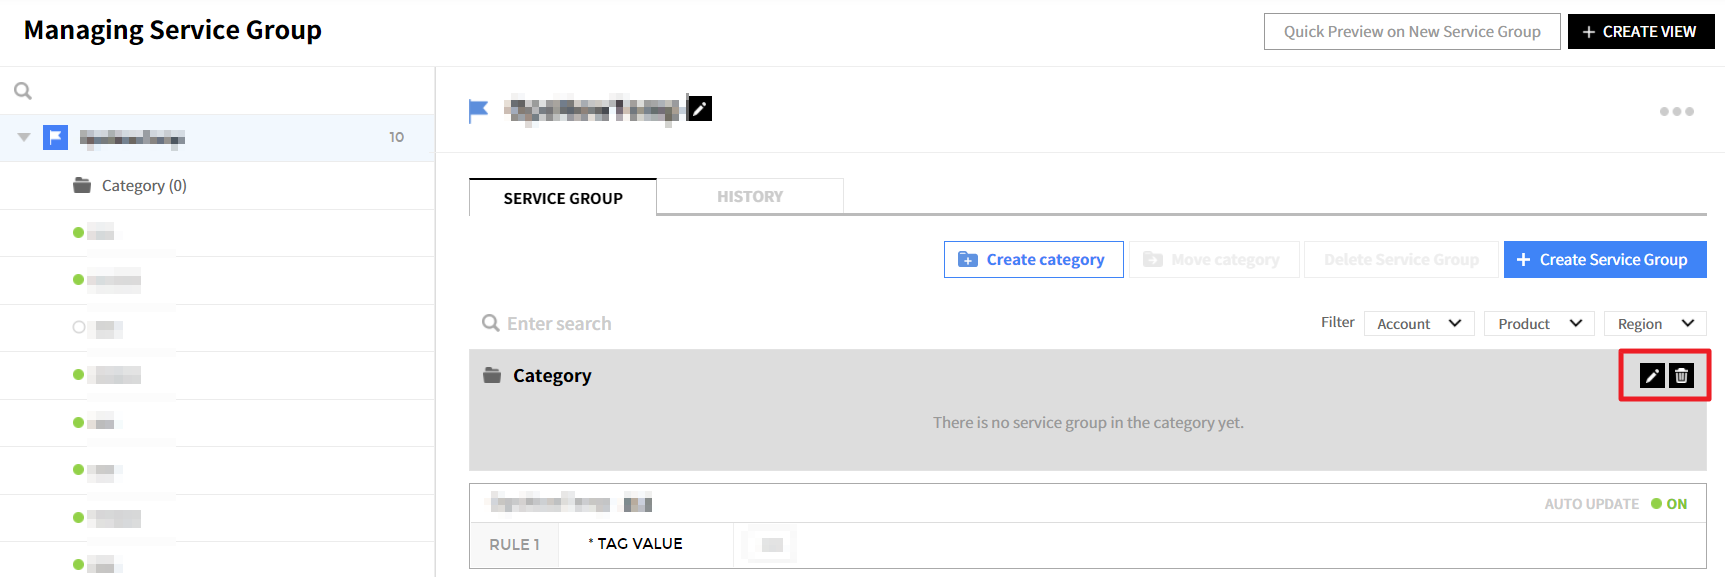
Change Category
To rename or delete the Category, you can change it by clicking the icon on the right.
Register Service Group
There are two ways to register a Service Group to a Category.
① By using the blue button that appears when you hover the mouse pointer over the Service Group on the left.
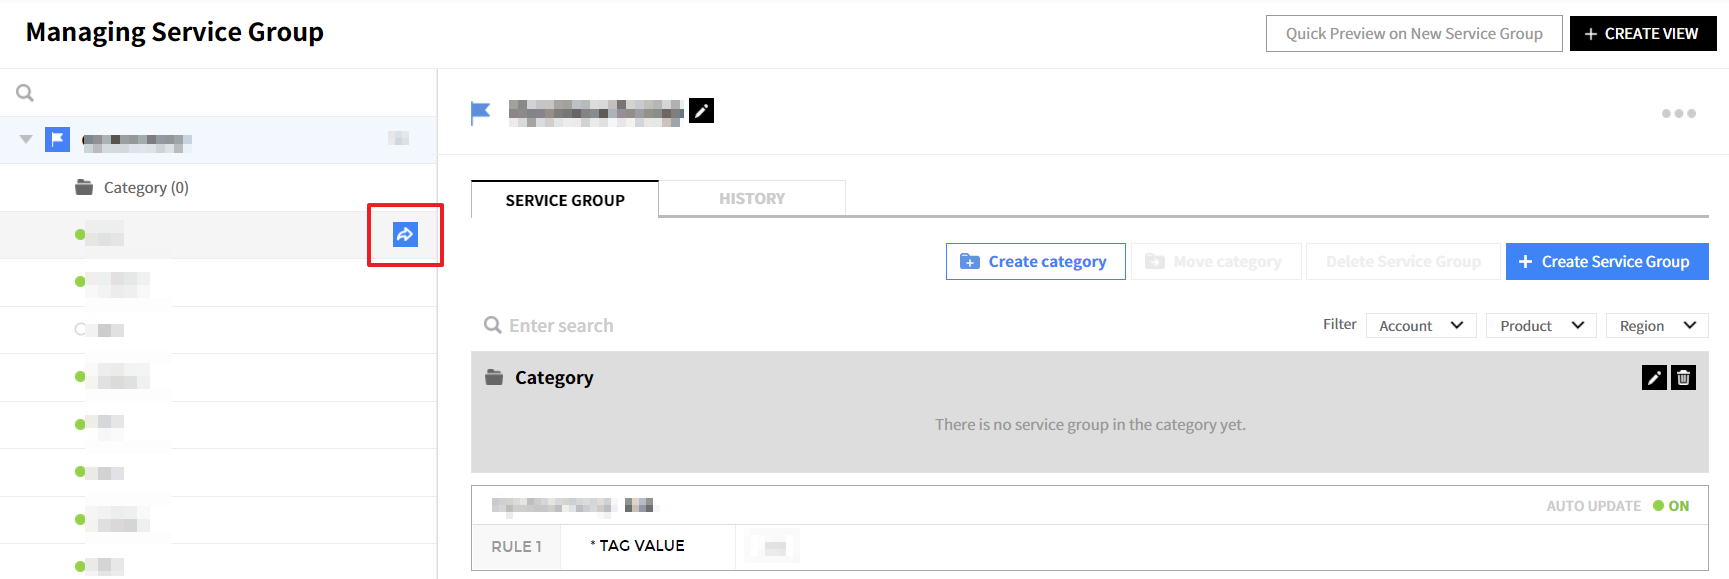
When you click the blue button, a pop-up window will appear. You can select a desired Category from the available categories. After selecting the Category, click the [Apply] to move the Service Group into the designated category.
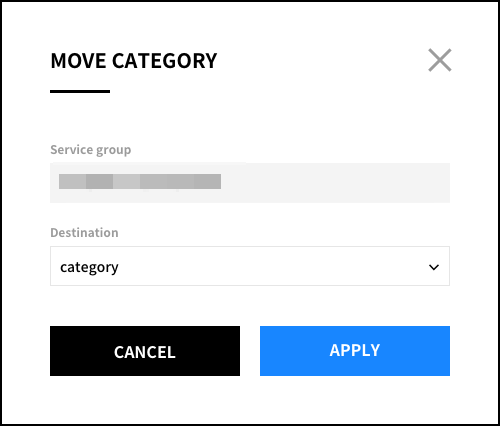
② By clicking the checkbox that appears when you hover the mouse pointer over the individual Service Groups on the right. When the checkbox is checked, Move Category button will become clickable.
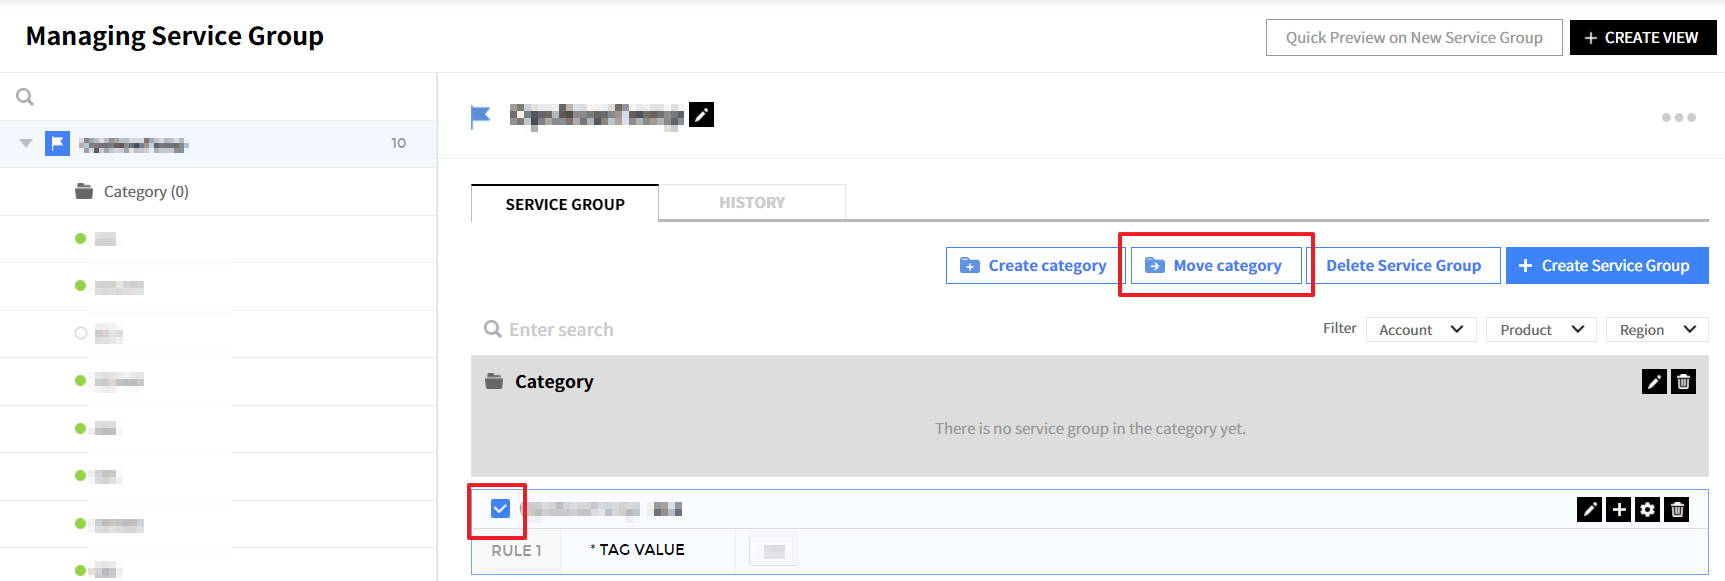
③ Click Move Category. A pop-up window will appear. You can select a desired Category from the available categories. After selecting the Category, press Apply to move the Service Group into the designated category.
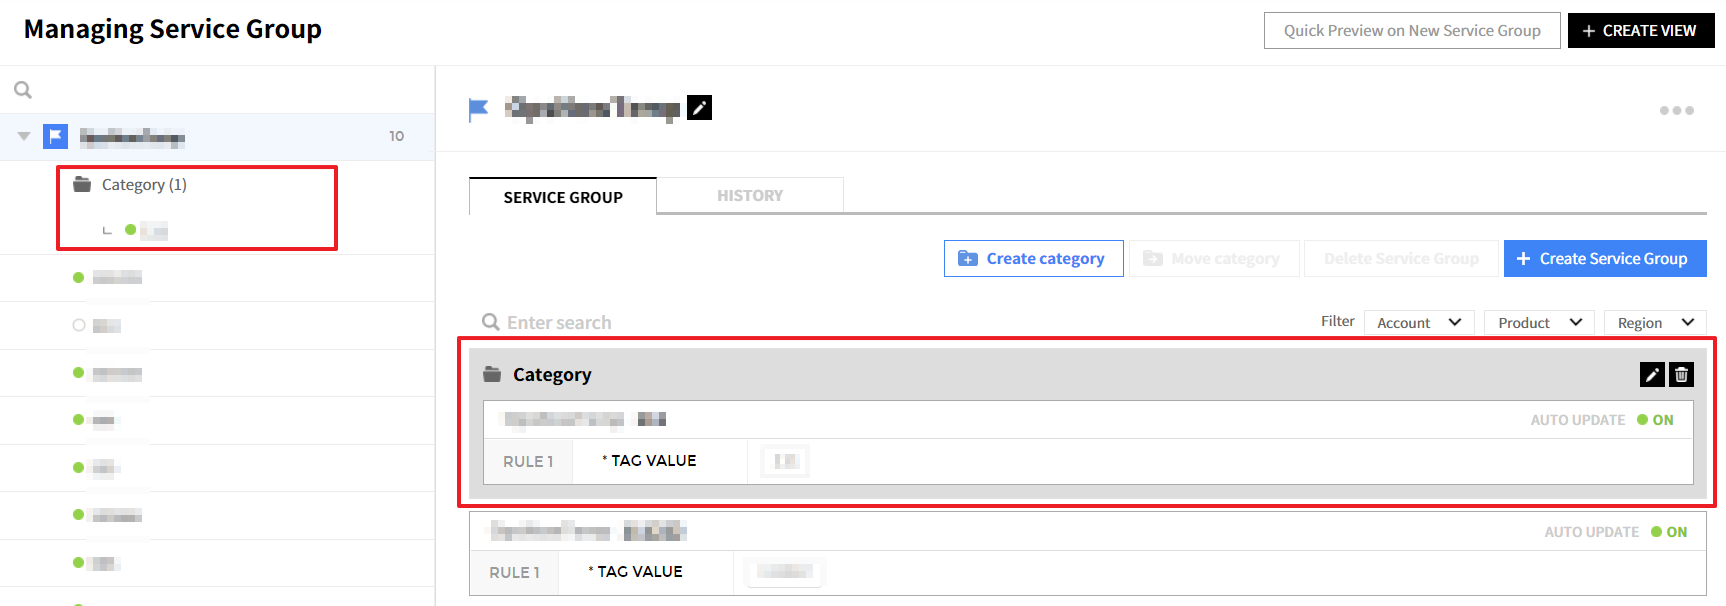
④ Moved Service Group is now under the designated Category as shown below.
Add Resources
Users with multiple accounts or who are already classifying resources through the Tag feature of Console/Portal do not have to make an extra effort to create a Service Group. With just a few clicks, you can easily classify your resources.
Automatically add resources by setting Rules
Ypou can set rules on adding resources by Service Group. Define the desired conditions and the resource will be automatically classified even if a new resource is added. Select Tag, Account, Region, and Product of the resources to be included in the Service Group, the resources under that condition will be automatically added to the selected Service Group.
Set automatic addition conditions for resources of Service Group created by Tag
① Click the Edit rule button that appears when you hover over it with the mouse to switch to edit mode.
② Enter Rule Edit Mode in Detailed Page of View
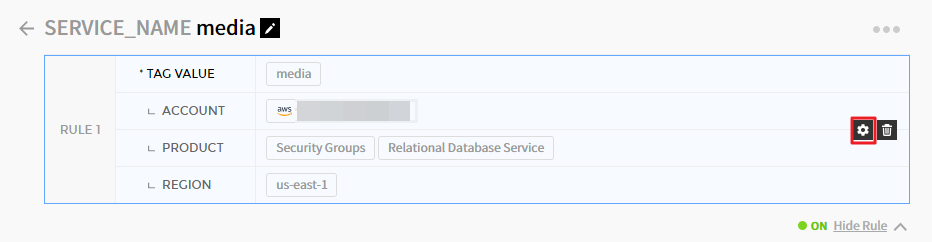
③ Enter Rule Edit Mode in Detailed Page of Service Group
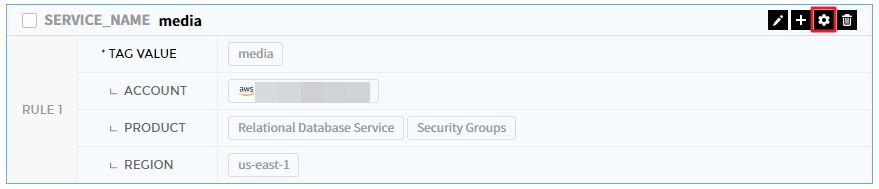
Set conditions for each item. In this case, the tag value condition must be selected.
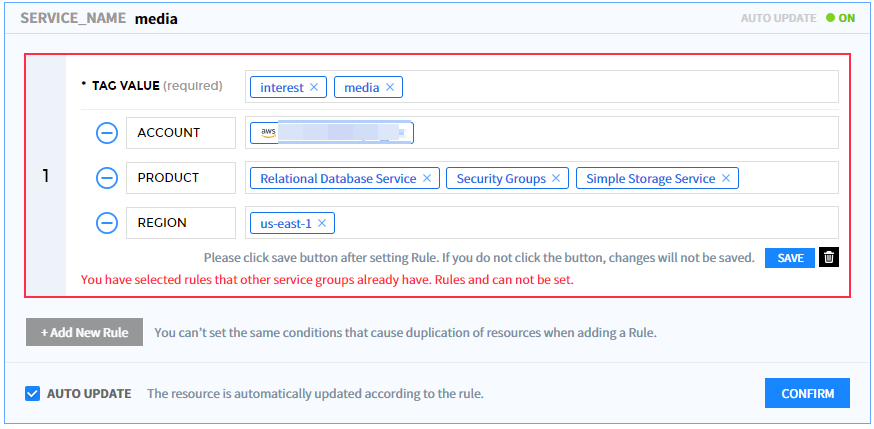
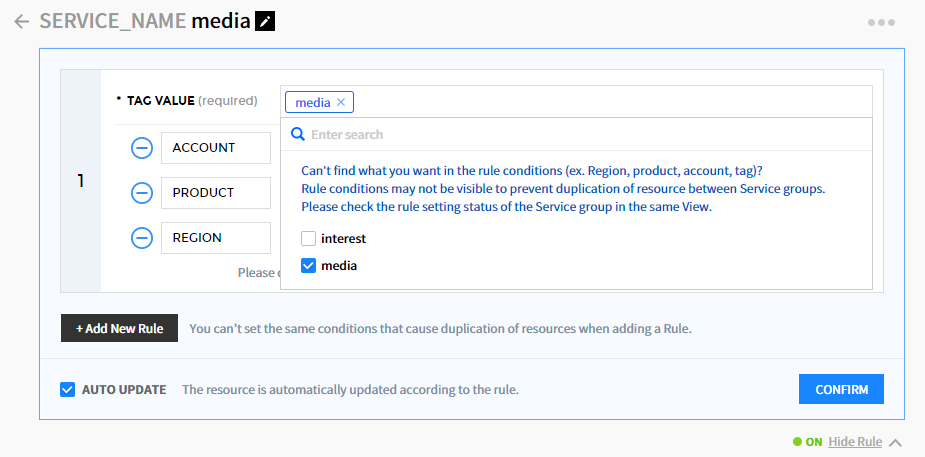
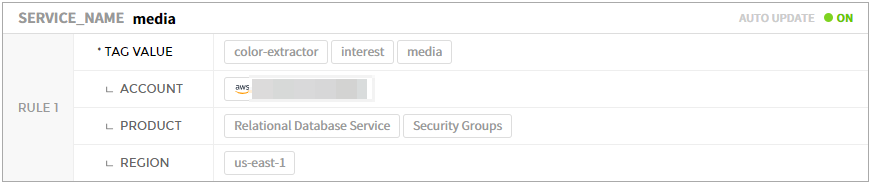
④ Rule Setting Based on Tag
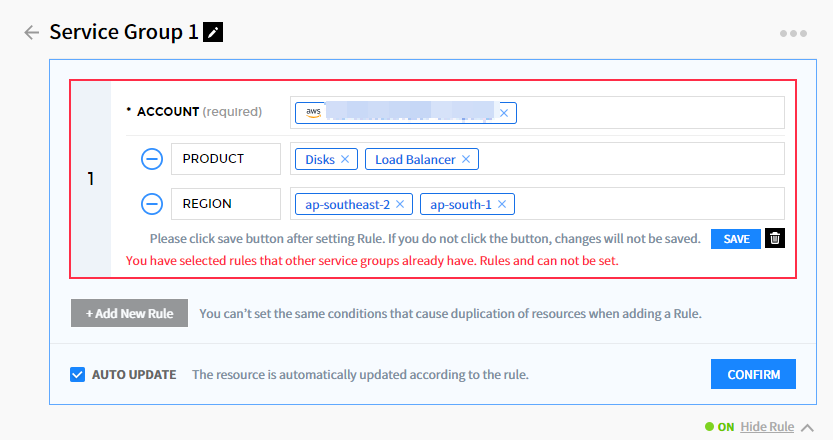
Selecting the Add New Rule button will expand the list and show the setting options. If there is a predefined condition, it is shown together. If a Tag value condition is not selected or a duplicate condition is set in another Service Group, a warning message is shown and it will not be saved.
Set automatic addition conditions for resources of Service Group created by account
① Click the Edit rule button that appears when you hover over it with the mouse to switch to edit mode.

② Enter Rule Edit Mode in Detailed Page of View
③ Enter Rule Edit Mode in Detailed Page of Service Group
Set conditions for each item. In this case, the account value condition must be selected.
④ Rule Setting Based on Account
Selecting the [Add New Rule] button will expand the list and show the setting options. If there is a predefined condition, it is shown together. If an Account condition is not selected or a duplicate condition is set in another Service Group, a warning message is shown and it will not be saved.
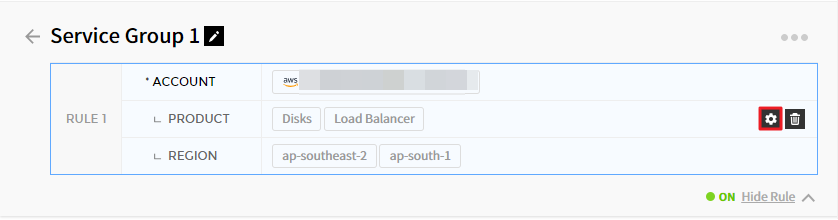
You can always add or edit Rules and turn it on or off. You can also apply the PIN function to set certain resources are not affected by the Rule.
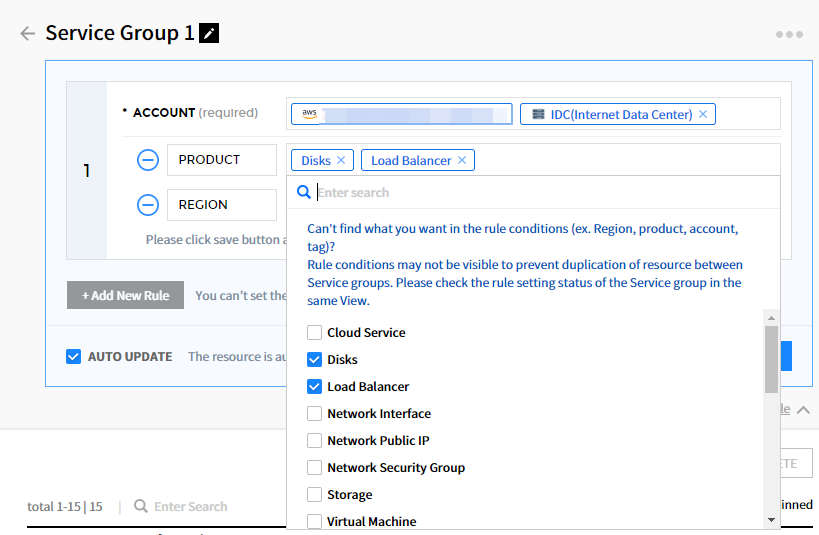
Set automatic addition conditions for resources of Service Group created manually by the user
① Click [Edit rule] button that appears when you hover the mouse over it to switch to edit mode.

② Enter Rule Edit Mode in Detailed Page of View
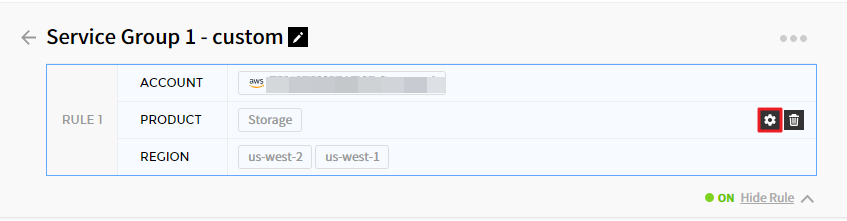
③ Enter Rule Edit Mode in Detailed Page of Service Group
Set conditions for each item.
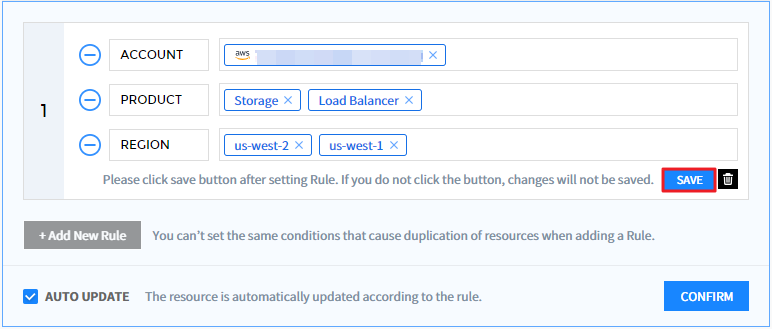
④ Manually Created Service Group Rule Setting Page
Selecting the [Add New Rule] button will expand the list and show the setting options. If there is a predefined condition, it is shown together. If a duplicate condition is set in another Service Group, a warning message is shown and it will not be saved.
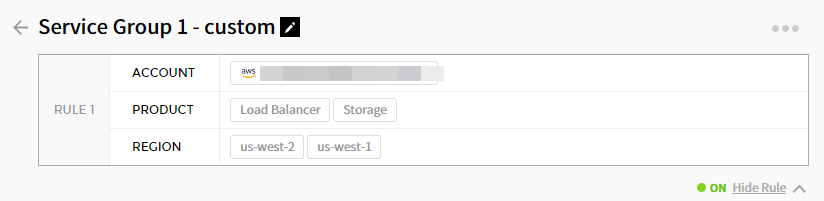
Manually Add Resources
① Click the [Add Resource] button on the detailed page of Service Group to go to the Add resource/Intelligent search page.
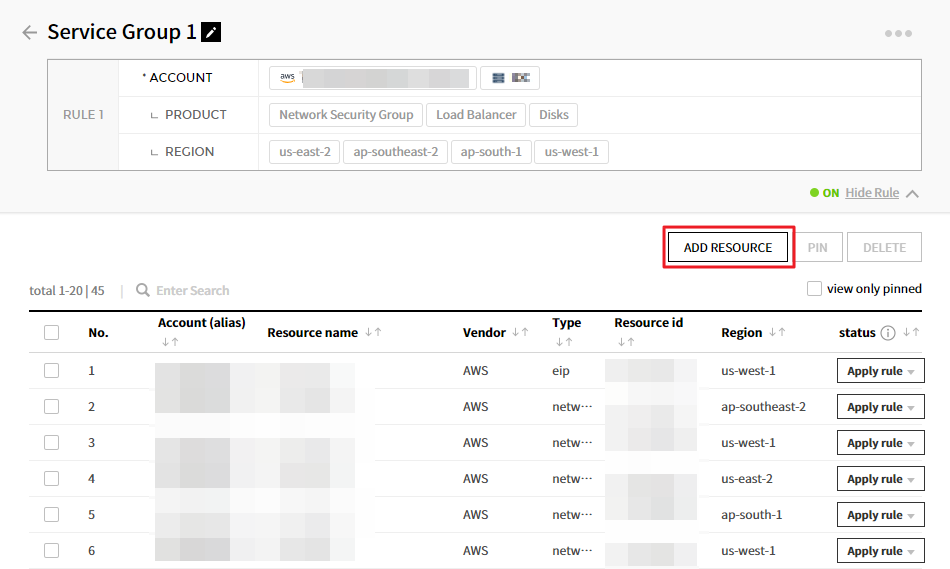
② Set conditions using the Intelligent Search, select a resource from the search results, and click the [Add Selected Resource] button.
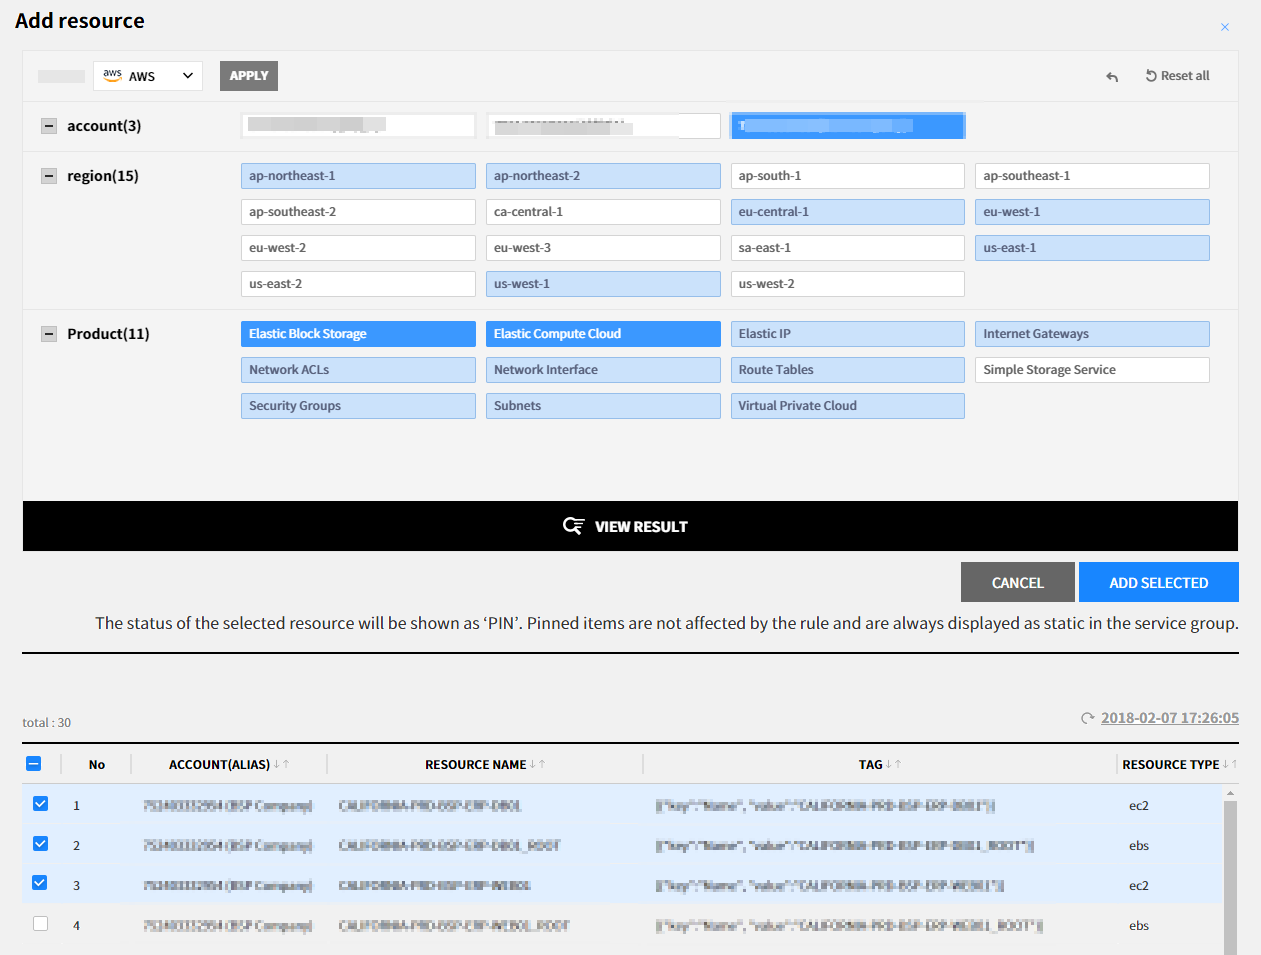
③ You will be redirected to the detailed page of Service Group and a popup confirming the resource added will be displayed, indicating that N resources have been added.
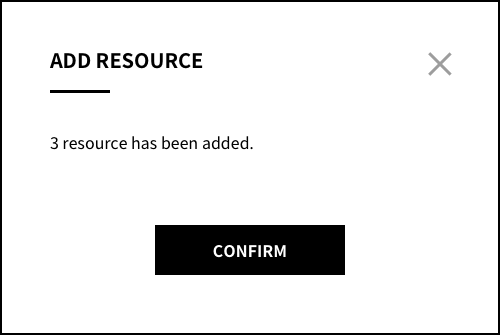
Manage Service Group
Create multiple Views
You can now create more than one Views for different requirements.
If you need to group the resources by Roles, you can now maintain the existing View and create a new View to categorize the same resources.
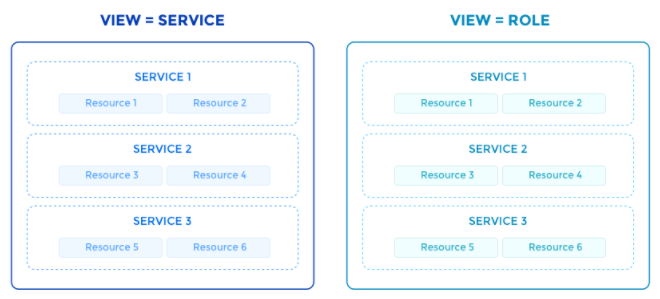
Set Default View
You can set the Default View which is the standard among multiple Views. In Asset and Cost Management services, information is shown based on the Default View.
① You can select the Default View by clicking the default view icon in the left menu or by clicking the Default View setting menu on the detailed page of View.
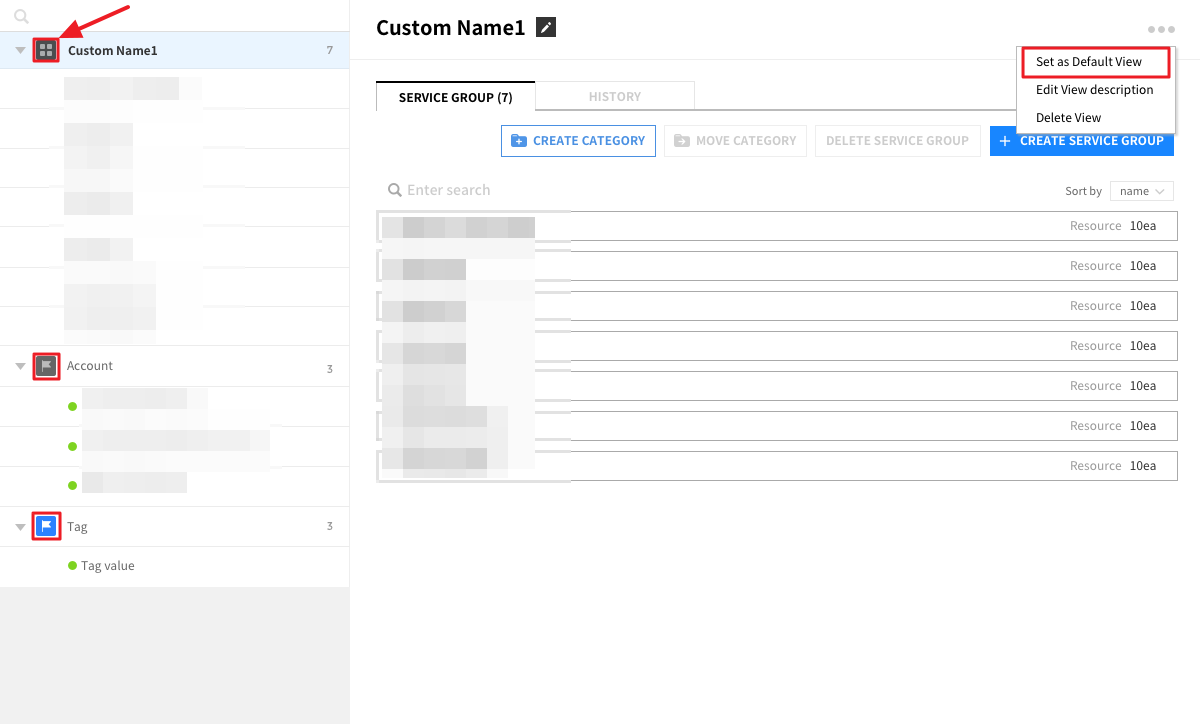
② The selected view will be changed to Default View.
Auto update ON/OFF
Even if you do not delete the Rule, you can turn the auto update feature ON/OFF to set whether to let the Service Group be affected by the rule condition or not.
Uncheck auto update field in Rule edit mode.
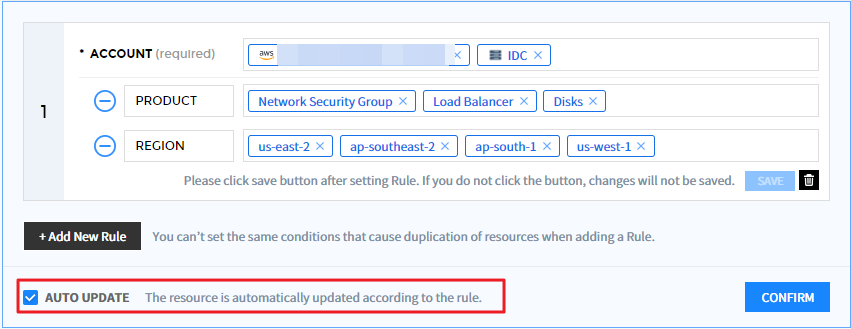
When unchecked, the auto update status is switched to OFF.
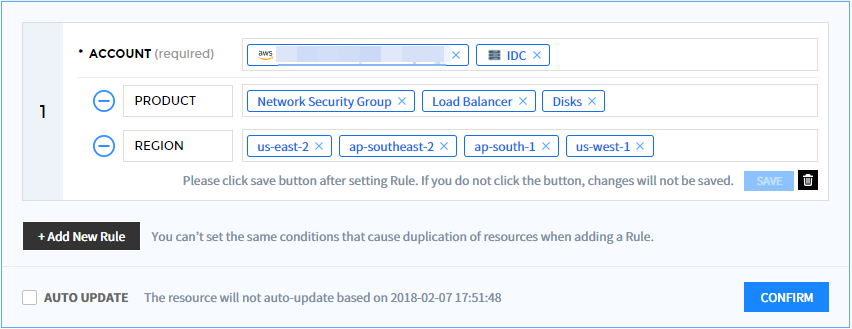
When the auto update is turned OFF, the resource is no longer classified according to the rule conditions. If you check the auto update again to turn it ON, it is classified automatically according to the rule conditions.
Resource PIN
You can also use the PIN feature to prevent specific resources from being affected by the rule.
① PIN processing can be done all at once by checking the resources to be processed, or the PIN can be processed individually in the Status field.
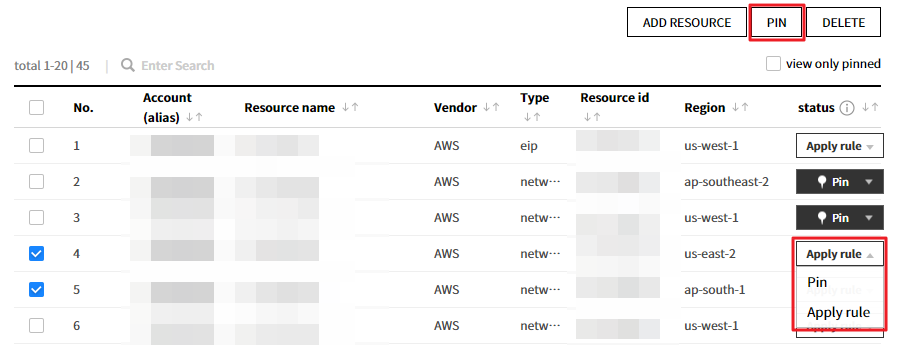
② If processing PIN for multiple resources, a warning pop-up will appear, and once you click OK, the selected resources will be PIN-processed and changed to a resource that is no longer affected by the rule.
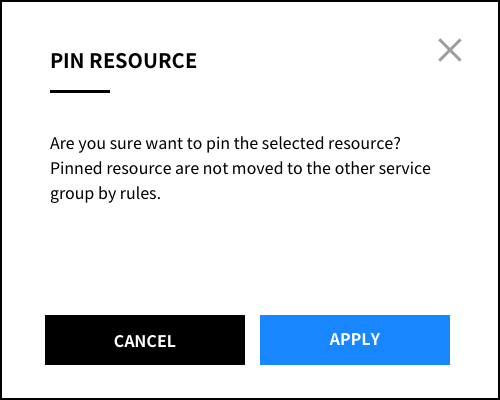
Delete View, Category, and Service Group
Delete View
① Click the Delete View menu using the top right menu on the Detailed Page of View. However, the Default View cannot be deleted.
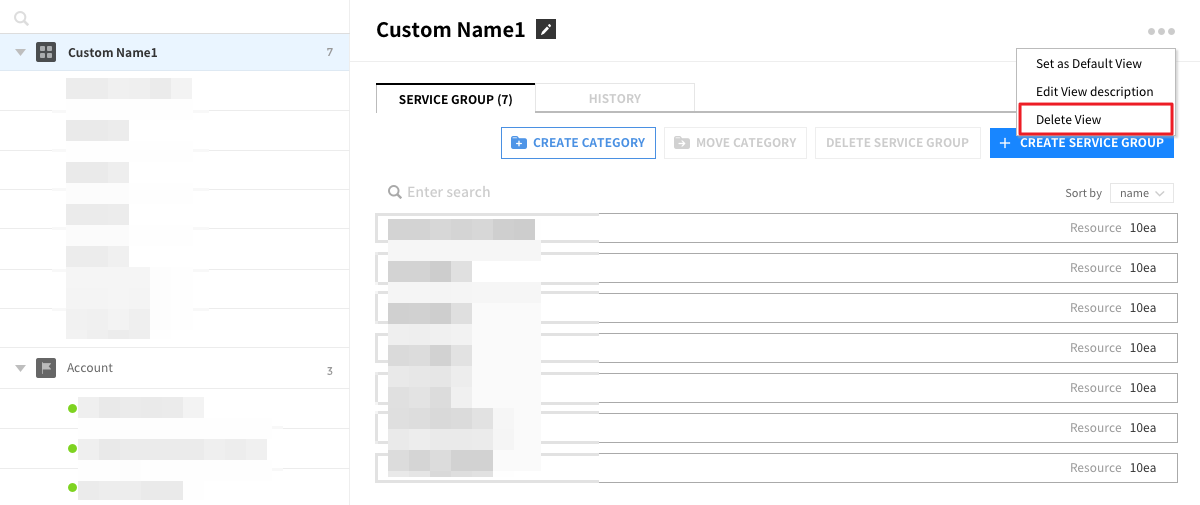
② If you click the Delete View menu, a delete confirmation pop-up will appear. Click the Delete button to delete the selected View.
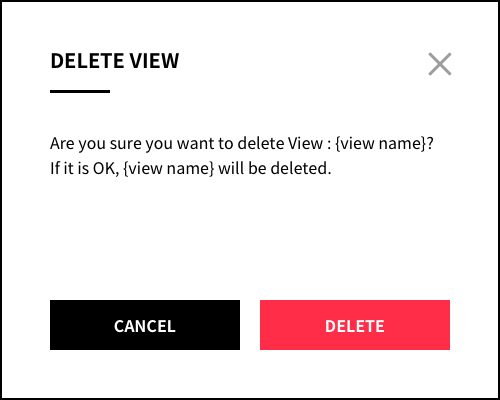
Delete Category
① Click the Trash button that appears when you hover the mouse over the created Category name.
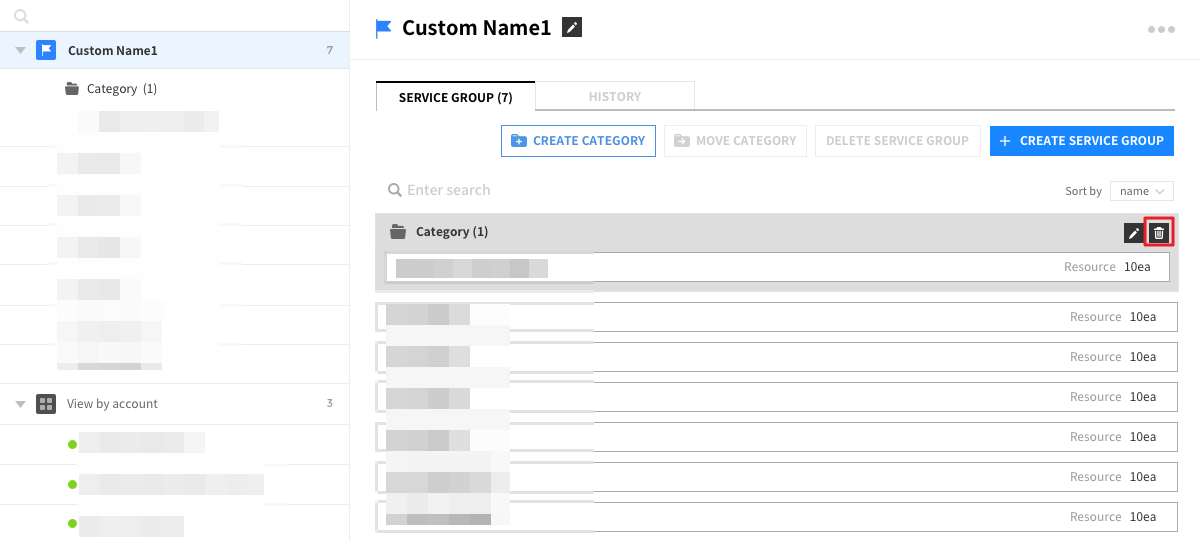
② If you click the Trash button, a category deletion confirmation pop-up will appear. If you click the Delete button, the selected category will be deleted, and Service Group included in the category will be changed to a Service Group not included in the category.
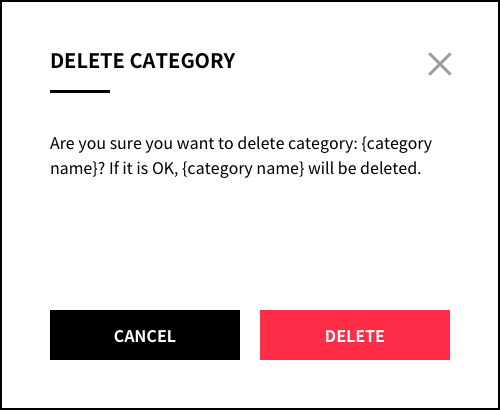
Delete Service Group
① Click Delete Service Group button on the detailed page of Service Group.
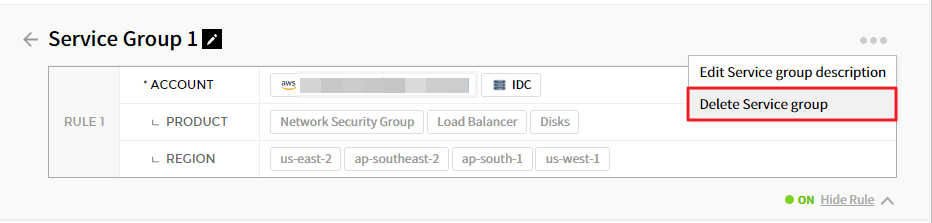
② Alternatively, you can delete multiple Service Groups at once by checking the Service Groups to be deleted and clicking Delete Service Group button. Or you can delete by hovering your mouse to a Service Group you want to delete, then the Delete button will appear.
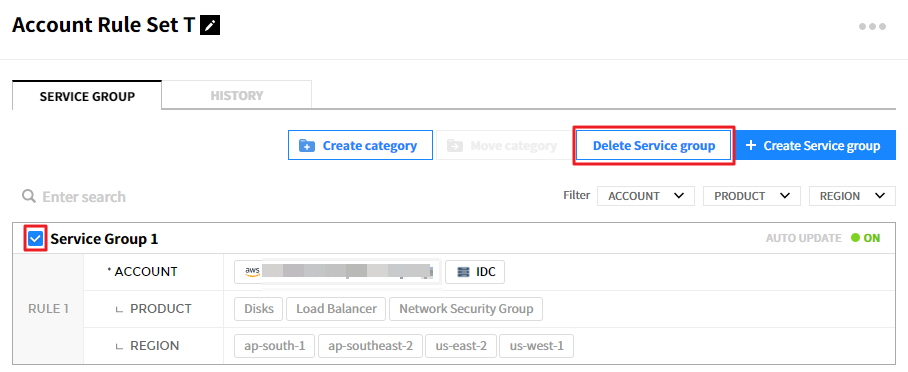
③ If you click the Delete button, a confirmation pop-up will appear. Select Delete to delete the Service Group.
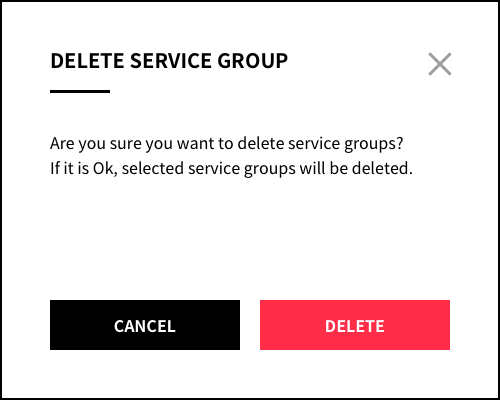
Organization Tree
Service Portal > Organization Tree
Organization Tree helps business organizations with multi-cloud accounts or multiple accounts to manage costs easily based on the changes in their organizations. The feature also allows you to match cloud resources and costs for your organizations in a hierarchical structure. In the Organization Tree page, you can create a node by service group from Asset Management, and assign the person in charge for each node. Users with sufficient permissions can access the organizational node and can view its resources and costs.
📜 Note: An organization has a single tree structure, and consists of a root node (as the organization) and subnodes (as divisions or teams). The subnode can be added as much as you like. Organization node is the basic unit of the organization tree.
The organizational structure tree provides the following functions.
Set Organization Tree
This section explains how to start and create an Organization Tree. Click the hidden button as shown in the image below to set your organization tree. You can set your organization tree by using Load AWS Organizations, Load GCP Organizations, Load Service Group, and Reset to Excel Format.
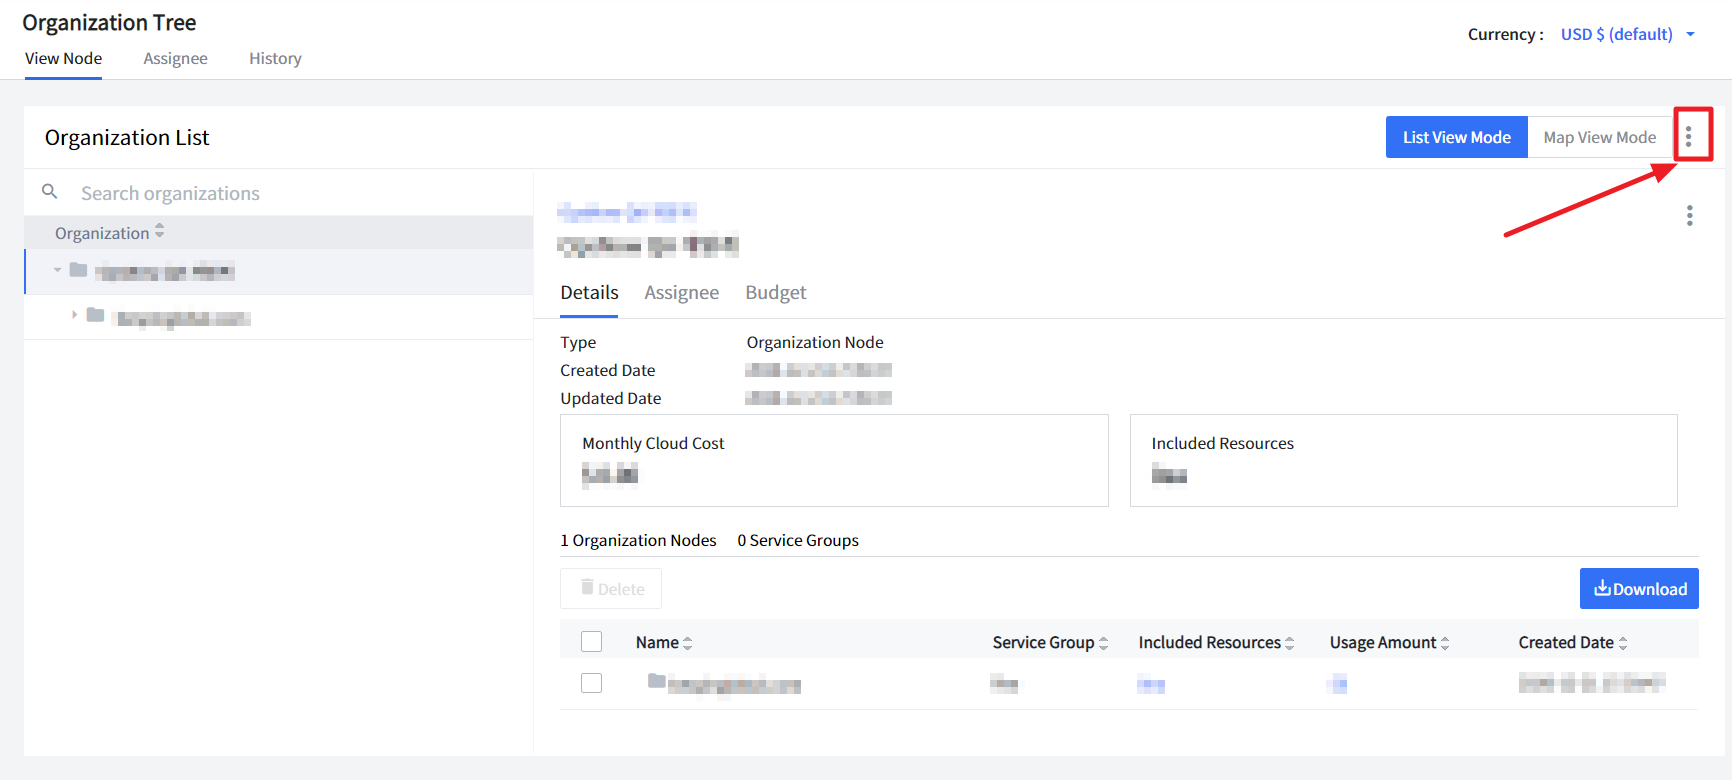
There are several ways to set the tree: 1) Load AWS Organizations, 2) Load GCP Organization, 3) Load Service Group, and 4) Reset to Excel Format.
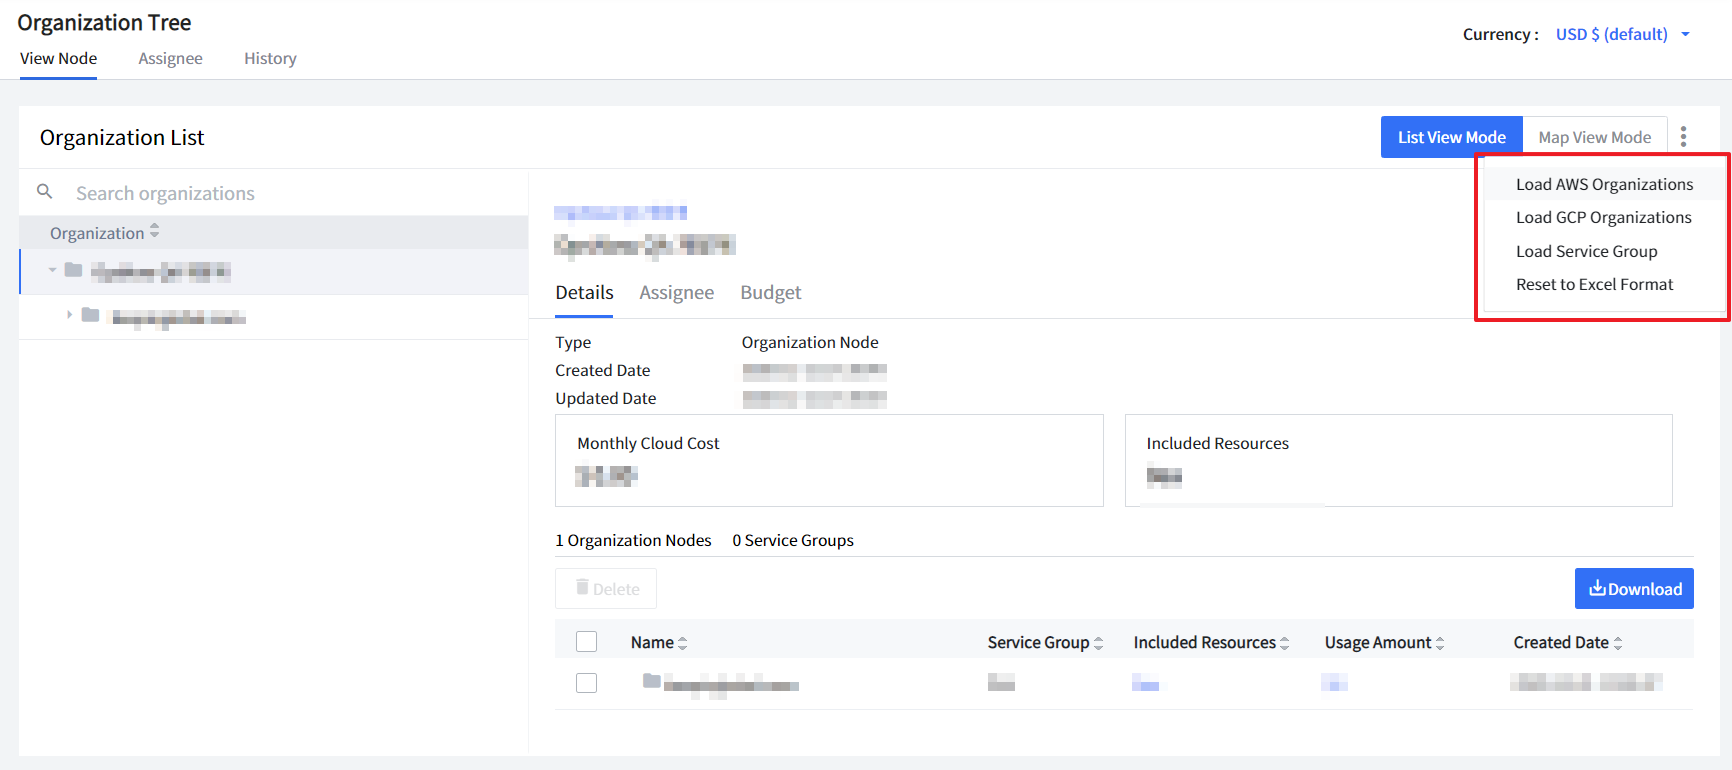
Load AWS Organizations
If you are using AWS Organizations service to manage your accounts, simply load AWS Organizations to the Organization Tree for cost monitoring. Click Load AWS Organizations from the drop-down list.
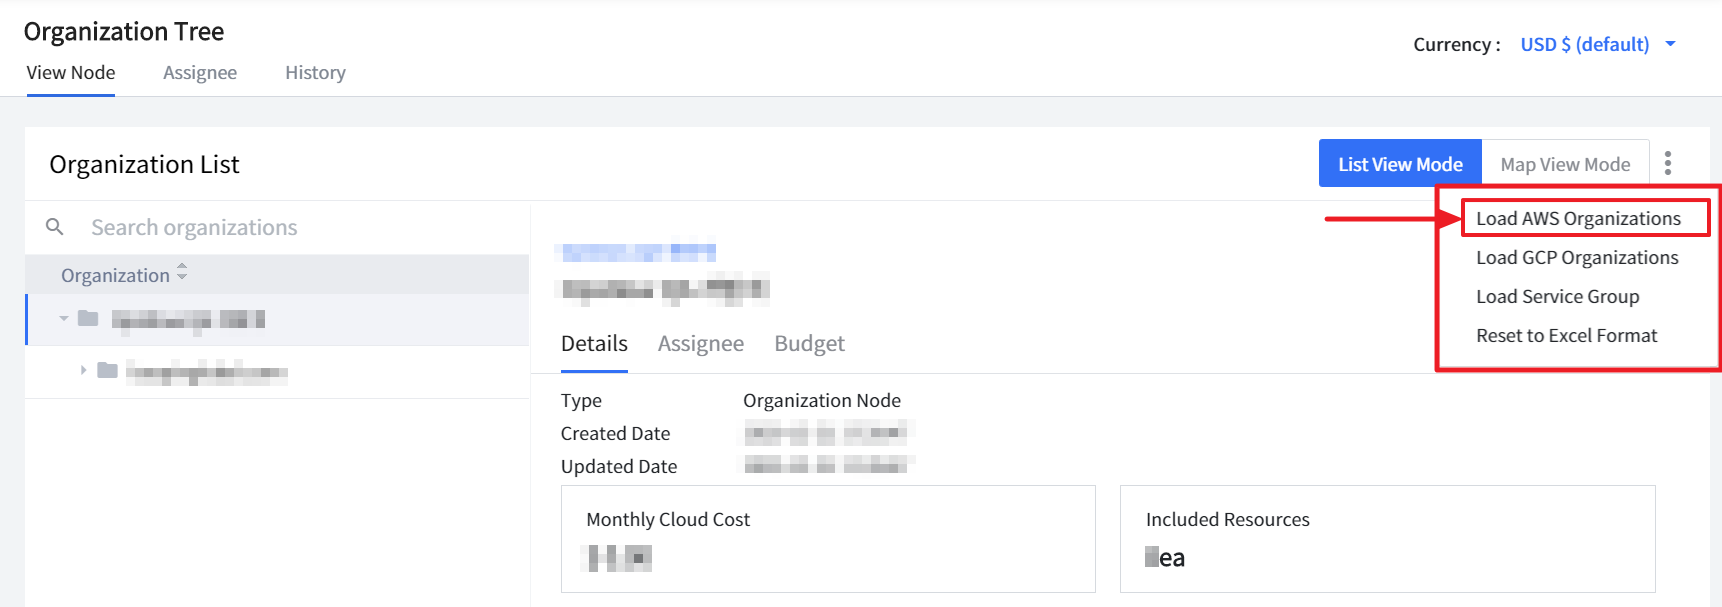
Enter Access Key and Secret Key. Then, click the [Create] to set up a new organization tree.
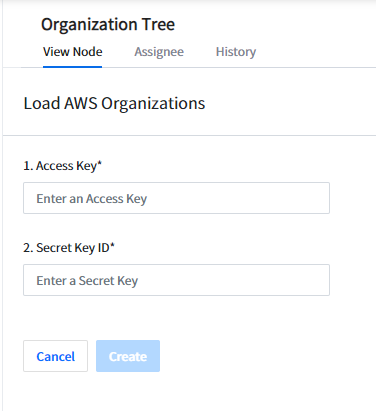
Load GCP Organizations
If you are using GCP Organizations service to manage your accounts, simply load GCP Organizations to Organization Tree for cost monitoring. Click Load GCP Organizations from the drop-down list.
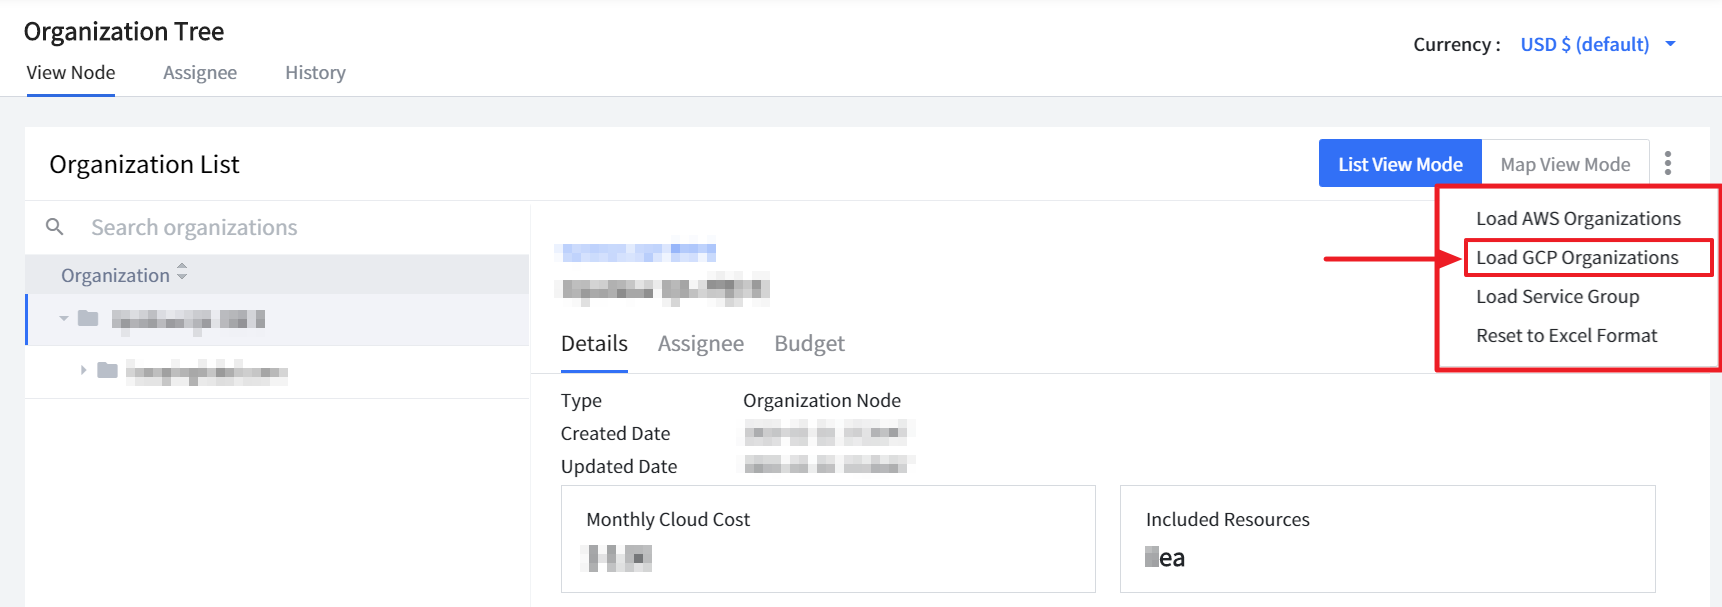
Upload Private Key. Then, click the [Create] to set up a new organization tree.
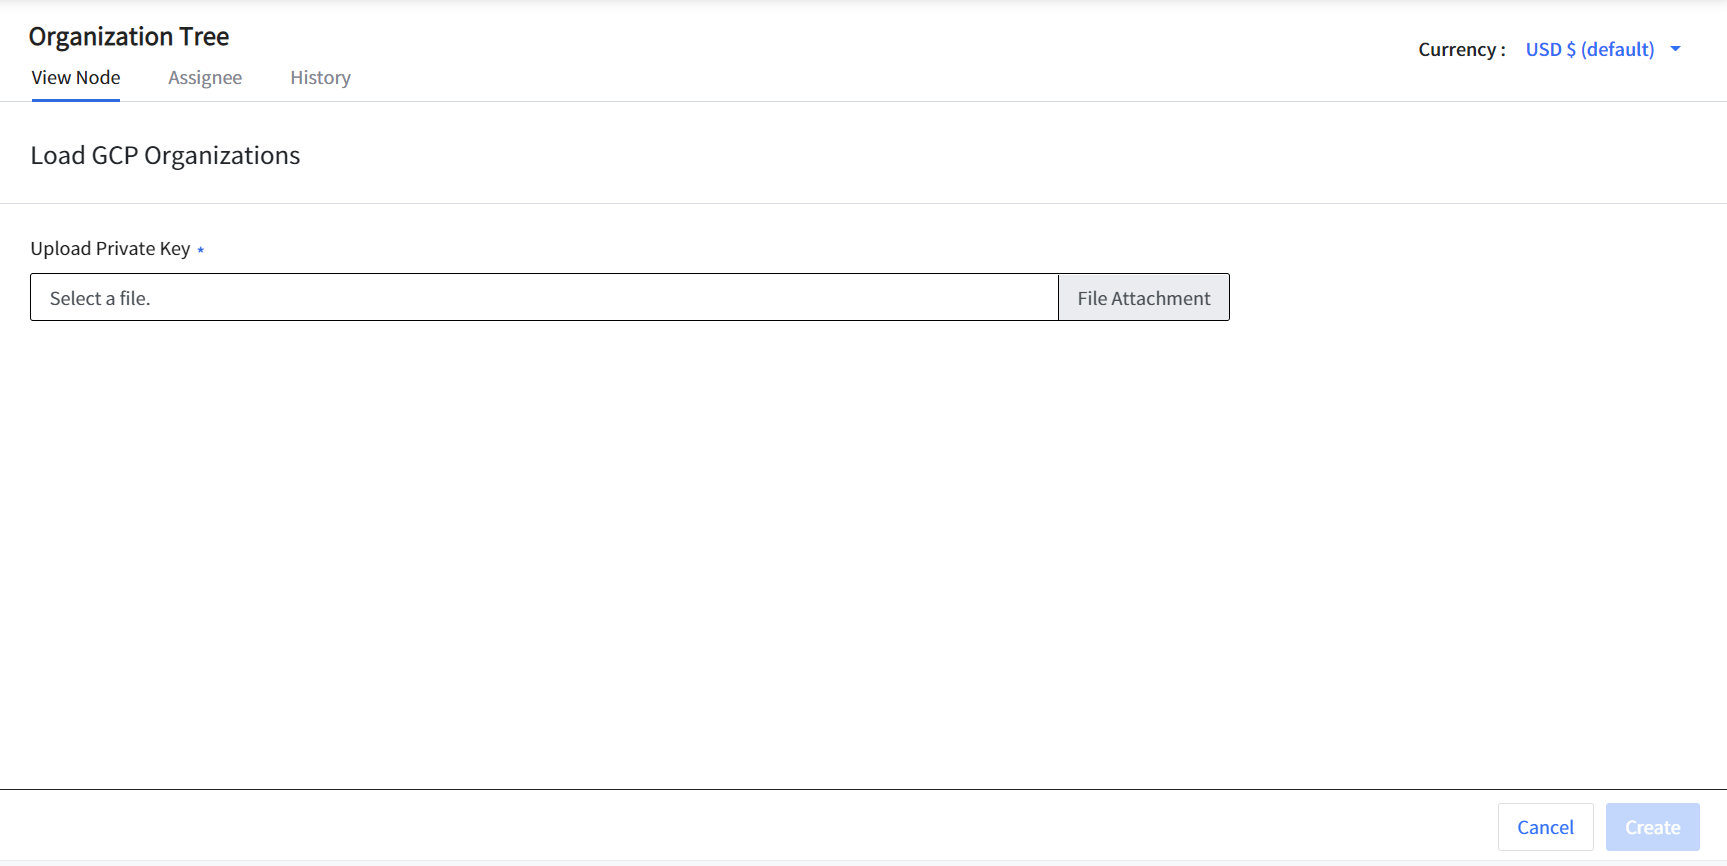
Load Service Group
If you are using Service groups in Service Portal, simply load Service Group to Organization Tree for monitoring your costs. Click Load Service Group from the drop-down list. In the next page, select View and Service groups in a sequential order. Then, click Create to map the service group to an organization tree.
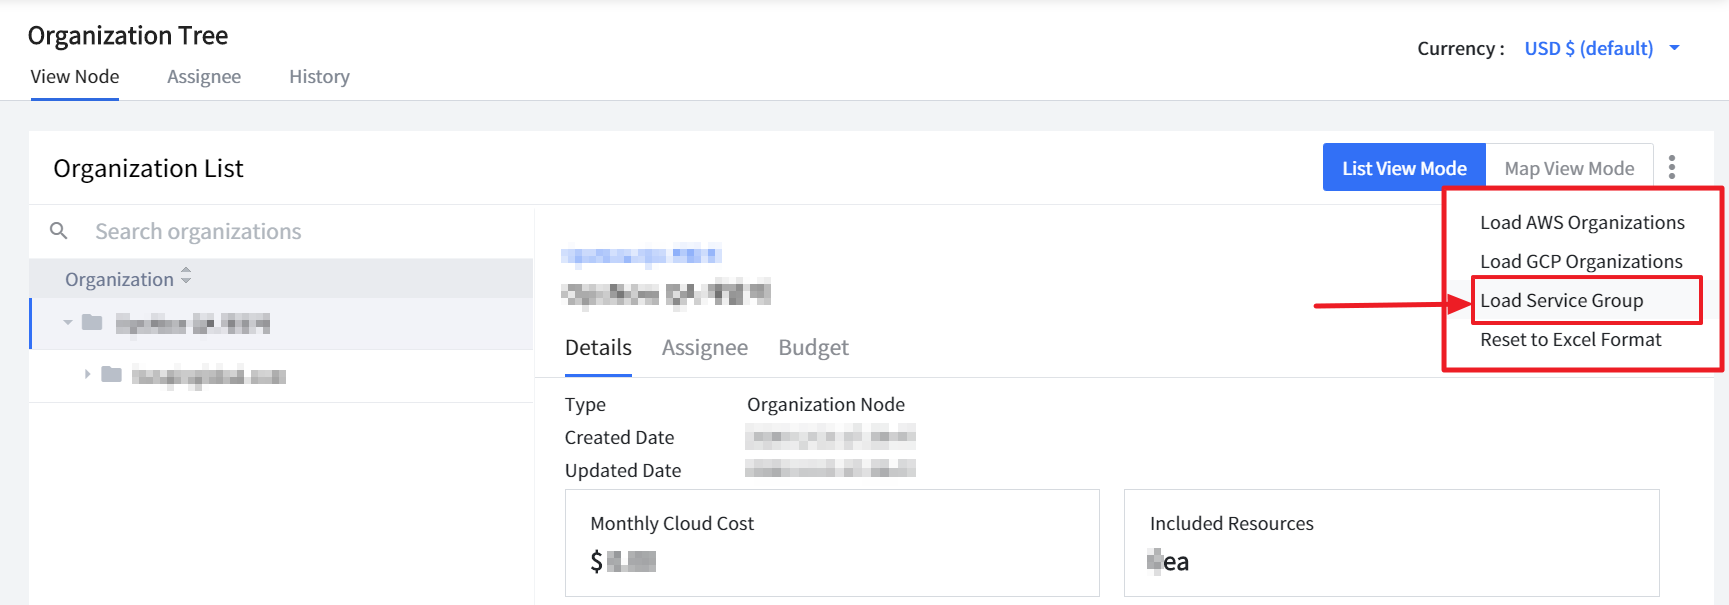
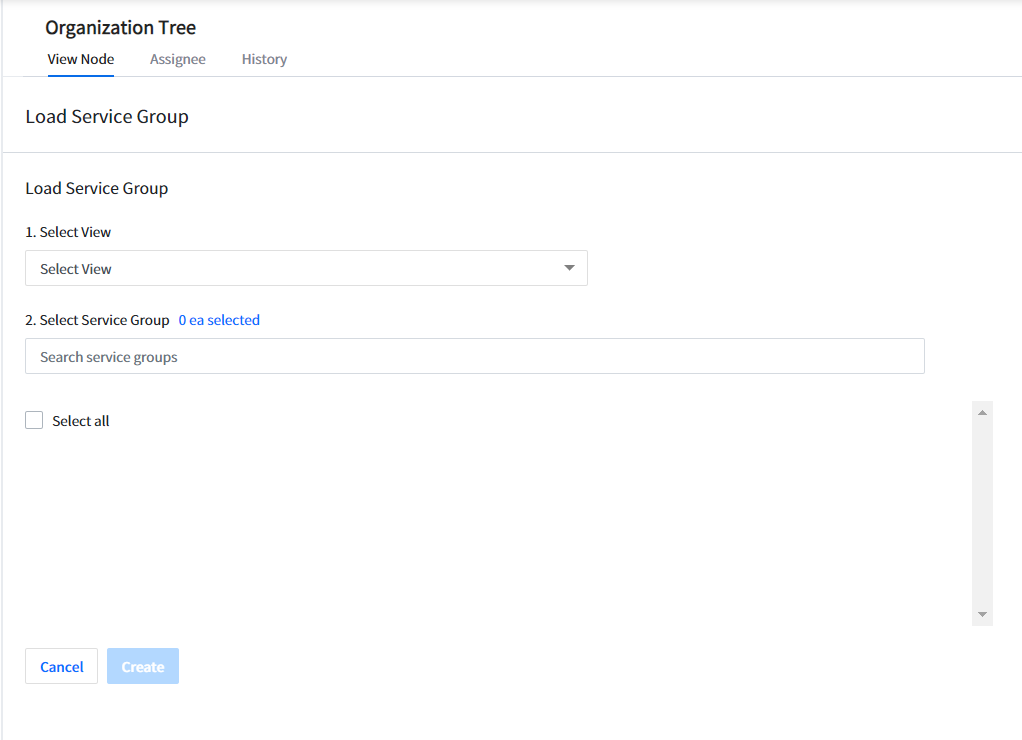
Reset to Excel Format
Click Reset to Excel Format from the drop-down list. This allows you to upload a large volume of organization charts to an organization tree with excel file format. You can download the excel file and enter necessary information. Then, upload the excel file to create an organization tree.
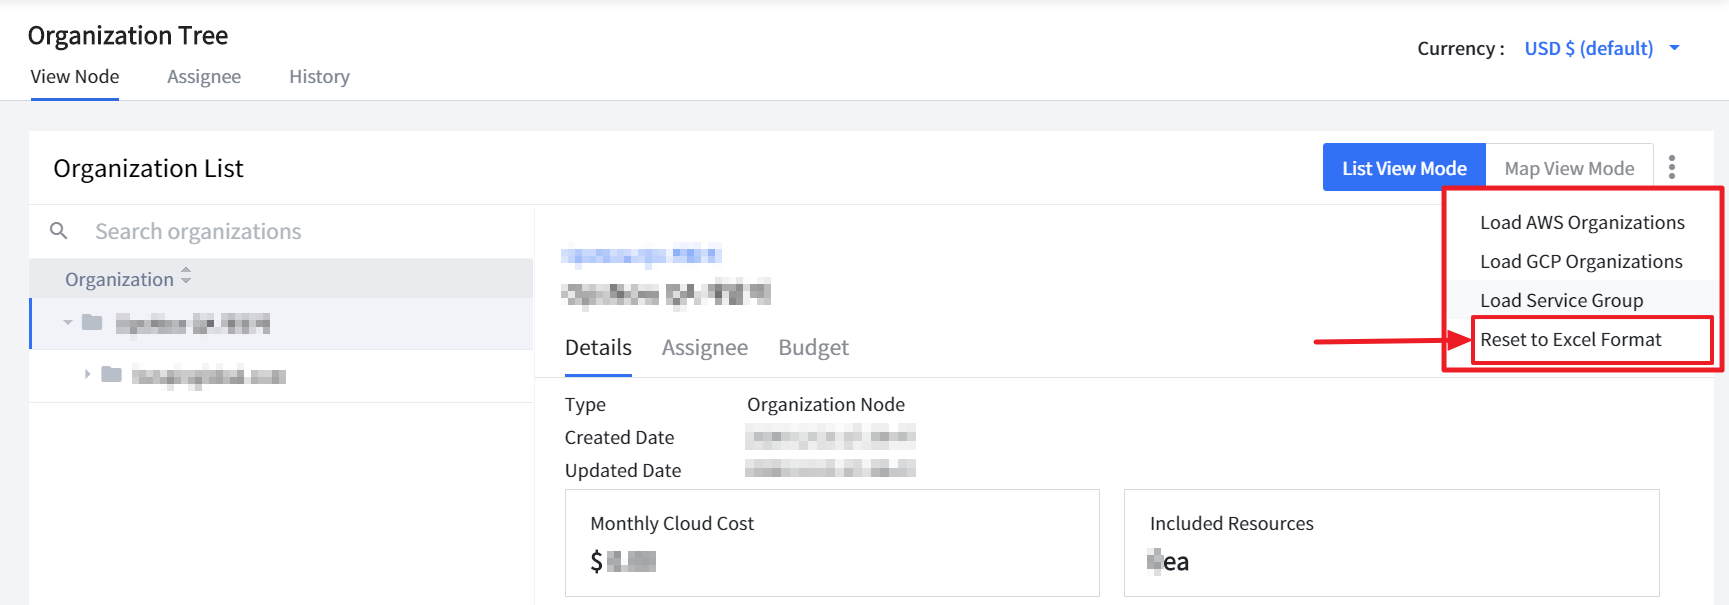
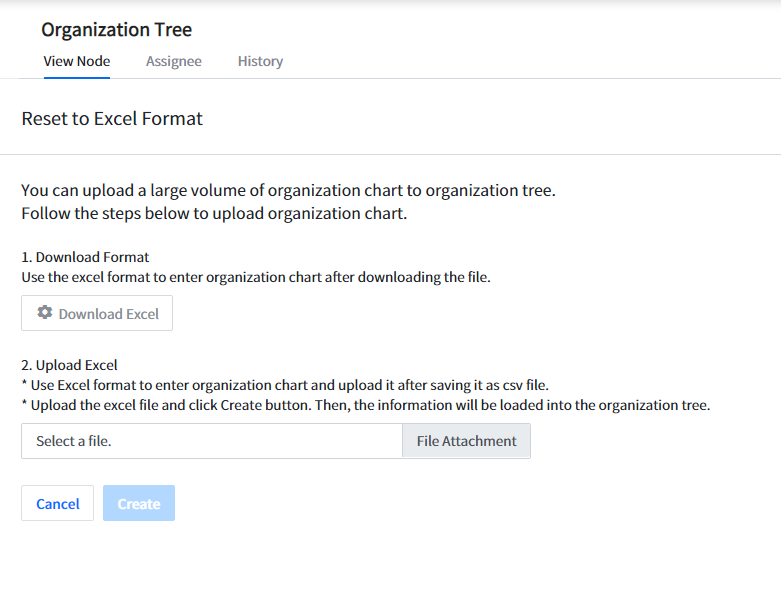
View Node
Organization Tree offers two options to view: List View Mode and Map View Mode. You can view the entire organization in full screen and scale up or down. Map View Mode allows users to change or edit the organization tree by simply drag and drop a node.

Create New Organization
You can create a new organization to the selected node. When you create a new organization, you can map service groups as well.
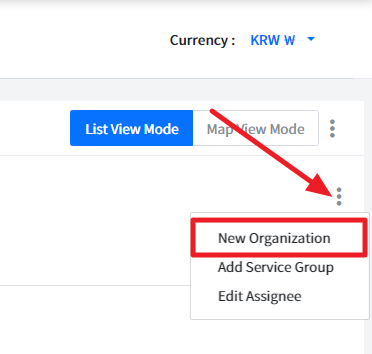
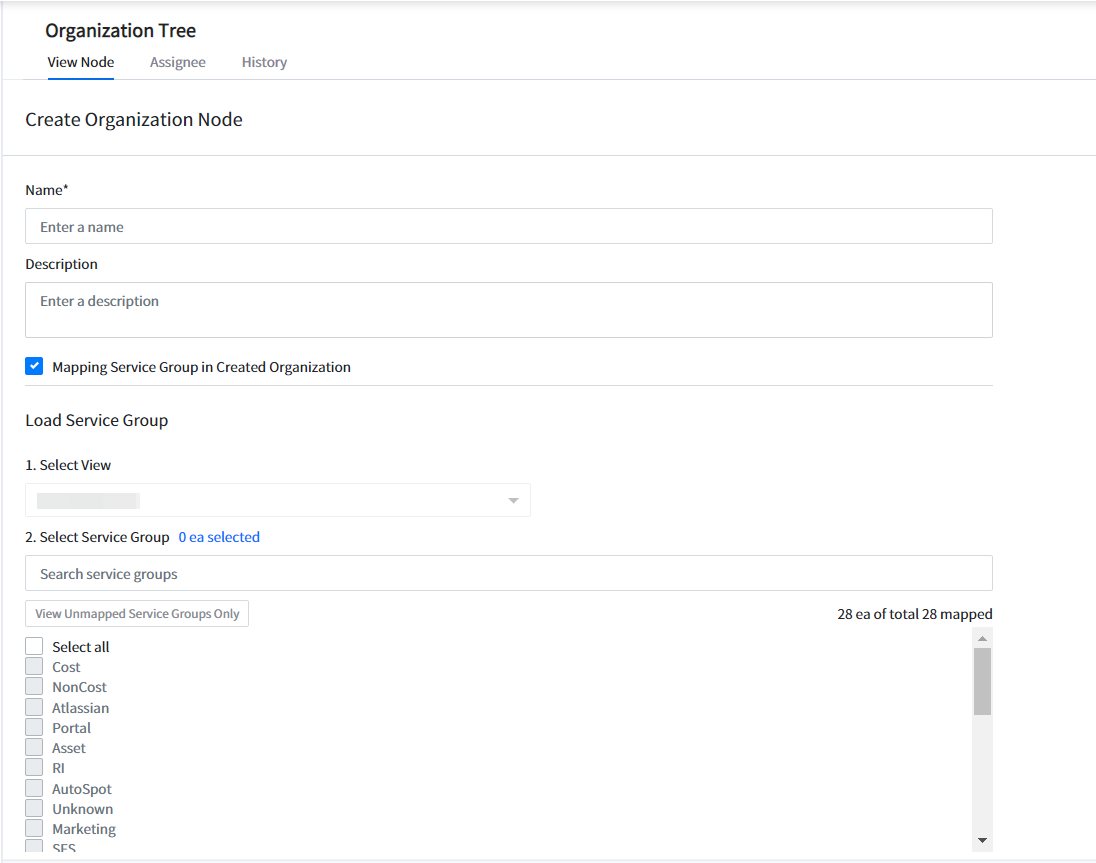
Add Service Group
You can add service groups to the selected node.
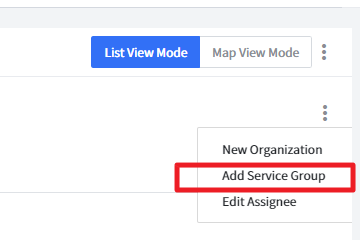
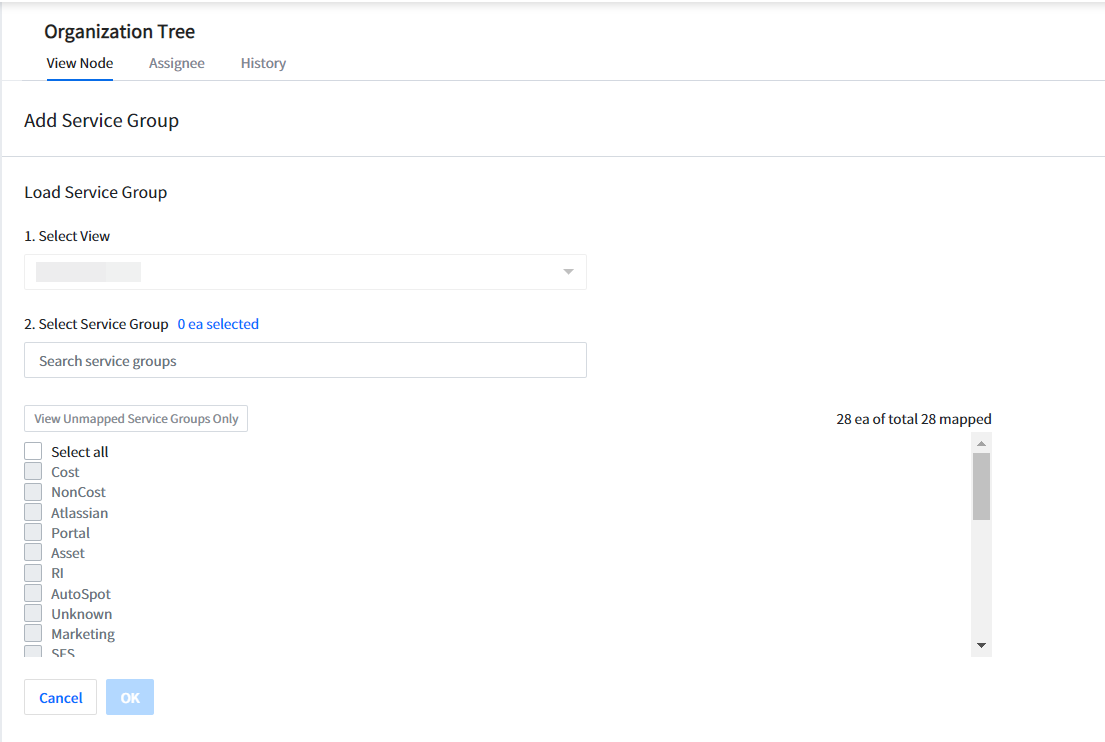
Details
When you select a node, you can view details of the node you currently selected such as type, created date, cloud cost, and number of resources.
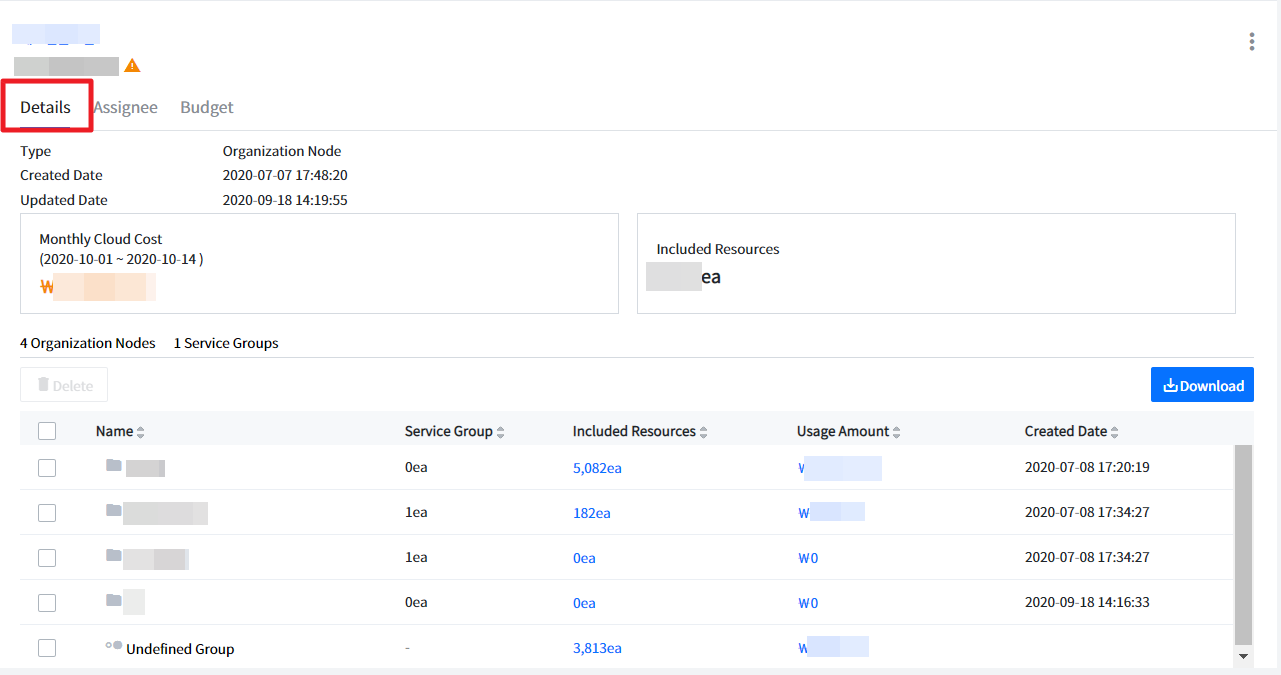
History
Organization Tree logs every history for each node. If a node has been created, edited, or deleted, you can find it in the History menu. Click View Changes to check what has been changed compared to prior logs.
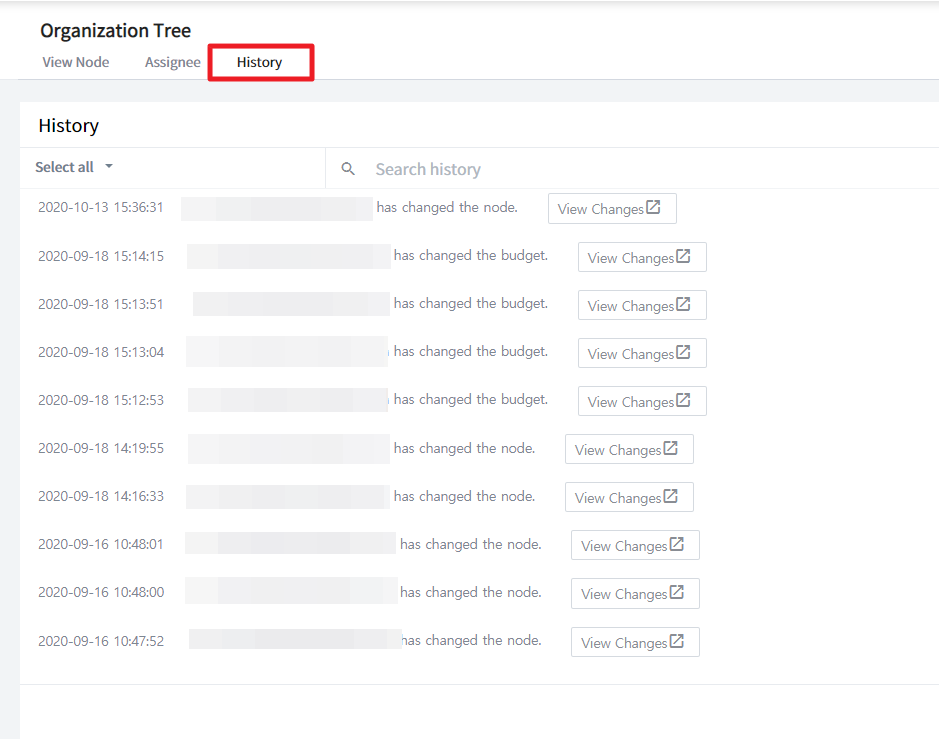
Set Assignee
Users can set an assignee to an organization tree for granting permissions to create, edit, and delete the node. Users with insufficient permissions cannot access the node at all.
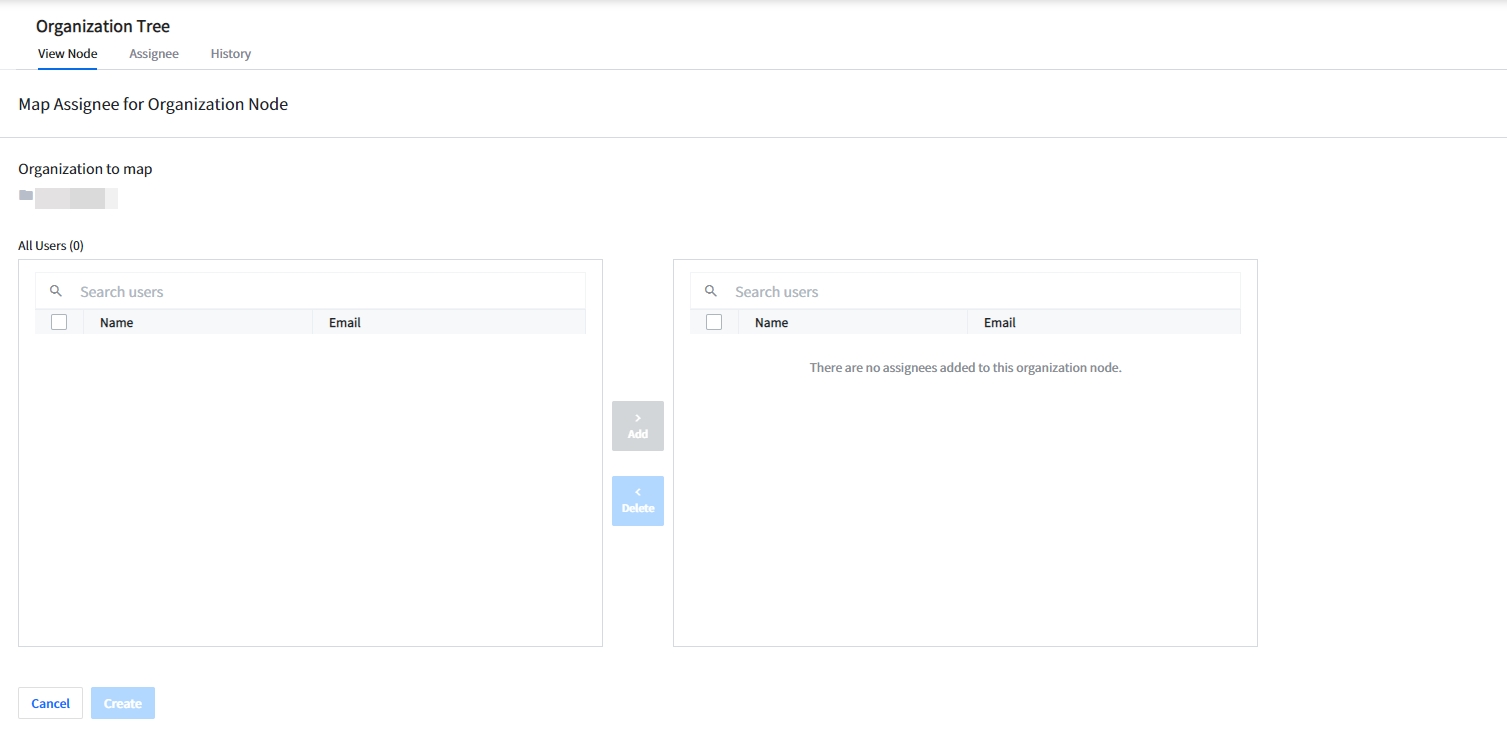
You can set an assignee from the organization list. Select a node and click the [Assignee] or [Edit Assignee] button to set an assignee.
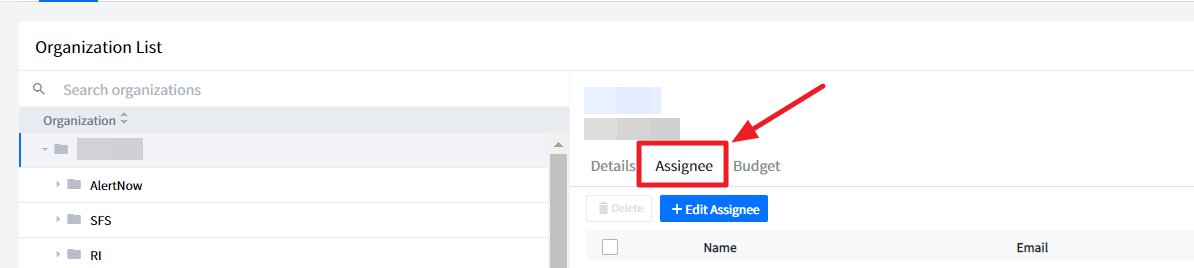
Budget
You can set and manage budgets for each node.
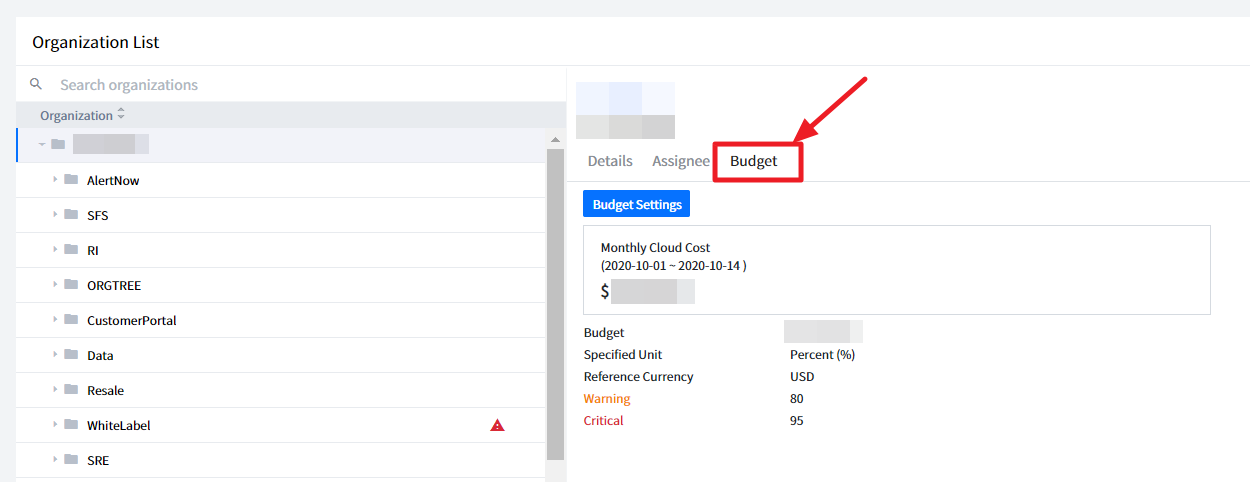
Budget Settings
Click Budget Settings button to set the threshold to issue warning or critical alarms for your needs. Values for warning and critical can be set as percentage (%) or absolute amount.
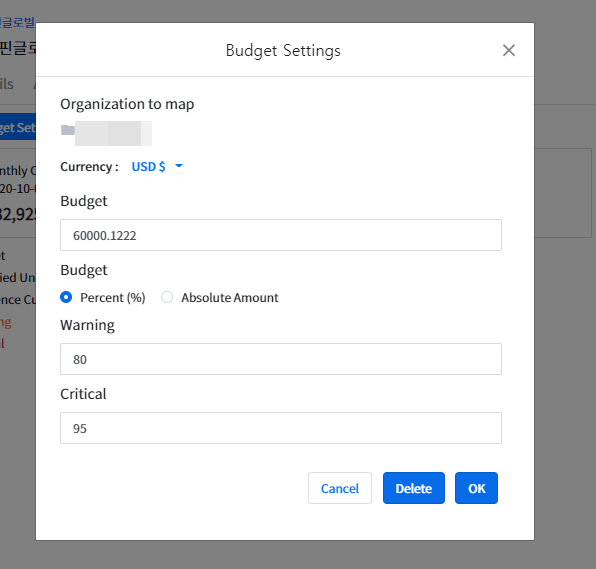
📜 Note: If the spending exceeds the threshold, a warning or critical sign will be displayed on each node.
Personal Data & Security
On this page, you can set and manage basic information such as my account, email address, and password and additional security settings in order to strengthen the security of the service.
My Account
Select My Account menu located on the top-right corner of the screen. On My Account page, you can set personal information and additional security settings.
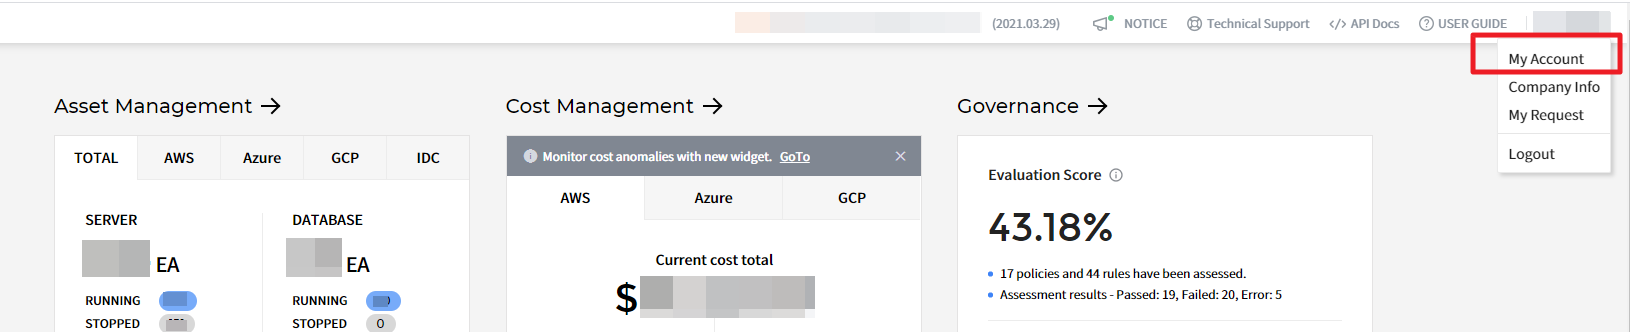
Basic Information
On the Basic Information page, you can check basic information such as email ID, name, phone number, company name, granted service groups, service platform, and retrievable companies.
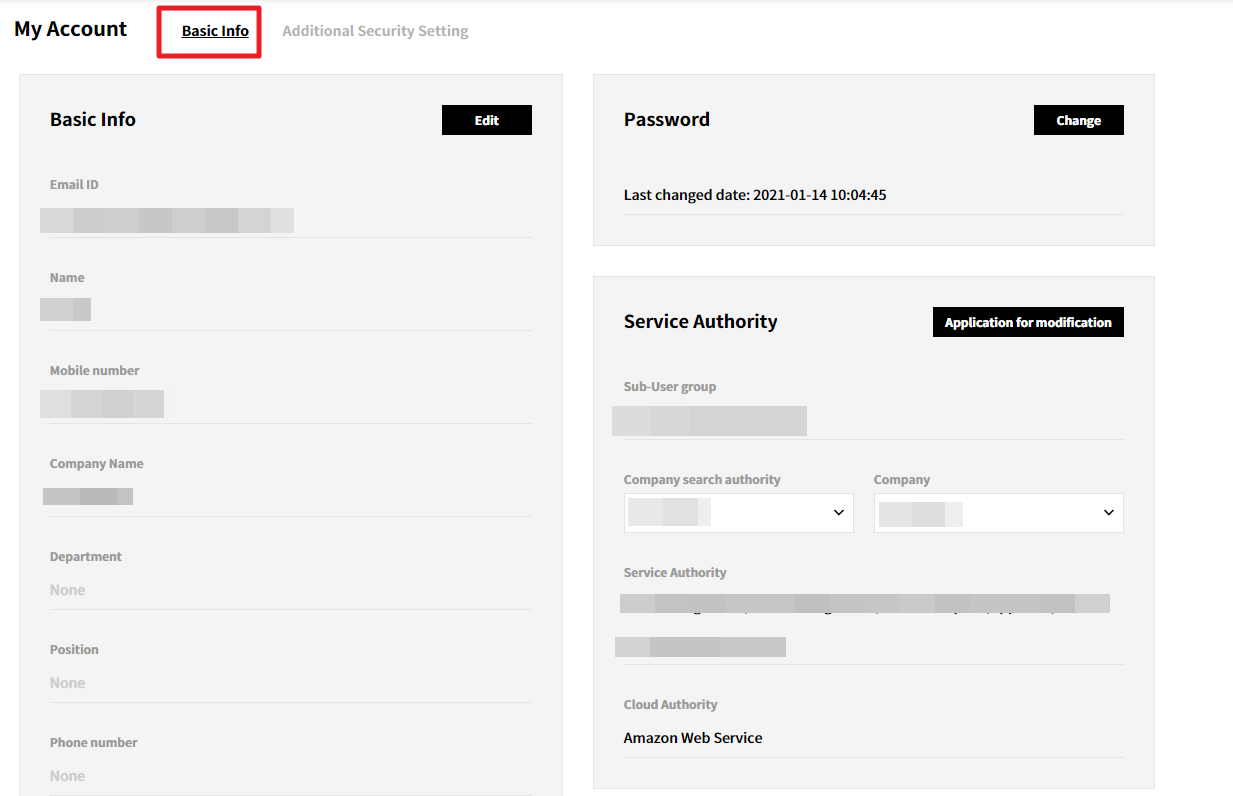
Change and Reset Password
You can change your password for security reasons or reset it if you forget it. You can change your password on My Account -> Basic Info -> Password. A popup window will be appeared when you click the [Change] button to enter a new password.
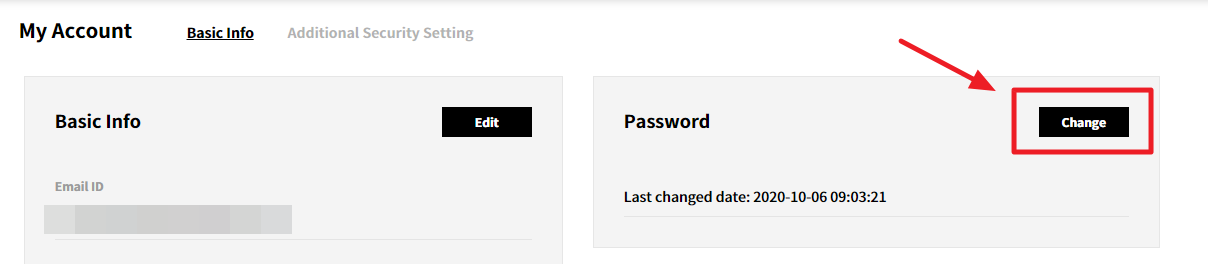
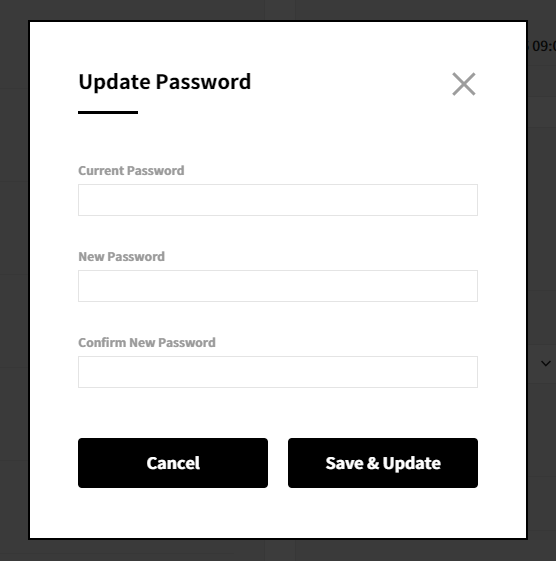
If you forgot your password, go to login page and click the [Forgot password?]. In a pop-up window, enter your name and email address, then the system will send you a temporary password to your email address. Login with a temporary password and change the password in My Account -> Basic Info -> Password menu.
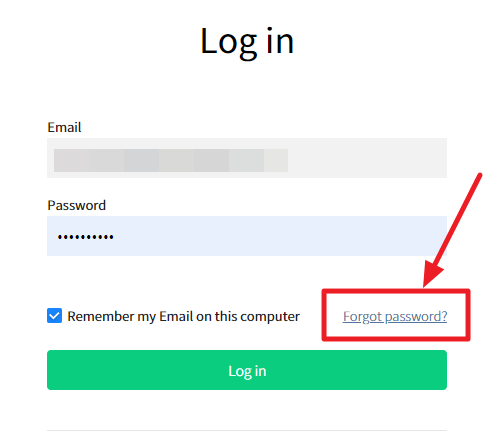
Additional Security Settings
It is recommended to use Multi Factor Authentication (MFA) and Restrict Multiple Logins features in order to safely protect your resources. By using MFA, you can force users to go through another authentication process after logging in to strengthen the security.
Restrict Multiple Logins
① On this page, select Enabled and click the [Apply] button to apply Restrict Multiple Logins.
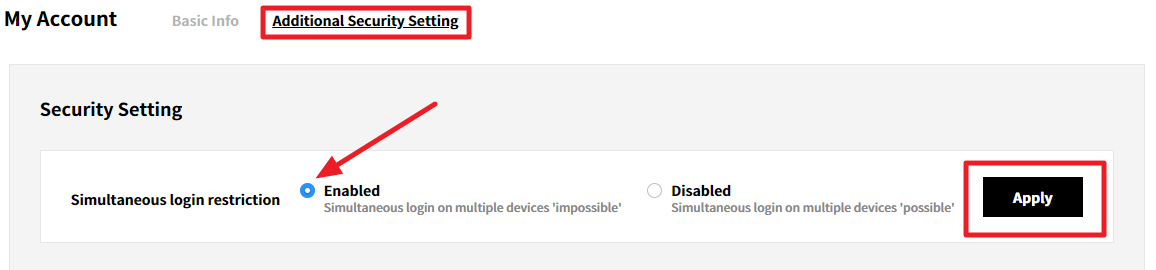
② Click [Confirm] button when a pop-up window appears asking whether to apply the changes.
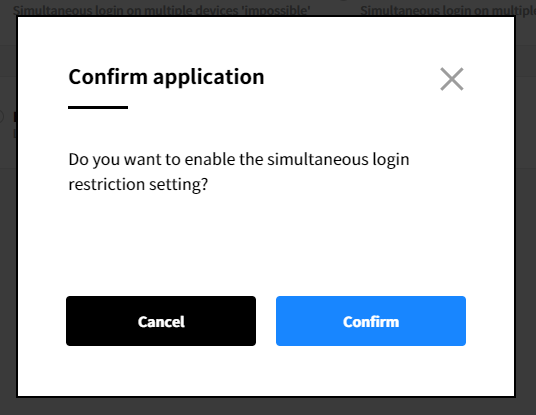
Set Multi Factor Authentication
① Enable Multi Factor Authentication feature and click the [Apply] button. For Admin users, it is mandatory to use MFA but for non-admin users, it is optional.
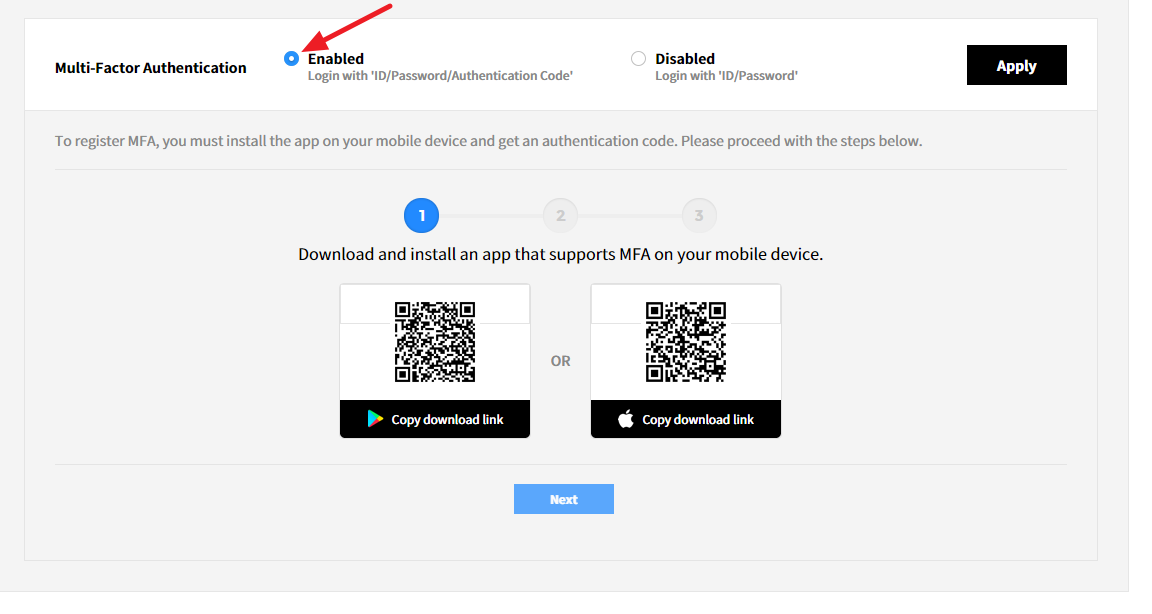
② Click [Confirm] button to complete the process when a pop-up window appears asking whether to apply the changes.
③ Install the application on your mobile device after enabling MFA. You can download an authentication application or scan the QR listed below with your mobile device, then it will automatically take you to the available application to download.
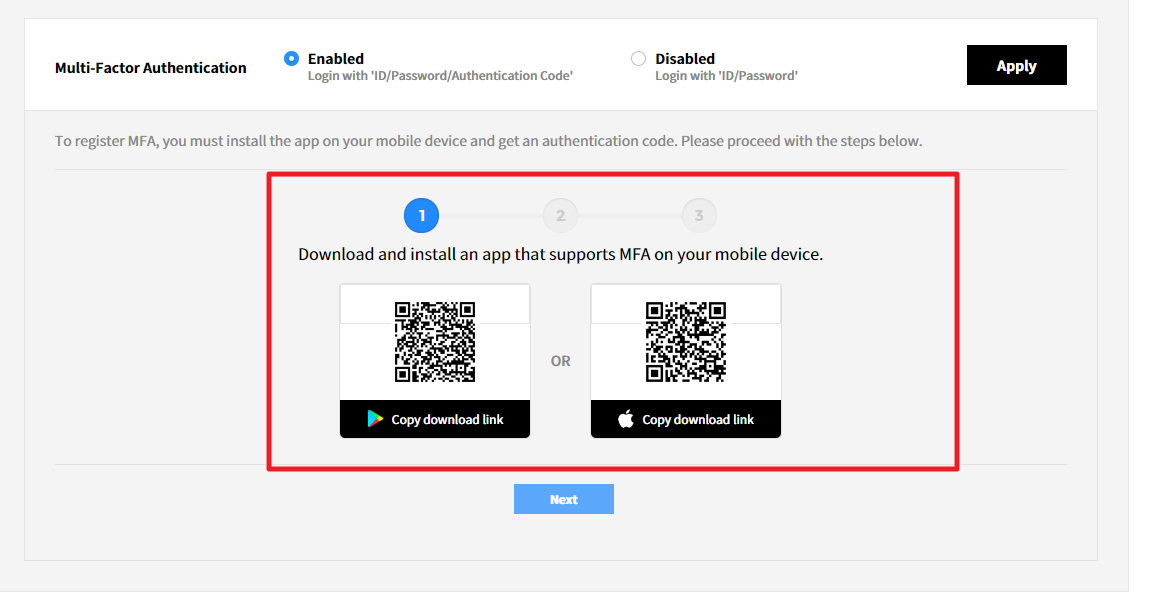
④ Scan the QR code below and enter the authentication code.

⑤ When you enter the code, the MFA registration process will be completed.
Company Information
On this page, you can check the Company’s basic information, Service usage, Azure CSP Usage, and Payment information.
Basic Information
On this page, you can check and edit basic information like company name and representativa account, and subscriber information.
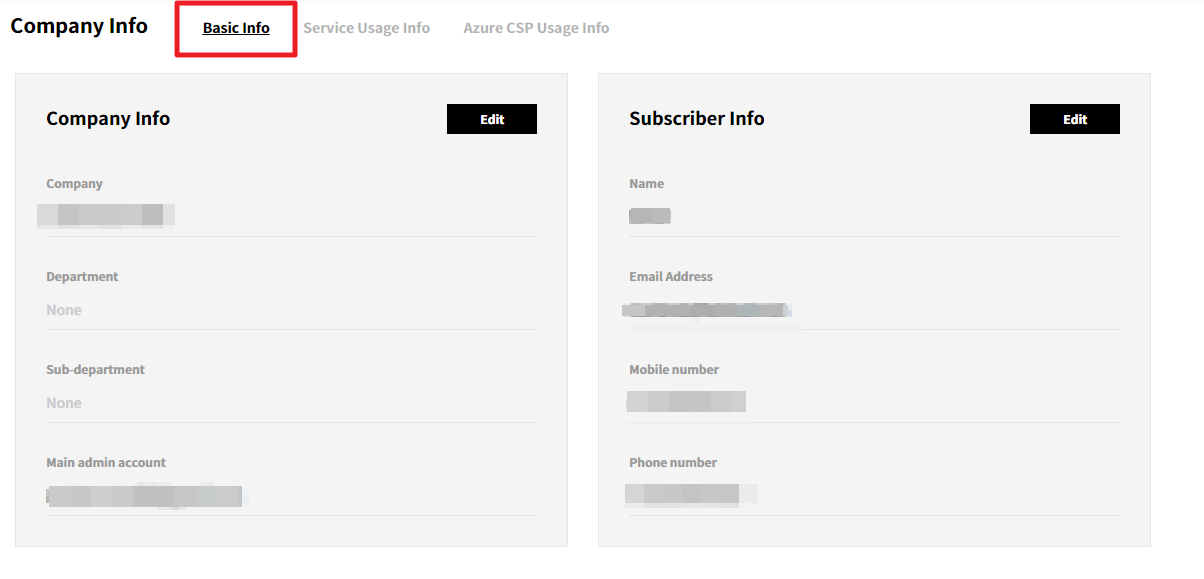
Service Usage Information
You can check a list of services that the company is currently using.
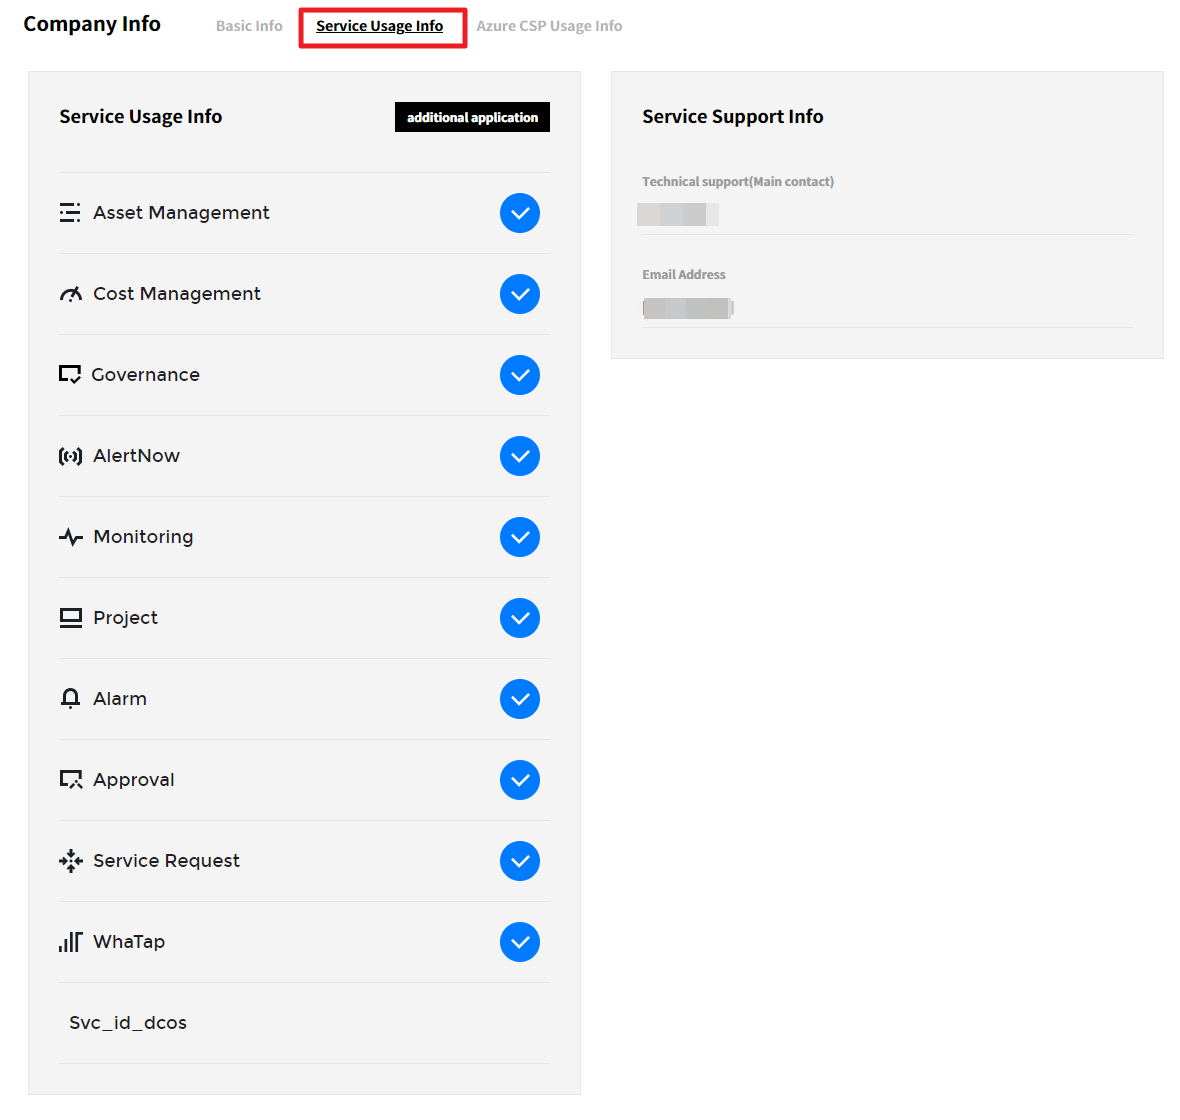
Azure CSP Usage Information
You can check Azure CSP information such as CSP Usage, CSP Support, Contacts and Subscription status.

Security Settings
Restricting IP address feature is only for Admin users and must set this feature enabled on your PC. To register IP address, please contact our support team.
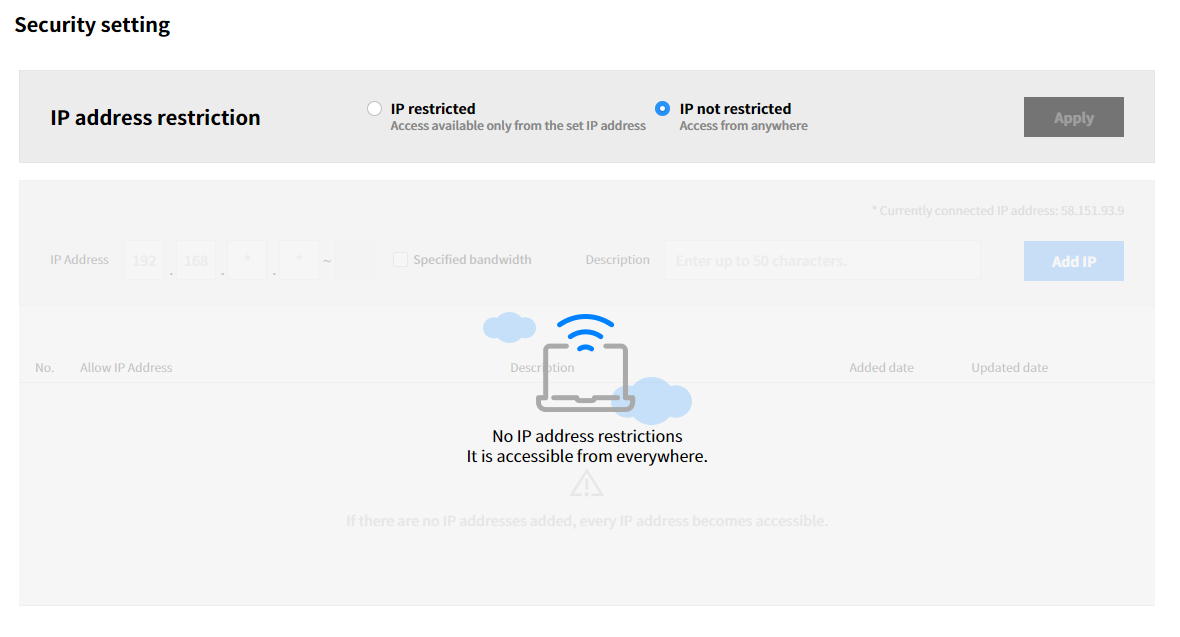
IP Address Restrictions
After registering an IP address, you can access the Admin portal service with the registered IP address only. If you have to use a different IP address to access the service, you need to go through the IP address registration process again.